Table of Contents
Advertisement
Quick Links
Chapter 1: Introduction
Read this chapter before use.
This chapter gives you an overview of the PENTAX WG-8.
Chapter 2: Getting Started
Read this chapter before using the PENTAX WG-8 for the first time.
This chapter explains about basic operations such as turning the camera on,
performing shooting, and playing back images.
Chapter 3 and later
Read these chapters when you want to learn more about the different
camera functions.
These chapters explain about shooting and playback functions, as well as
how to customize the camera settings and use it with a computer.
Operating Manual
The serial number is located inside the battery/card cover.
Model: R08050
Advertisement
Table of Contents

Related Manuals for Pentax WG-8


Summary of Contents for Pentax WG-8
- Page 1 This chapter gives you an overview of the PENTAX WG-8. Chapter 2: Getting Started Read this chapter before using the PENTAX WG-8 for the first time. This chapter explains about basic operations such as turning the camera on, performing shooting, and playing back images.
- Page 2 Regarding User Registration Thank you for purchasing the PENTAX WG-8. In order to provide you with the best customer support and service experi- ence for the product you have purchased, we ask you to complete the user registration. Visit the following website to complete the user registration.
-
Page 3: Introduction
Introduction This Operating Manual provides information on how to use the shooting and playback functions of this camera and related precautions. Thoroughly read this Operating Manual to make the best use of the functions available with this camera. Be sure to keep this Operating Manual for future reference. It is recommended to update the camera firmware to the latest version before using the camera. - Page 4 Trademarks • Microsoft, Windows, and Microsoft Teams are registered trademarks of Microsoft Corporation in the United States of America and other countries. • Skype is a registered trademark or trademark of Microsoft Corporation in the United States of America and other countries.
-
Page 5: Safety Precautions
Safety Precautions Warning Symbols Various symbols are used throughout this Operating Manual and on the product to prevent physical harm to you or other people and damage to property. The symbols and their meanings are explained below. This symbol indicates matters that may lead to imminent risk of Danger death or serious injury if ignored or incorrectly handled. - Page 6 Warning Turn off the power immediately in the event of abnormalities such as smoke or unusual odors being emitted. Remove the battery as soon as possible, being careful to avoid electric shocks or burns. If you are drawing power from a household electrical outlet, be sure to unplug the power plug from the outlet.
- Page 7 Keep the battery and SD memory card used in the camera out of the reach of children to prevent accidental swallowing. The battery and memory card are harmful if swallowed. Seek medical assistance immediately. Keep the camera out of the reach of children. For children, accidents may occur because they cannot understand the contents of “Safety Precau- tions”...
- Page 8 Caution Contact with fluid leaking from a battery can lead to burns. If part of your body comes in contact with a damaged battery, rinse the area with water immediately. (Do not use soap.) If a battery starts to leak, remove it immediately from the camera and wipe the battery chamber thoroughly before replacing it with a new battery.
-
Page 9: Table Of Contents
Contents Introduction ........................... 1 Safety Precautions ........................ 3 Introduction Checking the Contents of the Package ..............11 Names and Functions of the Working Parts ..............12 Operating Controls ...........................14 Indicators on the Monitor ....................16 Shooting Screen ..........................16 Playback Screen ..........................17 Changing the Screen Display ......................18 How to Change Function Settings ................19 Using the Button ..........................19 Setting from the Menus ........................22... - Page 10 Using the Camera as a Webcam ..................47 Installing the Camera ........................47 Setting the Focus Mode ....................49 Focusing Manually (Manual Focus) .....................51 Setting the Exposure ......................52 Selecting a Metering Method .......................52 Setting the ISO Sensitivity ......................53 Using the Flash ...........................54 Setting the White Balance ....................56 Setting the White Balance Manually ...................57 Setting the Drive Mode ....................58 Shooting Using the Self-timer ......................58...
- Page 11 Editing Movies ............................77 Correcting Red Eyes in Images .....................79 Changing the Settings Saving Frequently Used Settings ..................80 Using the Mode Dial .........................80 Exporting the Settings to a File ....................81 Customizing the Button Functions ................82 Registering Functions to the Movie Button ................82 Changing the Functions of the Green Button .................
- Page 12 Others ..............................106 Error Messages ..........................107 Main Specifications ......................108 Camera ..............................108 USB Power Adapter AC-U2 ......................111 Rechargeable Battery DB-110 .....................111 Image Storage Capacity ........................112 Operating Environment ........................113 Using the Camera Abroad .....................114 Precautions for Use ......................115 Camera Care and Storage ....................118 Warranty Policy........................120 Regulatory Compliance Statements ................123 Index............................133...
-
Page 13: Introduction
Introduction Checking the Contents of the Package Before using your digital camera, confirm that the package contains the items listed below. PENTAX WG-8 Rechargeable USB power Power plug battery (DB-110) adapter (AC-U2) Macro stand (O-MS3) USB cable (I-USB173) Hand strap (O-ST104) -
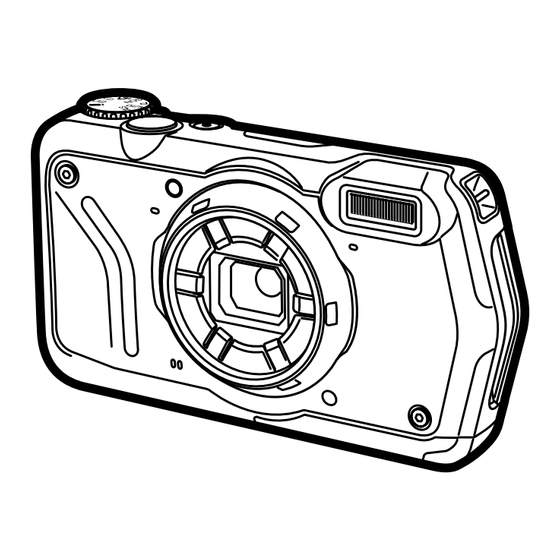
Page 14: Names And Functions Of The Working Parts
Names and Functions of the Working Parts AF assist light Flash Strap eyelet Microphone Lens Microphone Speaker Remote control receiver Ring light Power button lamp Strap eyelet Monitor Strap eyelet Remote control receiver... - Page 15 Tripod screw hole HDMI® micro output terminal (Type D) Release lever USB terminal (USB Type-C) Battery/card cover...
-
Page 16: Operating Controls
Operating Controls This section explains about operating controls. The icons in parentheses are used in the descriptions of this manual. 1 2 3 Mode dial Power button Changes the capture mode. (p.40) Turns the power on or off. (p.35) Shutter release button (z) Press to capture images. - Page 17 Movie/ADJ. button 13 OK button (e) In the still image mode, press to start and end Switches the information displayed on the the movie recording. (p.44) shooting screen and playback screen. (p.18) Calls ADJ. mode functions when the functions Confirms the selected items when setting a are assigned to the button.
-
Page 18: Indicators On The Monitor
Indicators on the Monitor Shooting Screen 1 2 3 4 5 99999 99999 0:58 58˝ 0:58 58˝ 4.1x 128° 128° ESE 4.1x E:139° E:139° N:35° N:35° X 3 (4) X 3 (4) 3d 3d 100PENTX 100PENTX 05/05/2024 05/05/2024 10:10 10:10 Exit Exit 1/400... -
Page 19: Playback Screen
Playback Screen 99998 99998 99999 99999 05/05/2024 05/05/2024 10:00 10:00 05/05/2024 05/05/2024 10:00 10:00 9998/9999 9998/9999 100-0630 100-0630 999-9999 999-9999 00´ 20˝ 00´ 20˝ 1/2400 1/2400 F5.5 F5.5 EV+0.7 EV+0.7 12 13 Still image mode Movie mode Shooting date and time Shutter speed Image protection (p.72) 10 Aperture value... -
Page 20: Changing The Screen Display
Changing the Screen Display You can switch the information displayed on the screen by pressing e. Shooting Mode The information displayed on the shooting screen can be switched. Standard information display Displays the standard information such as shooting settings and electronic level. -
Page 21: How To Change Function Settings
How to Change Function Settings Using the Button Using the Direct Keys Quick settings are possible by pressing abcd in the shooting mode. The following functions can be activated. a (w) Drive Mode (p.58) b (s) Focus Mode (p.49) c (l) Flash Mode (p.54) Press and hold d (x) GPS On/Off (p.89) - Page 22 Using the ADJ. Mode The functions assigned to the movie button in [ADJ Button Setting 1] to [ADJ Button Setting 5] of the D menu can be easily recalled. (p.82) Set [Movie Button] to [Off] in the D menu. The ADJ. mode is enabled. Press the movie button in the shooting mode.
- Page 23 Using the Green Button The assigned function can be activated by pressing the green button in the shooting mode. By default, [Green Mode] is assigned to the button. You can perform shooting in the green mode by pressing the button. (p.40) Memo --------------------------------------------------------------------------------------------------------- •...
-
Page 24: Setting From The Menus
Setting from the Menus Most functions are set from the menus. Press f. The menu appears. The menu displayed differs depending on the camera status. When changing the menu type, press Shooting c, and use ab to select a type. Focus Standard Multi... - Page 25 Memo --------------------------------------------------------------------------------------------------------- • When f is pressed, the first screen of the A menu or C menu appears. To display the last used menu screen first, set [Cursor Pos. Keeping] to [On] in the E menu. • The setting is saved even after the power is turned off. To reset the menu settings, select a menu type to reset in [Initialized Setting] of the E menu, and execute [Reset] in the E menu.
-
Page 26: Menu List
Menu List The following menus are available. (The underlined settings and the square-bracketed settings are the default settings.) A Shooting Menu Focus Standard, Macro, 1cm Macro, PF, Infinity, MF p.49 Multi, Spot, Tracking p.50 Auto Macro On, Off p.49 Focus Assist On, Off p.50 AE Metering... -
Page 27: B Movie Menu
Sharpness Soft, Standard, Hard p.64 Saturation Soft, Standard, Hard Tone Adjustment Blue, Black & White, Sepia Contrast Soft, Standard, Hard Date Imprint Date, Date & Time, Time, Off p.64 IQ Enhancer On, Off p.64 B Movie Menu Recorded Pixels 4K 30fps, FullHD 30fps, HD 60fps, HD 30fps p.62 On, Off Microphone... -
Page 28: C Playback Menu
C Playback Menu Image Copy [Internal M]>>>[Card], [Card]>>>[Internal M] p.71 Protect 1 File, Sel. Multiple, Select All, Cancel All p.72 Rotation 0°, 90° (counterclockwise), 180°, 90° (clockwise) p.68 Slideshow Interval: 30sec., 20sec., 10sec., 5sec., 3sec. p.67 Screen Effect: Wipe, Checker, Fade, Random, Off Sound Effect: On, Off Recover File —... -
Page 29: D Customize Menu
D Customize Menu Reg. USER U1, U2 p.80 CALS Pixels L, M, S, XS, 2M, 1M, VGA p.40 CALS Quality 8, 9, 0 ADJ Button Setting 1 Off, EV Comp. [Setting1], Recorded Pixels [Setting2], Aspect p.82 ADJ Button Setting 2 Ratio [Setting3], Setting [Setting4], White Balance [Setting5], ADJ Button Setting 3 Image Tone, Quality Level, AE Metering, AF, Face Detection,... - Page 30 Lens Adapter On Off, WIDE p.100 Movie Button On, Off p.45...
-
Page 31: E Setup Menu
E Setup Menu Format [Card] — p.37 Format [Internal M] — New folder options Standard, Date, Custom p.94 File name Standard, Custom p.96 File Sequence No. On, Off p.96 Reset File Number — p.97 Embed Info On, Off p.97 Copyright Info A freely defined string of 32 characters Copyright Print On(OVR), On(New), Off... - Page 32 Language/H English, French, German, Spanish, Portuguese, Italian, Dutch, p.36 Danish, Swedish, Finnish, Polish, Czech, Hungarian, Turkish, Greek, Russian, Thai, Korean, Traditional Chinese, Simplified Chinese, Japanese Date Adjustment Date Format: Y/M/D, D/M/Y, M/D/Y p.36 Date: January 1, 2024 to December 31, 2045 Time: 00:00 to 23:59 World Time Select Time: Hometown, Destination...
-
Page 33: Getting Started
Getting Started Setting the Battery and a Memory Card Inserting the Battery and a Memory Card SD memory cards, SDHC memory cards, and SDXC memory cards can be used with this camera. “Memory card” refers to these memory cards in this manual. - Page 34 Caution ------------------------------------------------------------------------------------------------------- • When opening and closing the battery/card cover, be sure to remove water and dirt such as sand adhering to the camera, and avoid locations where dirt can enter the camera interior. • Close the battery/card cover securely. If the battery/card cover is not closed securely, water or dust may enter the camera interior.
-
Page 35: Charging The Battery
Charging the Battery Charge the rechargeable battery DB-110 using the provided USB cable, USB power adapter, and power plug before use. Insert the power plug to the USB power adapter. Insert it until it clicks into place. Open the battery/card cover, and connect the USB cable to the USB terminal. - Page 36 Storage Capacity -------------------------------------------------------------------------------------------- • About 340 pictures can be taken when the battery is fully charged. • This is based on tests conducted according to CIPA standards under the following conditions: At 23°C (73°F) temperature; the monitor is on; a picture is taken every 30 seconds; the flash is fired every two pictures;...
-
Page 37: Initial Settings
Initial Settings Turn the camera on and make the initial settings. Turning the Camera On Press the power button. The power button lamp turns on. The first time the camera is turned on after purchase, the [Language/H] screen ap- pears. When the power button is pressed again, the power turns off. -
Page 38: Setting The Language And The Date And Time
Setting the Language and the Date and Time You can set the display language for menus and the date and time. Use ab to select a language and press e. The selected language is set and the [Date Adjustment] screen appears. Set the display format and the date Date Adjustment and time. -
Page 39: Formatting A Memory Card
Formatting a Memory Card When using a new memory card or a memory card used with another de- vice, be sure to format the memory card with this camera. The internal mem- ory can also be formatted with the same operations. Press f. -
Page 40: Basic Shooting Operation
Basic Shooting Operation Shooting in the Auto Mode The camera automatically selects the optimal capture mode. Set the mode dial to S. The capture mode is set to S, and the Live View is displayed. Use 4 (T)/5 (W) to change the zoom magnification. The optical zoom up to 5x magnification is available. -
Page 41: Viewing The Captured Images
Zoom ---------------------------------------------------------------------------------------------------------- • When 4 is pressed and held, the zooming method switches from the optical zoom to the intelligent zoom. If 4 is release and pressed again, the zooming method switches from the intelligent zoom to the digital zoom with up to 40.5x magnification. The digital zoom magnification varies depending on the [Recorded Pixels] settings in the A menu. -
Page 42: Shooting
Shooting Taking Still Images Setting the Capture Mode Turn the mode dial to select capture modes. Takes images with the recorded pixels and quality level set in [CALS Pixels] and [CALS Quality] of the D menu. The aspect ratio is fixed to [4:3]. By default, the recorded pixels are set to [1M] and the quality level is set to CALS Mode [9]. - Page 43 Performing Shooting in the Scene Mode Set the mode dial to T. The mode switches to the T mode. Press f. The T menu appears. Use abcd to select a scene. Scene Mode Combines 3 images into a single image delivering a wider dynamic range image Cancel Cancel...
- Page 44 Memo --------------------------------------------------------------------------------------------------------- • The T menu is displayed only in the T mode. • When the scene is set to [Interval Shooting] or [Interval Movie], shooting is performed at a fixed in- terval. You can set [Interval], [Number of Shots] ([Total Time] for [Interval Movie]), and [Start Delay]. •...
-
Page 45: Using Exposure Compensation
Using Exposure Compensation Select [EV Comp.] in the A menu, and press d. The [EV Comp.] screen appears. Use ab to select a compensation EV Comp. EV Comp. value. The compensation value can be selected in the range of ±2.0. Cancel Cancel Press e. -
Page 46: Recording Movies
Recording Movies Movies can be directly recorded even when the mode dial is set to a mode other than B. Set [Movie Button] to [On] in the D menu. Movie recording with the movie button is enabled. Press the movie button. Recording starts. - Page 47 Caution ------------------------------------------------------------------------------------------------------- • When [Movie Button] is set to [Off] in the D menu, turn the mode dial to B and use z to start and end the movie recording. • When the movie recording has been started with the movie button, use the movie button to end the recording.
-
Page 48: Playing Back Movies
Playing Back Movies Press g. An image is displayed in the single image display of playback mode. Use cd to select a movie to play back. The first frame of the movie is displayed as a still image. Play back a movie. The following operations are available. -
Page 49: Using The Camera As A Webcam
The AF assist light turns on and the camera enters the UVC mode. Fix the camera on a tripod or similar device. Start the web conferencing software and select “PENTAX WG-8” in the camera settings of the software. To exit the UVC mode, turn the camera off. - Page 50 Caution ------------------------------------------------------------------------------------------------------- • The image quality in the UVC mode is fixed to [FullHD 30fps]. • During the UVC mode, nothing is displayed on the camera monitor. • During the UVC mode, the microphone of the camera cannot be used. •...
-
Page 51: Setting The Focus Mode
Setting the Focus Mode Press s (b) in the shooting mode. The [Focus Mode] screen appears. Use ab to select a setting. Focus Mode Focus Mode Standard Standard Cancel Cancel Focuses on the subject at a distance of 50 cm or more from the camera when z is pressed halfway. - Page 52 Memo --------------------------------------------------------------------------------------------------------- • The focus mode can also be set in [Focus] of the A menu. • The autofocus method for the still image mode can be set in [AF] of the A menu. Multi Measures the distances from 3 × 3 AF areas and focuses to the nearest AF area.
-
Page 53: Focusing Manually (Manual Focus)
Focusing Manually (Manual Focus) If the camera fails to focus automatically, you can focus manually. The manual focus enables shooting at a fixed distance. Select [MF] in Step 2 on p.49, and press e. The focus bar appears on the shooting screen. Use ab to set a focus distance. -
Page 54: Setting The Exposure
Setting the Exposure Selecting a Metering Method Set the metering method in [AE Metering] of the A menu. Meters exposure in multiple areas of the frame. Divide Meters exposure with emphasis on the center. Center Meters exposure within a narrow range. Use this option when metering exposure in a part of an image or when the meter- Spot ing target subject is small. -
Page 55: Setting The Iso Sensitivity
Setting the ISO Sensitivity Select [ISO Setting] in the A menu, and press d. Use ab to select a setting. Shooting Focus AUTO Auto Macro Focus Assist AE Metering ISO Setting 1600 AUTO ISO Range 3200 Cancel Cancel Press e. Press f. -
Page 56: Using The Flash
Using the Flash Press l (c) in the shooting mode. The [Flash Mode] screen appears. Use ab to select a setting. Flash Mode Flash Mode Auto Auto Cancel Cancel Fires the flash according to conditions. Auto Does not fire the flash. Flash Off Always fires the flash. - Page 57 Memo --------------------------------------------------------------------------------------------------------- • The flash mode can also be set in [Flash Mode] of the A menu. • When [Underwater] is selected in the T mode, both an image with the flash used and an image with the flash not used can be taken. Caution ------------------------------------------------------------------------------------------------------- •...
-
Page 58: Setting The White Balance
Setting the White Balance Make adjustments to the white balance so that white subjects will appear white under any kind of light. Select [White Balance] of the A menu, and press d. The [White Balance] screen appears. Use ab to select a setting. White Balance White Balance Auto WB... -
Page 59: Setting The White Balance Manually
Used with incandescent lighting. Tungsten Used when the ring light of the camera is used. Ring Light Set the white balance manually. (p.57) Manual WB Press e. Press f. The shooting screen reappears. Caution ------------------------------------------------------------------------------------------------------- • The white balance may not be adjusted correctly for a subject that is mostly dark. Setting the White Balance Manually Select [Manual WB] in Step 2 on p.56. -
Page 60: Setting The Drive Mode
Setting the Drive Mode You can set the drive mode by pressing w Drive Mode Drive Mode (a) in the shooting mode. The drive mode can also be set in [Drive Mode] of the A menu. Cancel Cancel Shooting Using the Self-timer Press w (a) in the shooting mode. -
Page 61: Shooting Continuously
Shooting Continuously Press w (a) in the shooting mode. The [Drive Mode] screen appears. Use ab to select a setting. Performs continuous shooting while z is pressed. Cont. Shoot Fixes the recorded pixels and aspect ratio to [S] and [4:3], respectively, and performs continuous shooting at high speed. -
Page 62: Shooting Using The Remote Control Unit
Memo --------------------------------------------------------------------------------------------------------- • The focus setting and exposure value are fixed during continuous shooting. • The maximum number of images that can be taken continuously varies depending on the [Recorded Pixels] setting in the A menu. • The continuous shooting setting is reset when the camera is turned off and on again. •... -
Page 63: Shooting With Varied Exposure Values
Shooting with Varied Exposure Values Takes three images with different exposure settings of -1.0 EV, 0 EV, and +1.0 Press w (a) in the shooting mode. The [Drive Mode] screen appears. Use ab to select [A-Bracket], and press e. The shooting screen reappears. Press z. -
Page 64: Configuring The Capture Settings
Configuring the Capture Settings Image Capture Settings Set the file format for still images in the A menu. Recorded Pixels [L], [M], [S], [XS], [VGA] Aspect Ratio [4:3], [3:2], [1:1] Quality Level [8], [9], [0] Caution ------------------------------------------------------------------------------------------------------- • The settings that can be selected are limited depending on the capture mode. Memo --------------------------------------------------------------------------------------------------------- •... -
Page 65: Setting The Image Finishing Tone And Correction
Setting the Image Finishing Tone and Cor- rection Setting the Image Atmosphere (Image Tone) You can control the finishing tone for taken images. Select [Image Tone] in the A menu, and press d. The [Image Tone] screen appears. Use ab to select a setting. Increases the values of [Contrast], [Sharpness], and [Saturation] to take sharp images. -
Page 66: Setting The Sharpness, Saturation, Tone, And Contrast
Setting the Sharpness, Saturation, Tone, and Contrast The following settings can be made in the A menu. Sharpness [Soft], [Standard], or [Hard] can be selected. Saturation [Soft], [Standard], or [Hard] can be selected. [Saturation] can be set only when [Image Tone] is set to [Monochrome] in the A menu. -
Page 67: Correcting A Range Of Tones (D-Range Setting)
Correcting a Range of Tones (D-Range Setting) With [D-Range Setting] of the A menu, you can expand an image gradation to make the bright and dark portions of an image clearly visible. Highlight Cor. Corrects the bright portions of the image. Shadow Cor. -
Page 68: Playback Functions
Playback Functions Changing the Playback Method Displaying Multiple Images You can display multiple images in the thumbnail view. Press 5 (W) in the single image 05/05/2024 05/05/2024 10:00 10:00 LAST FILE LAST FILE display of playback mode. The images are displayed in 20 thumbnails. 100-0630 100-0630 1/60... -
Page 69: Playing Back Images Continuously (Slideshow)
Playing Back Images Continuously (Slideshow) Select [Slideshow] in the C menu, and press d. The [Slideshow] screen appears. Set the image switching interval and screen effects. Interval Sets the image switching interval. [Interval] cannot be set when [Screen Effect] is set to [Random]. Screen Effect Sets the screen effects applied when images are switched. -
Page 70: Displaying Rotated Images
Displaying Rotated Images You can change image rotation information. Display an image in the single image display of playback mode. Select [Rotation] in the C menu, and press d. Select the rotation direction, and Rotation Rotation press e. Cancel Cancel Caution ------------------------------------------------------------------------------------------------------- •... -
Page 71: Connecting The Camera To An Av Device
Connecting the Camera to an AV Device Connect to an AV device, such as TVs, equipped with an HDMI® terminal to display Live View images while shooting or to play back images. Prepare a commercially available HDMI® cable that is suitable for the device connected to the camera. -
Page 72: Organizing Files
Organizing Files Deleting Files Press i in the single image display or multiple image display. Select the deletion method, and press e. Available deletion methods vary depending on the camera status when i is pressed. Single image display [Delete One], [Delete Multi], or [Delete All] can be selected. When [Delete Multi] is selected, select [Sel. -
Page 73: Copying Images
Restoring Deleted Files You can restore the deleted files in [Recover File] of the C menu. Caution ------------------------------------------------------------------------------------------------------- • The images cannot be restored when the following operations have been performed after deleting them. • Turning the camera off • Switching from the playback mode to the shooting mode •... -
Page 74: Protecting Images From Deletion
Protecting Images from Deletion You can protect images to prevent them from being deleted accidentally. Select [Protect] in the C menu, and press d. Select the protection method. Select the method from [1 File], [Sel. Multiple], [Select All], and [Cancel All]. When [1 File] is selected, use cd to display the previous/next image. -
Page 75: Copying Images To A Computer
Copying Images to a Computer Connect the camera to a computer using the provided USB cable. Set [USB Connection] to [MSC] in the E menu. Open the battery/card cover of the camera, and connect the USB cable to the USB terminal. Connect the USB cable to the USB port of the computer. -
Page 76: Editing And Processing Images
Editing and Processing Images You can edit and process taken images. Caution ------------------------------------------------------------------------------------------------------- • Only images taken with this camera can be edited and processed. Still images saved from movies cannot be edited and processed. • If you edit and process images repeatedly, image quality will deteriorate. Changing the Image Size Changing the Number of Recorded Pixels (Resize) Display an image in the single image display of playback mode. - Page 77 Cropping Images You can crop a part of images and then save them. Display an image in the single image display of playback mode. Select [Cropping] in the C menu, and press d. The [Cropping] screen appears. Specify the range to crop. Cropping Cropping 1280x960...
-
Page 78: Processing Images With Filters
Processing Images with Filters You can process images with filters. Display an image in the single image display of playback mode. Select [Filter] in the C menu, and press d. The [Filter] screen appears. Use ab to select a filter, and press d. Small Face Filter [5%], [7%], [10%] Ink Rubbing Filter... -
Page 79: Editing Movies
Editing Movies Select [Movie Edit] in the C menu, and press d. The [Movie Edit] screen appears. Use ab to select an editing method. Save as Still Image Saves the specified frame as a still image. Divide Movies Divides a movie into two files at the specified devision point and saves as new files. - Page 80 Dividing a Movie Select [Divide Movies], and press e. The movie playback screen appears. Display the frame at which you want to divide the movie. You can play or pause the movie in the same manner as when viewing a mov- ie in the playback mode.
-
Page 81: Correcting Red Eyes In Images
Memo --------------------------------------------------------------------------------------------------------- • The inserted image is displayed for 3 seconds at the beginning or end of the movie. • When the image is inserted at the beginning of the movie, it is displayed as the thumbnail for the movie. When the image is inserted at the end of the movie, the thumbnail for the movie is not changed. -
Page 82: Changing The Settings
Changing the Settings Saving Frequently Used Settings Using the Mode Dial You can assign frequently used shooting settings to the mode dial P and Q so that you can easily recall the settings. The following settings can be saved. • Capture mode •... -
Page 83: Exporting The Settings To A File
Exporting the Settings to a File You can export the menu settings to a file and save it in a memory card. The settings can be restored from the exported file. Also, the settings can be copied to multiple cameras using the exported file. You can export the settings in a memory card using [Write] and can import the settings to the camera using [Read] in [Camera Settings File] of the E menu. -
Page 84: Customizing The Button Functions
Customizing the Button Functions Registering Functions to the Movie Button You can change the settings for “ADJ. mode” of which functions can be easily used by pressing the movie button. Five functions selected from the following functions can be saved. (The functions indicated with a square-bracketed item are the default settings for the item.) •... -
Page 85: Changing The Functions Of The Green Button
Changing the Functions of the Green Button You can change the functions activated when the green button is pressed. The following functions can be saved. Still images • Green Mode (default setting) • Auto Macro • EV Comp. • AE Metering •... -
Page 86: Display And Sound Settings
Shut-down Screen Displays the PENTAX logo and the number of images captured on the day except for deleted images when the camera is turned off. Setting the Live View Display You can set the Live View display in the D menu. -
Page 87: Setting The Brightness Of The Monitor
Setting the Brightness of the Monitor You can adjust the brightness of the monitor in the E menu. LCD Brightness Sets the brightness of the monitor. Outdoor View Adjusts the brightness of the monitor when the monitor display is difficult to see during outdoor shooting or in other situations. -
Page 88: Power Saving Settings
Power Saving Settings Automatically Turning the Power Off The camera turns off automatically if no operations are made for a certain period of time. Set the time until the the camera is turned off in [Auto Power Off ] of the E menu. Memo --------------------------------------------------------------------------------------------------------- •... - Page 89 Memo --------------------------------------------------------------------------------------------------------- • [Power Saving] is not available in the following cases. • During shooting in the B mode or in [Interval Shooting] of the T mode • In the V mode • In the C mode • While a menu is displayed •...
-
Page 90: Setting The Gps
Setting the GPS The camera can acquire information from GPS satellites using the built-in GPS function. Caution ------------------------------------------------------------------------------------------------------- • After the GPS function is turned on, the camera periodically acquires GPS information even when the camera is turned off, which drains the battery. •... -
Page 91: Displaying The Gps Information
Displaying the GPS Information You can record the location information in images using the GPS function. Set in [GPS] of the D menu or press and hold x (d) to turn the GPS func- tion on and off. The GPS information is acquired every one second in the shooting mode. -
Page 92: Automatically Adjusting The Date And Time Settings
Memo --------------------------------------------------------------------------------------------------------- • The standard of GPS information displayed on the monitor can be set in [GPS Disp Mode] of the D menu. LAT/LON Displays the latitude and longitude. Displays the Universal Transverse Mercator (UTM) coordinates. MGRS Displays the Military Grid Reference System (MGRS) coordinates used as mil- itary information. - Page 93 Set [Logging Interval] and [Logging Record log Duration]. Start Logging Interval 10sec. Logging Duration Exit Exit Logging Interval Select from [1sec.] to [60sec.]. Logging Duration Select from [1] hour to [24] hours. Select [Start], and press e. GPS logging starts. Select [Stop] to stop the GPS logging.
-
Page 94: Setting The Direction Information
Saving Logs You can save the recorded logs to the memory card as a file. Select [Save log data] on the screen in Step 2 on p.90, and press d. Select [NMEA] or [KML], and press e. The log file is saved in the “GPSLOG” folder in the memory card with the file name composed of the serial number 001 to 999 and the month and day. -
Page 95: Imprinting The Gps Information
Imprinting the GPS Information The acquired GPS information can be imprinted at the bottom right of the image. Set in [Data Imprint] of the D menu. GPS Data Imprint Sets the standard of GPS information to imprint. UTC Data Imprint Imprints the Universal Coordinated Time. -
Page 96: File Management Settings
File Management Settings Specifying the Folder/File Settings By default, folders and files are automatically named as follows. Folder Name 100PENTX to 999PENTX File Name IMGP0001.JPG to IMGP9999.JPG When the file number exceeds IMGP9999, the next folder is created and the file number becomes IMGP0001. - Page 97 Select [Custom], and press d. The text-entry screen appears. Enter a folder name. Up to five single-byte alphanumeric characters can be entered. Text entry cursor PENTX Delete one character B N M Switch character type End entry Finish Moves the text selection cursor (yellow frame). abcd Enters a character selected with the text selection cursor.
- Page 98 File Name The string of characters “IMGP” is used as the file name prefix by default. You can change this to any string of characters. Select [File name] in the E menu, and press d. Select [Custom], and press d. Select a character to enter.
-
Page 99: Setting The Copyright Information
Reset File Number If [Reset File Number] of the E menu is executed, a folder with a new num- ber is created and file number starts from 0001. Memo --------------------------------------------------------------------------------------------------------- • When a memory card is not inserted, the file number in the internal memory is reset. Setting the Copyright Information You can set the copyright information embedded in the Exif data. - Page 100 Imprinting the Copyright Information The copyright information can be imprinted at the bottom of the image. Set in the E menu. Copyright Print Select from [On(OVR)], [On(New)], and [Off]. Copyright Position Select from [Left], [Middle], and [Right]. Copyright Font Size Select from [Large], [Middle], and [Small].
-
Page 101: Saving The Local Date And Time Of The Specified City
Saving the Local Date and Time of the Specified City The date and time set in “Initial Settings” (p.35) serve as the date and time of your present location and are reflected in the shooting date and time for images. Setting the destination to a location other than your present location en- ables you to save images time-stamped with the local date and time. -
Page 102: Appendix
Appendix Attaching Optional Accessories Wide Conversion Lens If the wide conversion lens (DW-5) is attached to the camera, you can per- form shooting with the 0.8x lens magnification (35 mm equivalent focal length: 22 mm (wide angle)). When using the wide conversion lens, set [Lens Adapter On] to [WIDE] in the D menu. -
Page 103: Ac Adapter
AC Adapter If you intend to use the camera continuously for a long period, the use of the AC adapter (K-AC166) is recommended. Make sure that the camera is turned off, and open the battery/ card cover. Remove the battery. Connect the USB cable (Type-C) of the AC adapter to the USB terminal of the camera. -
Page 104: Troubleshooting
Troubleshooting Power Supply Problem Cause Solution Page The camera does not The battery is not inserted. Charge the battery and correctly p.33 turn on. insert it into the camera. The battery is exhausted. The battery is not inserted in the correct orientation. -
Page 105: Shooting
Shooting Problem Cause Solution Page Shooting cannot be The battery is exhausted. Charge the battery. p.33 performed by pressing The camera is turned off or not in Turn the camera on or press z p.35 the shooting mode. to switch the camera to the shooting mode. - Page 106 Problem Cause Solution Page Images are too bright. Flash output is not appropriate. Move away from the subject — or use a different light source. The monitor brightness is not Adjust the brightness of the monitor p.85 appropriate. in the E menu. Images are too dark.
-
Page 107: Playback/Deletion
Playback/Deletion Problem Cause Solution Page Shooting information is Information display is set to “No Press e to switch the information p.18 not displayed. information display”. displayed on the screen. Images cannot be The AV device is not correctly Connect the cable correctly. p.69 played back. -
Page 108: Others
Others Problem Cause Solution Page The memory card The card is not in the correct Insert the memory card in the p.31 cannot be inserted. orientation. correct orientation. Camera controls have The battery is exhausted. Charge the battery. p.33 no effect. The camera is malfunctioning. -
Page 109: Error Messages
Error Messages Error Message Description Insufficient Memory The memory is full and no more files can be saved. Insert a new memory card or delete unwanted files. (p.70) No image There are no files that can be played back. Unmatched File You are trying to play back a file in a format not supported by this camera. -
Page 110: Main Specifications
Main Specifications Camera Lens PENTAX lens, 11 elements in 9 groups (5 aspherical lens elements) Focal Length 5 to 25 mm 35 mm Equivalent Focal Approx. 28 to 140 mm Length Maximum Aperture F3.5 (W) to F5.5 (T) Zoom Mag-... - Page 111 Exposure Metering System Multi-segment metering, Center-weighted metering, Spot Control metering Exposure Compensation ±2 EV (1/3 EV steps) Capture Mode Auto Picture, Program, HDR, Handheld Night Snap, Movie, High Speed Movie, Digital Microscope, Landscape, Flower, Portrait, Underwater, Underwater Movie, Interval Shooting, Interval Movie, Surf &...
- Page 112 Dimensions Approx. 118.2 mm (W) × 65.5 mm (H) × 33.1 mm (D) (4.7 in. (W) × 2.6 in. (H) × 1.3 in. (D)) (excluding operating controls and protrusions) Weight Approx. 242 g (8.5 oz) (including the dedicated battery and SD memory card) Approx.
-
Page 113: Usb Power Adapter Ac-U2
USB Power Adapter AC-U2 Power Supply 100 to 240 VAC (50/60 Hz), 0.2 A Output 5.0 VDC, 1000 mA Average Active Efficiency No-Load Power Con- 70 mW sumption Operating Temperature 0 to 40°C (32 to 104°F) * It depends on the operating temperature of the camera. Storage Temperature -20 to 60°C (-4 to 140°F) Dimensions... -
Page 114: Image Storage Capacity
Image Storage Capacity The following table shows the approximate number of images and record- ing time (in seconds) of movies that can be saved in the internal memory and a memory card in various formats. Memory Card Internal Memory Recorded Aspect (8 GB) Pixels... -
Page 115: Operating Environment
Caution ------------------------------------------------------------------------------------------------------- • The figures for movies are the total length that can be recorded. The maximum recording time per shooting is 25 minutes or the equivalent of 4 GB. • The number of images that can be taken may differ from the number of storable images displayed on the monitor. -
Page 116: Using The Camera Abroad
Using the Camera Abroad USB Power Adapter (AC-U2), AC Adapter (K-AC166), and Battery Charger (BJ-11) These products are for use with currents of 100 to 240 V and 50 or 60 Hz. Before traveling, purchase a travel adapter for connection to the type of out- lets used at your destination. -
Page 117: Precautions For Use
Precautions for Use Waterproof and Dustproof Function • The camera complies with JIS/IEC waterproof grade 8 and JIS/IEC dustproof grade 6 (IP68). • After shooting in the rain or washing with water, water may leak out from the lens barrel or the tripod screw hole on the bottom of the camera. However, this is not problematic because the camera is protected with the double-layered structure. - Page 118 • When carrying the camera, be careful that it does not strike other objects. Particular care is required to protect the lens and monitor. • The flash may overheat if fired many times in succession. Do not use the flash succes- sively more than necessary.
- Page 119 • Do not allow other metallic objects to come in contact with the connectors, or con- tacts of the rechargeable battery as this can result in a short. • The operating temperature range is 10 to 40°C (50 to 104°F). Charging takes longer at temperatures below 10°C (50°F).
-
Page 120: Camera Care And Storage
Camera Care and Storage Caring for the Camera • Image quality can be affected by fingerprints and other foreign matter on the lens. Avoid touching the lens with your fingers. • Remove dust or lint on the lens with a commercially available blower, or gently clean the lens with a soft, dry cloth. - Page 121 Replacement of Rubber Packings • Replace the rubber packing with a new one every two years even if it is not dirty and there is no problem with it, to maintain the waterproof function. When the camera is frequently used in water, in a sandy area, or in a dusty room, it is recommended to replace it every year.
-
Page 122: Warranty Policy
Warranty Policy All our cameras purchased through authorized bona fide photographic distribution channels are guaranteed against defects of material or workmanship for a period of twelve months from the date of your purchase. Service will be rendered, and defective parts will be replaced without cost to you within that period, provided the camera does not show evidence of impact, sand or liquid damage, mishandling, tampering, battery or chemical corrosion, operation contrary to operating instructions, or modification by an unauthorized repair shop. - Page 123 For Customers in USA and Canada Conditions of RICOH IMAGING North America Warranty 1. RICOH IMAGING products originally distributed by RICOH IMAGING AMERICAS CORPORATION and RICOH IMAGING CANADA and purchased through our authorized distribution channels, are warranted by RICOH IMAGING AMERICAS CORPORATION and RICOH IMAGING CANADA to the original retail purchaser for a period of one year from date of purchase against defects in material and/or workmanship.
- Page 124 Pour les utilisateurs aux États-Unis et au Canada Conditions de garantie RICOH IMAGING en Amérique du Nord 1. Les produits RICOH IMAGING distribués à l’origine par RICOH IMAGING AMERICAS CORPORATION et RICOH IMAGING CANADA et achetés par l’entremise de nos réseaux de distribution dûment agréés sont garantis par RICOH IMAGING AMERICAS CORPORATION et RICOH IMAGING CANADA contre tout défaut de fabrication et de main-d’œuvre pendant un an à...
-
Page 125: Regulatory Compliance Statements
STATEMENT OF FCC COMPLIANCE Supplier’s Declaration of Conformity 47 CFR § 2.1077 Compliance Information Product Name: PENTAX WG-8 Model Number: R08050 This device complies with Part 15 of the FCC Rules. Operation is subject to the following two conditions: (1) This device may not cause harmful interference, and (2) this device must accept any interference received, including interference that may cause undesired operation. - Page 126 FCC Part 15 Subpart C This transmitter must not be co-located or operated in conjunction with any other an- tenna or transmitter. The available scientific evidence does not show that any health problems are associ- ated with using low power wireless devices. There is no proof, however, that these low power wireless devices are absolutely safe.
- Page 127 SAFETY STANDARD FOR BUTTON CELL OR COIN BATTERIES AND CONSUMER PRODUCTS CONTAINING SUCH BATTERIES This product contains a non-replaceable button cell or coin battery. Do not replace the button cell or coin battery. This can cause a fire or electric shock. WARNING •...
- Page 128 GENERAL CERTIFICATE OF COMFORMITY PRODUCT MODEL MODEL: R08050 TYPE: DIGITAL CAMERA THE IMPORTER ISSUING RICOH IMAGING AMERICAS CORPORATION THE CERTIFICATE 2 Gatehall Drive Suite 204, Parsippany, New Jersey 07054, U.S.A. (800) 234-0276 CONTACT INFORMATION RICOH IMAGING AMERICAS CORPORATION FOR THE INDIVIDUAL Yuliana Kwok MAINTAINING RECORDS orders@ricoh-usa.com...
- Page 129 For Customers in USA and Canada Lithium-ion batteries are recyclable. You can help preserve our environment by returning your used rechargeable batteries to the collection and recycling location nearest you. For more information regarding recycling of rechargeable batteries, call toll free 1-800- 822-8837, or visit https://www.call2recycle.org/.
- Page 130 Pour les utilisateurs au Canada Avis de conformité à la réglementation d’Innovation, Sciences et Développement économique Canada (ISDE) Cet appareil numérique de la classe B est conforme à la norme NMB-003 (B) du Canada. L’émetteur/récepteur exempt de licence contenu dans le présent appareil est conforme aux CNR d’Innovation, Sciences et Développement économique Canada applicables aux appareils radio exempts de licence.
- Page 131 For Customers in Europe Information for Users on Collection and Disposal of Old Equip- ment and Used Batteries 1. In the European Union These symbols on the products, packaging and/or accompanying docu- ments mean that used electrical and electronic equipment and batteries should not be mixed with general household waste.
- Page 132 Notice to Users in Countries that Require the CE Marking This product complies with the essential requirements and provisions. RE Directive 2014/53/EU The EU Declaration of Conformity is available by accessing the URL: https://www.ricoh-imaging.co.jp/english/support/declaration_of_conformity.html and selecting the product applicable. Importer (CE Marking): RICOH IMAGING EUROPE S.A.S. 7-9, avenue Robert Schuman, 94150 Rungis, FRANCE Manufacturer: RICOH IMAGING COMPANY, LTD.
- Page 133 Notice to Users in Countries that Require the UKCA Marking This product complies with the essential requirements and provisions. Radio Equipment Regulations 2017 The UK Declaration of Conformity is available by accessing the URL: https://www.ricoh-imaging.co.jp/english/support/declaration_of_conformity.html and selecting the product applicable. Manufacturer : RICOH IMAGING COMPANY, LTD.
- Page 134 For Customers in Thai This telecommunication equipment conforms to the requirements of the Office of the National Broadcasting and Telecommunications Commission.
-
Page 135: Index
Compass Calibration ........92 Index Compass Heading ........92 Confirm. Time..........38 Numerics Connection to a computer ....... 73 Contrast............64 1cm Macro ............. 49 Cont. Shoot ............ 59 Copyright Info ..........97 Correcting a range of tones ..... 65 A-Bracket ............ - Page 136 Flash On (Flash) ..........54 Flower (Scene) ..........41 Landscape (Scene) ........41 Fluorescent (White Balance) ....56 Language setting ........36 Fn button ............21 LAT/LON (GPS) ..........90 Focus Assist............ 50 LCD Brightness ..........85 Focus Mode ........... 49 Lens Adapter On ........
- Page 137 PF (Focus) ............49 Show folder at startup ....... 84 Pix. Track SR ........... 65 Shut-down Screen ........84 Playback ........... 39, 66 Single image display ........39 Playback menu ..........26 Slide Film (Image Tone) ......63 Playback Volume.......... 85 Slideshow ............
- Page 138 Zoom ..............39...
- Page 139 RICOH IMAGING COMPANY, LTD. 1-3-6, Nakamagome, Ohta-ku, Tokyo 143-8555, JAPAN (https://www.ricoh-imaging.co.jp/english/) RICOH IMAGING EUROPE 7-9, avenue Robert Schuman, 94150 Rungis, S.A.S. FRANCE (https://www.ricoh-imaging.eu) RICOH IMAGING 2 Gatehall Drive Suite 204, Parsippany, New Jersey AMERICAS CORPORATION 07054, U.S.A. (https://www.us.ricoh-imaging.com) RICOH IMAGING CANADA 5560 Explorer Drive Suite 100, Mississauga, Ontario, INC.
Need help?
Do you have a question about the WG-8 and is the answer not in the manual?
Questions and answers
Good day, My WG-8 digital camera is not recognized by my laptop computer, a 2023 MacBook Air with OS Sequoia 15.3.1. Please advise, thank you.
What is the C menu and how do I find it?
The C menu on the Pentax WG-8 is the Playback menu, which includes functions such as deleting images, recovering deleted files, resizing, cropping, and copying images between internal memory and a memory card. It can be accessed by pressing the "f" button, which brings up the first screen of the A or C menu.
This answer is automatically generated