Advertisement
- 1 Meeting Your F9
- 2 F9 Power Tools
- 3 Setting Up Your Camera
- 4 Connect to the Redtiger App
- 5 Home Screen of the Redtiger App
- 6 Customizing Your F9
- 7 Parking Mode (Optional)
- 8 Maintenance
- 9 Trouble Shooting
- 10 Product Information
- 11 Customer Service
- 12 Documents / Resources
Meeting Your F9

F9 Power Tools
- Cig Charger
![]()
(Doesn't prevent car battery drain)
![]()
Note: It is best to use the power cord that comes with our products, or our professional hardware kits. - Hardwire Kit
(Required for Parking Mode. Prevents car battery drain.)
(Not included, purchase separately)
![]()


If you want to use another power cord, please contact us for suggestions. Otherwise it will cause damage to the dash cam.
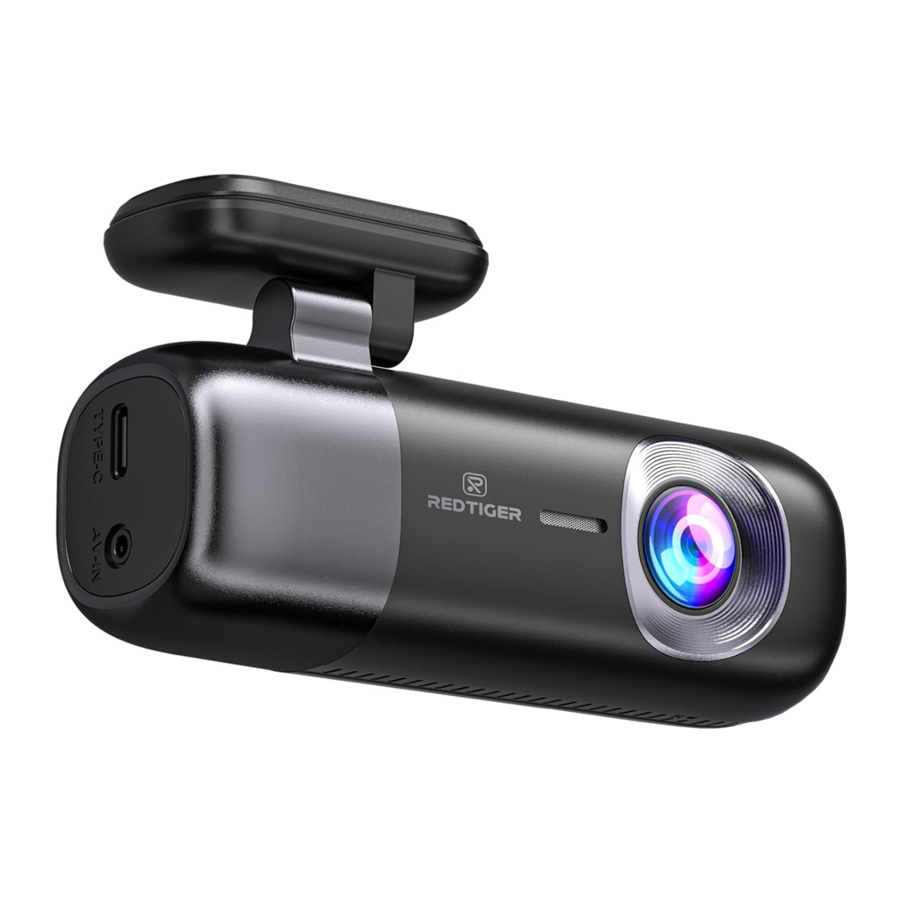
Setting Up Your Camera
INTRO TO F9
Trustful Dashcam that guarding each ridding of yours.
Power button
In the power-on state, short press to lock/unlock the video, long press the power button to restore the factory settings and shut down; ln the power-off state, short press the power button to turn on.

Indicator Light
In the power-on state, stop recording red light long on, in the video red light flashing.
Most operations are performed on the mobile app with one hand.
POP-UP: Keep your SD card in good condition by reformatting it regularly. This will erase al of your media, so be sure to save it first.

This product is for DC 12v / 24v only.
MicroSD (TF) card
With your camera off, insert the card into the card slot with the label facing the back of your camera.
You can eject the card by pressing it into the slot with your fingernail.
WIRING SET UP
Connect your camera to a Cig charger using the included cig charge cable.
SD CARD
You'll need a micro SD card (sold separately) to save your videos and photos. Use a U3 Class 10 SDTM Card dedicated or your camera may malfunction.
SD cards can degrade over time and affect your camera's ability to save your media. Try swapping out an older card for a new one if you're having any problems.
POP-UP: The camera supports 16~256GB SD cards.
Indicator lights
When powered on, the dash cam is recording when the lights are flashing.

Warmly remind: when you use SD card for the first time, please format the SD card after connecting the mobile app.
Installation steps
- Install the electrostatic sticker on the windshield

- Use 3M glue to fix the dash cam on the static sticker

- Install the power cord as shown in the picture

- Install the rear camera as shown in the picture

- Removed easily from camera body as shown in the picture


Connect to the Redtiger App
DOWNLOAD APP
- Download our "REDTIGER" App from: https://www.redtigercam.com/pages/app
- Download "REDTIGER" App from Apple APP Store or Goog e Play Store


Wifi connection operation: https://youtu.be/B9bleETTwhl

POP-UP: The dashboard can only connect to one phone at a time. When the phone is connected to wifi, mobile devices outside cannot connect.
CONNECT YOUR F9

POP-UP: This is to avoid series connection between different device. Some device may prompt that the software contains virus, you could run the installation as an administrator to download App.

Camera > View app-connected cameras
Album > Storage of video files downloaded from the phone itself
More > Settings in the app itself
POP-UP: Since dash cam has a loop recording mode, if you encounter an important video you can save and download it first.
Home Screen of the Redtiger App

- Mute
- F/R View switch
- Full screen display
- Geographical map
- Real-Time speed
- GPS Info
- PlayBack
- Stop/start recording
- Photo Taking
- Settings
Customizing Your F9
Optimize the Functions from Your Phone.

- Whether to record sound
- The volume
- Resolution 2160P/1440P/1080P
- The duration of each recording Imin/2min/3min
- Frame Rate 50hz/60hz
- ON/OFF the time stamp
- Km/h/mph
- 12-hour/24 hour
- Off/Low/Medium/High

- ON/OFF Parking Mode
- Off / 12 hours/24 hours /48 hours
- Change the name of your wifi
POP-UP: Parking Monitor requires a Hardwire Kit.
Parking Mode (Optional)
PREPARE YOUR HARDWIRE KIT
Since we considered some customers have no need of Parking Mode, there's no hardwire kit included in your packages.
If you need this feature, you can contact us to buy.
GETTING TO KNOW YOUR HARDWIRE KIT

Features:
- Low Voltage Protection
- Multi Input Power
- Universal Compatibility
- Length: 11.5ft
Wrong connection may disable Voltage Protection and damage your car.
INSTALL YOU HARDWIRE KIT

Red wire → ACC → power only when car key is on
Yellow wire → B+ → Always has power
Black wire → Ground → Any grounded (neg) screw
POP-UP: Fuse box panel is typically located driver side dash board. You could cut the head of wires and connect it to your fuse directly if fuses is small.
SELECT PARKING MODE
Enter Parking Mode In Settings
Setting → Parking Mode → Off/ 12 hours/24 hours/48 hours
Once you have properly connected the hardware suite, you can see the parking monitoring mode in the app Settings.
TIME-LAPSE
- Select 12 hours/24 hours/48 hours
- A Record will be created in 1 fps during your parking time
- 1 min = actual 12 mins
- Collision or vibration be detected
- An Unerasable record will be created in Lock space
POP-UP: 1 fps = 1 image during 1 second.
G-sensor could be activated by a deceleration zone.
In order to meet the needs of our customers, we have set up an excellent customer service team. If you have any questions about the use or design, please feel free to contact us.
How to confirm that the parking monitoring system is activated
- Voice broadcast
- See parking monitoring mode in app Settings
If the parking monitoring mode cannot be enabled according to the picture on the next page. Try this method.
Turn the car off. Connect both the red and yellow lines to the constant current, and then move the red lines to the ACC interface. Ensure that the ACC port is not supplied with power.
Installation Notes

PARTICULAR WRONG CONNECTION

- The camera will run Parking Mode normal y, but your car battery will be ran out under this connection.
- The Parking Mode will normal working in screen off status. Un ess there is a collision or vibration triggered Sensor.
- Please check if your camera working after 15mins your car is off.
DOWNLOAD GPS PLAYER
Download our GPS Player from website: https://www.redtigercam.com/pages/gps-player

Transfer your recordings to computer

USE YOUR GPS PLAYER


Maintenance
MAINTAIN YOUR CAMERA
Do not directly plug and unplug the cable or SD card, except when the camera it turned off.
Please contact Redtiger before connecting a different hardwire kit to the F9 camera.
It is normal for the camera to be warm during operation. Excess exposure to heat from the sun may cause damage that isn t covered under the 1 year warranty.
Trouble Shooting
WIFI CONNECTION GOES WRONG
Connection Prepare
- Mobile data / VPN is off
- 16 ft less close to your F9
- Only allowed 1 device connection
Connection Notice
- WiFi password: 12345678
- Connect only this time
OTHER PROBLEM
Won't enter Parking Mode
- Hardwire kit needed
- App shows "ACC disconnected" pop-up when trying to enter Parking Mode
Camera always on after Car turned down
- Wrong connection of Red wire and Yellow wire
- Please connect red wire to a fuse that is not powered when the key is off and the driver door is open
Over Heat
- Camera should stay between -4°F- 158°F
RECEIVED DEAD CAMERA
Use USB cable to connect your camera with computer and verify that the indicator is blinking.
- If not, please Contact Redtiger directly.
ULTIMATE SOLUTION
Use different charging ways to verify if the camera work.
- Unplug all cables from the camera (make sure you can perform the following steps to troubleshoot).
- Plug Type-C USB charger to see if the camera working. f not, please use your personal USB charge and check again.
- Check your SD card is U3 Classl 0, if not, please change to one that is U3 Class 10.
- Plug SD card and see if the camera working, if not, please contact Redtiger.
- If the methods above don't solve your problem, feel free to contact Redtiger and please leave your contact information and current address which may be needed if a replacement is warranted.
Product Information
BASIC INFO OF YOUR CAMERA
| Model | F9 |
| Power | 12V/24V |
| Aperture | F1.5 |
| Battery | Super capacitor |
| Video Format | TS |
| Loop recording | 1min/2min/3min |
| Recording method | Normal recording/Time-lapse recording |
| Screen View | Front or rear view |
| Resolution | Front 2160P/1440P/1080P Rear 1080P |
| Audio | Support sound recording and playback |
| Micro SD card | Micro SD 16GB-256GB |
| Record photo | Computer / Smartphone |
| Temperature | -4°F- 158°F |
| Warranty period | 1 Year |
Be careful when using your camera and its accessories. Always be cautious of your surroundings to avoid injuring yourself and others.
Make sure to follow all local laws including all privacy laws which may restrict recording in certain areas.
Customer Service

WHATS APP

FACE BOOK

LINE

Email
Mirror Dash Cam
Email: support@redtigercam.com
Mini Dash Cam
Email: help@redtigercam.com
BusinessCooperation or Others
Email: contact@redtigercam.com
Customer Phone Service:
+1 888 966 8028
Business Day, Mon-Fri
6 AM 12 AM, 1 PM-8 PM EST(GMT-4)
Documents / Resources
References
Download manual
Here you can download full pdf version of manual, it may contain additional safety instructions, warranty information, FCC rules, etc.
Advertisement


Need help?
Do you have a question about the F9 and is the answer not in the manual?
Questions and answers