Table of Contents
Advertisement
Advertisement
Table of Contents

Related Manuals for MAMMOTION YUKA


Summary of Contents for MAMMOTION YUKA
- Page 2 Thank you for choosing Mammotion as your garden care lawn mower. This user manual will help you learn and operate Mammotion Yuka, a perimeter-free lawn mower, to cut grass and maintain your lawn. This manual is copyrighted by Mammotion company. Without the written permission of the company, any unit or individual shall not copy, modify, reproduce, transcribe or transmit in any way or for any reason.
-
Page 3: Table Of Contents
Operation ............................- 33 - Preparation ..........................- 33 - Download Mammotion App ......................- 33 - Mammotion Account Signup and Login ..................- 34 - Add Your Product .........................- 37 - Main Page Introduction ....................... - 39 - Map Page Introduction ........................- 41 - 4.7 Service .............................- 68 -... - Page 4 Product Specifications ........................- 72 - Technical Specifications ....................... - 72 - LED Indicator Codes ........................- 75 - Fault Codes ..........................- 77 - Warranty ............................- 79 - Compliance ............................- 81 -...
-
Page 5: Safety Instructions
Do not use the product in areas where people are unaware of its presence. When manually operating the product with the Mammotion App, do not run. Always walk, watch your steps on slopes, and maintain balance at all times. -
Page 6: Safety Instructions For Installation
Only use original batteries recommended by Mammotion. The safety of the product cannot be guaranteed with non-original batteries. Do not use non-rechargeable batteries. -
Page 7: Battery Safety
Do not use the product if the STOP button is not functioning. Avoid collisions between the product and people or animals. If a person or animal comes in the path of the product, stop it immediately. Always power off the robot when it is not in operation. ... -
Page 8: Introduction
About Mammotion Yuka 2.1.1 About 3D vision module Yuka is equipped with a vision module that provides 3D vision positioning, 3D vision obstacle detection, and video/FPV mode. 3D vision positioning helps to guarantee positioning accuracy when RTK positioning fails due to poor ... - Page 9 2. Yuka operates similarly, requiring an open sky view to receive satellite signals. 3. Data transmission from the RTK reference station to Yuka is possible. This does not imply that there must constantly be an unobstructed view from every point on your lawn to the RTK reference station. As long as the transmission path is not completely blocked, the data can be transmitted via radio.
- Page 10 2.1.5 About connectivity Yuka supports three methods of connectivity, namely, Bluetooth, Wi-Fi, and 4G cellular data. Bluetooth is used to connect Yuka with your phone, while Wi-Fi and 4G cellular data are used to access the Internet. - 6 -...
- Page 11 Yuka has an anti-theft system to prevent unauthorized removal. The alarm is triggered when Yuka is lifted. Users can track Yuka's location by GPS and 4G positioning through the Mammotion app, as long as it is online. Additionally, Yuka's structure allows for an AirTag to be attached to track its location.
-
Page 12: In The Box
In the Box Ensure the parts can be found in the package according to your option. If any parts are missing or damaged, contact your local dealer or our after-sales support. 2.2.1 Yuka installation kit Yuka x1 Security Key x2... - Page 13 2.2.3 RTK installation kit RTK Reference Station x1 Radio Antenna x1 Trident Ground Stake x1 Mounting Pole x2 RTK Reference Station Extension RTK Reference Station Power Cable (10M) x1 Supply x1 2.2.4 Tool kit Allen Key 8mm x1 Cord Tie x4 Cable Peg x4 Screwdriver (Phillips bit+2.5mm SIM-eject Tool x1...
- Page 14 2.2.5 Other accessories (optional) The following accessories are sold separately. RTK reference station wall mount kit By using the wall mount kit, the RTK reference station can be securely installed on a wall, enhancing its satellite signal reception. RTK Wall Mount x1 M8x50 Expansion Bolt x4 Drilling Template x1 Self-emptying Lawn Sweeper Kit...
- Page 15 Solar panel unit kit Solar Panel x1 Mounting Bracket x1 Stake x4 Expansion Bolt x6 Screw x6 M5x40 Screw x4 (2pcs for spare use) (2pcs for spare use) (2pcs for spare use) Allen Key 1.5mm x1 Allen Key 4mm x1 Allen Key 8mm x1 - 11 -...
-
Page 16: Symbols On The Product
Symbols on the Product These symbols can be found on the product. Study them carefully. Symbol Description Warning. Read user instructions before operating the product. Use a detachable supply unit TS-A090-3003001. Use a detachable supply unit TS-A012-1201002. This product complies with the applicable EU Directives. This product complies with the applicable UK Directives. - Page 17 Symbol Description Class III appliance. Keep hands or feet away from movable blades. Do not ride on the product. Keep a safe distance from your product when operating. WARNING: Do not touch rotating blade. WARNING: Read the user instructions before operating the product. WARNING: Danger of projections of objects against the body.
-
Page 18: Product Overview
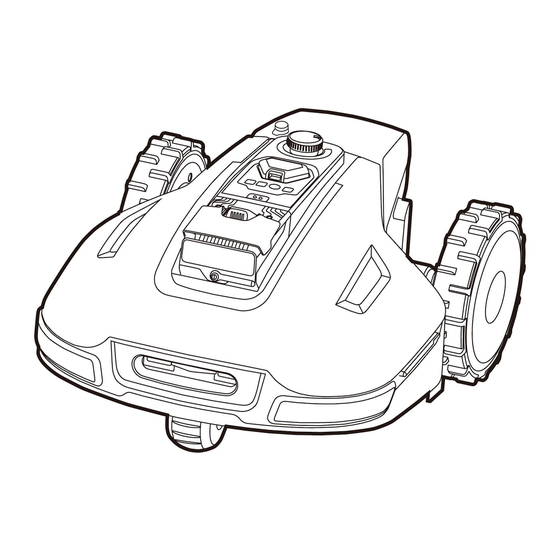
11. Rain Sensor 12. Start Button 13. Grass Button — press to continue the task 14. Power Button — long press to turn on/off Yuka 15. Auto-return Button — press to call back Yuka IMPORTANT 1. The cutting height can only be changed by manually pressing down and turning the Push button. - Page 19 Figure 2- 2 Front View of Yuka 16. Charging Pad Figure 2- 3 Bottom View of Yuka 17. SIM Card Tray 18. Cutting Blade 19. Cutting Disk 20. Battery Compartment - 15 -...
- Page 20 2.4.2 RTK solar panel 1. USB port — for charging 2. Indicator 3. Power 4. Vent Figure 2- 4 Rear View of Solar Panel To use the solar panel unit for the first time, provide power through either sunlight or an external power ...
-
Page 21: Installation
Installation Preparation Read and understand the safety instructions prior to installation. Use original parts and installation materials. Sketch your lawn and mark up obstacles. This will make it easier to examine where to place the charging station and RTK reference station, and to set the virtual boundaries. Choosing a Location for RTK Reference Station To optimize the performance of the RTK system, the RTK reference station must be in an open area to receive satellite signals. - Page 22 The location requirements are as follows: The RTK reference station should be oriented vertically, as shown below: Place the RTK reference station on a flat, open ground or on an unobstructed wall or roof. Make sure there are no roofs or trees that may obstruct the satellite signals. DO NOT install the RTK reference station at the corner of an L-shaped building or on a narrow path ...
- Page 23 If you need to install an RTK solar panel unit, for optimal exposure to sunlight, Mammotion recommends the following locating guidelines: If your home is located north of the equator, place the solar panel unit facing south; If your home is located south of the equator, place the solar panel unit facing north;...
-
Page 24: Choosing A Location For Charging Station
On a slope Ground not flat Easy to bend when a heavy object on it, such as Yuka. Thick grass Easy to bend when a heavy object on it, such as Yuka. - 20 -... -
Page 25: Installing
Installing 3.4.1 Yuka assembly Installing the security key Insert a key into the top key slot. - 21 -... - Page 26 Installing the 4G sim card (optional) IMPORTANT Activate the SIM card on your phone before installation. 1. Use the screwdriver with 2.5mm hex bit to detach the cover. 2. Eject the SIM card tray using the SIM-eject tool, install the SIM card, and push the card tray into place.
- Page 27 3.4.2 Installing the charging station 1. Insert the charging tower into the charging base plate. 2. Install and tighten the three screws from the bottom of the charging base plate using the screwdriver with 2.5mm hex bit. 3. Select an open spot to install the charging station.
- Page 28 3.4.3 Installing the RTK reference station 1. Assemble the two mounting poles and the trident ground stake as shown. 2. Fix the radio antenna to the RTK reference station. 3. Route the RTK reference station cable into the mounting pole as shown. 4.
- Page 29 3.4.4 Installing the RTK reference station wall mount kit (optional) Skip the section 3.4.3 if you have ordered the RTK reference station wall mount kit. 1. Choose a suitable installation area at a high place of your house. 2. Stick the drilling template on the wall and drill four holes (10 x 40mm/0.4 x 1.6 in) at the appropriate position.
- Page 30 1. Use the screwdriver with 2.5mm hex bit to loosen the 6 screws to detach the battery cover at the bottom of Yuka. 2. Connect the battery wires and use the two screws to secure the battery. Tighten the screws using the screwdriver with 2.5mm hex bit.
- Page 31 5. Insert the protrusion on the lawn sweeper into the slot on the rear of Yuka. 6. Mount the sweeper onto Yuka. 7. Connect the sweeper plug to Yuka. - 27 -...
- Page 32 3.4.6 Installing the RTK solar panel kit (optional) NOTE There are three options to install the RTK solar panel kit. Please decide the optimal one to continue. Option 1: Install the RTK solar panel kit on a wall 1. Place the mounting bracket on the wall and mark four holes with a pencil, ensuring the distance is within the cable's reach.
- Page 33 4. Attach the bracket to the wall without reversing it. Reinsert washers, spring washers, nuts, and tighten with a 13mm/0.5 in. socket wrench. 5. Secure the solar panel to the bracket with four screws and tighten using a 4mm/1.5 in. Allen key. 6.
- Page 34 Option 2: Install the RTK solar panel kit on a flat ground/roof 1. Reverse and place the mounting bracket on the surface, secure with stakes or expansion bolts, ensuring the cable's reach. 2. Secure the solar panel to the bracket with four screws and tighten using a 4mm/1.5 in.
- Page 35 Option 3: Install the RTK solar panel kit on a RTK wall mount 1. Mount the bracket onto the RTK wall mount with two screws (M5x40). Tighten the screws using a 4mm/1.5 in. Allen key. Avoid reversing the mounting bracket during installation. 2.
- Page 36 After the charging station and RTK reference station have been properly installed, place Yuka on the charging station by: Placing Yuka about 1.5 m/5 ft. in front of the charging station with the head of Yuka facing the charging ...
-
Page 37: Operation
Yuka is designed to work with the Mammotion app, please download the free Mammotion app first. You can scan the QR code below to get it from the Android or Apple app stores, or search for Mammotion in these stores. -
Page 38: Mammotion Account Signup And Login
NOTE If you already have a Mammotion account, input your account and password to log it in. After successfully install the Mammotion app in your phone, you are ready to create your account. Follow the below instructions to register one. - Page 39 4.3.2 To log in Log in with a Mammotion account Input your email address and password, check Privacy Agreement User Agreement, then click Login. NOTE If you forget your password, click Reset password and follow the screen instructions to reset your password.
- Page 40 2. Select Associated account to link your Mammotion account if needed. Or, 3. Click Set Password/Login to set your password for the Mammotion account you are signing up. 4. Click Confirm and login to log in. - 36 -...
-
Page 41: Add Your Product
2. Select Add Yuka. 3. Follow the onscreen guidelines to set up Yuka. 4. Long press (5 s) the power button to turn on Yuka. 5. Follow the onscreen instructions to connect Yuka via Bluetooth and set network successfully. - 37 -... - Page 42 4.4.2 Add RTK The RTK reference station can also be added to check its data such as the number of satellites received, signals, etc. Click Add RTK to continue if needed. 1. Supply power to the RTK reference station and it will turn on automatically. 2.
- Page 43 Main Page Introduction 1. Status bar 2. Settings 3. Customer service 4. Switch device 5. Create 6. Notification 7. Device serial number 8. Device status NOTE 1. See Status Bar for further information. 2. See Settings for further information. 3. See Customer service for further information.
- Page 44 After a task area is created, you can start working or set a task schedule. Tap to quickly start mowing. Tap to set a task schedule. - 40 -...
- Page 45 Yuka's status shows Ready and the positioning status is good. We highly recommend you leave 15 cm/6 in distance if you drive Yuka along the edge of a wall/fence/obstacles/ditches. The controller should follow Yuka within 3 m/10 ft to ensure a good Bluetooth connection and for safety ...
- Page 46 Please map the task area along the perimeter of the lawn. - 42 -...
- Page 47 3. The solid line marks the perimeter that you have set, while the dotted line will help you to get back to the starting point. The lawn map will not be created until you control Yuka to the starting point. 4. Click to modify the perimeter that has been set if needed.
- Page 48 Technical Specifications upper limit (See for more information), or the task area mapping will fail. Drive Yuka out of the task area or no-go zone first if a new area is created. To add a no-go zone No-go zones are created for pools, flowerbeds, trees, roots, ditches, and any other obstructions present in the lawn.
- Page 49 NOTE Ensure that Yuka has been transported to the appropriate task location when adding a channel. Delete the current channel and create a new one if a change is required. To do so, go to Edit > Delete.
- Page 50 After the self-emptying lawn sweeping kit is successfully installed, you are ready to set it up in the Mammotion app. A dumping spot is where Yuka sends collected grass clippings, leaves, and debris. Once a task area is created, you can define the dumping spot either inside or outside the task area.
- Page 51 After mapping 1. Automatic mowing 2. Manual mowing 3. Task schedule 4. Map management 5. Recharge 6. Channel 7. Task area 8. No-go zone Map management 1. Create 2. Edit 3. FPV mode 4. Task speed and cutting height adjustment - 47 -...
- Page 52 To edit or delete the current task area/channel/no-go zone/dumping spot To edit the current task area 1. Long press the task area you want to modify until a floating window appears. Tap Modify to re-draw the perimeter. Tap Rename to edit the name of the task ...
- Page 53 When mowing, it is important to only trim a third of the grass height each time. For example, if the initial grass height is 60 mm/2 in, the cutting height of Yuka should be set to 40 or 45 mm/1.6 or 1.8 in.
- Page 54 IMPORTANT For initial use of Yuka, we strongly advise setting the cutting height to above 50 mm/2 in. Adjust the cutting height by manually pressing down and turning the PUSH button on Yuka before mowing. To start mowing 1.
- Page 55 Perimeter laps only Yuka will mow/sweep the perimeter grass only. Zigzag path Yuka will work in straight rows. Yuka will work in straight rows both horizontally and Chess board path vertically. The task area will be divided into segments for efficient Adaptive zigzag path working.
- Page 56 Obstacle obstacles by sensors and bypass the obstacles detecting mode after a collision of front bumper. Level 2: Yuka will slow down and bypass the obstacles after detecting obstacle by sensors. The mowing circles at the perimeter. Perimeter *In the perimeter laps only mode, the mowing laps perimeter mowing laps cannot be set 0.
- Page 57 Yuka should return to an area covered by RTK signals before the momentum reaches 0, otherwise, Yuka will come to a stop. Schedule With the Schedule function, you can set a regular task and Yuka will automatically do its work according to your setting. Now — Yuka will commence work promptly upon ...
- Page 58 To set a schedule NOTE The task schedule adding is temporarily disabled when Yuka is working. A schedule can be set after a task area has been created. 1. Click + on the main page. 2. Click + at the bottom start settings.
- Page 59 To change/delete a schedule 1. Click on the schedule you set to open the drop- down menu. 2. Toggle the button to off to inactivate the schedule if needed. 3. Select Run now to run this schedule immediately. 4. Click Edit to directly change the schedule. Or 5.
- Page 60 Manual mowing To ensure your safety, please use this function with care and observe the following: Minors are not permitted to use this function; Please always supervise your children, pets and important belongings to prevent accidents; Take extra care when using the manual lawn mower function to avoid injury. To activate Manual mowing 1.
- Page 61 1. On the Map page, select Manual. 2. Click Sweeping. 3. Maneuver forwards/backwards or turn left/right to start working. FPV mode This mode allows Yuka to activate the camera. 1. Clean the vision camera 2. Switch camera 3. Switch to map page - 57 -...
- Page 62 Cellular strength Positioning status Yuka battery status Click the status bar to show the following details. Positioning status — shows the strength of positioning. Fix — fine positioning status with an accuracy of less than 10 cm/4 in, up to 2 cm/1 in with a good open-sky area.
- Page 63 station. Weak or Bad — indicates that the Yuka is too far from the RTK reference station or that there are thick walls or buildings obstructing the signal. None — indicates there is no connection between the RTK reference station and Yuka. Without the data from the RTK reference station, RTK positioning cannot be accomplished.
- Page 64 Confirm that the radio antenna has been installed. Re-pair the RTK reference station and Yuka to see if it can be fixed. If you replace the RTK reference station, pair the new station with Yuka on the Mammotion app. For more details, visit https://mammotion3006.zendesk.com/hc/en-us/articles/16503733641367...
- Page 65 Satellite (Yuka): 0 Satellite (Co-viewing): L1:0, L2:0 Positioning status: None Measures: Check whether the Yuka is inside or if its rear is covered with metal. If the Yuka is faulty, please contact our after-sales team at https://mammotion3006.zendesk.com/hc/en- us/requests/new?ticket_form_id=13773144519703 ...
- Page 66 Simply click on Chat to Agent to start a conversation with one of our representatives. 4.6.6 Track your devices In the case that your Mammotion robot or RTK reference station is missing, go to Service page to track your equipment.
- Page 67 4.6.7 Notification Information regarding the status, any errors, etc. will be displayed in the notification section. Click the upper-right corner to check the historical records. 4.6.8 Settings Click to enter the Settings page. - 63 -...
- Page 68 Task record — shows the historical tasks which were completed and uncompleted. Feedback — click to send your issues and logs to Mammotion to target. You can attach a maximum of 5 images and 1 video. - 64 -...
- Page 69 Manual operation for details. No mowing on rainy days — when you enable this function, the Yuka will not mow if it rains. Vision module wiper — click to clean the vision module. Turnaround mode — Zero turn and Multi-point turn.
- Page 70 To reset/change the RTK pairing code The first RTK pairing code is read from the Yuka. To link a different RTK reference station, access Settings, go to RTK pairing, select Change, then enter the LoRa number found on the RTK reference station nameplate and click Confirm to update it.
- Page 71 When performing recharge function, Yuka must be in the task area. The Recharge button allows Yuka to return to charge. To perform recharge Click in Mammotion app, or Press the button on the Yuka, then press START to guide Yuka to the charging station. - 67 -...
-
Page 72: Service
Winter Maintenance — click to access the winter maintenance details. After-sales Support — click to submit your request. About Us — click to access more information about Mammotion. Frequently Asked Questions — shows common questions and answers. - 68 -... - Page 73 Forum — click to go to forums. After-sales Support — click to submit your request. Store — click to go to Mammotion mall. Alexa — click to link your Alexa account. - 69 -...
- Page 74 Prior to starting a job using voice control, it is necessary to have created at least one task beforehand. In cases where more than 2 sets of Yuka are linked to the same Mammotion account, the voice command will be directed to the most recently bound Yuka by default.
-
Page 75: Maintenance
Make sure the cutting blade discs are clean and will not get struck. If Yuka is stored for a long time, it will be better to add anti-rust oil on the cutting blades after cleaning. ... -
Page 76: Product Specifications
Product Specifications Technical Specifications Table 6- 1 Technical Specifications YUKA Parameters 1000 1500 2000 600 m 1,000 m 1,500 m 2,000 m Max. Mowing Size 0.15 acres 0.25 acres 0.37 acres 0.5 acres In-App Area 750 m 1,200 m 1,800 m... - Page 77 Charging Station: IPX6 RTK Station: IPX7 Rain Detection Weight 15.6 kg/34.4 lbs. Dimensions (L x W x H) YUKA robot: 648 x 519 x 330 mm/25.5 x 20.4 x 13 in. Warranty 2 years Table 6- 2 Sweeper Specifications Parameters Specifications Dimensions (L x W x H) 650 x 420 x 390 mm/25.6 x 16.5 x 15.4 in.
- Page 78 Table 6- 3 Battery Specifications YUKA Parameters 1000 1500 2000 TS-A090-3003001 Battery charger Input: 100-240V~, 50/60Hz, 2.0A Output: 30Vdc, 3.0A, 90W Battery pack 21.6Vdc, 4.5Ah Battery capacity 4.5Ah Temperature range for charging is 4-45 °C / 39-113 °F. Too high temperatures might cause damage to the product.
-
Page 79: Led Indicator Codes
Description System initialization Manual control mode Constant green Automatic work mode Charging finished (Yuka still on the charging station) Breathing green OTA upgrade in progress Slow flash green Charging in progress Slow flash red Emergency stop activated ... - Page 80 Table 6- 5 Charging Station's Indicator Description Indicator Status Description Flash green Yuka is being charged. Constant green Yuka is fully charged or uncharged. Charging Station Indicator Constant red An error has occurred. Table 6- 6 RTK Reference Station Indicator Description Indicator Status...
-
Page 81: Fault Codes
This process may take overheating. several minutes. The sensor for the left cutting disk Restart Yuka. If the issue persists after a few motor has failed. times of restart, contact the after-sale team. Check if the cutting disk is jammed and clear it The right cutting disk motor is if necessary. - Page 82 Fault Codes Causes Solutions Charging has been stopped due to Restart Yuka. If the issue persists after a few 2713 low battery voltage. times of restart, contact the after-sale team. Stop charging immediately. If overcharging 2726 The battery is overcharged.
-
Page 83: Warranty
Warranty Shenzhen Mammotion Innovation Co., Ltd warrants that this product will be free from material and workmanship defects under normal use in accordance with the product materials published by Mammotion during the warranty period. The published product materials include but not limited to user manual, quick start guide, maintenance, specifications, disclaimer, in-app notifications, etc. - Page 84 Mammotion factory for further diagnosis. Mammotion will repair or replace and send back to users at no cost if the problem falls under the warranty. If not, Mammotion or designated service center may charge a fee accordingly.
-
Page 85: Compliance
Compliance FCC Compliance Statements This device complies with Part 15 of the FCC Rules. Operation is subject to the following two conditions: (1) this device may not cause harmful interference, and (2) this device must accept any interference received, including interference that may cause undesired operation. Caution: Changes or modifications not expressly approved by the party responsible for compliance could void the user’s authority to operate the equipment. - Page 86 ISED Compliance Statements This device contains licence-exempt transmitter(s)/receiver(s) that comply with Innovation, Science and Economic Development Canada’s licence-exempt RSS(s). Operation is subject to the following two conditions: (1) This device may not cause interference. (2) This device must accept any interference, including interference that may cause undesired operation of the device.
- Page 87 SHENZHEN MAMMOTION INNOVATION CO., LTD www.mammotion.com Copyright © 2024, MAMMOTION All Rights Reserved.
Need help?
Do you have a question about the YUKA and is the answer not in the manual?
Questions and answers
Hi! Is there a way to duplicate a map area? For example if I have an area for sweeping only with dump spots inside the area. Is it possible to create a copy of that area that would be for mowing only and I could edit it and remove the dump spots so those spaces can be mowed? If not, then can you add to a future firmware upgrade that if "Mow" is selected the dump spots would be ignored instead of mowing around them?
No, the MAMMOTION YUKA does not support duplicating a map area for mowing. If you attempt to create another map in the same area, the app requires you to delete an existing one first.
This answer is automatically generated
Hallo , ik maai met een Yuka mini 800 . ik heb het idee dat op sommige plaatsen waar grote planten in de border staan , de Yuka verder van de kant maait , de obstakel beveiliging staat op normaal , echter die instelling kan ik niet meer vinden , weet iemand waar je dat vind bvd