
Related Manuals for Watlow PM Plus


Summary of Contents for Watlow PM Plus
- Page 1 Watlow PM Plus Programming Guide Forced Air and Vacuum Ovens Last Revised: Feb 13, 2024 Part Number (Guide): 4112036 P a g e...
-
Page 2: Table Of Contents
TABLE OF CONTENTS INTRODUCTION ....................... 3 PM Plus Panel ............................4 Profile Elements ............................5 Power and Memory ........................... 5 Event Parameters............................6 PROFILE EXAMPLE ....................7 Simple Heating Recipe Profile Example ....................7 How to use programming directions......................8 Navigate to the Profile Page ........................ -
Page 3: Introduction
INTRODUCTION The Watlow PM Plus controller included with your oven enables the programming of profiles and sequences to automate the baking process, including the activation and deactivation of blowers or valves. This guide offers details tailored to your specific oven. For comprehensive guidance on using this controller, please refer to Watlow's website to download additional manuals and resources as needed. -
Page 4: Pm Plus Panel
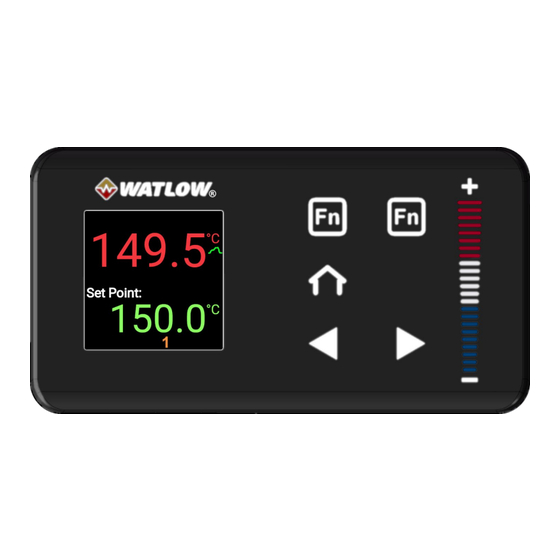
INTRODUCTION PM P ANEL Right Function Left Function Indicator Button Indicator Button Chamber Temperature Setpoint Heat On Event 1 On Profile Active Indicator The Home button allows immediate navigation back to the home screen, where it displays the current temperature and the set temperature. -
Page 5: Profile Elements
The controller contains a wider range of steps than those covered in this manual. We will concentrate on three specific steps detailed below. For additional details on other "Step Types," please consult the user manual for Watlow's controller. Step Types:... -
Page 6: Event Parameters
INTRODUCTION VENT ARAMETERS Some models do not support events, if yours does not this section will not apply. Depending on the model type, the oven may be provided with one of the following: • Power Outlet Control, intended for powering an accessory exhaust blower fan mounted on the oven exhaust vent. -
Page 7: Profile Example
PROFILE EXAMPLE IMPLE EATING ECIPE ROFILE XAMPLE Step 1: Type: Time - Ramps the oven up to 150°C over a 1-hour period • Step 2: Type: Soak - Runs the oven at 150°C for 4 hours • Step 3: Type: End - Terminates the profile and returns the oven to manual user control •... -
Page 8: How To Use Programming Directions
PROFILE EXAMPLE OW TO USE PROGRAMMING DIRECTIONS Each row will have up to 3 instructions for the operator to follow. Each instruction will have the following elements. 1) Text instruction Select is used to choose a menu Use the (+/-) bar on the item from the list on the screen control panel to make these changes... -
Page 9: Navigate To The Profile Page
PROFILE EXAMPLE AVIGATE TO THE ROFILE Start at Home Select Profile Select Profile 1 Step This screen allows you to choose any of the four available profiles to configure your steps. “P 1”, “S 1” ETUP ROFILE Select Step 1 Set Step Type Step Type = Time Hours = 1... -
Page 10: Setup "Profile 1", "Step 2
PROFILE EXAMPLE 1 “P 1”, “S 2” ETUP ROFILE Select Step 2 Set Step Type Step Type = Soak Hours = 4 Minutes = 0 Seconds = 0 Event 1 = Off Event 2 = Off “P 1”, “S 3” ETUP ROFILE Select Step 3... -
Page 11: Launch Profiles / Steps
LAUNCH PROFILES / STEPS 1 & 2) UICK AUNCH UNCTION UTTONS ROFILE Profile 1 (Step 1) can be fast launched on the Homepage using the left (Fn) Button and Profile 2 (Step 11) can be fast launched using the right (Fn) button. 1. -
Page 12: How To Start [Profile 1 (Step 1)]
LAUNCH PROFILES / STEPS 1 (S OW TO TART ROFILE Start at Home Select Profile Status Select Profile Start Profile Start = 1 Select Step Return to Home 2 (S 11)] OW TO TART ROFILE Start at Home Select Profile Status Select Profile Start Profile Start = 11 Select Step... -
Page 13: How To Start [Profile 3 (Step 21)]
LAUNCH PROFILES / STEPS 3 (S 21)] OW TO TART ROFILE Start at Home Select Profile Status Select Profile Start Profile Start = 21 Select Step Return to Home 4 (S 31)] OW TO TART ROFILE Start at Home Select Profile Status Select Profile Start Profile Start = 31 Select Step... -
Page 14: Combining Profiles
COMBINING PROFILES Profiles may be combined by configuring steps sequentially as a single profile. For example, programming steps 1 – 14 sequentially and choosing the End Option for Step 14 causes Profile 1 to run through all 14 steps when launched. Launching Profile 2 in this configuration would only run Steps 11 –... -
Page 15: Aborting Programs
ABORTING PROGRAMS BORTING A UNNING ROFILE Left Right The left function (Fn) button can be used to abort an active profile. Push the button once to abort Profile 1 if it was launched using the left (Fn) quick • launch function. Push the button twice to abort any programs launched from the Profile Action page.
Need help?
Do you have a question about the PM Plus and is the answer not in the manual?
Questions and answers