Table of Contents

Related Manuals for XIEGU X6200


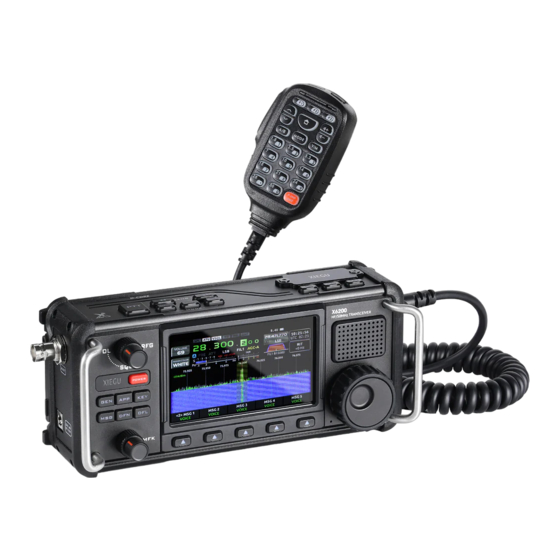
Summary of Contents for XIEGU X6200
- Page 1 X6200 HF/50MHz Ultra-Portable Transceiver User Manual V0.1 The X6200 is available in France from Passion Radio : https://www.passion-radio.com/hf-transceiver/x-6200-2722.html Copyright 2024 XIEGU / Weisheng Communication / Passion Radio...
- Page 2 In addition, X6200 possesses all the characteristics of a super portable device, making it easy to carry outdoors or while traveling. Its compact design and portability allow users to listen to their favorite signals at any time and any place, making the use of transceivers freer and more flexible.
- Page 3 On/Off prompt! The startup and shutdown operations of X6200 require some time, please read the following startup and shutdown instructions carefully and pay attention to the operating methods: Startup: Short press the power switch button until the logo light turns green, then release the power button and wait for the system to start up.
-
Page 4: Table Of Contents
CONTENTS Precautions Safety precautions ........................6 Operation permit ........................7 Battery precautions ........................7 Important tips ..........................7 Electromagnetic interference ....................8 I. Panel Instructions .......................... 8 Front panel ..........................8 Right side ........................... 9 Left side ............................9 Top button ..........................10 Hand microphone button ....................... - Page 5 Connection between X6200 and XPA125B (L4001 Cable) ..........38 Appendix 2 ..........................38 Connection between X6200 and Computer for Data Communication & Control ... 39 Appendix 3 ..........................39 Setting Method for Remote Control of WFSERVER Radio Station End ......40 Parameter Specifications ......................
-
Page 6: Safety Precautions
Safety precautions ■ Do not use this device in lightning weather. Disconnect the power supply and antenna in advance. ■ Do not touch the antenna during the transmission of the device. ■ Do not apply AC power to the DC interface on the side panel of transceiver. Otherwise it may cause fire or damages to the device. -
Page 7: Operation Permit
Operation permit ■ Make sure you have had legal and valid operating certificates or permissions issued by local government departments before making a call on the frequency band of amateur radio. Battery precautions This device contains lithium-ion battery components, so improper use may result in dangers such as smoke, fire or battery rupture. -
Page 8: Electromagnetic Interference
■ Please place the device in a safe and reliable place and keep it away from children or unauthorized persons. Electromagnetic interference It shall be noted when using wireless LAN or Bluetooth devices that when other wireless devices, such as wireless mouse, wireless keyboard and wireless router, work in the same frequency band, they may interfere with each other, resulting in unstable or interrupted connection of the device. -
Page 9: Right Side
Inner circle: adjust frequency (default) Outer circle: adjust power (default) Right side CARD microSD memory card slot. USB port. Accessory interface 10 HOST USB port. Host interface. 11 MIC Hand microphone interface. The interface is of type RJ45. 12 ACC It is a 3.5mm stereo interface. -
Page 10: Top Button
Top button 17 PTT 23 A/B PTT button on device body. Short press: VFOA-VFOB switch button. 18/19 Left and right switch Long press: Set VFOA and VFOB to the same Frequency band/channel increase parameters. and decrease switch. 24 ATU key 20 AM | FM Short press: Open the built-in antenna tuner. -
Page 11: Hand Microphone Button
Hand microphone button Short press to lock/unlock the larger impeller 1. SPCH/LOCK button Transmitting control button 2. PTT button Frequency step +/- under VFO mode; previous/ next channel 3. Up/down under channel mode 4. Transceiver indicator Hand microphone operation indicator light light Waveband direct access/numeric keyboard area 5. -
Page 12: Connection Of Key Port
Power supply wiring 9~15V external DC power supply can be used for X6200. The current load capacity of DC power supply shall be at least 3.5A. Attached power lines can be used to connect to radio and DC power supply. -
Page 13: Charging
AC terminal of the charging adapter into the mains power supply and the output terminal into the DC interface on the left side of the X6200, and the turn on the charging switch in the menu of SETTING 1 to charge the internal battery. The charging process shall be kept continuous until the charging instruction indicates it has been completed. -
Page 14: Operation Of Mfk Knob
Outer circle function: select different function options. Select language The display interface of X6200 supports Chinese and English languages, and users can choose the corresponding language according to their needs. Set methods: 1. The default startup interface is English. Press [SYSTEM] key in a short time to enter the system setting. -
Page 15: Function Description Of Each Area On The Main Interface
1. Rotate the inner circle of MFK, select the desired language, press the corresponding [OK] button at the bottom of the screen to complete the setting, and press [EXIT] to exit the current interface. As shown in the figure below: Simplified Chinese Function description of each area on the main interface... -
Page 16: Basic Operation
8. Main VFO frequency display area Basic Operation Turn on/off radio Operation method: 1. Press the power button until the XIEGU icon is displayed on the screen. Release the power button and wait for the system to start up. 2. Press the power button until the screen turns black and there is no display. -
Page 17: Set Operation Frequency
3. Set frequency by multi-function hand microphone: Press [F-INP ENT] key on hand microphone, and the X6200 will be in frequency setting state, and cursor will be flickering at the first place on the left of frequency display position;... -
Page 18: Ssb/Am/Nfm Mode Transmission
3. Release the PTT button to return to the receiving state. Transmit in CW mode Insert the KEY interface on the right side of the X6200 with a manual key or an external keyer. (see Page 10 for the definition of wiring) Operation method: 1. -
Page 19: Automatic Antenna Tuner
Automatic antenna tuner There is an efficient ATU integrated inside the X6200 radio to help you quickly erect and debug antenna. 1. Press [ATU] key in a short time to connect with built-in antenna tuner. There will be an antenna icon at the top of screen. -
Page 20: Lock Button
The adjustment parameters are displayed in the numeric part of the Function menu tab. ■ The X6200 can display both English and Chinese interfaces. The following operation steps will be explained with an English interface. -
Page 21: Gen Function Operation
GEN function operation After short pressing the [GEN] key, the Default menu will appear at the bottom of the screen, as shown in the following figure: Menu line Short press the key corresponding to [SETTING1] to enter the "General Setting 1" submenu, as shown in the following figure: Operation method: 1. - Page 22 Menu functions are defined as follows: SPLE HANDLE F1 HANDLE F2 Split frequency Hand microphone Hand microphone Receiving offset Emission offset transmission and F1 key setting F2 key setting reception DISPLAY menu Short press the key corresponding to [DISPLAY] to enter the "Display Setting" submenu, as shown in the following figure: Menu functions are defined as follows: RF FFT AVE...
-
Page 23: System Menu
SYSTEM menu Short press the key corresponding to [SYSTEM] to enter the "System Setting" submenu, as shown in the following figure: Language Settings Menu functions are defined as follows: SYSTEM FIRMWARE TIME SETTING WLAN BLUETOOTH INFO UPGRADE System Time setting Firmware upgrade Wireless network Bluetooth... -
Page 24: App Function Operation
1. Short press [SAVE VFO] to save the current frequency, mode, etc. into a blank channel. As shown in the figure below: 2. Short press [TAG] to name the current channel. 3. Short press [MARK] to mark the current channel, and the symbol of a small house will be displayed on the channel tag. -
Page 25: Automatic Sending Of Preset Information Under Modem
MODEM menu Short press the corresponding key of [MODEM] to enter the sub-menu of the "Modem", as shown in the figure below: Automatic message decoding display area The submenu <1> is defined as follows: MODE FC/TONE RATE/SPEED Select <1> Carrier/side tone RTTY/CW/BPSK Baud rate/code rate frequency... -
Page 26: Swr Scan Standing Wave Scanner Operation
2. Press the corresponding tag, X6200 will start sending the preset text information in the tag in the mode (CW, PSK, PTTY) selected by MODEM until the sending of information is completed. -
Page 27: Recording Automatic Call
Recording automatic call X6200 has a built-in recording caller, which can record and store the call voice in the machine in advance, and the stored voice can be used for call transmission. Operation sequence:... -
Page 28: Key Function Operation
■ For the recording method of voice messages, see the relevant operation chapter of "MSG" key. KEY function operation Short press [KEY] to enter the menu of KEY items, as shown in the figure below: The function of menu <1> is defined as follows: KEY TYPE KEY SPEED IAMBIC... - Page 29 Preset message list X6200 can pre-store 5 preset messages. These messages can be used for automatic transmission of CW, RTTY and BPSK. Click any MGS label to enter the editing interface, as shown below: Icon function Virtual Exit Save and exit...
-
Page 30: Voice Recording
Press [MSG] again to enter the voice recording menu page on the second page of MSG options: Preset recording list X6200 can pre-store 5 voice messages. These messages can be used for automatic transmission of voice mode. Click any MSG label to enter the editing interface, as... -
Page 31: Dfn Function Operation
shown below: Icon function Stop Exit Record Play Recording operation method: Pick up the hand microphone and keep it about 5~10cm away from the lips. Press the "Record" key and start speaking at a normal volume until the speech is finished. -
Page 32: Dfl Function Operation
1. Short press [DFN] to enter the menu on the first page of DFN options, as shown below: The function of menu <1> is defined as follows: NR DEPTH NB WIDTH NB LEVEL Noise reduction Noise reduction Pulse suppression Pulse noise width Pulse noise level switch depth... - Page 33 Short press [DFL] to enter the DFL option menu, as shown below: Operation method: 1. Select any filter from FILTER1~3 to enter. 2. Short press the MFK knob to switch and select different filter edges (red or blue trapezoidal box). The blue trapezoidal box is the high-cut filter (H-CUT), and the red trapezoidal box is the low-cut filter (L-CUT).
-
Page 34: Set Time/View System Information/Update Firmware/Restore Factory Settings
As shown in the figure on the right, the filter is acted by L-CUT and H-CUT together to form an effective filter bandwidth. Actual filter L-CUT controls boundary bandwidth frequency and can effectively cut off the low frequency component; H-CUT controls the high boundary frequency and can effectively cut off the high frequency component;... -
Page 35: Set Wireless Network Parameters
1. Rotate the MFK knob, select [FACTORY RESET], press the MFK knob, and select. 2. Read the on-screen prompts and press the "OK" button twice to confirm reset. 3. After the reset is completed, the X6200 will automatically shut down. Manually power on again to complete the reset. -
Page 36: Set Bluetooth Function
EDIT: Edit the element selected by the orange border on the right NEXT: Select the next item with the orange border on the right side EXIT: Exit Operating instructions: 1. When entering the interface for the first time, press the [EDIT] button to turn on the WIFI switch. -
Page 37: Forced Shutdown
The Bluetooth function can be used to connect peripheral devices such as Bluetooth keyboards, Bluetooth mice, or Bluetooth serial ports, for direct input of information, operation of clicks, control, etc. Operation sequence: [GEN]---Via the multi-function key [SYSTEM] at the bottom of the screen, enter the system setting interface, and select the Bluetooth option. -
Page 38: Connection Between X6200 And Xpa125B (L4001 Cable)
XPA125B. Moreover, the ALC control will be built between two machines. When the X6200 output power exceeds the power limit of the XPA125B, the AACL control will automatically decrease the output power of the radio so that the output power of the XPA125B will be constant. -
Page 39: Connection Between X6200 And Computer For Data Communication & Control
The connection method is the same as above, and the port is also connected to the DEV port on the right side of X6200. Once the settings for the N1MM end are configured, the X6200 can be controlled by a PC to send CW telegrams. -
Page 40: Setting Method For Remote Control Of Wfserver Radio Station End
Setting Method for Remote Control of WFSERVER Radio Station Operation method: 1. Rotate the MFK knob, select the [WFSERVER] menu item, press the MFK knob to enter the remote control setting interface, as shown in the following figure, and set according to the information in the figure: 2. - Page 41 Frequency range: Receive: 0.5MHz~30MHz 50.00~54.00MHz 88.0~108.0MHz 108.0~136.0MHz Transmit: 1.8~2.0MHz 3.5~3.9MHz 7.0~7.2MHz 10.1~10.15MHz 14.0~14.35MHz 18.068~18.168MHz 21.0~21.45MHz 24.89~24.99MHz 28.0~29.7MHz 50.00~54.00MHz Working mode: CW, AM, SSB, FM Minimum step: Antenna 50Ω impedance: Operating 0℃~+50℃ temperature range: Frequency ±1ppm in the 10min after startup stability: @25°C: 1ppm/h Power voltage:...
-
Page 42: Packing List
1 copy Certificate of conformity 1 copy (printed on the packaging box label) EU simplified Declaration of Conformity Weisheng Communication / XIEGU, hereby declare that the radio equipment: Make: XIEGU Type: X6200 Trade Name: X6200 Is in conformity with the CE directive RED 2014/53 / EU. - Page 43 XIEGU Wireless Technology, Unlimited Creativity The X6200 is available in Europe from Passion Radio : https://www.passion-radio.com/hf-transceiver/x-6200-2722.html ©Weisheng Communication 2018-2024 Edition Mar 2024 XDC-C01 www.cqxiegu.com The information in this manual may be updated with device firmware upgrades without prior notice. Copyright 2024 XIEGU / Weisheng Communication / Passion Radio...
Need help?
Do you have a question about the X6200 and is the answer not in the manual?
Questions and answers
On the display of the Xiegu 5105, What do the S and Po scales indicate?
Как настроить LogHX3 с X6200