Table of Contents
Advertisement
Digital Wireless Weather Station
OPERATING INSTRUCTION
Base unit: UN0585
Wireless sensor: UN02
If you want to know about our features or support solutions, please let us know! We
really hope that owning an Unni Technology product is not only a practical
experience, but also a pleasure.
Pleaseemail us at: unni_technology@hotmail.com
Advertisement
Table of Contents

Related Manuals for unni UN0585


Summary of Contents for unni UN0585
- Page 1 Wireless sensor: UN02 If you want to know about our features or support solutions, please let us know! We really hope that owning an Unni Technology product is not only a practical experience, but also a pleasure. Pleaseemail us at: unni_technology@hotmail.com...
-
Page 3: Table Of Contents
Catalogue Package included ....................... 3 Technical data ........................3 Base unit ........................3 Wireless sensor ......................3 USB cable ........................4 Product functions ........................ 4 Weather station ......................4 Wireless sensor ......................4 Overview of weather station ..................5 Operating elements and parts of the weather station and wireless sensor ..... 6 How to set up ........................ -
Page 4: Package Included
Package included • UN0585 weather station x 1 • UN02 wireless sensor x 1 • Operating instructions • USB Cord (Length: 5.9Ft) x 1 Technical data Base unit Model: UN0585 Power supply: 3 x LR03 (AAA) / 1.5 V Temperature measuring range: 14.2°F ~ 122°F Resolution: 0.1°F... -
Page 5: Usb Cable
USB cable Power consumption: 5.0V 500mA Power cable: Length: 5.9 Ft Note: With the continuous development and improvement of our products, the design and technology may be changed. Product functions Weather station • Indoor temperature display in °F • Indoor and outdoor humidity display •... -
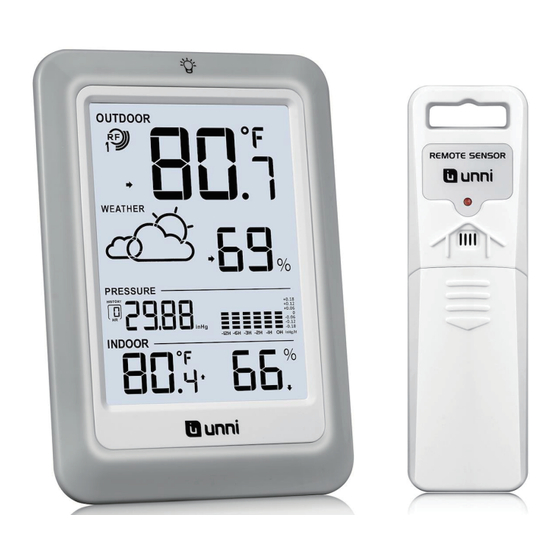
Page 6: Overview Of Weather Station
Overview of weather station 10. Indoor humidity 1. Current channel of outdoor sensor 2. Low battery indicator for outdoor 11. Indoor humidity trend 3. Illumination backlight 12. Max/Min indoor 4. Outdoor temperature temperature/humidity 5. Max/Min outdoor 13. Indoor temperature temperature/humidity 14. -
Page 7: Operating Elements And Parts Of The Weather Station And Wireless Sensor
Operating elements and parts of the weather station and wireless sensor Operating buttons Button WEATHER * Switch degrees Fahrenheit/Celsius * Set mode for weather symbol Button PRESSURE * Switch inHg/hPa * Barometric calibration mode Button HISTORY * View pressure data for the past 1 to 12 hours Button CHANNEL * Display weather data from various wireless sensors ( channel 1.2.3) - Page 8 * Long press to delete and re-record MAX and MIN values in 24 hours Button DOWN * Set values (decrease) Battery compartment Detachable stand Hole for wall mounting Adapter port Red pilot light (Lights up for 1 second only when transmitting data) TX button Sliding switch 1 2 3: Set sensor number (transmission channel)
-
Page 9: How To Set Up
How to set up Insert batteries Insert 2x AA batteries into the wireless sensor. Pay attention to the correct polarity. While the sensor is transmitting, the red LED indicator will flash. 2. Open the battery compartment of the weather station and insert 3xAAA batteries in the correct polarity. -
Page 10: Pairing The Outdoor Sensor With The Weather Station
1.The air pressure unit starts flashing, the default is inHg, you can use the UP or DOWN button to switch the inHg/Hpa system. 2.Press the PRESSURE button to confirm and enter the air pressure value setting. 3.The air pressure value starts flashing. The default is 29.88 inHg which is the air pressure of sea level. -
Page 11: Pressure
PRESSURE History Graph Read from left to right, your Pressure History Graph indicates the rise and fall in air pressure over the past 12 hours. The numbers below represent the hour in which the reading was taken. The “0h” is the current pressure level. -
Page 12: Other Functions
Other functions Daily MAX/MIN data From normal display, press and release the UP button to view: • MAX-- indoor and outdoor temperature/ humidity records. • MIN-- indoor and outdoor temperature/ humidity records. Note: All MAX / MIN temperature/humidity records will reset automatically every 24h. Press and hold the UP button for 3 seconds to clear and record again. -
Page 13: How To Add Extra Sensors
Currently displayed symbol means the forecast for the next 12 hours. It may not reflect the current state of the weather. The accuracy of the weather forecast is around 75 %. Temperature alarm - If the wireless sensor measures a temperature between 33.8 °F and 30.2°F, there is a risk of frost and a snowflake symbol will flash. -
Page 14: Where The Sensor Should Be Placed
Note: You need to set different channels for the sensor (1-3). You can set it through pull the stick on near the batteries. Under the corresponding channel displayed on the base unit, press and hold the CHANNEL button until the signal icon starts to flash to receive the signal from the newly added sensor. -
Page 15: Where The Weather Station Should Be Placed
• In low temperatures in winter the battery performance of the wireless sensors can be significantly reduced. This reduces the transmitter range. Where the weather station should be placed • Pull out the stand and place on a flat surface. •... -
Page 16: Safety
Safety Read the following advice carefully and store these operating instructions in case you want to reread something later. If you give the item to someone else, give them these operating instructions as well. • This device may be used by children over 8 years of age and over, as well as by persons with reduced physical, sensory or mental abilities, or lack of experience and / or knowledge if they are supervised or instructed regarding the safe use of the equipment and have understood the resulting hazards. -
Page 17: Disclaimers
WARNING: Changes or modifications to this unit not expressly approved by the party responsible for compliance could void the user’s authority to operate the equipment. NOTE: This equipment has been tested and found to comply with the limits for a Class B digital device, pursuant to Part 15 of the FCC Rules. -
Page 18: Trouble Shooting
Trouble shooting Problem Possible Solution Outdoor temperature Dashes is generally an indication of wireless is showing dashes interference. a. Shut off the main weather station (take out Replace battery batteries or unplug the power cord). b. Take the batteries out of the outdoor sensor. c. -
Page 19: Warranty And Support
Warranty and support Unni Technology, Ltd. provides a 1-year limited time warranty (from date of purchase) on this product relating to manufacturing defects in materials & workmanship. Before returning a product, please contact our friendly customer support with questions: Unni_technology@hotmail.com...
Need help?
Do you have a question about the UN0585 and is the answer not in the manual?
Questions and answers
why is there a a usb cable included with this product?
The USB cable is included with the Unni UN0585 product for power connection. It allows the device to be connected to a properly installed power socket, ensuring continuous operation. Users must ensure the socket corresponds to the technical data and that the cable is fully uncoiled before use to prevent damage.
This answer is automatically generated
How do I adjust the brightness?
If the Unni UN0585 weather station is powered by a USB cable, you can adjust the backlight brightness to HI, LOW, or OFF by pressing the LIGHT/SNOOZE button. If the station is operating on batteries only, the backlight will turn off after 10 seconds, but you can press the LIGHT/SNOOZE button to activate it again.
This answer is automatically generated
what does the TX button do?
Can I have more than one UNNI base station reading from 1 UNNI sensor?