
Related Manuals for TP-Link Kasa KS240


Summary of Contents for TP-Link Kasa KS240
- Page 1 User Guide Smart Ceiling Fan Control and Dimmer Switch © 2024 TP-Link 1910013617 REV1.0.0...
-
Page 2: Table Of Contents
Contents About This Guide ···················································· 1 Introduction ······························································· 2 Appearance ······························································· 3 Wire Your Switch······················································ 5 Before You Start ····················································· 5 Wire Your Switch······················································ 6 Set Up Your Switch via Kasa ···························10 Set Up Your Switch via HomeKit ···················11 Use Your Smart Switch ······································13 Manage Device Settings ··································20 Remove Your Device ···········································26 Authtication ······························································28... -
Page 3: About This Guide
Hyperlinks are in teal and underlined. You can click to redirect to a website. More Info • Operating temperature, storage temperature, and other specifications can be found on the product page at https://www.tp-link.com. • Our Technical Support and troubleshooting information can be found at https://www.tp-link.com/support/. -
Page 4: Introduction
Introduction KS240 is a 2-in-1 Smart Ceiling Fan Control and Dimmer Light Switch. Adjust fan speed and dim your lights from anywhere with smart- phone using the Kasa Smart app. • Smooth Dimming - Set the optimal brightness of your lights for the perfect ambiance. Smoothly illuminate or dim your lights with the Fade On/Off feature. -
Page 5: Appearance
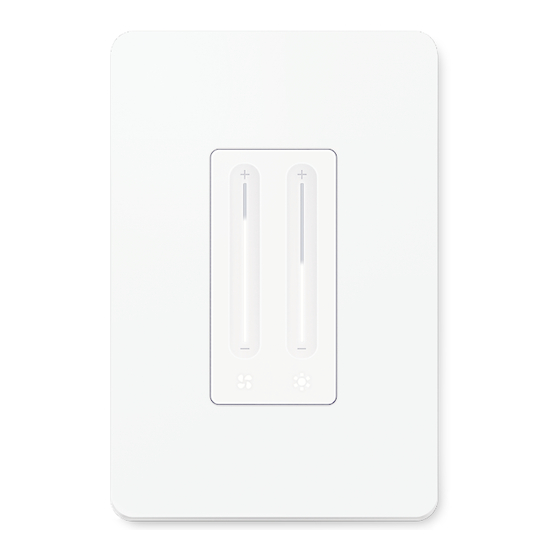
Appearance The Smart Ceiling Fan Control and Dimmer Switch includes a fan speed bar, a fan LED/button, brightness bar, a light LED/button, and a Restart button. See the explanation below: Slide to adjust the fan speed. Restart Button Slide to adjust the lighting brightness. Buttons: Touch to turn on/off the fan/light. - Page 6 LED Status Starting up; Solid red Disconnected from Cloud. Ready for setup. Blinking red & white slowly Connecting to Wi-Fi. Blinking white quickly Connected to Cloud. Solid white Blinking red slowly Disconnected from Wi-Fi. Blinking red quickly Restoring to factory default settings. Blinking red &...
-
Page 7: Wire Your Switch
Wire Your Switch Follow the steps below to wire your Smart Ceiling Fan Control and Dimmer Switch. If you are not familiar with basic electronical wiring, please consult an electrician. Before You Start 1. Prepare Baisc Knowledge of Wiring • For optimal fan performance, please manually adjust the fan speed to the highest settings with the independent speed control (e.g., pull chain) of your •... -
Page 8: Wire Your Switch
Wire Your Switch Step 1. Turn Off Power and Remove the Wallplate Step 2. Pull out the Old Switch Turn off the light and fan of the old switch and turn off the circuit Unscrew the old switch and pull it out. Use a voltage detector to breaker. - Page 9 2) Use a voltage detector to identify the energized wire (Line wire). and label them with the provided wire labels. Note: If you find more than one wire is energized, please refer to: https://www.tp-link.com/support/faq/3682/ 3) Take a photo of the old switch wiring conditions for later reference.
- Page 10 Step 5. Identify the Load Wires Step 6. Remove Old Switch 1) Turn on your light switch, turn off your fan switch, and turn on the Disconnect all wires from the old switch, and connect them to the circuit breaker to see that your light is working. smart switch as below.
- Page 11 Step 7. Install Smart Switch Line up the smart switch with the mounting holes. Secure it with screws. Ensure the UP arrow on the back of the wallplate points up and attach the wallplate. Then turn on the circuit breaker.
-
Page 12: Set Up Your Switch Via Kasa
Follow the steps below to set up your smart dimmer switch via Kasa Smart app. 1. Install Kasa Smart app 2. Log in or sign up with TP-Link ID 3. Add Device Get the Kasa Smart app from Google Play or... -
Page 13: Set Up Your Switch Via Homekit
Set Up Your Switch via HomeKit Before You Start • Your iPhone/iPad should be connected to a stable 2.4 GHz Wi-Fi network with internet access. • Ensure your iPhone/iPad, HomeKit device, and Apple home hub* (if any) are connected to the same Wi-Fi network. *The hub like HomePod, HomePod mini, and Apple TV helps control your HomeKit devices remotely, share the devices with others, and automate your devices to do tasks for you. - Page 14 • Creating a new home in the Home app can greatly help set up your smart device. • You can visit https://www.tp-link.com/support/faq/3390/ or scan the QR code below for more troubleshooting instructions. Scan QR Code Contact us at https://www.tp-link.com/support...
-
Page 15: Use Your Smart Switch
Use Your Smart Switch After setup, your Smart Switch will be listed on the Home page. You can tap your device to manage it. 1. Home Page 2. Status Page Your can turn on or off your device on the Home page. Tap your fan control or light switch to enter its Status page. - Page 16 3. Standard Mode VS Sleep Mode 4. Adjust fan speed. Standard Mode: Normal working status for the fan. Go to the Status page. You can change fan speed when working on Standard Mode. In Sleep Mode, adjusting the speed or turning off the Sleep Mode: Automatically switches to a gentle fan speed after a fan will disable Sleep...
- Page 17 5. Adjust lighting brightness. Change light brightness from 1% to 100%. You can also set brightness presets here.
- Page 18 6. Set schedules for the fan/light. Fan schedule: Adjust speed or turn on/off the fan at set times. Light schedule: Adjust brightness or turn on/off the light at set times.
- Page 19 7. Set Timer for the fan/light. Fan Timer: Turn on/off the fan, adjust fan speed, or enter Sleep Mode, after a set time. Light Timer: Turn on/off the light after a set time.
- Page 20 8. Set Away Mode for the light. With Away Mode, the light will turn on/off automatically at random intervals while you are away to make the appearance that someone is at home.
- Page 21 9. Check Runtime of the fan/light. Fan Runtime: Check runtime of the fan. Light Runtime: Check runtime of the light.
-
Page 22: Manage Device Settings
Manage Device Settings Tap the gear icon on the Status page of the fan or the light to enter the Device Settings page. - Page 23 1. Edit device name and icon. 2. Set light brightness presets. You can edit the device name and icon for the fan/light. Set preset brightness levels so you can switch to the desired brightness with just one tap. The presets will appear on the Status page of the light.
- Page 24 3. Set default state for your Smart Switch. 4. Set fade on/off for the light. Set the default state your Smart Switch will turn to when it is Set the fade on/off time for the light to reduce the strain on your eyes. turned on from the app or the power source.
- Page 25 5. Control your device LEDs. 6. Calibrate your Smart Switch. Set when to turn on your device LEDs and the brightness. Calibrate your device to better dim your light.
- Page 26 7. Set Sleep Mode for the fan. 8. Check Groups that your Smart Switch is in. Set the interval for your fan to gradually lower its speed on Sleep Check whether your device is added to a group with other devices for Mode.
- Page 27 9. Check Homekit setup code. 10. Add to Home You can check the HomrKit setup code and save the code to Add your device to your Apple Home app. add your device to your Apple Home app anytime.
-
Page 28: Remove Your Device
Remove Your Device You can remove your device from the Kasa Smart app on the Home page or on the Device Settings page, or by pressing the fan/light button of your device. Home Page Device Settings Page Remove Device. The whole device will be removed. Long press the fan or the light and then tap . - Page 29 Press the fan/light button Press and hold the fan or light button for at least 10 seconds to restore factory default settings.
-
Page 30: Authtication
Authtication FCC compliance information statement Product Name: Smart Ceiling Fan Control and Dimmer Switch Model Number: KS240 Responsible party: TP-Link USA Corporation Address: 10 Mauchly, Irvine, CA 92618 Website: http://www.tp-link.com/us/ Tel: +1 626 333 0234 Fax: +1 909 527 6804 E-mail: sales.usa@tp-link.com... - Page 31 We, TP-Link USA Corporation, has determined that the equipment shown as above has been shown to comply with the applicable technical standards, FCC part 15. There is no unauthorized change is made in the equipment and the equipment is properly maintained and operated.
- Page 32 Canadian Compliance Statement This device contains licence-exempt transmitter(s)/receiver(s) that comply with Innovation, Science and Economic Development Canada’s licence- exempt RSS(s). Operation is subject to the following two conditions: (1) This device may not cause interference. (2) This device must accept any interference, including interference that may cause undesired operation of the device. L’émetteur/récepteur exempt de licence contenu dans le présent appareil est conforme aux CNR d’Innovation, Sciences et Développement économique Canada applicables aux appareils radio exempts de licence.
- Page 33 • Keep the device away from water, fire, humidity or hot environments. • Do not attempt to disassemble, repair, or modify the device. If you need service, please contact us. • Do not use the device where wireless devices are not allowed. •...
- Page 34 Symbol Explanation Polarity of output terminals Indoor use only Dangerous voltage Caution, risk of electric shock Energy efficiency Marking Protective earth Earth Frame or chassis Functional earthing Caution, hot surface Caution Operator’s manual...
- Page 35 Symbol Explanation Stand-by “ON”/”OFF” (push-push) Fuse Fuse is used in neutral N RECYCLING This product bears the selective sorting symbol for Waste electrical and electronic equipment (WEEE). This means that this product must be handled pursuant to European directive 2012/19/EU in order to be recycled or dismantled to minimize its impact on the environment.
Need help?
Do you have a question about the Kasa KS240 and is the answer not in the manual?
Questions and answers
I have a 3 speed fan controlled by a pull chain. What setting should I leave the fan speed on when I install the Kasa fan switch? Does it matter?
When installing the TP-Link Kasa KS240 fan switch on a 3-speed fan controlled by a pull chain, set the fan's pull chain to its highest speed.
This answer is automatically generated