Table of Contents
Advertisement
Quick Links
Advertisement
Table of Contents

Related Manuals for GardePro T5NG


Summary of Contents for GardePro T5NG
- Page 1 T5NG Trail Camera INSTRUCTION MANUAL V1.1...
- Page 2 Congratulations on your purchase of one of the best trail cameras on the market! We appreciate your business and want to earn your trust. Please refer to the notes below and the instructions in this manual to ensure that you are completely satisfied with this product.
-
Page 3: Table Of Contents
TABLE OF CONTENT 1. IN THE BOX ..............1 2. IMPORTANT NOTE ............1 3. INTRODUCTION ............2 3.1. ABOUT THE CAMERA ........2 3.2. MAIN FEATURES ..........2 4. PARTS AND CONTROLS ..........3 5. INSTALLING THE BATTERIES AND SD CARD ..7 5.1. -
Page 4: In The Box
1. IN THE BOX 1 x Camera, 1 x Mounting Strap, 1 x Instruction Manual, 1 x Mini USB Cord Note: Memory card and batteries are not included (user supplied). 2. IMPORTANT NOTE Require eight (8) 1.5V AA Alkaline or Lithium batteries. We recommend the use of Energizer AA Lithium batteries in this camera to obtain maximum battery life. -
Page 5: Introduction
3. INTRODUCTION 3.1. ABOUT THE CAMERA The GardePro T5NG trail camera is a new generation of digital scouting camera, it can be triggered by any movement of game in a location, detected by a highly sensitive Passive Infra-Red (PIR) motion sensor, and then take high quality pictures (up to 32MP still photos), 1296P 20fps or 1080P 30fps H.264 video clips with audio. -
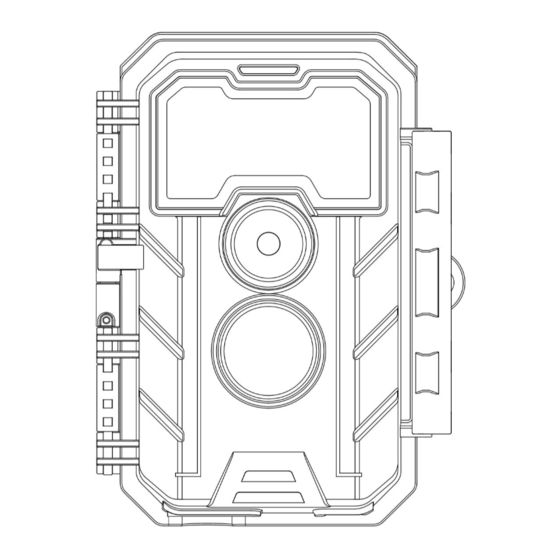
Page 6: Parts And Controls
Fast trigger time - approx. 0.2s, Fast recovery time - 0.5s, Long trigger distance up to 90ft, Detection Angle - 70°. Info strip on each capture: Date, Time, Temperature & Moon phase. Operation hours, Loop recording, Password protected. ... - Page 7 Light IR LEDs Sensor Indicator Optical Lens Lock Hole Lens Lock Buckle Figure 1: Front View...
- Page 8 The camera provides the following connections for external devices: Mini USB port and SD card slot etc. (Figure 2). Tripod Base SD Card 1/4" - 20 Holder DC 12V/1A Microphone Plug 5.5x2.1mm Mini USB Port Figure 2: Bottom View The camera has one security cable hole and two strap holes on the back.
- Page 9 and operation, 8 AA batteries slot supported (Figure 4). Color Battery Screen Compartment and Cover Operation Buttons Figure 4: Inside View Surveillance Mode Power Switch Figure 5: Operation Buttons A power switch is used to power on (ON mode) or off the camera (OFF mode).
-
Page 10: Installing The Batteries And Sd Card
5. INSTALLING THE BATTERIES AND SD CARD Before you begin learning how to use your camera, you will first need to install a set of batteries and insert an SD card. Although that may only take you a minute, there are some important notes about both batteries and SD cards you should be aware of, so please take the time to read the following directions and cautions:... -
Page 11: Inserting The Sd Card
Figure 6: Loading the Batteries 5.2. INSERTING THE SD CARD Insert the SD card (with the camera powered off), before beginning to operate the camera. Don't insert or remove the SD card when the camera is powered on or in the surveillance mode (Figure 7). -
Page 12: Using The Camera
card is not installed correctly, the device will not display an SD card icon on the screen in ON mode. Formatting the SD card by using the camera's "Format SD Card" menu option before first use is recommended, especially when a card has been used in other devices. To take out the SD card, just gently push in the card (do ... -
Page 13: The Off, On, And Surveillance Modes
7. THE OFF, ON, AND SURVEILLANCE MODES The camera has three basic operational modes: OFF mode: Power switch in the OFF position (The camera is powered off). ON mode: Power switch in the ON position (The camera is powered on and its screen is on). SURVEILLANCE mode: When the camera is powered ... -
Page 14: Surveillance Mode
that shows how many images have been taken, the battery level, camera or video mode, etc. Attention please: In the ON mode, the camera will automatically enter SURVEILLANCE mode if there is no operation (key pressing) within 5 minutes. Then the camera will perform as your settings in the menu. - Page 15 enter/exit the menu. Press the UP/DOWN key to move the marker, Press the LEFT/RIGHT key to change the setting, and press the OK key to confirm the change. Always remember to press the OK to save the change. Otherwise you will lose your new setting. Settings Description Parameter...
- Page 16 Select video recording length. seconds, Note: It is highly recommended to set Video Optional the night video length to less than 30 Length from seconds as the IR LEDs will consume 3s to 5m more battery power. Video Selecting On will record video with Sound sound.
- Page 17 This feature helps you aim the camera Motion at your target area. Please refer to the Test details in Section 9.2. Set the earliest shot time after Time First Shot Lapse or Hybrid mode is enabled. If Time: you would like to get photos earlier, it hh:mm is recommended to set it later than the current time.
- Page 18 set current date and time. Date input format may change. Please refer to "Date Format" parameter settings accordingly. D/M/Y Date Select date format which will be shown M/D/Y Format on the screen and each capture. Y/M/D Select time format which will be shown Time on the screen and each capture.
-
Page 19: Mounting And Positioning
will not be triggered. Note: This option is ONLY valid if Mode is set as "Motion Detection" . Set up a 4-digit password to protect your camera from unauthorized users. If Password the code is lost, you can contact customer support to reset the password. All files will be deleted after formatting the SD card. -
Page 20: Sensing Angle And Distance Test
than 100ft. (30m) and no closer than 10ft. (3m) from the camera. There are two ways to mount the camera: using the provided adjustable web belt, or the tripod socket. Using the adjustable strap: Illustrates using the strap on the camera. Push one end of the strap through the two brackets on the back of the camera. - Page 21 Switch the camera to the ON mode. Press MENU button, go to "Motion Test". The camera will count down a max 60-second delay and be ready to capture motions. (Note: The delay time may be less than 60 seconds, depending on the actual time of the motion sensor to be activated.
-
Page 22: Starting
toward to glass objects. 9.3. STARTING The camera supports three working modes, "Motion Detection", "Time Lapse" and "Hybrid", press START button to enter surveillance mode. (1) If you set the camera’s working mode as "Motion detection" in the menu, the camera will count down a 30-second delay, and then will be ready to go into standby (surveillance) and capture. -
Page 23: Review Photos Or Videos
10. REVIEW PHOTOS OR VIDEOS After you have setup, mounted and activated your CAMERA, you will of course be eager to return later and review the images it has captured for you. The camera stores photos and videos in the folder \DCIM\100MEDIA in the SD card. -
Page 24: Technical Specifications
11. TECHNICAL SPECIFICATIONS Element Description Working Mode Motion detection, Time lapse or Hybrid Max. Pixel Size 32MP Lens f/1.6, FOV=70°, Auto IR-Cut IR Flash 100ft. (30m) LCD Screen 2.4" Color screen Keypad 7 Keys, 1 Power switch SD, SDHC or SDXC standard memory card Memory (not included), maximum capacity 512GB Picture... - Page 25 Hours Password 4-Digit Code Camera Name 4-Character (A-Z, 0-9) Time Lapse 3 Seconds ~ 24 Hours Interval Power Supply 8x1.5V AA Batteries (not included) Stand-by Time 8 Months in Stand-by Auto Stand-by (Surveillance mode) in 5 Auto Stand-by minutes while no operation in the ON mode 8V - Low Battery (Batteries die) Low Battery 9V - Night vision is unavailable in low...
-
Page 26: Troubleshooting
12. TROUBLESHOOTING If your camera does not seem to be functioning properly or if you are having photo/video quality issues, please run these simple and quick checks: Make sure the camera is powered on and in the correct mode Format the SD card in the camera or replace the SD card, ... - Page 27 If your unit is still having trouble, please contact us, providing us with your order number, or check the website to determine that you are using the latest firmware. Please be assured we will make the things right for you...
Need help?
Do you have a question about the T5NG and is the answer not in the manual?
Questions and answers