Segway NAVIMOW i Series User Manual
Hide thumbs
Also See for NAVIMOW i Series:
- Quick start manual (13 pages) ,
- Important information manual (24 pages) ,
- Quick start manual (12 pages)
Table of Contents
Advertisement
Advertisement
Table of Contents

Related Manuals for Segway NAVIMOW i Series


Summary of Contents for Segway NAVIMOW i Series
- Page 1 User Manual Choose Life Without Boundaries...
-
Page 2: Table Of Contents
Table of Contents 1. Overview 1.1 Introduction 1.2 How EFLS 2.0 works 1.3 Safety Warnings 1.4 Symbols and Decals 1.5 What's in the Box? 1.6 Parts and Functions 1.7 Specifications 1.8 Accessories (sold separately) 2. Installation and Mapping 2.1 Before You Start 2.2 Activate the Mower 2.3 Find Locations 2.4 Install the Antenna and the Charging Station... - Page 3 Welcome With Exact Fusion Locating System 2.0 (EFLS 2.0) and superb traversing capabilities, Navimow can handle lawns of all types. No perimeter wires are needed and it's super easy to use, thanks to smart app connectivity and the intuitive control panel. Collection of grass is not necessary because the fine grass clippings serve as a natural fertilizer.
-
Page 4: Introduction
2022. The Navimow i Series is a brand new series of robotic lawnmowers designed for compact lawns. For lawns with a size of less than 1000 ㎡ (1/4 acre), the Navimow i Series is your first choice for lawn maintenance. - Page 5 lonosphere & troposphere lonosphere & troposphere ≥ EFLS (Exact Fusion Locating System) is Navimow's unique high-precision localization technology. Based on satellite positioning, EFLS technolo- gy integrates various sensor data to improve positioning accuracy and fault tolerance through algorithm fusion. The mower can locate itself through satellite signals, which can also be picked up by the antenna. By comparing the satellite signals from the antenna and the mower, errors in the transmission of the signal (such as the offset of the satellite signal as it travels through the ionosphere) can be minimized, improving satellite positioning accuracy to the centimeter level.
-
Page 6: Safety Warnings
1 ) Be sure to install and operate the Navimow (referred to as the mower in this manual) and the charging station according to the instructions. Go to navimow.segway.com or the Help and Support section via the app for the complete User Manual and the latest user materials. - Page 7 • It is recommended to conduct regular maintenance of the mower (See Maintenance in the User Manual) by an adult. • Regularly check the warning devices to ensure they are effective. These devices include the speaker, the LED light on the charging station, and the ambient light on the mower.
-
Page 8: Symbols And Decals
1.4 Symbols and Decals Please study the symbols on the product and labels carefully and understand their meaning: WARNING-Read instruction WARNING-Do not touch manual before operating the rotating blade. machine. WARNING-Keep a safe WARNING-Do not ride on the distance from the machine machine. -
Page 9: What's In The Box
1.5 What’s in the Box? If there are missing or defective parts, please contact after-sales service. We recommend retaining the package materials for future transportation and shipping. Navimow i Series i 105 i 108 / i 110 10 m (32.8 ft) -
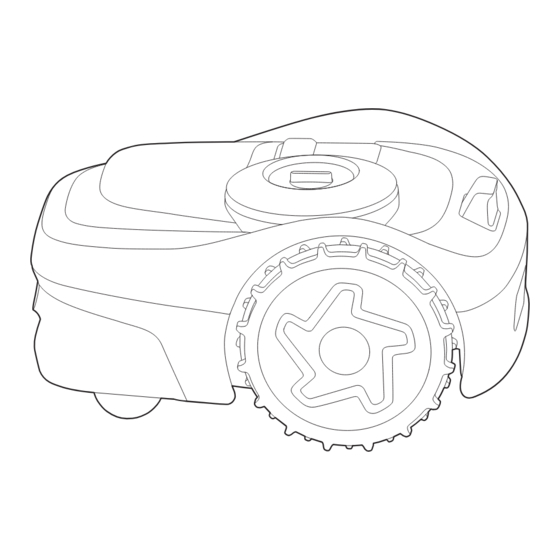
Page 10: Parts And Functions
1.6 Parts and Functions Mower Cutting deck knob GNSS antenna in the mower Camera sensor Ambient light Stop button Control panel • Control panel: The buttons on the control panel can be used for the basic operations of the mower. The digital numbers on the dashboard display shows mowing progress, battery level, and mower status. - Page 11 • Blades: The blades can rotate freely after being attached to the blade disc. When mowing, the spinning blade disc will generate centrifugal force to keep the blades pointing outside so that the blades can cut grass. When hitting an obstacle, the blade will turn inside. See 4.2 Replace Blades for instructions on replacement.
- Page 12 Control Basic operation Instruction Power on Press OK. Press and hold OK for 3s. The mower cannot be turned off when it's in the charging station. When the mower is Power off turned off, you will hear a sound, display on the mower and the ambient light will be off. Start mowing Press MOW and then OK.
- Page 13 Charging Station and GNSS Antenna GNSS antenna LED indicator • GNSS antenna: Receives satellite signals to improve the positioning accuracy of the mower. • LED indicator: Indicates different working states with various colors. LED indicator Meaning The mower is not on the charging station. Solid blue The mower is on the charging station.
-
Page 14: Specifications
E: Europe Model Suffix and A: Australia and New Zealand Supported Regions: N: United States and Canada Navimow i Series Product Name Navimow (powered by Segway) Brand Dimensions: 545 x 385 x 285 mm (21.4 x 15.1 x 11.2 in) Basic Information Length ×... - Page 15 i105 i108/i110 European Union and Norway: NBW32D002D5N-EU United Kingdom: NBW32D002D5N-UK Supply Unit Model Switzerland: NBW32D002D5N-CH Australia, New Zealand: NBW32D002D5N-AU United States and Canada: NBW32D002D5N-US Power Supply Input Voltage 100–240 V AC Output Voltage 32 V DC MAX Output Current 2.5 A MAX Cable Length 1.5 m Input Voltage...
- Page 16 Antenna Extension Kit Antenna Extension Kit is for antenna installation on a wall or roof, improving satellite signal. Overview Extension cable 10m x1 Installation base×1 Expansion tube×4 Self-tapping screw×4 Center column×1 CAUTION: Whenever the location of the antenna is changed, the existing map cannot be used anymore, please create a new map for your lawn.
- Page 17 Hold the GNSS antenna to a place where you want to install it. Make sure that the top surface of the antenna points straight up. Make sure there is nothing blocking the antenna. Top surface Secure the installation base. • For a wooden surface, just secure the base with the self-tapping screws.
- Page 18 Blade Assembly Spare blades and bolts Blades for regular replacement. For advice and how-to guides for blade replacement, see 4.2 Replace Blades. Temporary Fence Protect areas that you don't want the mower to enter. How to Install Insert the fencing arches into the ground to form a protective fence. Use the connecting panels to secure the arches. Navimow Access⁺...
- Page 19 Navimow Garage S Navimow Garage S is fully compatible with the Navimow i Series, as it does not block GPS signals or network connectivity. The garage provides extra protection against sunshine and rain. The flip-up cover enables easy access to the control panel so you can operate the mower on the charging station.
-
Page 20: Installation And Mapping
2. Installation and Mapping To ensure a successful setup, please scan the QR code to download the Navimow app. Alternatively, go to the Google Play Store (Android) or the Apple App Store (iOS) and search ‘Navimow’. After installing the app, please register and log in. Before using Navimow to start mowing, please cut your lawn to a height of no more than 6 cm (3.6 inches for US and Canada). - Page 21 A new mower may have a low battery after a long-time storage. Fully charge the mower before the first use. Place the mower in the charging station. Make sure the charging strip on the mower and the contact strip on the charging station are in good contact. Charging: pulsating green Fully charged: solid green Press the OK button on the mower to power it on.
- Page 22 The basic principles for placing the antenna and the charging station are: 1. Remain a certain distance away (greater than 2 m/6.6 ft) from houses, trees and walls. 2. Place the charging station and antenna in an open space with nothing blocking the signal (for example, the tree canopy or the sunshade umbrella).
- Page 23 When both the mower and the antenna are connected to the same satellite, it's called a 'Co-visible Satellite'. For accurate positioning of the mower, it requires at least 5 Co-visible Satellites. Having more Co-visible Satellites means the positioning is better. The Satellite Signal Analyzer helps you to check if your antenna and the charging station are installed at a proper location.
- Page 24 Fix the GNSS antenna on the tube. Unfold the base fork and insert it into the ground. To make sure that the antenna can be stably connected to the charging station once the installation is completed, please fully insert the base fork into the ground.
- Page 25 1.Connect the power supply cable to the power supply adapter. Align the notch on the power supply cable (A) with the base on the power supply adapter (B). 2.Connect the power supply cable to the power interface. Turn the nuts until they are locked into each other. 3.
- Page 26 Check the Charging Station Make sure the mower is not on the charging station. Power on the mower and wait until the light on the charging station turns blue (takes about 5 minutes). If the light does not turn blue, it means you need to relocate the antenna. Check the Mower 1.
- Page 27 3.Make sure the cables are not placed in the mowing zones or anywhere the mower may pass. Otherwise the cables may be damaged. Navimow uses Over-The-Air (OTA) to upgrade the firmware. To fully experience Navimow, prior to use, please upgrade to the latest firmware. Go to Settings>MOWER>Firmware version.
- Page 28 Make sure the mower is powered on. With Bluetooth connection, Tap ‘Create a map’ to start mapping. your phone will connect to the mower automatically. Note: If the mower is in lock status, you must enter the PIN code before operating the mower. The default code is 0000 and can be reset via the Navimow app.
- Page 29 Two boundary options are available for you to choose, based on the actual layout of your lawn. The Standard Boundary is chosen by default and it is recommended to use it for most scenarios. For instructions, follow the guidance in the app. For lawns where the grass meets a pathway or pavement at an even level, you may need the mower to ride on the edge in order to fully trim the grass right up to the non-grass area.
- Page 30 2.6.2 Create an Off-limit Island When the mower hits a hard obstacle taller than 10 cm (3.9 in) (such as big rocks or a tree trunk), it will reverse and change the direction automatically. However, you need to lay borders for objects that need protection or areas you don't want the mower to enter, e.g., a flowerbed, small trees, lawn decorations, pond, sprinkler heads, emerged roots, etc.
- Page 31 2.6.4 Create a VisionFence-off Zone A VisionFence-off zone is a place where the mower automatically turns off the camera used for obstacle avoidance, so the mower will directly pass through instead of turning away. If you need the mower to pass through flat non-grass areas to achieve a thorough cut, you can set up a VisionFence-off zone. These areas can be, for example, stone roads or utility holes, where the visual detection causes the mower to avoid.
-
Page 32: Daily Use
3. Daily Use 3.1 Mow 3.1.1 How Does Navimow Mow Mowing along the boundary Your mower mows along the boundary when it starts a mowing task. If the boundaries of your lawn have complex surroundings, to avoid risks, you can disable it by turning off the 'Edge Mowing' switch from Map management > Edit > Edge Mowing for each zone. Mowing with systematic patterns Inside the work area, the mower will mow the lawn along a planned path calculated by an algorithm for maximum efficiency. - Page 33 3.1.2 Manage Multiple Zones You can create multiple zones for your map, each zone with its own unique name and a customized mowing direction, and mowing schedule. For manual mowing, you can select to mow all zones or only some of them. For scheduled mowing, you can set up schedules for all or selected zones.
- Page 34 1. Go to Settings > MOWER > Mowing schedule. 2. Select a day to set up a schedule. 3. Set the start time and end time of the schedule. 4. Select which zone(s) to apply the schedule. 5. Tap 'Confirm' to save the settings. Enable or disable mowing schedules You can disable the mowing schedules if you don't want the mower to follow the schedule.
-
Page 35: Navimow App
3. Turn on the Bluetooth on your phone and make sure your phone has a network signal. NOTES: 1. If you have registered an account through other services of Segway-Ninebot, you can log in to the Navimow app with the account and vice versa. - Page 36 3.2.4 Basic Operations Bind your mower After registration and login, tap 'Add device' to bind your mower to your account. For more information, see 2.2 Activate the Mower. Add device Create a map Before mowing your lawn with Navimow, you need to create a work area (map) using the Navimow app. Tap 'Create a map', and follow the instructions in the app.
-
Page 37: App Notifications
All/Zone Displays if the current mowing task is applied to all zones or specific zones Map management Navigates to the Map management page 2600m³ Battery level Battery level and charging status Lock status Locked/Unlocked. See How to enter PIN code in 1.6 Parts and Functions Bluetooth Bluetooth connected. - Page 38 3.3.2 Pop-up Messages Pop-up messages appear at the center of the screen. For example, an error code message appears if an error has occurred.
-
Page 39: Mower Settings
3.4 Mower Settings 3.4.1 Edit the Map You can edit or delete the map elements in Settings > MOWER > Map management. Make sure your phone is connected to the mower via Bluetooth. Front lawn Add More Edit Map size 270 / 500㎡ By tapping ‘Edit’... - Page 40 3.4.3 Add, Switch, Unbind Devices You can add multiple mowers from Settings > MOWER > Switch / Add Device and switch to another mower by selecting another serial number (SN) in the list. When unbinding the mower, you need to verify your identity by entering the hidden characters of your email address or phone number.
-
Page 41: App Settings
3.4.7 VisionFence Settings You can enable the 'Mowing at night' switch to let the mower mow at night with the ambient light on and the visual detection on to avoid obstacles. The mower will not mow along the boundaries at night and mow at a reduced speed. When the switch is disabled, the mower will go back to the charging station. -
Page 42: Maintenance
Units You can switch between the metric units and the imperial units here. About You can view the current app version, the latest User Agreement and Privacy Policy here. Log out You can log out of your account here, and your data will not be deleted after logging out. 4. -
Page 43: Replace Blades
4.2 Replace Blades The blade disc automatically changes its rotation direction multiple times during mowing to prevent excessive wear on one side. If the mower is used on a regular basis, it is recommended to replace the blades and screws every 1–2 months to ensure safety and better mowing results. Replace all three blades and their screws at the same time for a safe cutting system. -
Page 44: Transportation
Fasten the new blades and screws (Torque: 1 N·m). Make sure the blades can pivot freely. Note: After fastening the blades and screws the blades will still seem loose. This is normal as the blades need to spin during mowing. The blades are intentionally designed to rotate freely when attached to the blade disc. -
Page 45: Battery
4.4 Battery • Power off the mower and charge its battery to 85% or higher before storage to avoid over-discharge and damage to the electrical components. Charge the mower every 120 days for long-time storage. • Battery damage caused by over-discharge will not be covered by the Limited Warranty. •... -
Page 46: Recycling And End-Of-Life Disposal
If you encounter any product or app-related problems, common issues and questions, check out the FAQ articles from 'Service and Support > Help Center' on the Navimow official website (http://navimow.segway.com) or from the 'Help and feedback' section from the Navimow app. -
Page 47: Important Information
Object of the declaration Generic designation: Robotic Lawnmower Product name: Navimow i Series Type/model: i105E/i108E Serial number: S4RE x yyyy x yyyy/S4TH x yyyy x yyyy/S4RK x yyyy x yyyy/S4TN x yyyy x yyyy/S4RL x yyyy x yyyy/S4TP x yyyy x yyyy (“x”... -
Page 48: Ukca Declaration Of Conformity
Address: Dynamostraat 7, 1014BN Amsterdam, The Netherlands Object of the declaration Generic designation: Robotic Lawnmower Product name: Navimow i Series Type/model: i105E/i108E Serial number: S4RJ x yyyy x yyyy/S4TM x yyyy x yyyy (“x” indicates any latter from A-Z except O and I, “y” indicates any latter from A-Z except O and I or any number from 0-9) This Declaration of Conformity is issued under the sole responsibility of the manufacturer. -
Page 49: Certifications
6.3 Certifications European Union Compliance Statement Information on Disposal for Users of Waste Electrical & Electronic Equipment This symbol on the product or on its packaging indicates that used electrical and electronic products should not be mixed with unsorted municipal waste. For proper treatment, it is your responsibility to dispose of your waste equipment by arranging to return it to designated collection points. - Page 50 Use of Certain Hazardous Substances in Electrical and Electronic Equipment Regulations 2012, the Radio Equipment Regulations 2017 and the Supply of Machinery (Safety) Regulations 2008. The declaration of conformity can be viewed at the following address: https://navimow.segway.com/HelpCenter Frequency Band(s) 2.4000-2.4835GHz...
-
Page 51: Limited Warranty
2. Limited Warranty Service Process Navimow’s online services are available at navimow.segway.com. During your use of the Product, if you believe the Product or its component is defective and/or does not work correctly. PLEASE IMMEDIATELY STOP USING THE PRODUCT, AND STORE THE PRODUCT... - Page 52 DEATH TO YOU OR THE OTHERS AND/OR CAUSE PROPERTY DAMAGES. Thereafter, please immediately contact Navimow at support-navimow@rlm.segway.com. or from Live Chat via the app Navimow’s technical support personnel are available to assist you online in diagnosing the defect, and if any, and providing further instructions. In the event the warranty services are required, please prepare for the following materials, including (i) proof of the original purchase of the Product, (ii) the Product’s serial number, and...
- Page 53 THAN THIRTY (30) CALENDAR DAYS AFTER THE DATE OF THE FIRST CONSUMER PURCHASER’S PURCHASE OF THE PRODUCT. TO OPT-OUT, YOU MUST SEND NOTICE BY EMAIL AT OPTOUT@SEGWAY.COM, WITH THE SUBJECT LINE: “ARBITRATION OPT-OUT.” THE OPT-OUT NOTICE BY E-MAIL MUST INCLUDE (A) YOUR NAME, EMAIL ADDRESS, MAILING ADDRESS, AND PHONE NUMBER; (B) THE DATE ON WHICH THE PRODUCT WAS PURCHASED;...
- Page 54 This Agreement may be translated into different languages. In the event of a conflict, the English version shall prevail and control. 7. Intended third Party Beneficiary (a) If a natural person receives a Product that is new as a gift from its original purchaser and this recipient does not become a party to this Agreement, this recipient shall be deemed as an intended third-party beneficiary to this Agreement.
-
Page 55: Contact Us
Address: Dynamostraat 7, 1014 BN Amsterdam, The Netherlands Contact us if you experience issues relating to the operation, maintenance and safety, or errors/faults with your mower. Email: support-navimow@rlm.segway.com Europe Authorised representative: AR Experts B.V., P.O. Box 5047, 3620 AA Breukelen, The Netherlands... - Page 56 The manufacturer reserves the right to make changes to the product, release firmware updates, and update this manual at any time. Illustrations of the product, accessories, and app interface in the User Manual are for reference purposes only. Actual product and functions may vary. Go to navimow.segway.com for the latest user materials.
Need help?
Do you have a question about the NAVIMOW i Series and is the answer not in the manual?
Questions and answers
The cutting height knob will not move ist stuck on 2.2
Hi We brought a segaway Navimow last year but have only just set it up. Our garden has three lawns, each of which is separated by a change of level. The docking station is on the lowest level. The mower will need to be manually carried between lawns. Having mapped the lawn which has the docking station we now need to map the second, and then the third. How do we do this?