Table of Contents
Advertisement
Available languages
Available languages
Quick Links
EDELSTAHL-MIKROWELLE / STAINLESS STEEL MICROWAVE /
FOUR À MICRO-ONDES EN ACIER INOXYDABLE
SMW 900 EDS B5
EDELSTAHL-MIKROWELLE
Bedienungsanleitung
FOUR À MICRO-ONDES EN ACIER
INOXYDABLE
Mode d'emploi
MIKROVLNNÁ TROUBA
Návod k obsluze
MICRO-ONDAS EM AÇO INOXIDÁVEL
Manual de instruções
IAN 284999
STAINLESS STEEL MICROWAVE
Operating instructions
MAGNETRON
Gebruiksaanwijzing
MICROONDAS DE ACERO INOXIDABLE
Instrucciones de uso
Advertisement
Chapters
Table of Contents

Related Manuals for Silvercrest 284999


Summary of Contents for Silvercrest 284999
- Page 1 SMW 900 EDS B5 EDELSTAHL-MIKROWELLE STAINLESS STEEL MICROWAVE Bedienungsanleitung Operating instructions FOUR À MICRO-ONDES EN ACIER MAGNETRON INOXYDABLE Gebruiksaanwijzing Mode d’emploi MIKROVLNNÁ TROUBA MICROONDAS DE ACERO INOXIDABLE Návod k obsluze Instrucciones de uso MICRO-ONDAS EM AÇO INOXIDÁVEL Manual de instruções IAN 284999...
- Page 2 Klappen Sie vor dem Lesen die Seite mit den Abbildungen aus und machen Sie sich anschließend mit allen Funktionen des Gerätes vertraut. Before reading, unfold the page containing the illustrations and familiarise yourself with all functions of the device. Avant de lire le mode d‘emploi, ouvrez la page contenant les illustrations et familiarisez-vous ensuite avec toutes les fonctions de l‘appareil.
-
Page 4: Table Of Contents
Inhaltsverzeichnis Einleitung ........... . . 3 Bestimmungsgemäßer Gebrauch . - Page 5 Rezepte ........... . . 34 Frikadellen .
-
Page 6: Einleitung
Einleitung Herzlichen Glückwunsch zum Kauf Ihres neuen Gerätes. Sie haben sich damit für ein hochwertiges Produkt entschieden. Die Bedienungs- anleitung ist Bestandteil dieses Produkts. Sie enthält wichtige Hinweise für Sicherheit, Gebrauch und Entsorgung. Machen Sie sich vor der Benutzung des Produkts mit allen Bedien- und Sicherheitshinweisen vertraut. -
Page 7: Gerätebeschreibung
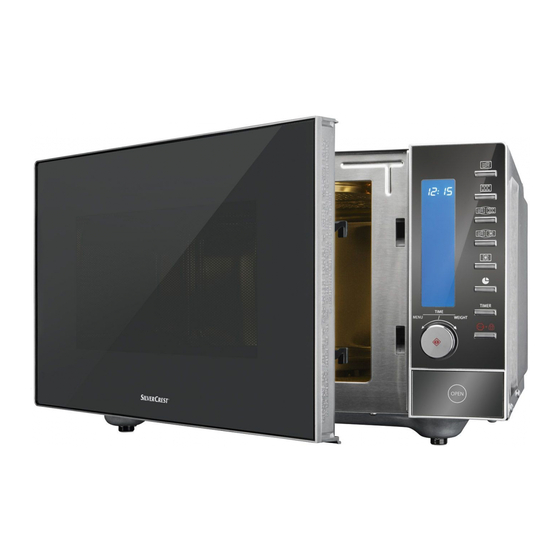
Gerätebeschreibung Abbildung A: Display Taste Türöffner Drehteller Rollen Lüftungsschlitze Abbildung B: Taste Mikrowelle Taste Grill Taste Kombination Mikrowelle - Grill Taste Kombination Mikrowelle - Heißluft Taste Heißluft Taste Uhr Taste TIMER (Küchentimer) Taste Stop / Kindersicherung Drehregler / Taste Start / Schnellstart Abbildung C: Grillständer Technische Daten... -
Page 8: Wichtige Sicherheitshinweise
Wichtige Sicherheitshinweise Lesen Sie die Sicherheitshinweise und die Bedienungsanleitung vor der ersten Ver- wendung aufmerksam durch und heben Sie diese für den späteren Gebrauch auf. GEFAHR! ELEKTRISCHER SCHLAG! Ein Warnhinweis dieser Gefahrenstufe kennzeichnet eine mögliche gefährliche Situation. Falls die gefährliche Situation nicht vermieden wird, kann dies zum Tod oder schweren Verletzungen führen. - Page 9 Klemmen Sie nichts zwischen Gerätefront und Tür und sorgen ► Sie dafür, dass sich keine Verschmutzungen oder Reinigungs- mittelrückstände auf den Dichtflächen ansammeln. GEFAHR! ELEKTRISCHER SCHLAG! Tauchen Sie nie das Netzkabel oder den Netzstecker in ► Wasser oder andere Flüssigkeiten. Halten Sie das Netzkabel von Hitzequellen fern.
- Page 10 WARNUNG - VERLETZUNGSGEFAHR! Reinigung und Benutzer-Wartung dürfen nicht durch Kinder ► durchgeführt werden, es sei denn, sie sind 8 Jahre und älter und werden beaufsichtigt. Kinder jünger als 8 Jahre sind vom Gerät und der Anschluss- ► leitung fernzuhalten. Verwenden Sie dieses Gerät nur zum bestimmungsgemäßen ►...
- Page 11 WARNUNG - VERLETZUNGSGEFAHR! Personen, die einen Herzschrittmacher tragen, sollten sich ► vor Inbetriebnahme der Mikrowelle bei ihrem Hausarzt über mögliche Risiken informieren. Lassen Sie das Netzkabel nie über den Tisch oder die Ar- ► beitsplatte hängen. Kinder könnten daran ziehen. Öffnen Sie Dosen, Popcorntüten etc.
- Page 12 WARNUNG - VERLETZUNGSGEFAHR! Achtung! Heiße Oberfläche! WARNUNG - BRANDGEFAHR! Lassen Sie die Mikrowelle nie unbeaufsichtigt, wenn Sie Le- ► bensmittel in Plastik oder Papierverpackungen erhitzen. Stellen Sie keine brennbaren Materialien in der Nähe der ► Mikrowelle oder der Lüftungsöffnungen auf. Entfernen Sie alle metallischen Verschlüsse der Verpackungen ►...
- Page 13 WARNUNG - BRANDGEFAHR! Tauen Sie kein gefrorenes Fett oder Öl in der Mikrowelle ► auf. Das Fett oder Öl kann sich entzünden. Benutzen Sie keine externe Zeitschaltuhr oder ein separates ► Fernwirksystem, um das Gerät zu betreiben. Diese Mikrowelle ist für die Erwärmung von Speisen und ►...
- Page 14 ACHTUNG - SACHSCHADEN! Flüssigkeiten und sonstige Nahrungsmittel dürfen nicht in ► luftdicht verschlossenen Behältern erhitzt werden, da diese explodieren und das Gerät beschädigen können. Lehnen Sie sich nicht auf die Mikrowellentür. ► Mangelhafte Sauberkeit des Kochgerätes kann zu einer ► Zerstörung der Oberfläche führen, die ihrerseits die Gebrauchsdauer beeinflusst und möglicherweise zu ge- fährlichen Situationen führt.
- Page 15 HINWEISE ZUM SICHEREN UMGANG Wenn das Gerät Rauch abgibt, ist das Gerät abzuschalten ► oder der Stecker zu ziehen und die Tür geschlossen zu hal- ten, um eventuell auftretende Flammen zu ersticken. Eier in der Schale und hart gekochte Eier dürfen nicht in ►...
-
Page 16: Bevor Sie Beginnen
FUNKSTÖRUNGEN BEI ANDEREN GERÄTEN Der Betrieb der Mikrowelle kann Störungen bei Ihrem Ra- ► dio, Fernseher oder ähnlichen Geräten hervorrufen. Falls solche Interferenzen auftreten sollten, lassen sie sich mit Hilfe der folgenden Maßnahmen vermindern oder ausschalten: Tür und Dichtfläche der Mikrowelle säubern. –... -
Page 17: Geeignetes Kochgeschirr Verwenden
Geeignetes Kochgeschirr verwenden ■ Das ideale Material für einen Mikrowellenherd ist mikrowellendurchlässig, lässt also die Energie durch den Behälter hindurch, um die Speise zu erwärmen. Mikrowellen sind nicht in der Lage, Metall zu durchdringen. Aus diesem Grund dürfen keine Metallgefäße und kein Metallgeschirr verwendet werden. ■... -
Page 18: Erste Inbetriebnahme
Erste Inbetriebnahme HINWEIS ZUM ERSTEN AUFHEIZEN Betreiben Sie die Mikrowelle niemals in der Be- ► triebsart „Mikrowelle“ im Leerzustand! Betreiben Sie die Mikrowelle ausschließlich beim ► ersten Aufheizen ohne Zubehör und Lebensmittel in der Betriebsart „Grill“ (Gr 3)! (siehe Kapitel „Gerät vorbereiten”) Gerät aufstellen WARNUNG - BRANDGEFAHR! ►... -
Page 19: Gerät Vorbereiten
Gerät vorbereiten ■ Entfernen Sie das Verpackungsmaterial und die auf dem Panel und der Taste Türöffner angebrachte Schutzfolie. ACHTUNG - SACHSCHADEN! Entfernen Sie nicht die hellgraue Glimmer-Abdeckplatte, die zum Schutz der Magnetfeldröhre im Garraum ange- bracht ist. ■ Stecken Sie den Netzstecker in eine Netzsteckdose. Benutzen Sie eine 230 - 240 V ~ , 50 Hz, Netzsteckdose mit einer 16 A Sicherung. -
Page 20: Drehteller Einsetzen
HINWEIS ► Bei der ersten Inbetriebnahme kann es durch fertigungsbedingte Rückstände zu leichter Rauch- und Geruchsentwicklung kommen. Dieses ist unschädlich. Sor- gen Sie für eine ausreichende Belüftung. Öffnen Sie zum Beispiel ein Fenster. Nach 5 Minuten schaltet sich das Gerät automatisch aus. Warten Sie, bis es vollständig abgekühlt ist. -
Page 21: Standby-Modus
Standby-Modus Die Mikrowelle schaltet automatisch in den Standby-Modus und die Uhrzeit wird angezeigt, wenn für längere Zeit keine Taste gedrückt wird. Wenige Sekunden nach der Umstellung in den Standby-Modus wird auch die Displaybeleuchtung gedimmt. Küchentimer einstellen Die Mikrowelle verfügt über einen Küchentimer, den Sie unabhängig vom Mikro- wellenbetrieb einsetzen können. -
Page 22: Gar- Oder Auftauvorgänge Unterbrechen/Abbrechen
Leistungsstufe während des Betriebs abfragen Drücken Sie während des Garvorgangs die Taste Mikrowelle . Im Display erscheint für einige Sekunden die aktivierte Leistungsstufe. Gar- oder Auftauvorgänge unterbrechen/abbrechen ■ Drücken Sie einmal die Taste Stop , um einen Gar- oder Auftauvor- gang zu unterbrechen. - Page 23 Garzeit einstellen Nachdem Sie die Leistung ausgewählt haben, stellen Sie die gewünschte Garzeit ein: ■ Drehen Sie den Drehregler , bis die gewünschte Garzeit eingestellt ist. Die Stufen für die Einstellungszeit des Drehreglers sind wie folgt: – von 0 Sek. bis 5 Min.: in 10-Sek.-Schritten –...
-
Page 24: Grill-Funktion
Grill-Funktion WARNUNG - BRANDGEFAHR! ► Benutzen Sie bei Verwendung der Grill-Funktionen auf keinen Fall Abdeckun- gen oder nicht hitzebeständiges Geschirr, da diese schmelzen oder in Brand geraten können! HINWEIS ► Benutzen Sie zum Grillen immer den Grillständer . So erzielen Sie ein optimales Grillergebnis. -
Page 25: Kombinations-Garvorgang „Grill
Kombinations-Garvorgang „Grill“ Diese Funktion vereint die Grill-Funktion mit dem normalen Mikrowellenbetrieb. Während des Kombinationsvorgangs wird eine bestimmte Zeit für Garen und die übrige Zeit für Grillen automatisch und in einem Vorgang ausgeführt. Den Umschaltzeitpunkt des Gerätes können Sie durch ein leises Klicken wahrnehmen. WARNUNG - BRANDGEFAHR! ►... -
Page 26: Heißluftbetrieb
2) Stellen Sie mit dem Drehregler die gewünschte Kombination ein: „C 1” für Kombination 1, „C 2” für Kombination 2 (Displayanzeige: C2, 55:45, „C 3” für Kombination 3 (Displayanzeige: C3, 30:70, „C 4” für Kombination 4 (Displayanzeige: C4, 55:45, Bestätigen Sie Ihre Auswahl durch Drücken der Taste Start/Schnellstart 3) Stellen Sie mit dem Drehregler die gewünschte Garzeit ein. -
Page 27: Kombinations-Garvorgang „Heißluft
4) Stellen Sie die Temperatur durch Drehen des Drehreglers ein und bestä- tigen Sie die Temperatur durch Drücken der Taste Start/Schnellstart 5) Stellen Sie mit dem Drehregler die gewünschte Garzeit ein. Die maxi- mal einstellbare Garzeit beträgt 95 Minuten. 6) Drücken Sie zum Starten die Taste Start/Schnellstart Im Display erscheint das Symbol für Heißluftbetrieb dauerhaft. -
Page 28: Automatik-Menü
Automatik-Menü Für Speisen, die im Automatik-Menümodus zubereitet werden sollen, ist es nicht notwendig, die Dauer des Garvorgangs und die Leistungsstufe einzugeben. Es reicht vielmehr aus, wenn Sie eingeben, welche Art Lebensmittel gegart/gekocht werden soll sowie das Gewicht dieses Lebensmittels. WARNUNG - BRANDGEFAHR! ►... - Page 29 Display Symbol Lebensmittel Gewicht A-04 Fisch 200 - 1200 g * P1 200 - 450 g A-05 Pizza P2 200 - 450 g P3 200 - 450 g A-06 Obst / Gemüse 100 - 1000 g A-07 Kartoffeln 100 - 800 g A-08 Aufwärmen 300 - 700 g...
- Page 30 HINWEIS ► Um ein gleichmäßiges Kochen oder Garen zu erreichen, sollten einige Speisen nach 2/3 der Garzeit gewendet werden. Die Mikrowelle stoppt nach dieser Zeit automatisch, 4 Signaltöne erklingen und „Turn“ erscheint im Display Display Symbol Lebensmittel Wenden nach... A-01 Rind 2/3 der Zeit A-02...
- Page 31 Display Symbol Lebensmittel Nachgaren mit... Kombinations- A-01 Rind Garvorgang „Grill” - C3 Kombinations- A-02 Schwein Garvorgang „Grill” - C3 Kombinations- A-03 Geflügel Garvorgang „Grill” - C3 Kombinations- A-04 Fisch Garvorgang „Grill” - C3 Automatikmenü A-05 Pizza „Pizza” - P2 Mikrowellenbetrieb A-06 Obst / Gemüse mit 900 W...
-
Page 32: Pizza Backen
VERLETZUNGSGEFAHR! ► Der Drehteller ist nach einem Garvorgang mit Grill sehr heiß! Benutzen Sie daher unbedingt Topflappen oder hitzebeständige Handschuhe, wenn Sie ihn aus dem Garraum entnehmen. HINWEIS ► Bitte beachten Sie, dass Größe, Form und die Sorten der Lebensmittel das Kochergebnis mitbestimmen. - Page 33 3) Wählen Sie mit Hilfe des Drehreglers das passende Pizza-Programm: – „P-01“ für tiefgefrorene Pizza, Temperatur ca. -18 Grad Gewicht 200 g – 450 g („P-01“ erscheint im Display – „P-02 für gekühlte Pizza, Temperatur ca. 5 Grad, Gewicht 200 g – 450 g („P-02“...
-
Page 34: Auftauen
Auftauen Auftauen nach Gewicht HINWEIS ► Legen Sie die aufzutauenden Lebensmittel immer auf für Mikrowellen geeignetes Geschirr. Niemals direkt auf den Drehteller Mit dieser Funktion können Sie problemlos Fleisch, Geflügel, Fisch, Obst/Gemüse und Pizza auftauen. Die Auftauzeit und die Leistungsstufe werden nach Eingabe des Gewichts automatisch errechnet und eingestellt. - Page 35 4) Wenn das gewünschte Lebensmittel im Display erscheint, drücken Sie die Taste Start/Schnellstart 5) Stellen Sie durch Drehen des Drehreglers das Gewicht ein. Es lassen sich folgende Gewichte einstellen: Display Symbol Lebensmittel Gewicht d-01 Rind 100 - 1800 g d-02 Schwein 100 - 1800 g d-03...
-
Page 36: Auftauen Nach Zeit
HINWEIS ► Um ein optimales Auftauen zu gewährleisten, ist es nötig die Speisen während des Auftauvorganges zu wenden. Das Gerät erinnert Sie an das Wenden, indem Signaltöne erklingen und auf dem Display „turn“ erscheint. Öffnen Sie die Gerätetür, wenden Sie die Speise und schließen Sie die Gerätetür wieder. -
Page 37: Rezepte
Rezepte Frikadellen Zubereitung 1) Formen Sie je ca. 125 g Rinderhackfleisch zu einer Frikadelle (Durchmesser ca. 75 mm, Höhe ca. 35 mm). 2) Verteilen Sie die Frikadellen gleichmäßig auf dem Drehteller 3) Das beste Ergebnis erzielen Sie, wenn Sie Heißluft und Mikrowellen-Funktion abwechselnd benutzen. -
Page 38: Muffins
Zubereitung 1) Schneiden Sie die Kartoffeln in ca. 3 – 4 mm dicke Scheiben. 2) Legen Sie ungefähr die Hälfte der Kartoffeln dachziegelartig in die Auflaufform. 3) Bestreuen Sie die Kartoffeln mit ca. der Hälfte des Käses. 4) Geben Sie die Hälfte der Gewürze hinzu sowie ca. 150 g Sahne. 5) Legen Sie den Rest der geschnittenen Kartoffeln ebenfalls dachziegelartig darüber. -
Page 39: Zucchinisuppe
Zubereitung 1) Mischen Sie alle Zutaten gut durch. 2) Füllen Sie den Muffinteig in handelsübliche Papier-Backförmchen (Durchmesser ca. 45 mm,Höhe ca. 28 mm) 3) Heizen Sie die Mikrowelle mit der Heißluft-Funktion auf 170°C vor. HINWEIS ► Sollten Sie bedingt durch die Anzahl der Muffins mehrere Backvorgänge benötigen, ist das Vorheizen nur einmal erforderlich. -
Page 40: Schoko-Apfel-Kuchen
Schoko-Apfel-Kuchen Zutaten ▯ 125 g Butter ▯ 125 g Zucker ▯ 1 Päckchen Vanillezucker ▯ 2 Eier ▯ 125 g Mehl ▯ 2 EL Kakaopulver ▯ 1/2 Päckchen Backpulver ▯ 1 Apfel ▯ etwas Puderzucker Zubereitung 1) Vermischen Sie den Zucker, die weiche Butter, den Vanillezucker, die Eier, das Mehl, das Backpulver und das Kakaopulver zu einem Teig. -
Page 41: Hackbraten
Hackbraten Zutaten ▯ 500 g Hackfleisch (halb/halb) ▯ 1/2 Zwiebel ▯ 1 Ei ▯ 1/2 Brötchen ▯ Salz, Pfeffer, Paprikapulver für die Soße: ▯ 75 ml Wasser ▯ 1 EL Senf ▯ 2 EL Tomatenketchup ▯ 2 EL Bratensaft ▯ Muskat, Petersilie, Paprikapulver ▯... -
Page 42: Reinigung Und Pflege
Reinigung und Pflege GEFAHR! ELEKTRISCHER SCHLAG! ► Schalten Sie vor dem Säubern die Mikrowelle ab und ziehen Sie den Netzstecker aus der Netzsteckdose. Ansonsten besteht die Gefahr eines elektrischen Schlages! Auf keinen Fall darf das Gerät in Wasser oder andere Flüssigkeiten getaucht werden. -
Page 43: Fehlerbehebung
Fehlerbehebung PROBLEM MÖGLICHE URSACHE MÖGLICHE LÖSUNGEN Der Netzstecker steckt nicht Kontrollieren Sie den in der Netzstekkdose. Netzstecker. Das Display zeigt nichts Probieren Sie eine andere Die Netzsteckdose ist defekt. Netzsteckdose. Kontaktieren Sie den Service. Das Display ist defekt. Deaktivieren Sie die Das Gerät reagiert nicht auf Die Kindersicherung ist Kindersicherung (siehe... -
Page 44: Entsorgen
PROBLEM MÖGLICHE URSACHE MÖGLICHE LÖSUNGEN Unterbrechen Sie das Pro- gramm und ziehen Sie den Netzstecker. Beheben Sie, Die Mikrowelle ist, aufgrund falls möglich, das Problem, eines Kurzschlusses oder z.B. Metall im Garraum, Das Display zeigt „E03“ einer Leerlaufspannung, welches bei Nutzung der an und Signaltöne erklingen. -
Page 45: Garantie Der Kompernaß Handels Gmbh
Garantie der Kompernaß Handels GmbH Sehr geehrte Kundin, sehr geehrter Kunde, Sie erhalten auf dieses Gerät 3 Jahre Garantie ab Kaufdatum. Im Falle von Mängeln dieses Produkts stehen Ihnen gegen den Verkäufer des Produkts gesetz- liche Rechte zu. Diese gesetzlichen Rechte werden durch unsere im Folgenden dargestellte Garantie nicht eingeschränkt. -
Page 46: Service
Tel.: 0820 201 222 (0,15 EUR/Min.) E-Mail: kompernass@lidl.at Service Schweiz Tel.: 0842 665566 (0,08 CHF/Min., Mobilfunk max. 0,40 CHF/Min.) E-Mail: kompernass@lidl.ch IAN 284999 Importeur Bitte beachten Sie, dass die folgende Anschrift keine Serviceanschrift ist. Kontak- tieren Sie zunächst die benannte Servicestelle. KOMPERNASS HANDELS GMBH... - Page 47 ■ 44 │ DE │ AT │ CH SMW 900 EDS B5...
- Page 48 Contents Introduction ..........47 Intended use .
- Page 49 Recipes ............78 Rissoles .
-
Page 50: Introduction
Introduction Congratulations on the purchase of your new device. You have selected a high-quality product. The operating instructions are part of this product. They contain important information on safety, usage and disposal. Before using the product, please familiarise yourself with all operating and safety instructions. -
Page 51: Description Of The Appliance
Description of the appliance Figure A: Display Door opener button Turntable Rollers Ventilation slits Figure B: Microwave button Grill button Microwave/grill combination button Microwave/convection combination button Convection button Clock button TIMER button (kitchen timer) Stop/child safety lock button Control dial/start/quick start button Figure C: Grill stand Technical data... -
Page 52: Important Safety Instructions
Important safety instructions Read the safety advice and these operating instructions carefully before using the appliance, and keep them for future reference. DANGER! ELECTRIC SHOCK! A warning notice at this hazard level indicates a potentially hazardous situation. If the hazardous situation is not avoided, it could result in death or serious physical injury. - Page 53 Do not jam anything between the front of the appliance and ► the door, and make sure that there is no food or cleaning agent residue left on the seals. DANGER! ELECTRIC SHOCK! Never submerse the appliance, the power cable or the plug ►...
- Page 54 WARNING – RISK OF INJURY! Cleaning and user maintenance must not be carried out by ► children, unless they are aged 8 or over and are supervised. Children younger than 8 years of age must be kept away ► from the appliance and the power cable. Use this appliance only for its intended purpose as described ►...
- Page 55 WARNING – RISK OF INJURY! People fitted with a heart pacemaker should consult their ► doctor about the possible risks of using a microwave oven before using it. Do not allow the power cable to hang down from a table or ►...
- Page 56 WARNING – RISK OF INJURY! Caution! Hot surface! WARNING – RISK OF FIRE! Never leave the microwave oven unattended if you are ► heating foodstuffs packed in plastics or paper. Do not place flammable materials close to the microwave ► oven or the ventilation openings.
- Page 57 WARNING – RISK OF FIRE! Do not thaw frozen fat or oil in the microwave oven. The fat ► or oil could ignite. Do not use an external timer switch or a separate remote ► control system to operate the appliance. This microwave is designed for heating foods and drinks.
- Page 58 CAUTION – PROPERTY DAMAGE! Do not heat liquids and other foods in airtight containers, as ► these may explode and damage the appliance. Do not lean on the microwave oven door. ► Insufficient cleanliness of the appliance could lead to the ►...
- Page 59 NOTES ON SAFE USE If the appliance starts to give off smoke, switch it off immedi- ► ately or remove the plug from the mains, and keep the door closed to smother any flames that might otherwise escape. Eggs in their shells and hard-boiled eggs should not be ►...
-
Page 60: Before You Begin
INTERFERENCE WITH OTHER APPLIANCES The operation of the microwave may cause interference on ► your radio, television or similar appliances. If such interference occurs, it can be reduced or corrected by the following remedial measures: Clean the door and the seals of the microwave. –... -
Page 61: Use Suitable Cookware
Use suitable cookware ■ The ideal material for a microwave oven is microwave-permeable, allowing the energy to penetrate the container to heat the food. Microwaves cannot permeate metal. For this reason, metal containers and cookware should not be used. ■ When using the microwave for heating, do not use products made of recycled paper. -
Page 62: First Use
First use NOTE ON HEATING UP FOR THE FIRST TIME Never operate the microwave in "Microwave" mode ► when it is empty! When heating up for the first time, operate the ► microwave without food or accessories in the operating mode "Grill" (Gr 3)! (see section "Preparing the appliance") Setting up the device WARNING –... -
Page 63: Preparing The Appliance
Preparing the appliance ■ Remove the packaging material and the protective films from the panel and the door opener button CAUTION – PROPERTY DAMAGE! Do not remove the light grey mica cover plate, which is mounted inside the cooking chamber to protect the magnetron. -
Page 64: Inserting The Turntable
NOTE ► The appliance may generate light smoke and a slight smell during initial use. This is due to the production residues and is not harmful. Provide for sufficient ventilation. For example, open a window. After 5 minutes, the appliance will switch itself off automatically. Wait until it has cooled down completely. -
Page 65: Standby Mode
Standby mode The microwave oven automatically switches to standby mode and the time is displayed if no button is pressed for a long time. A few seconds after switching to standby mode, the display lighting is also dimmed. Setting the kitchen timer The microwave oven is provided with a kitchen timer which you can use indepen- dently of the microwave operation. -
Page 66: Pause/Cancel Cooking Or Defrosting Operations
Query the power level during operation During the cooking process press the microwave button . The current power level appears for a few seconds on the display Pause/cancel cooking or defrosting operations ■ Press the stop button once to pause a cooking or defrosting pro- cess. - Page 67 Programming the cooking time After you have selected the power level, programme in the desired cooking time: ■ Turn the control dial , until the desired cooking time has been set. The increments for setting the time with the control dial are as follows: –...
-
Page 68: Grill Function
Grill function WARNING – RISK OF FIRE! ► When using the grill function, do not use any form of lid or cookware that is not heat resistant, as these could melt or set on fire! NOTE ► Always use the grill stand when grilling. -
Page 69: Combination Cooking Mode "Grill
Combination cooking mode "Grill" This function combines the grill function and the normal microwave operation. In combination mode, a certain amount of time is automatically set aside for cooking and the remaining time for grilling in a single process. You may notice a quiet clicking noise when the oven is switching between modes. -
Page 70: Convection Operation
2) Set the required combination with the control dial "C 1" for combination 1, "C 2" for combination 2 (Display: C2, 55:45, "C 3" for combination 3 (Display: C3, 30:70, "C 4" for combination 4 (Display: C4, 55:45, Confirm your selection by pressing the start/quick start button 3) Set the required cooking time with the control dial . -
Page 71: Combination Cooking Mode "Convection
4) Turn the control dial to select the required temperature and confirm the temperature by pressing the start/quick start button 5) Set the required cooking time with the control dial . The maximum possible cooking time setting is 95 minutes. 6) To start, press the start/quick start button The convection symbol appears permanently on the display... -
Page 72: Automatic Menu
Automatic menu It is not necessary to program the duration of the cooking process and the power level for foods that are prepared in the automatic menu mode. You only need to enter the type of food you wish to cook and its weight. WARNING –... - Page 73 Display Symbol Food Weight A-04 Fish 200–1200 g * P1 200–450 g A-05 Pizza P2 200–450 g P3 200–450 g A-06 Fruit/vegetables 100–1000 g A-07 Potatoes 100–800 g A-08 Heating up 300–700 g A-09 Beverages 200–500 ml A-10 Entrees 300 / 500 g Defrosting A-11 by weight...
- Page 74 NOTE ► To ensure uniform heating or cooking, some foods should be turned after 2/3 of the cooking time. The microwave oven will stop automatically after this time. You will hear four beeps and "Turn" appears on the display Display Symbol Food turn over after...
- Page 75 Finish cooking Display Symbol Food with... Combination cooking A-01 Beef mode "Grill" - C3 Combination cooking A-02 Pork mode "Grill" - C3 Combination cooking A-03 Poultry mode "Grill" - C3 Combination cooking A-04 Fish mode "Grill" - C3 Automatic menu A-05 Pizza "Pizza"...
-
Page 76: Baking Pizza
RISK OF INJURY! ► After a cooking cycle, the turntable is very hot! You should therefore always use an oven cloth or heat resistant oven gloves when removing it from the cooking area. NOTE ► Please note that the size, shape and the type of foodstuff affects the result of the cooking process. - Page 77 3) Use the control dial to select the appropriate pizza programme: – "P-01" for deep-frozen pizza, temperature approx. -18°C Weight 200 g–450 g ("P-01" appears on the display – "P-02" for chilled pizza, temperature approx. 5°C, Weight 200 g–450 g ("P-02"...
-
Page 78: Defrosting
Defrosting Defrosting by weight NOTE ► Always place the food to be defrosted on dishes suitable for use in a micro- wave oven. Never directly onto the turntable You can use this function to defrost meat, poultry, fish, fruit/vegetables and pizza. The defrosting time and the power level are calculated and set automatically once you have entered the weight. - Page 79 4) Once the desired food item appears on the display , press the start/quick start button 5) Now select the weight by turning the control dial The following weights can be set: Display Symbol Food Weight d-01 Beef 100 – 1800 g d-02 Pork 100 –...
-
Page 80: Defrosting By Time
NOTE ► To ensure optimum defrosting, it is necessary to turn the food during the thawing process. The appliance reminds you of the need to turn by beep- ing and "turn" appears on the display . Open the appliance door, turn the food and then reclose the door. -
Page 81: Recipes
Recipes Rissoles Preparation 1) Shape approx.125 g of minced beef into a patty (roughly 75 mm in diameter and 35 mm thick). 2) Distribute the rissoles evenly on the turntable 3) You will get the best results if you use the convection and microwave functions alternately. -
Page 82: Muffins
Preparation 1) Cut the potatoes into slices approximately 3–4 mm thick. 2) Lay about half of the potatoes in the casserole dish in the style of roof tiles. 3) Sprinkle the potatoes with about half of the cheese. 4) Then add half of the spices and about 150 g of cream. 5) Lay the rest of the sliced potatoes on top, also in the style of roof tiles. -
Page 83: Courgette Soup
Preparation 1) Mix all ingredients well. 2) Add the muffin pastry into standard commercial paper baking cases (diameter 45 mm, height 28 mm) 3) Preheat the oven with the convection function to 170°C. NOTE ► If the number of muffins requires multiple baking operations are necessary, preheating is required only for the first batch. -
Page 84: Chocolate Apple Cake
Chocolate apple cake Ingredients ▯ 125 g butter ▯ 125 g sugar ▯ 1 packet of vanilla sugar ▯ 2 eggs ▯ 125 g flour ▯ 2 tbsp. cocoa powder ▯ 1/2 packet baking powder ▯ 1 apple ▯ a little icing sugar Preparation 1) Mix the sugar, softened butter, vanilla sugar, eggs, flour, baking powder and cocoa powder to make a dough. -
Page 85: Meat Loaf
Meat loaf Ingredients ▯ 500 g minced meat (half and half) ▯ 1/2 onion ▯ 1 egg ▯ 1/2 bread roll ▯ Pepper, salt, paprika powder For the sauce: ▯ 75 ml water ▯ 1 tbsp mustard ▯ 2 tbsp. tomato ketchup ▯... -
Page 86: Cleaning And Care
Cleaning and care DANGER! ELECTRIC SHOCK! ► Before cleaning, switch the microwave oven off and remove the plug from the mains power socket. Otherwise, there is the great risk of receiving an electric shock! Never immerse the device in water or other liquids. This could result in you receiving a fatal electric shock and the appliance could be damaged. -
Page 87: Troubleshooting
Troubleshooting PROBLEM POSSIBLE CAUSE POSSIBLE SOLUTIONS The plug is not inserted into Check the plug. a mains power socket. There is nothing on the The mains power socket is Try another mains power display defective. socket. Contact Customer Service. The display is defective. -
Page 88: Disposal
PROBLEM POSSIBLE CAUSE POSSIBLE SOLUTIONS Stop the programme and re- move the power plug. If pos- sible, eliminate the problem, The microwave has switched "E03" appears on the e.g. metals in the cooking into fault protection due to display and you hear area, which can lead to the a short circuit or open-circuit beeps. -
Page 89: Kompernass Handels Gmbh Warranty
Kompernass Handels GmbH warranty Dear Customer, This appliance has a 3-year warranty valid from the date of purchase. If this product has any faults, you, the buyer, have certain statutory rights. Your statutory rights are not restricted in any way by the warranty described below. Warranty conditions The validity period of the warranty starts from the date of purchase. -
Page 90: Service
Tel.: 1890 930 034 (0,08 EUR/Min., (peak)) (0,06 EUR/Min., (off peak)) E-Mail: kompernass@lidl.ie IAN 284999 Importer Please note that the following address is not the service address. Please use the service address provided in the operating instructions. KOMPERNASS HANDELS GMBH... - Page 91 SMW 900 EDS B5 ■ 88 │ GB │ IE...
- Page 92 Table des matières Introduction ..........91 Utilisation conforme à...
- Page 93 Recettes ........... . 122 Boulettes de viande .
-
Page 94: Introduction
Introduction Toutes nos félicitations pour l'achat de votre nouvel appareil. Vous venez ainsi d'opter pour un produit de grande qualité. Le mode d'emploi fait partie intégrante de ce produit. Il contient des remarques importantes concernant la sécurité, l'usage et la mise au rebut. Avant d'utiliser le produit, veuillez vous familiariser avec toutes les consignes d'utilisation et de sécurité. -
Page 95: Description De L'appareil
Description de l'appareil Figure A : Écran Touche d'ouverture de la porte Plateau tournant Roulettes Fentes d'aération Figure B : Touche Micro-ondes Touche Gril Touche Combinaison micro-ondes - Gril Touche Combinaison micro-ondes - air chaud Touche Air chaud Touche Horloge Touche MINUTERIE (minuterie de cuisine) Touche Stop/Sécurité... -
Page 96: Consignes De Sécurité Importantes
Consignes de sécurité importantes Lire attentivement et entièrement les consignes de sécurité et le mode d'emploi avant la première utilisation et les conserver pour une utilisation ultérieure. DANGER ! RISQUE D'ÉLECTROCUTION ! Un avertissement à ce niveau de danger signale une situation potentiellement dangereuse. - Page 97 Ne mettez rien entre l'avant de l'appareil et la porte et assurez- ► vous qu'aucune salissure ou résidu de détergent ne s'accumule sur les joints. DANGER ! RISQUE D'ÉLECTROCUTION ! Ne plongez jamais le cordon d'alimentation ou la fiche ► secteur dans l'eau ou d'autres liquides. Maintenez le cordon d'alimentation à...
- Page 98 AVERTISSEMENT - RISQUE DE BLESSURE ! Le nettoyage et la maintenance réalisée par l'utilisateur ne ► doivent pas être effectués par des enfants à moins qu'ils soient âgés de plus de 8 ans et surveillés. Éloignez l'appareil et son cordon de raccordement des ►...
- Page 99 AVERTISSEMENT - RISQUE DE BLESSURE ! Il est recommandé aux personnes portant un stimulateur car- ► diaque de s'informer auprès de leur médecin sur les risques éventuels avant la mise en service d'un appareil micro-ondes. Ne laissez jamais traîner le cordon d'alimentation sur la ►...
- Page 100 AVERTISSEMENT - RISQUE DE BLESSURE ! Attention ! Surface brûlante ! AVERTISSEMENT - RISQUE D'INCENDIE ! Ne laissez jamais le micro-ondes sans surveillance lorsque ► vous chauffez des aliments dans des emballages en plas- tique ou en papier. Ne placez pas de matériaux inflammables à proximité du ►...
- Page 101 AVERTISSEMENT - RISQUE D'INCENDIE ! Ne décongelez pas de la graisse ou de l'huile congelée dans ► le micro-ondes. La graisse ou l'huile risque de s'enflammer. N'utilisez pas de minuterie externe ni de dispositif de com- ► mande à distance séparé pour opérer l'appareil. Ce micro-ondes est destiné...
- Page 102 ATTENTION - DÉGÂTS MATÉRIELS ! Les liquides et autres denrées alimentaires ne doivent pas ► être réchauffés dans des récipients hermétiquement fermés, ces derniers pouvant exploser et endommager l'appareil. Ne vous appuyez pas sur la porte du micro-ondes. ► Si l'appareil de cuisson se trouve dans un état de propreté ►...
- Page 103 REMARQUES CONCERNANT UNE MANIPULATION SÛRE Si l'appareil dégage de la fumée, éteindre l'appareil ou le ► débrancher et laisser la porte fermée pour étouffer toutes flammes éventuelles. Les œufs à la coque et les œufs durs ne doivent pas être ►...
-
Page 104: Avant De Commencer
INTERFÉRENCES CHEZ D'AUTRES APPAREILS La mise en service du micro-ondes peut entraîner des pertur- ► bations sur votre radio, votre téléviseur ou appareils similaires. Si de telles interférences devaient se produire, il est possible de les réduire ou de les éliminer en prenant les mesures suivantes : Nettoyage de la porte et joints du micro-ondes. -
Page 105: Utiliser De La Vaisselle De Cuisson Appropriée
Utiliser de la vaisselle de cuisson appropriée ■ Le matériau idéal pour un four à micro-ondes laisse passer les micro-ondes, et par conséquent l'énergie à travers le récipient, pour réchauffer les aliments. Les micro-ondes ne passent pas à travers le métal. C'est la raison pour laquelle il ne faut pas utiliser de récipient ou de vaisselle métallique. -
Page 106: Première Mise En Service
Première mise en service REMARQUE CONCERNANT LE PREMIER ÉCHAUFFEMENT N'opérez jamais le micro-ondes vide en mode ► "Micro-ondes" ! Utilisez le micro-ondes exclusivement sans accessoires ► et aliments en mode "Gril" (Gr.3) lorsque vous le faites chauffer pour la première fois ! (voir le chapitre "Préparer l'appareil") Installer l'appareil AVERTISSEMENT - RISQUE D'INCENDIE ! -
Page 107: Préparez L'appareil
Préparez l'appareil ■ Retirez le matériau d'emballage et le film de protection fixé sur le panneau et la touche d'ouverture de porte ATTENTION - DÉGÂTS MATÉRIELS ! Ne retirez pas la plaque de recouvrement en mica gris clair car elle sert de protection pour les tubes magnétrons dans l'espace de cuisson. -
Page 108: Mettre Le Plateau Tournant En Place
REMARQUE ► En raison de résidus liés à la fabrication, la première mise en service peut entraîner de légères odeurs ou de la fumée. Ceci est absolument inoffensif. Veillez à une aération suffisante. Ouvrez par exemple une fenêtre. L'appareil s'arrête automatiquement après 5 minutes. Attendez que l'appareil ait entièrement refroidi. -
Page 109: Mode Veille
Mode veille Le micro-ondes passe automatiquement en mode veille et l'heure est affichée lorsqu'aucune touche n'est actionnée pendant quelque temps. Quelques secondes après le passage en mode veille, l'éclairage de l'écran est également assombri. Réglage de la minuterie de cuisine Le micro-ondes dispose d'une minuterie de cuisine que vous pouvez utiliser indépendamment du fonctionnement du micro-ondes. -
Page 110: Interrompre/Stopper Les Opérations De Décongélation Ou De Cuisson
Afficher le niveau de puissance pendant le fonctionnement Pendant la cuisson, appuyez sur la touche Micro-ondes . L'écran affiche pendant quelques secondes le niveau de puissance activé. Interrompre/stopper les opérations de décongélation ou de cuisson ■ Appuyez une fois sur la touche Stop , pour interrompre une opération de décongélation ou de cuisson. - Page 111 Définir le temps de cuisson Après avoir sélectionné la puissance, définissez le temps de cuisson souhaité : ■ Tournez le bouton de sélection jusqu'à ce que le temps de cuisson souhaité soit réglé. Les tranches de durée à régler par le bouton de sélection sont les suivantes : –...
-
Page 112: Fonction Gril
Fonction gril AVERTISSEMENT - RISQUE D'INCENDIE ! ► Lors de l'utilisation des fonctions gril, n'utilisez en aucun cas des couvercles ou une vaisselle non thermorésistante car ils risquent de fondre ou de s'enflammer ! REMARQUE ► Pour le gril, utilisez toujours le support de gril . -
Page 113: Processus De Cuisson Combinée "Gril
Processus de cuisson combinée "Gril" Cette fonction associe la fonction d'un gril au fonctionnement normal du micro- ondes. Pendant la combinaison, une certaine durée de cuisson et la durée res- tante pour le gril sont appliquées automatiquement et dans un même processus. Le moment de commutation de l'appareil se caractérise par un léger clic audible. -
Page 114: Fonctionnement À Air Chaud
2) À l'aide du bouton de sélection , réglez la combinaison souhaitée : "C 1 " pour la combinaison 1, "C 2 " pour la combinaison 2 (Affichages écran : C2, 55:45, "C 3 " pour la combinaison 3, (Affichages écran : C3, 30:70, "C 4 "... -
Page 115: Opération De Cuisson Combinée "Air Chaud
4) En tournant le bouton de sélection , sélectionnez la température et confirmez-la en appuyant sur la touche Démarrage/Démarrage rapide 5) À l'aide du bouton de sélection réglez le temps de cuisson souhaité. Le temps de cuisson maximal réglable est de 95 minutes. 6) Pour le démarrage, appuyez sur la touche Démarrage/Démarrage rapide L'écran affiche l'icône de mode air chaud... -
Page 116: Menu Automatique
Menu automatique Pour les plats devant être préparés en mode menu automatique, il n'est pas nécessaire de régler la durée de cuisson et le niveau de puissance. Il suffit plutôt d'indiquer le type de denrée alimentaire qui doit être cuit ainsi que son poids. AVERTISSEMENT - RISQUE D'INCENDIE ! ►... - Page 117 Écran Icône Aliments Poids A-04 Poisson 200 - 1200 g * P1 200 - 450 g A-05 Pizza P2 200 - 450 g P3 200 - 450 g A-06 Fruits/légumes 100 - 1000 g A-07 Pommes de terre 100 - 800 g A-08 Réchauffer 300 - 700 g...
- Page 118 REMARQUE ► Pour obtenir une cuisson uniforme, certains aliments doivent être retournés au bout des 2/3 du temps de cuisson. le micro-ondes s'arrête automatique- ment au bout de ce temps, 4 signaux sonores retentissent et "Turn" apparaît à l'écran Retourner au Écran Icône Aliments...
- Page 119 Finir la cuisson Écran Icône Aliments avec ..Combinaison de A-01 Bœuf cuisson "Gril" - C3 Combinaison de A-02 Porc cuisson "Gril" - C3 Combinaison de A-03 Volaille cuisson "Gril" - C3 Combinaison de A-04 Poisson cuisson "Gril" - C3 Menu automatique A-05 Pizza...
-
Page 120: Cuisson De Pizza
RISQUE DE BLESSURE ! ► Le plateau tournant est très chaud après une cuisson avec le gril ! Utilisez donc absolument des maniques ou des gants résistants à la chaleur pour le sortir de l'espace de cuisson. REMARQUE ► Veuillez noter que la taille, la forme et les variétés des aliments déterminent en partie le résultat de la cuisson. - Page 121 3) Sélectionnez à l'aide du bouton de sélection le programme de pizza approprié : – "P-01" pour une pizza surgelée, Température : env. -18 degrés Poids 200 g – 450 g ("P-01" apparaît à l'écran – "P-02" pour une pizza réfrigérée, Température : env.
-
Page 122: Décongeler
Décongeler Décongélation selon le poids REMARQUE ► Posez toujours sur des articles de vaisselle appropriés pour le micro-ondes les produits alimentaires à décongeler. Jamais directement sur le plateau tournant Avec cette fonction, vous pouvez décongeler sans problème de la viande, de la volaille, des fruits et légumes et une pizza. - Page 123 4) Lorsque l'aliment souhaité apparait à l'écran appuyez sur la touche Démarrage/Démarrage rapide 5) Sélectionnez le poids en tournant le bouton de sélection Vous pouvez régler les poids suivants : Écran Icône Aliments Poids d-01 Bœuf 100 - 1800 g d-02 Porc 100 - 1800 g...
-
Page 124: Décongélation Selon La Durée
REMARQUE ► Pour garantir une décongélation optimale, il est nécessaire de retourner les aliments pendant la décongélation. L'appareil vous rappelle de les retourner en faisant retentir des signaux sonores et en affichant "turn" à l'écran Ouvrez la porte de l'appareil, retournez l'aliment, puis refermez la porte de l'appareil. -
Page 125: Recettes
Recettes Boulettes de viande Préparation 1) Formez des boulettes de viande avec environ 125 g de hachis de bœuf (diamètre : env. 75 mm, hauteur : env. 35 mm). 2) Répartissez maintenant les boulettes uniformément sur le plateau tournant 3) Vous obtiendrez le meilleur résultat en utilisant l'air chaud et la fonction micro-ondes à... -
Page 126: Muffins
Préparation 1) Coupez les pommes de terre en rondelles d'env. 3 à 4 mm d'épaisseur. 2) Posez à peu près la moitié des pommes de terre comme des tuiles dans le moule à gratin. 3) Parsemez à peu près la moitié du fromage sur les pommes de terre. 4) Ajoutez la moitié... -
Page 127: Soupe Aux Courgettes
Préparation 1) Mélangez bien ensemble tous les ingrédients. 2) Versez la pâte à muffin dans des petits moules à papier du commerce (diamètre env. 45 mm, hauteur env. 28 mm) 3) Préchauffez le micro-ondes avec la fonction d'air chaud à 170 °C. REMARQUE ►... -
Page 128: Gâteau Au Chocolat Et Aux Pommes
Gâteau au chocolat et aux pommes Ingrédients ▯ 125 g de beurre ▯ 125 g de sucre ▯ 1 sachet de sucre vanillé ▯ 2 œufs ▯ 125 g de farine ▯ 2 cuillères à soupe de cacao en poudre ▯... -
Page 129: Rôti De Viande Hachée
Rôti de viande hachée Ingrédients ▯ 500 g de viande hachée (moitié/moitié) ▯ 1/2 oignon ▯ 1 œuf ▯ 1/2 petit pain ▯ Poivre, sel et poudre de piment pour la sauce : ▯ 75 ml d'eau ▯ 1 cs de moutarde ▯... -
Page 130: Nettoyage Et Entretien
Nettoyage et entretien DANGER ! RISQUE D'ÉLECTROCUTION ! ► Éteignez le micro-ondes avant de le nettoyer et retirez la fiche secteur de la prise secteur. Sinon, il y a un risque de choc électrique ! L'appareil ne doit sous aucun prétexte être plongé dans l'eau ou d'autres liquides ! Il peut en résulter un danger de mort par choc électrique et l'appareil peut être endommagé. -
Page 131: Dépannage
Dépannage PROBLÈME CAUSE POSSIBLE SOLUTIONS POSSIBLES La fiche secteur n'a pas été Contrôlez la fiche secteur. insérée dans la prise secteur. Essayez de brancher La prise électrique est défec- l'appareil sur une autre prise L'écran n'affiche rien. tueuse. électrique. Contactez le service après- L'écran est défectueux. -
Page 132: Élimination
PROBLÈME CAUSE POSSIBLE SOLUTIONS POSSIBLES Interrompez le programme et débranchez la fiche secteur de la prise de cou- En raison d'un court-circuit rant. Réglez le problème si ou d'une tension de marche possible, par exemple s'il y L'écran affiche "E03" à... -
Page 133: Garantie De Kompernass Handels Gmbh
Garantie de Kompernass Handels GmbH Chère cliente, cher client, Cet appareil est garanti 3 ans à partir de la date d'achat. Si ce produit venait à présenter des vices, vous disposez de droits légaux face au vendeur de ce produit. Vos droits légaux ne sont pas restreints par notre garantie présentée ci-dessous. -
Page 134: Service Après-Vente
Tel.: 0800 919270 E-Mail: kompernass@lidl.fr Service Belgique Tel.: 070 270 171 (0,15 EUR/Min.) E-Mail: kompernass@lidl.be IAN 284999 Importateur Veuillez tenir compte du fait que l'adresse suivante n'est pas une adresse de service après-vente. Veuillez d'abord contacter le service mentionné. KOMPERNASS HANDELS GMBH... - Page 135 ■ 132 │ FR │ BE SMW 900 EDS B5...
- Page 136 Inhoud Inleiding ........... . 135 Gebruik in overeenstemming met bestemming .
- Page 137 Recepten ........... 166 Gehaktschijven .
-
Page 138: Inleiding
Inleiding Hartelijk gefeliciteerd met de aankoop van uw nieuwe apparaat. U hebt hiermee gekozen voor een hoogwaardig product. De gebruiksaanwijzing maakt deel uit van dit product. Deze bevat belangrijke aanwijzingen voor veilig- heid, gebruik en afvoer. Lees alle bedienings- en veiligheidsaanwijzingen voordat u het product in gebruik neemt. -
Page 139: Productbeschrijving
Productbeschrijving Afbeelding A: Display Toets Deuropener Draaiplateau Rollen Ventilatiesleuven Afbeelding B: Toets Magnetron Toets Grill Toets Combinatie magnetron - grill Toets Combinatie magnetron - hete lucht Toets Hete lucht Toets Klok Toets TIMER (kookwekker) Toets Stop / Kinderslot Draaiknop / toets Start/Snelstart Afbeelding C: Grillstandaard Technische gegevens... -
Page 140: Belangrijke Veiligheidsvoorschriften
Belangrijke veiligheidsvoorschriften Lees de veiligheidsvoorschriften en de gebruiksaanwijzing aandachtig door voordat u het apparaat voor het eerst gebruikt en berg deze op voor toekomstig gebruik. GEVAAR! ELEKTRISCHE SCHOK! Een waarschuwing op dit niveau van gevaar duidt op een mogelijk gevaarlijke situatie. Als de gevaarlijke situatie niet wordt vermeden, kan dit de dood of ernstig letsel tot gevolg hebben. - Page 141 Klem niets tussen de voorzijde van het apparaat en de deur ► en zorg ervoor dat zich geen kleine verontreinigingen of res- tanten van schoonmaakmiddelen op de sluitvlakken kunnen ophopen. ELEKTRISCHE SCHOK! GEVAAR! Dompel het snoer of de stekker nooit onder in water of ►...
- Page 142 WAARSCHUWING - LETSELGEVAAR! Reiniging en onderhoud door de gebruiker mogen niet worden ► uitgevoerd door kinderen, tenzij ze 8 jaar of ouder zijn en onder toezicht staan. Houd het apparaat en het snoer buiten bereik van kinderen ► jonger dan 8 jaar. Gebruik dit apparaat uitsluitend in overeenstemming met het ►...
- Page 143 WAARSCHUWING - LETSELGEVAAR! Personen die een pacemaker dragen, dienen voor ingebruik- ► name van de magnetron bij hun huisarts te informeren naar mogelijke risico's. Laat het snoer nooit over de rand van tafel of werkblad han- ► gen. Kinderen zouden eraan kunnen trekken. Open verpakkingen, popcornzakjes enz.
- Page 144 WAARSCHUWING - LETSELGEVAAR! Let op! Heet oppervlak! WAARSCHUWING - BRANDGEVAAR! Laat de magnetron nooit zonder toezicht wanneer u levens- ► middelen in plastic- of papierverpakkingen verwarmt. Plaats geen brandbare materialen in de buurt van de mag- ► netron of de ventilatiesleuven. Verwijder alle metalen sluitingen van de verpakking van de ►...
- Page 145 WAARSCHUWING - BRANDGEVAAR! Ontdooi geen bevroren vet of olie in de magnetron. Het vet ► of de olie kan in brand vliegen. Gebruik geen externe timer of een aparte afstandsbediening ► om het apparaat te bedienen. Deze magnetron is bestemd voor het verwarmen van spijzen ►...
- Page 146 LET OP - MATERIËLE SCHADE! Vloeistoffen en overige voedingsmiddelen mogen niet in ► luchtdicht afgesloten voorwerpen verhit worden, omdat deze kunnen ontploffen en het apparaat kunnen beschadigen. Leun niet op de deur van de magnetron. ► Als het apparaat niet afdoende wordt schoongehouden, kan ►...
- Page 147 AANWIJZINGEN VOOR VEILIGE OMGANG Als er rook uit het apparaat komt, moet u het uitschakelen ► of de stekker uit het stopcontact trekken en de deur gesloten houden om eventuele vlammen te doven. Eieren in de schaal en hardgekookte eieren mogen niet in ►...
-
Page 148: Voordat U Begint
INTERFERENTIESTORINGEN BIJ ANDERE APPARATUUR Het gebruik van de magnetron kan storingen bij uw radio, ► tv-toestel of vergelijkbare apparatuur veroorzaken. Indien dergelijke interferenties optreden, kunt u deze met be- hulp van de volgende maatregelen verminderen of wegnemen: Reinig deur- en afdichtvlakken van de magnetron. –... -
Page 149: Maak Gebruik Van Geschikt Kookgerei
Maak gebruik van geschikt kookgerei ■ Het ideale materiaal voor een magnetronoven laat microgolven door en laat dus de energie door het reservoir heendringen om het gerecht te verwarmen. Microgolven kunnen niet door metaal dringen. Derhalve mogen geen meta- len pannen of schalen en metalen keukengerei worden gebruikt. ■... -
Page 150: Ingebruikname
Ingebruikname OPMERKING OVER DE EERSTE KEER OPWARMEN Gebruik de magnetron nooit in lege toestand in de ► magnetronmodus! Laat de magnetron bij de eerste keer opwarmen ► uitsluitend werken zonder accessoires en levens- middelen in de grillmodus (Gr 3)! (zie hoofdstuk “Apparaat voorbereiden”) Apparaat plaatsen WAARSCHUWING - BRANDGEVAAR! ►... -
Page 151: Apparaat Voorbereiden
Apparaat voorbereiden ■ Verwijder het verpakkingsmateriaal en de op het paneel en de toets Deuro- pener aangebrachte beschermfolie. LET OP - MATERIËLE SCHADE! Verwijder niet de lichtgrijze mica afdekplaat die ter bescherming van de magneetveldbuizen in de gaarruimte aangebracht is. ■... -
Page 152: Draaiplateau Plaatsen
OPMERKING ► Bij het eerste gebruik kan een lichte rook- en geurontwikkeling optreden, veroorzaakt door restanten die inherent zijn aan het productieproces. Dit is onschadelijk. Zorg voor voldoende ventilatie. Open bijvoorbeeld een raam. Na 5 minuten wordt het apparaat automatisch uitgeschakeld. Wacht totdat het apparaat volledig is afgekoeld. -
Page 153: Stand-Bymodus
Stand-bymodus Wanneer langere tijd niet op een toets wordt gedrukt, gaat de magnetron automatisch over op de stand-bymodus en wordt de tijd weergegeven. Enkele seconden na omschakeling op de stand-bymodus wordt ook de displayverlichting gedimd. Kookwekker instellen De magnetron beschikt over een kookwekker die u onafhankelijk van de magnetron- modus kunt gebruiken. -
Page 154: Garings- Of Ontdooiproces Onderbreken/Afbreken
Vermogensniveau tijdens de werking opvragen Druk tijdens het garingsproces op de toets Magnetron . Op het display verschijnt enkele seconden lang het geactiveerde vermogensniveau. Garings- of ontdooiproces onderbreken/afbreken ■ Druk één keer op de toets Stop om een garings- of ontdooiproces te onderbreken. - Page 155 Garingstijd instellen Nadat het vermogen is gekozen, stelt u de gewenste garingstijd in: ■ Draai de draaiknop totdat de gewenste garingstijd is ingesteld. De standen voor de tijdsinstelling van de draaiknop zijn als volgt: – van 0 sec. tot 5 min.: in stappen van 10 sec. –...
-
Page 156: Grillfunctie
Grillfunctie WAARSCHUWING - BRANDGEVAAR! ► Gebruik bij de grillfuncties in geen geval afdekkingen of niet hittebestendig servies, omdat deze kunnen smelten of in brand kunnen vliegen! OPMERKING ► Gebruik voor het grillen altijd de grillstandaard . Zo behaalt u een opti- maal grillresultaat. -
Page 157: Combinatie-Garingsproces "Grill
Combinatie-garingsproces “Grill” Deze functie combineert de grillfunctie met de normale magnetronfunctie. Tijdens dit gecombineerde proces wordt een bepaalde tijd voor het garen en de reste- rende tijd voor het grillen automatisch en in een doorgaand proces uitgevoerd. Het omschakelmoment van het apparaat kunt u waarnemen door een zachte klik. WAARSCHUWING - BRANDGEVAAR! ►... -
Page 158: Heteluchtmodus
2) Stel met de draaiknop de gewenste combinatie in. “C 1” voor combinatie 1, “C 2” voor combinatie 2 (Display-indicatie: C2, 55:45, “C 3” voor combinatie 3 (Display-indicatie: C3, 30:70, “C 4” voor combinatie 4 (Display-indicatie: C4, 55:45, Bevestig uw keuze door op de toets Start/Snelstart te drukken. -
Page 159: Combinatie-Garingsproces "Hete Lucht
4) Stel door draaien van de draaiknop de temperatuur in en bevestig uw keuze door op de toets Start/Snelstart te drukken. 5) Stel met de draaiknop de gewenste garingstijd in. De maximaal instelbare garingstijd is 95 minuten. 6) Druk op de toets Start/Snelstart om te starten. -
Page 160: Automaat-Modus
Automaat-modus Het is niet nodig om voor gerechten die in de automaat-modus moeten worden bereid, de duur van het garingsproces en het vermogen in te voeren. Het volstaat dat u invoert welke soort levensmiddelen gegaard of gekookt moet worden, alsook het gewicht van deze levensmiddelen. WAARSCHUWING - BRANDGEVAAR! ►... - Page 161 Display Symbool Levensmiddel Gewicht A-04 200 - 1200 g * P1 200 - 450 g A-05 Pizza P2 200 - 450 g P3 200 - 450 g A-06 Fruit/groente 100 - 1000 g A-07 Aardappels 100 - 800 g A-08 Opwarmen 300 - 700 g A-09...
- Page 162 OPMERKING ► Om tot een gelijkmatig kook- of garingsresultaat te komen, moeten de gerechten na 2/3 van de garingstijd worden omgedraaid. De magnetron stopt na deze tijd automatisch, er klinken 4 geluidssignalen en “Turn” verschijnt op het display Display Symbool Levensmiddel Omdraaien na...
- Page 163 Display Symbool Levensmiddel Nagaren met... Combinatie-garings- A-01 Rundvlees proces “Grill” - C3 Combinatie-garings- A-02 Varkensvlees proces “Grill” - C3 Combinatie-garings- A-03 Gevogelte proces “Grill” - C3 Combinatie-garings- A-04 proces “Grill” - C3 Automaat-menu A-05 Pizza “Pizza” - P2 Magnetronmodus met A-06 Fruit/groente 900 W vermogen...
-
Page 164: Pizza Bakken
LETSELGEVAAR! ► Het draaiplateau is erg heet na een garingsproces met grill! Gebruik daarom beslist ovenhandschoenen of hittebestendige handschoenen als u het draaiplateau uit de kookruimte haalt. OPMERKING ► Bedenk dat bij levensmiddelen grootte, vorm en soort medebepalend zijn voor het kookresultaat. Toepassingsvoorbeeld 1: Ga als volgt te werk als u 400 g groente of fruit wilt garen: 1) Draai de draaiknop... - Page 165 3) Kies met de draaiknop het gewenste pizzaprogramma: – “P-01” voor diepvriespizza, Temperatuur ca. -18 graden Gewicht 200 g – 450 g (“P-01” verschijnt op het display – “P-02” voor pizza uit de koeling, Temperatuur ca. 5 graden, Gewicht 200 g – 450 g (“P-02”...
-
Page 166: Ontdooien
Ontdooien Ontdooien op gewicht OPMERKING ► Leg de te ontdooien levensmiddelen altijd op servies dat geschikt is voor magnetrons. Nooit direct op het draaiplateau Met deze functie kunt u probleemloos vlees, gevogelte, vis, fruit/groente en pizza ontdooien. De ontdooitijd en het vermogen worden na de invoer van het gewicht automatisch berekend en ingesteld. - Page 167 4) Wanneer het gewenste levensmiddel op het display verschijnt, drukt u op de toets Start/Snelstart 5) Draai nu de draaiknop om het gewicht in te stellen. De volgende gewichten kunnen worden ingesteld: Display Symbool Levensmiddel Gewicht d-01 Rundvlees 100 - 1800 g d-02 Varkensvlees 100 - 1800 g...
-
Page 168: Ontdooien Op Tijd
OPMERKING ► Voor een optimaal ontdooiresultaat moeten de etenswaren tijdens het ont- dooien worden omgedraaid. Het apparaat herinnert u aan het omdraaien doordat er geluidssignalen klinken en op het display “turn” verschijnt. Open de deur van de magnetron, draai de etenswaren om en sluit de deur weer. -
Page 169: Recepten
Recepten Gehaktschijven Bereiding 1) Maak gehaktschijven van elk ca. 125 gram rundergehakt (diameter ca. 75 mm, hoogte ca. 35 mm). 2) Verdeel de gehaktschijven gelijkmatig over het draaiplateau 3) Het beste resultaat bereikt u door afwisselend hete lucht en de magnetron- functie te gebruiken. -
Page 170: Muffins
Bereiding 1) Snijd de aardappelen in schijfjes van ca. 3 – 4 mm dik. 2) Leg ongeveer de helft van de aardappelen dakpansgewijs in de vuurvaste schaal. 3) Bestrooi de aardappelen met ca. de helft van de kaas. 4) Voeg de helft van de kruiden toe, en ca. 150 g room. 5) Leg de rest van de aardappelschijfjes er ook dakpansgewijs overheen. -
Page 171: Courgettesoep
Bereiding 1) Meng alle ingrediënten goed door elkaar. 2) Doe het muffindeeg in papieren bakvormpjes die in de winkel te koop zijn (diameter ca. 45 mm, hoogte ca. 28 mm) 3) Verwarm de magnetron met de heteluchtfunctie voor op 170 °C. OPMERKING ►... -
Page 172: Choco-Appeltaart
Choco-appeltaart Ingrediënten ▯ 125 g boter ▯ 125 g suiker ▯ 1 pakje vanillesuiker ▯ 2 eieren ▯ 125 g meel ▯ 2 el cacaopoeder ▯ 1/2 pakje bakpoeder ▯ 1 appel ▯ Een beetje poedersuiker Bereiding 1) Meng de suiker, de zachte boter, de vanillesuiker, de eieren, de bloem, het bakpoeder en het cacaopoeder tot een deeg. -
Page 173: Gehaktbrood (Meatloaf)
Gehaktbrood (meatloaf) Ingrediënten ▯ 500 g gehakt (half-om-half) ▯ 1/2 ui ▯ 1 ei ▯ 1/2 broodje ▯ Zout, peper, paprikapoeder Voor de saus: ▯ 75 ml water ▯ 1 el mosterd ▯ 2 el tomatenketchup ▯ 2 el vleesjus ▯... -
Page 174: Reiniging En Onderhoud
Reiniging en onderhoud GEVAAR! ELEKTRISCHE SCHOK! ► Schakel de magnetron vóór het schoonmaken uit en haal de stekker uit het stopcontact. Anders bestaat het gevaar voor een elektrische schok! Het apparaat mag in geen geval worden ondergedompeld in water of andere vloeistoffen! Hierdoor kan levensgevaar ontstaan door een elektrische schok en het apparaat kan beschadigd raken. -
Page 175: Problemen Oplossen
Problemen oplossen MOGELIJKE PROBLEEM MOGELIJKE OORZAAK OPLOSSINGEN De stekker zit niet in het Controleer de stekker. stopcontact. Probeer een ander stopcon- Het display geeft niets Het stopcontact is defect. tact. aan. Neem contact op met het Het display is defect. servicecentrum. -
Page 176: Afvoeren
MOGELIJKE PROBLEEM MOGELIJKE OORZAAK OPLOSSINGEN Onderbreek het programma en haal de stekker uit het stopcontact. Verhelp indien De storingsbeveiliging van mogelijk het probleem, bijv. Het display geeft “E03” de magnetron is geactiveerd metaal in de kookruimte, dat aan en er klinken geluids- door een kortsluiting of een bij gebruik van de magne- signalen. -
Page 177: Garantie Van Kompernaß Handels Gmbh
Garantie van Kompernaß Handels GmbH Geachte klant, U hebt op dit apparaat 3 jaar garantie vanaf de aankoopdatum. In geval van ge- breken in dit product hebt u wettelijke rechten tegenover de verkoper van het product. Deze wettelijke rechten worden door onze hierna beschreven garantie niet beperkt. Garantievoorwaarden De garantieperiode geldt vanaf de datum van aankoop. -
Page 178: Service
Tel.: 0900 0400223 (0,10 EUR/Min.) E-Mail: kompernass@lidl.nl Service België Tel.: 070 270 171 (0,15 EUR/Min.) E-Mail: kompernass@lidl.be IAN 284999 Importeur Let op: het volgende adres is geen serviceadres. Neem eerst contact op met het opgegeven serviceadres. KOMPERNASS HANDELS GMBH BURGSTRASSE 21... - Page 179 ■ 176 │ NL │ BE SMW 900 EDS B4...
- Page 180 Obsah Úvod ............179 Použití...
- Page 181 Recepty ........... . 210 Karbanátky .
-
Page 182: Úvod
Úvod Gratulujeme vám k zakoupení nového přístroje. Rozhodli jste se pro vysoce kvalitní výrobek. Návod k obsluze je součástí tohoto výrobku. Obsahuje důležité informace o bezpečnosti, použití a likvidaci. Před po- užitím výrobku se prosím dobře seznamte se všemi provozními a bezpečnostními pokyny. -
Page 183: Popis Přístroje
Popis přístroje Obrázek A: displej tlačítko otvírání dveří otočný talíř kolečka větrací otvory Obrázek B: tlačítko mikrovlnné trouby tlačítko grilu tlačítko kombinace mikrovlnná trouba - gril tlačítko kombinace mikrovlnná trouba - horký vzduch tlačítko horkého vzduchu tlačítko hodin tlačítko TIMER (kuchyňský časovač) tlačítko stop/dětská... -
Page 184: Důležitá Bezpečnostní Upozornění
Důležitá bezpečnostní upozornění Před prvním použitím si pečlivě přečtěte bezpečnostní pokyny a návod k obsluze a uchovejte je pro pozdější použití. NEBEZPEČÍ! ÚDER ELEKTRICKÝM PROUDEM! Výstražné upozornění tohoto stupně nebezpečí označuje možnou nebezpečnou situaci. Pokud se nebezpečné situaci nezabrání, může to mít za následek smrt nebo vážné... - Page 185 Mezi přední část přístroje a dveře nic svírejte a zajistěte, aby se ► na těsnících plochách nehromadily nečistoty a zbytky mycího prostředku. NEBEZPEČÍ! ÚDER ELEKTRICKÝM PROUDEM! Neponořujte síťový kabel nebo zástrčku do vody nebo ► jiných kapalin. Síťový kabel udržujte v dostatečné vzdálenosti od zdrojů ►...
- Page 186 VÝSTRAHA - NEBEZPEČÍ ZRANĚNÍ! Děti nesmí provádět čištění ani údržbu uživatele, ledaže jsou ► starší než 8 let a jsou pod dohledem. Děti mladší 8 let nesmí mít přístup k přístroji a přívodnímu ► kabelu. Používejte tento přístroj pouze v souladu s určením, a to podle ►...
- Page 187 VÝSTRAHA - NEBEZPEČÍ ZRANĚNÍ! Síťový kabel nikdy nenechávejte viset přes stůl nebo pracovní ► desku. Děti by za něj mohly zatáhnout. Dózy, sáčky s popcornem atd. otevírejte po ohřátí vždy tak, ► aby byl jejich otvor orientován směrem od vašeho těla. Vystupující...
- Page 188 VÝSTRAHA - NEBEZPEČÍ ZRANĚNÍ! Pozor! Horký povrch! VÝSTRAHA - NEBEZPEČÍ POŽÁRU! Mikrovlnnou troubu nikdy nenechávejte bez dozoru při ohří- ► vání potravin v plastovém nebo papírovém balení. Do blízkosti mikrovlnné trouby a ventilačních otvorů neumís- ► ťujte hořlavé materiály. Odstraňte všechny kovové uzávěry obalů potravin, které ►...
- Page 189 VÝSTRAHA - NEBEZPEČÍ POŽÁRU! V mikrovlnné troubě nerozmrazujte zmražený tuk nebo olej. ► Tuk nebo olej se může vznítit. K provozu přístroje nepoužívejte externí spínací hodiny ani ► samostatné dálkové ovládání. Tato mikrovlnná trouba je určena k ohřevu potravin a ná- ► pojů.
- Page 190 POZOR – VĚCNÉ ŠKODY! Tekutiny a jiné potraviny se nesmí ohřívat v hermeticky ► uzavřených nádobách, protože tyto mohou explodovat a přístroj poškodit. Neopírejte se o dvířka mikrovlnné trouby. ► Nedostatečná čistota kuchyňského nádobí může vést k po- ► škození povrchu, které může ovlivnit jeho životnost a zároveň může způsobit nebezpečné...
- Page 191 POKYNY PRO BEZPEČNOU MANIPULACI Vejce ve skořápce a natvrdo vařená vejce se v mikrovlnné ► troubě nikdy nesmí ohřívat, protože samy mohou ještě explo- dovat v mikrovlnné troubě i po ukončení ohřevu. Potraviny s tlustou slupkou, jako např. brambory, celé dýně, jablka a kaštany, je třeba před ohřevem naříznout.
-
Page 192: Dříve Než Začnete
RÁDIOVÉ RUŠENÍ U JINÝCH PŘÍSTROJŮ Provoz mikrovlnné trouby může vyvolat rušení Vašeho rádia, ► televizního přijímače nebo podobných zařízení. V případě výskytu těchto interferencí lze problémy snížit nebo omezit pomocí následujících opatření: Vyčistěte dveře a těsnicí plochu mikrovlnné trouby. – Změňte směr přijímací antény rádia nebo televize. –... -
Page 193: Použití Vhodného Nádobí
Použití vhodného nádobí ■ Ideální materiál pro mikrovlnnou troubu propouští mikrovlnné záření, nechává tedy prostupovat energii materiálem, čímž se pokrm zahřívá. Mikrovlny nejsou schopny pronikat kovem. Z tohoto důvodu se nesmí používat kovové nádoby ani kovové nádobí. ■ Při ohřívání v mikrovlnné troubě nepoužívejte výrobky z recyklovaného papíru. Ten může obsahovat drobné... -
Page 194: První Uvedení Do Provozu
První uvedení do provozu UPOZORNĚNÍ K PRVNÍMU OHŘEVU Neprovozujte mikrovlnnou troubu nikdy v provoz- ► ním režimu „Mikrovlnná trouba“, když je prázdná! Používejte mikrovlnnou troubu pouze během ► prvního ohřevu bez příslušenství a potraviny v provozním režimu "Gril" (GR 3)! (viz kapitolu „Příprava přístroje”) Umístění... -
Page 195: Příprava Přístroje
Příprava přístroje ■ Odstraňte obalový materiál a ochrannou fólii nanesenou na panelu a tlačítko otvírače dveří POZOR - HMOTNÉ ŠKODY! Neodstraňujte světle šedou slídovou krycí desku, která je nainstalována v prostoru pro vaření na ochranu magnetického pole trouby. ■ Zastrčte zástrčku do síťové zásuvky. Použijte síťovou zásuvku s napětím 230 –... -
Page 196: Vložení Otočného Talíře
UPOZORNĚNÍ ► Při prvním uvedení do provozu může dojít k mírnému kouři nebo zápachu, které jsou způsobeny zbytky z výroby. Toto není škodlivé. Zajistěte dosta- tečné větrání. Otevřete například okno. Po 5 minutách se přístroj automaticky vypne. Počkejte, dokud přístroj zcela nevychladne. -
Page 197: Režim Stand-By
Režim stand-by Mikrovlnná trouba se automaticky přepne do stand-by režimu a zobrazí se čas, když se po delší dobu nestiskne žádné tlačítko. Několik sekund po přepnutí do stand-by režimu se podsvícení displeje ztlumí. Nastavení kuchyňského časovače Mikrovlnná trouba je vybavena kuchyňským časovačem, který můžete používat nezávisle na provozu mikrovlnné... -
Page 198: Přerušení/Zrušení Vaření Nebo Rozmrazování
Zjišťování stupně výkonu během provozu Během vaření stiskněte tlačítko mikrovlnné trouby . Na displeji se na několik sekund zobrazí aktivovaný stupeň výkonu. Přerušení/zrušení vaření nebo rozmrazování ■ K přerušení vaření nebo rozmrazování jednou stiskněte tlačítko stop Přístroj přeruší proces a zastaví zbývající čas. K opětnému spuštění procesu stiskněte tlačítko startu/rychlého startu ■... - Page 199 Nastavit dobu vaření Poté, co jste zvolili výkon, nastavte požadovanou dobu vaření: ■ Otáčejte otočným regulátorem , dokud není nastavená požadovaná doba vaření. Stupně pro nastavení času otočného regulátoru jsou následující: – od 0 sek. do 5 min.: v 10 sek. krocích –...
-
Page 200: Grilovací Funkce
Grilovací funkce VÝSTRAHA - NEBEZPEČÍ POŽÁRU! ► Při použití funkce grilování v žádném případě nepoužívejte kryty nebo tepelně neodolné nádobí, protože by se tyto mohly roztavit nebo vznítit! UPOZORNĚNÍ ► Ke grilování používejte vždy grilovací stojan . Tím dosáhnete optimálních výsledků... -
Page 201: Kombinace Vaření „Gril
Kombinace vaření „Gril“ Tato funkce sdružuje funkci grilování s běžným provozem mikrovlnné trouby. Během kombinovaného procesu se část doby využívá pro vaření a zbývající čas pro grilování, a to automaticky během jednoho postupu. Okamžik přepnutí přístroje zaznamenáte díky tichému cvaknutí přístroje. VÝSTRAHA - NEBEZPEČÍ... -
Page 202: Provoz Horkým Vzduchem
2) Otočným regulátorem nastavte požadovanou kombinaci: „C 1” pro kombinaci 1, „C 2” pro kombinaci 2 (Indikace na displeji: C2, 55:45, „C 3” pro kombinaci 3 (Indikace na displeji: C3, 30:70, „C 4” pro kombinaci 4 (Indikace na displeji: C4, 55:45, Vaší... -
Page 203: Kombinace Vaření „Horký Vzduch
4) Otáčením otočeného regulátoru nastavte požadovanou teplotu a tuto potvrďte stisknutím tlačítka startu/rychlého startu 5) Otočným regulátorem nastavte požadovanou dobu vaření. Maximální nastavitelná doba ohřevu činí 95 minut. 6) Ke spuštění stiskněte tlačítko start/rychlý start Na displeji se trvale objeví symbol provozu horkým vzduchem . -
Page 204: Menu Automatického Režimu
Menu automatického režimu Pro jídla, která se mají připravovat v menu automatického režimu, není zapotřebí zadávat dobu procesu ohřevu a stupeň výkonu. Je dostačující, pokud zadáte, jaký typ potravin má být ohříván/vařen a dále uvedete hmotnost této potraviny. VÝSTRAHA - NEBEZPEČÍ POŽÁRU! ►... - Page 205 Displej Symbol Potravina Hmotnost A-04 Ryba 200 - 1200 g * P1 200 - 450 g A-05 Pizza P2 200 - 450 g P3 200 - 450 g A-06 Ovoce / zelenina 100 - 1000 g A-07 Brambory 100 - 800 g A-08 Ohřívání 300 - 700 g A-09 Nápoje 200 - 500 ml...
- Page 206 UPOZORNĚNÍ ► K dosažení rovnoměrného vaření nebo pečení, by se některé potraviny měly obrátit po 2/3 času vaření. Mikrovlnná trouba se po této době automaticky zastaví, zazní 4 signály a na displeji se objeví „Turn“. Displej Symbol Potravina Obracení po... A-01 Hovězí...
- Page 207 Displej Symbol Potravina Dovaření s... Kombinace vaření A-01 Hovězí maso „Gril” - C3 Kombinace vaření A-02 Vepřové maso „Gril” - C3 Kombinace vaření A-03 Drůbež „Gril” - C3 Kombinace vaření A-04 Ryba „Gril” - C3 Menu automatiky A-05 Pizza „Pizza” - P2 Provoz mikrovlnnou A-06 Ovoce / zelenina...
-
Page 208: Pečení Pizzy
NEBEZPEČÍ ZRANĚNÍ! ► Otočný talíř je po vaření grilem velmi horký! Použijte proto bezpodmí- nečně chňapky nebo tepelně odolné rukavice, když jej vyjměte z trouby. UPOZORNĚNÍ ► Dbejte prosím na to, že velikost, tvar a druhy potravin rovněž určují výsledek vaření. - Page 209 3) Pomocí otočného regulátoru zvolte vhodný program pizzy: – „P-01“ pro hluboce zmraženou pizzu, Teplota cca -18 stupňů Hmotnost 200 g – 450 g („P-01“ se objeví na displeji – „P-02“ pro mraženou pizzu, Teplota cca 5 stupňů, hmotnost 200 g – 450 g („P-02“...
-
Page 210: Rozmrazování
Rozmrazování Rozmrazování podle hmotnosti UPOZORNĚNÍ ► Položte potraviny, které chcete rozmrazit do nádobí, vhodné pro mikrovlnnou troubu. Nikdy je nepokládejte přímo na otočný talíř Pomocí této funkce můžete jednoduše rozmrazovat maso, drůbež, ryby, ovoce/ zeleninu a pizzu. Doba rozmrazování a stupeň výkonu se automaticky vypočítají a nastaví... - Page 211 4) Jakmile se na displeji objeví požadovaná potravina, stiskněte tlačítko startu/rychlého startu 5) Otočením otočného regulátoru nastavte hmotnost. Lze nastavit následující hmotnosti: Displej Symbol Potravina Hmotnost d-01 Hovězí maso 100 - 1800 g d-02 Vepřové maso 100 - 1800 g d-03 Drůbež 100 - 1800 g d-04 Ryba 100 - 1800 g...
-
Page 212: Rozmrazování Podle Času
UPOZORNĚNÍ ► K zajištění optimálního rozmrazení je nutné otočit potraviny během procesu rozmrazování. Přístroj připomene obrácení zazněním signálů a na displeji se objeví „turn“. Otevřete dvířka přístroje, obraťte pokrm a znovu zavřete dvíř- ka. K pokračování rozmrazování stiskněte tlačítko startu/rychlého startu ►... -
Page 213: Recepty
Recepty Karbanátky Příprava 1) Vytvořte z hovězího mletého masa karbanátky á cca 125 g (průměr cca 75 mm, výška cca 35 mm). 2) Rozdělte karbanátky rovnoměrně na otočném talíři 3) Nejlepších výsledků dosáhnete tehdy, když použijete střídavě horký vzduch a funkci mikrovlnné trouby. Vždy vyčkejte, dokud se neukončí nastavené vaření... -
Page 214: Muffiny
Příprava 1) Nakrájejte brambory na cca 3-4 mm silné plátky. 2) Dejte asi polovinu brambor, jako střešní tašky do zapékací misky. 3) Posypte brambory s asi polovinou sýra. 4) Dejte polovinu koření a přidejte cca 150 g smetany. 5) Dejte zbytek nakrájených brambor také jako střešní tašky nad ně. 6) Rozsypte zbývající... -
Page 215: Cuketová Polévka
Příprava 1) Důkladně smíchejte všechny přísady. 2) Dejte těsto na muffiny do běžných papírových formiček na pečení (průměr 45 mm, výška cca 28 mm) 3) Předehřejte mikrovlnnou troubu funkcí horkého vzduchu na 170° C. UPOZORNĚNÍ ► Pokud je potřeba více pečení z důvodu většího počtu muffinů, je předehří- vání... -
Page 216: Čokoládový Koláč S Jablky
Čokoládový koláč s jablky Přísady ▯ 125 g másla ▯ 125 g cukru ▯ 1 balíčky vanilkového cukru ▯ 2 vejce ▯ 125 g mouky ▯ 2 PL kakaového prášku ▯ 1/2 balíčku prášku do pečiva ▯ 1 jablko ▯ trochu práškového cukru Příprava 1) Smíchejte cukr, změklé... -
Page 217: Sekaná Pečeně
Sekaná pečeně Přísady ▯ 500 g mletého masa (půl hovězího na půl vepřového) ▯ 1/2 cibule ▯ 1 vejce ▯ 1/2 housky ▯ pepř, sůl, paprika v prášku pro omáčku: ▯ 75 ml vody ▯ 1 PL ostré hořčice ▯ 2 PL rajčatového kečupu ▯... -
Page 218: Čištění A Údržba
Čištění a údržba NEBEZPEČÍ! ÚDER ELEKTRICKÝM PROUDEM! ► Před čištěním vypněte mikrovlnnou troubu a vytáhněte zástrčku ze zásuvky. V opačném případě hrozí nebezpečí úrazu elektrickým proudem! V žádném případě se přístroj nesmí ponořit do vody nebo jiných tekutin. Vzniklo by tak ohrožení života v důsledku úrazu elektrickým proudem a spotřebič... -
Page 219: Odstranění Závad
Odstranění závad PROBLÉM MOŽNÁ PŘÍČINA MOŽNÁ ŘEŠENÍ Síťová zástrčka není Zkontrolujte síťovou zástrčku. zastrčená do síťové zásuvky. Na displeji se nic nezob- Vyzkoušejte jinou síťovou Síťová zásuvka je vadná. razuje. zásuvku. Kontaktujte servis. Displej je vadný. Přístroj nereaguje na stisknutí Je aktivována dětská... -
Page 220: Likvidace
PROBLÉM MOŽNÁ PŘÍČINA MOŽNÁ ŘEŠENÍ Přerušte program a vytáh- něte síťovou zástrčku. Pokud je to možné, odstraňte Mikrovlnná trouba se v problém, např. kov uvnitř důsledku zkratu nebo prostoru na vaření, který při Na displeji se zobrazí napětí naprázdno přepnula použití... -
Page 221: Záruka Společnosti Kompernass Handels Gmbh
Záruka společnosti Kompernass Handels GmbH Vážená zákaznice, vážený zákazníku, na tento přístroj získáváte záruku v trvání 3 let od data zakoupení. V případě závad tohoto výrobku máte zákonná práva vůči prodejci výrobku. Tato zákonná práva nejsou omezena naší níže uvedenou zárukou. Záruční... -
Page 222: Servis
Na webových stránkách www.lidl-service.com si můžete stáhnout tyto a mnoho dalších příruček, videí o výrobku a software. Servis Servis Česko Tel.: 800143873 E-Mail: kompernass@lidl.cz IAN 284999 Dovozce Dbejte prosím na to, že následující adresa není adresou servisu. Kontaktujte nejprve uvedený servis. KOMPERNASS HANDELS GMBH BURGSTRASSE 21 DE - 44867 BOCHUM NĚMECKO... - Page 223 ■ 220 │ SMW 900 EDS B5...
- Page 224 Índice Introducción ..........223 Uso previsto .
- Page 225 Recetas ........... . . 254 Hamburguesas .
-
Page 226: Introducción
Introducción Felicidades por la compra de su aparato nuevo. Ha adquirido un producto de alta calidad. Las instrucciones de uso forman parte del producto y contienen indicaciones importantes acerca de la seguridad, el uso y el desecho de este aparato. Antes de usar el producto, familiarícese con todas las indicaciones de manejo y de seguridad. -
Page 227: Descripción Del Aparato
Descripción del aparato Figura A: Pantalla Tecla Abridor de puerta Plato giratorio Ruedas Ranuras de ventilación Figura B: Tecla Microondas Tecla Grill Tecla Combinación microondas-grill Tecla Combinación microondas-aire caliente Tecla Aire caliente Tecla Reloj Tecla TIMER (temporizador de cocina) Tecla Stop/bloqueo de seguridad para niños Regulador giratorio/tecla Inicio/inicio rápido Figura C: Soporte para el grill... -
Page 228: Indicaciones Importantes De Seguridad
Indicaciones importantes de seguridad Lea atentamente las indicaciones de seguridad y el manual de instrucciones antes del primer uso y consérvelo para posteriores utilizaciones. ¡PELIGRO! ¡DESCARGA ELÉCTRICA! Una advertencia de este nivel de peligro indica una posible situación de peligro. Si no se evita la situación de peligro, puede causar la muerte o lesiones graves. - Page 229 No coloque objetos entre la parte frontal del aparato y la ► puerta y evite la acumulación de suciedad o de restos de productos de limpieza en las superficies de sellado. ¡PELIGRO! ¡DESCARGA ELÉCTRICA! No sumerja nunca el cable de red ni la clavija de red en ►...
- Page 230 ¡ADVERTENCIA: PELIGRO DE LESIONES! Los niños no deben realizar las tareas de limpieza y man- ► tenimiento a no ser que tengan más de 8 años de edad y estén bajo supervisión. El aparato y el cable de conexión deben mantenerse fuera ►...
- Page 231 ¡ADVERTENCIA: PELIGRO DE LESIONES! Las personas con marcapasos deben consultar a su médico ► acerca de los posibles riesgos antes de poner el microondas en funcionamiento. No permita que el cable de red cuelgue por encima de la ► mesa o de la superficie de trabajo. Los niños podrían tirar de él.
- Page 232 ¡ADVERTENCIA: PELIGRO DE LESIONES! ¡Atención! ¡Superficie caliente! ¡ADVERTENCIA: PELIGRO DE INCENDIO! No deje nunca el aparato desatendido mientras se calientan ► alimentos en envoltorios de plástico o de papel. No coloque materiales inflamables en las proximidades del ► microondas o de las ranuras de ventilación. Retire todos los cierres metálicos de los envases de los ali- ►...
- Page 233 ¡ADVERTENCIA: PELIGRO DE INCENDIO! No descongele grasas ni aceites congelados en el microon- ► das, ya que podrían arder. No utilice ningún tipo de reloj programador externo ni sistema ► de control remoto para accionar el aparato. Este microondas está previsto para el calentamiento de ►...
- Page 234 ¡ATENCIÓN: DAÑOS MATERIALES! Los líquidos y los alimentos similares no deben calentarse ► en recipientes cerrados herméticamente, ya que podrían estallar y dañar el aparato. No se apoye en la puerta del microondas. ► Una limpieza deficiente del microondas puede provocar ►...
- Page 235 INDICACIONES PARA UN MANEJO SEGURO Si el aparato desprende humos, apáguelo o desconecte el ► enchufe de la red eléctrica y mantenga la puerta cerrada para extinguir cualquier posible llama. Los huevos con cáscara y los huevos duros no deben calen- ►...
-
Page 236: Antes De Comenzar
INTERFERENCIAS CON OTROS APARATOS El funcionamiento del microondas puede provocar inter- ► ferencias en su radio, televisor u otros aparatos similares. Si se producen tales interferencias, aplique las siguientes medidas para mitigarlas o eliminarlas: Limpie la puerta y la superficie de sellado. –... -
Page 237: Uso De La Vajilla Adecuada
Uso de la vajilla adecuada ■ El material ideal para un horno microondas es aquel permeable a las microondas y que, por tanto, permita que la energía atraviese el recipiente para calentar los alimentos. Las microondas no pueden atravesar el metal. Por este motivo, no deben utilizarse recipientes ni platos de metal. -
Page 238: Primera Puesta En Funcionamiento
Primera puesta en funcionamiento INDICACIÓN PARA LA PRIMERA ACTIVACIÓN ¡No ponga nunca el microondas en funcionamiento ► en el modo de funcionamiento "Microondas" si está vacío! ¡Solo en la primera activación debe utilizarse el ► microondas sin accesorios ni alimentos en el modo de funcionamiento "Grill"... -
Page 239: Preparación Del Aparato
Preparación del aparato ■ Retire el material de embalaje y las láminas protectoras colocadas sobre el panel y sobre la tecla Abridor de puerta ¡ATENCIÓN: DAÑOS MATERIALES! No retire la placa de cobertura de mica de color gris claro colocada en la cámara de cocción para la protección del magnetrón. -
Page 240: Colocación Del Plato Giratorio
INDICACIÓN ► Durante la primera puesta en funcionamiento, es posible que se genere un ligero olor y se produzca humo debido a los residuos de fabricación. Este humo es inofensivo. Procure que haya suficiente ventilación. Por ejemplo, abra una ventana. Después de 5 minutos, el aparato se apaga automáticamente. -
Page 241: Modo De Espera Standby
Modo de espera Standby Si no se pulsa ninguna tecla durante un periodo de tiempo prolongado, el microondas cambia automáticamente al modo Standby y muestra la hora. Segundos después de la activación del modo Standby, se atenúa la iluminación de la pantalla. Ajuste del temporizador de cocina El microondas está... -
Page 242: Interrupción/Cancelación De Los Procesos De Cocción O Descongelación
Consulta del nivel de potencia durante el funcionamiento Pulse la tecla Microondas durante el proceso de cocción. En la pantalla se mostrará el nivel de potencia activado durante unos segundos. Interrupción/cancelación de los procesos de cocción o descongelación ■ Pulse una vez la tecla Stop para interrumpir el proceso de cocción o descongelación. - Page 243 Ajuste del tiempo de cocción Tras seleccionar la potencia, ajuste el tiempo de cocción deseado: ■ Gire el regulador giratorio hasta que quede ajustado el tiempo de cocción deseado. Los niveles para el ajuste de tiempo del regulador giratorio son los siguientes: –...
-
Page 244: Función De Grill
Función de grill ¡ADVERTENCIA: PELIGRO DE INCENDIO! ► Si utiliza las funciones de grill, no use nunca tapas ni vajilla que no sea termorresistente, ya que podrían fundirse o incluso incendiarse. INDICACIÓN ► Para cocinar al grill, utilice siempre el soporte para el grill a fin de obtener un resultado óptimo. -
Page 245: Proceso De Cocción Combinado "Grill
Proceso de cocción combinado "Grill" Esta función combina la función de grill y el funcionamiento normal de microon- das. Durante el proceso combinado, se aplica automáticamente un tiempo determinado para la cocción y el tiempo restante para el funcionamiento del grill en un solo proceso. -
Page 246: Funcionamiento Con Aire Caliente
2) Ajuste la combinación deseada con el regulador giratorio "C 1" para la combinación 1, "C 2" para la combinación 2 (Indicación de la pantalla: C2, 55:45, "C 3" para la combinación 3 (Indicación de la pantalla: C3, 30:70, "C 4" para la combinación 4 (Indicación de la pantalla: C4, 55:45, Confirme su selección con la tecla Inicio/inicio rápido 3) Ajuste el tiempo de cocción deseado con el regulador giratorio... -
Page 247: Proceso De Cocción Combinado "Aire Caliente
3) Abra la puerta e introduzca el alimento que desee cocinar. 4) Gire el regulador giratorio para ajustar la temperatura y pulse la tecla Inicio/inicio rápido para confirmar la selección. 5) Ajuste el tiempo de cocción deseado con el regulador giratorio El tiempo de cocción máximo ajustable es de 95 minutos. -
Page 248: Menú Automático
Menú automático No es necesario introducir la duración del proceso de cocción ni el nivel de potencia para los alimentos que deban prepararse en el modo de menú auto- mático. Es suficiente con que introduzca el tipo de alimento que deba cocinarse y su peso. - Page 249 Pantalla Símbolo Alimento Peso A-04 Pescado 200 - 1200 g * P1 200 - 450 g A-05 Pizza P2 200 - 450 g P3 200 - 450 g A-06 Fruta/verdura 100 - 1000 g A-07 Patatas 100 - 800 g A-08 Calentamiento 300 - 700 g...
- Page 250 INDICACIÓN ► Para lograr una cocción uniforme, es necesario dar la vuelta a algunos alimentos una vez transcurridos 2/3 del tiempo de cocción. Tras agotarse este tiempo, el microondas se detiene automáticamente, suenan 4 señales de aviso y aparece "Turn" en la pantalla Dar la vuelta Pantalla Símbolo...
- Page 251 Pantalla Símbolo Alimento Recocinar con... Proceso de cocción A-01 Ternera combinado "Grill": Proceso de cocción A-02 Cerdo combinado "Grill": Proceso de cocción A-03 Carne de ave combinado "Grill": Proceso de cocción A-04 Pescado combinado "Grill": Menú automático A-05 Pizza "Pizza": P2 Funcionamiento de A-06 Fruta/verdura...
-
Page 252: Horneado De Pizza
¡PELIGRO DE LESIONES! ► ¡El plato giratorio está muy caliente tras el proceso de cocción! Por este motivo, debe utilizar siempre manoplas o guantes termorresistentes para extraer el plato giratorio de la cámara de cocción. INDICACIÓN ► Tenga en cuenta que el tamaño, la forma y el tipo de alimento son factores que influyen sobre el resultado de la cocción. - Page 253 3) Utilice el regulador giratorio para seleccionar el programa de pizza más adecuado: – "P-01" para pizza congelada, temperatura: aprox. -18 grados, peso: 200-450 g (aparece "P-01" en la pantalla – "P-02" para pizza refrigerada, temperatura: aprox. 5 grados, peso: 200-450 g (aparece "P-02"...
-
Page 254: Descongelación
Descongelación Descongelación por peso INDICACIÓN ► Coloque siempre el alimento que desee descongelar en un recipiente adecuado para el microondas. ¡No lo coloque nunca directamente sobre el plato giratorio Con esta función, puede descongelar fácilmente carne, carne de ave, pescado, fruta/verdura y pizza. - Page 255 4) Cuando aparezca el alimento deseado en la pantalla , pulse la tecla Inicio/inicio rápido 5) Gire el regulador giratorio para ajustar el peso. Pueden ajustarse los siguientes pesos: Pantalla Símbolo Alimento Peso d-01 Ternera 100 - 1800 g d-02 Cerdo 100 - 1800 g d-03...
-
Page 256: Descongelación Por Tiempo
INDICACIÓN ► Para garantizar una descongelación óptima, es necesario dar la vuelta a los alimentos durante el proceso de descongelación. El aparato le recorda- rá que debe dar la vuelta al alimento mediante la emisión de señales de aviso y la indicación "turn" de la pantalla . -
Page 257: Recetas
Recetas Hamburguesas Preparación 1) Forme hamburguesas de carne picada de ternera de aprox. 125 g cada una (diámetro aprox. de 75 mm, altura aprox. de 35 mm). 2) Distribuya las hamburguesas de forma uniforme sobre el plato giratorio 3) Obtendrá mejores resultados si utiliza la función de aire caliente y la de microondas de forma alterna. -
Page 258: Magdalenas
Preparación 1) Corte las patatas en rodajas de aprox. 3 - 4 mm de grosor. 2) Coloque aproximadamente la mitad de las patatas.en el molde formando un lecho. 3) Espolvoree aprox. la mitad del queso sobre las patatas. 4) Añada la mitad de los condimentos y aprox. 150 g de nata. 5) Añada el resto de las patatas formando un lecho sobre la preparación anterior. -
Page 259: Crema De Calabacín
Preparación 1) Mezcle bien todos los ingredientes. 2) Reparta la masa de las magdalenas en los moldes de papel habituales (diámetro aprox. de 45 mm, altura aprox. de 28 mm). 3) Precaliente el microondas con la función de aire caliente a 170 °C. INDICACIÓN ►... -
Page 260: Tarta De Chocolate Y Manzana
Tarta de chocolate y manzana Ingredientes ▯ 125 g de mantequilla ▯ 125 g de azúcar ▯ 1 sobre de azúcar vainillado ▯ 2 huevos ▯ 125 g de harina ▯ 2 cucharadas de cacao en polvo ▯ 1/2 sobre de levadura en polvo ▯... -
Page 261: Pastel De Carne Picada
Pastel de carne picada Ingredientes ▯ 500 g de carne picada mixta (mitad cerdo/mitad vacuno) ▯ 1/2 cebolla ▯ 1 huevo ▯ 1/2 bollito de pan ▯ Pimienta, sal, pimentón Para la salsa: ▯ 75 ml de agua ▯ 1 cucharada de mostaza ▯... -
Page 262: Limpieza Y Mantenimiento
Limpieza y mantenimiento ¡PELIGRO! ¡DESCARGA ELÉCTRICA! ► Apague el microondas antes de limpiarlo y extraiga la clavija de red de la base de enchufe. ¡De lo contrario, existe peligro de descarga eléctrica! ¡No sumerja nunca el aparato en agua ni en cualquier otro líquido! Peligro de muerte por descarga eléctrica y de daños en el aparato. -
Page 263: Eliminación De Fallos
Eliminación de fallos PROBLEMA POSIBLE CAUSA POSIBLES SOLUCIONES La clavija de red no está Compruebe la clavija de conectada a una base de red. enchufe. La base de enchufe está Pruebe otra base de La pantalla no indica defectuosa. enchufe. nada. -
Page 264: Desecho
PROBLEMA POSIBLE CAUSA POSIBLES SOLUCIONES Interrumpa el programa y extraiga la clavija de red. Solucione el problema si es posible, p. ej., si hay Debido a un cortocircuito o una pieza metálica en la a una tensión en vacío, el En la pantalla , se mues- cámara de cocción que... -
Page 265: Garantía De Kompernass Handels Gmbh
Garantía de Kompernass Handels GmbH Estimado cliente: Este aparato cuenta con una garantía de 3 años a partir de la fecha de compra. Si se detectan defectos en el producto, puede ejercer sus derechos legales frente al vendedor. Estos derechos legales no se ven limitados por la garantía descrita a continuación. -
Page 266: Asistencia Técnica
(0,08 EUR/Min. + 0,11 EUR/llamada (tarifa normal)) (0,05 EUR/Min. + 0,11 EUR/llamada (tarifa reducida)) E-Mail: kompernass@lidl.es IAN 284999 Importador Tenga en cuenta que la dirección siguiente no es una dirección de asistencia técnica. Póngase primero en contacto con el centro de asistencia técnica especi- ficado. - Page 267 ■ 264 │ SMW 900 EDS B5...
- Page 268 Índice Introdução ..........267 Utilização correta .
- Page 269 Receitas ........... . 298 Hambúrgueres .
-
Page 270: Introdução
Introdução Parabéns pela compra do seu novo aparelho. Optou por um produto de elevada qualidade. O manual de instruções é parte integrante deste produto. Este contém instruções importantes para a segurança, utilização e eliminação. Antes de utilizar o produto, familiarize-se com todas as instruções de operação e segurança. -
Page 271: Descrição Do Aparelho
Descrição do aparelho Figura A: Visor Tecla para abrir a porta Prato rotativo Rodas Ranhuras de ventilação Figura B: Tecla Micro-ondas Tecla Grelhador Tecla Combinação micro-ondas/grelhador Tecla Combinação micro-ondas/ar quente Tecla Ar quente Tecla Relógio Tecla TIMER (temporizador de cozinha) Tecla Stop/Proteção para crianças Botão rotativo / tecla Início/Início rápido Figura C:... -
Page 272: Indicações De Segurança Importantes
Indicações de segurança importantes Leia atentamente as indicações de segurança e o manual de instruções antes da primeira utilização e guarde-os para consultas posteriores. PERIGO! CHOQUE ELÉTRICO! Uma indicação de aviso deste nível de perigo identifica uma possível situação perigosa. Se a situação de perigo não for evitada, existe perigo de morte ou de feri- mentos graves. - Page 273 Não coloque nada entre a frente do aparelho e a porta, e te- ► nha cuidado para não deixar acumular sujidade ou vestígios de detergentes de limpeza nas superfícies vedantes. PERIGO! CHOQUE ELÉTRICO! Não mergulhe o cabo de alimentação ou a ficha elétrica ►...
- Page 274 AVISO - PERIGO DE FERIMENTOS! A limpeza e a manutenção por parte do utilizador não ► podem ser efetuadas por crianças, salvo se tiverem idades superiores a 8 anos e forem vigiadas. Crianças com idades inferiores a 8 anos devem ser mantidas ►...
- Page 275 AVISO - PERIGO DE FERIMENTOS! Portadores de pacemakers devem consultar o seu médico ► de família sobre os riscos possíveis antes da colocação em funcionamento do micro-ondas. Nunca deixe o cabo de alimentação pendurado sobre ► a mesa ou a bancada de trabalho. As crianças podem puxá-lo.
- Page 276 AVISO - PERIGO DE FERIMENTOS! Antes do consumo, verifique a temperatura, para evitar quei- ► maduras que podem constituir perigo de vida para bebés. Como os utensílios de cozinha podem ficar muito quentes devido ao calor transmitido pelos alimentos aquecidos, deve tocar-lhes apenas com pegas de cozinha.
- Page 277 AVISO - PERIGO DE INCÊNDIO! Limpe bem o micro-ondas depois do aquecimento de alimentos ► gordurosos, especialmente se não tiverem sido cobertos. Deixe o aparelho arrefecer totalmente antes de o limpar. Os elementos de aquecimento do grelhador não podem conter resíduos, como por exemplo, gordura.
- Page 278 ATENÇÃO - DANOS MATERIAIS! Líquidos e outros alimentos não devem ser aquecidos em reci- ► pientes fechados, pois podem explodir e danificar o aparelho. Não se apoie na porta do micro-ondas. ► A limpeza insuficiente do aparelho de cozinha pode provocar ►...
- Page 279 INDICAÇÕES PARA UM MANUSEAMENTO SEGURO Ovos com casca e ovos bem cozidos não podem ser aque- ► cidos no micro-ondas, uma vez que podem explodir no micro-ondas mesmo após a conclusão do aquecimento. Furar os alimentos com casca grossa, como batatas, abóboras, maçãs e castanhas antes de os cozer.
-
Page 280: Antes De Começar
INTERFERÊNCIA COM OUTROS APARELHOS O funcionamento do micro-ondas pode causar interferências ► no seu rádio, televisor ou aparelhos similares. Se ocorrerem tais interferências, reduza-as ou elimine-as totalmente com a ajuda das seguintes medidas: Limpar a porta e a superfície de vedação do micro-ondas. –... -
Page 281: Utilizar Loiça Adequada
Utilizar loiça adequada ■ O material ideal para o micro-ondas é permeável às micro-ondas, ou seja deixa passar a energia através do recipiente para aquecer os alimentos. As micro-ondas não são capazes de atravessar o metal. Por este motivo, não podem ser utilizados recipientes ou loiça de metal. -
Page 282: Primeira Colocação Em Funcionamento
Primeira colocação em funcionamento NOTA SOBRE O PRIMEIRO AQUECIMENTO Nunca utilize o micro-ondas vazio no modo de ► funcionamento "Micro-ondas"! Opere o micro-ondas, exclusivamente no primeiro ► aquecimento, sem acessórios e alimentos no modo de funcionamento "Grelhador" (Gr 3)! (Consulte o capítulo "Preparar o aparelho") Instalar o aparelho AVISO - PERIGO DE INCÊNDIO! ►... -
Page 283: Preparar O Aparelho
Preparar o aparelho ■ Retire o material de embalagem e a película de proteção colocada no painel e na tecla para abrir a porta ATENÇÃO - DANOS MATERIAIS! Não retire a placa de cobertura cinzenta clara brilhante, que se encontra montada no espaço de cozedura para proteção dos tubos de campos magnéticos. -
Page 284: Colocar O Prato Rotativo
NOTA ► Durante a primeira colocação em funcionamento pode ocorrer uma ligeira formação de fumo e odores devido a resíduos resultantes da produção. Estes são inofensivos. Certifique-se de que existe uma ventilação suficiente. Abra, por exemplo, uma janela. Após 5 minutos, o aparelho desliga-se automaticamente. Aguarde até que este arrefeça completamente. -
Page 285: Modo Standby
Modo standby O micro-ondas liga automaticamente em modo standby e as horas são indicadas, caso uma tecla seja premida prolongadamente. Alguns segundos depois da alteração para o modo standby, a iluminação do visor também é reduzida. Ajustar o temporizador de cozinha O micro-ondas possui um temporizador de cozinha, que pode ser ajustado independentemente do funcionamento do micro-ondas. -
Page 286: Interromper/Terminar Processos De Cozedura Ou Descongelação
Consultar o nível de potência durante o funcionamento Prima durante o processo de cozedura a tecla Micro-ondas . No visor é apresentado, durante alguns segundos, o nível de potência ativado. Interromper/terminar processos de cozedura ou descongelação ■ Prima uma vez a tecla Stop para interromper um processo de cozedura ou de descongelação. - Page 287 Ajustar o tempo de cozedura Após selecionar a potência, ajuste o tempo de cozedura desejado: ■ Rode o botão rotativo até que o tempo de cozedura desejado esteja ajustado. Os níveis de ajuste do tempo do botão rotativo são os seguintes: –...
-
Page 288: Função Grelhador
Função Grelhador AVISO - PERIGO DE INCÊNDIO! ► Em programas com a função Grelhador, nunca utilizar coberturas ou loiça que não sejam resistentes ao calor, uma vez que podem derreter ou incendiar-se! NOTA ► Para grelhar utilize sempre a grelha . -
Page 289: Processo De Cozedura Combinado "Grelhador
Processo de cozedura combinado "Grelhador" Esta função combina a função de grelhador com o modo de micro-ondas normal. Durante o processo combinado é executado, automaticamente e num único processo, um determinado tempo para cozer e o tempo restante para grelhar. O momento de comutação do aparelho é... -
Page 290: Funcionamento Com Ar Quente
2) Regule a combinação desejada com o botão rotativo "C 1" para combinação 1, "C 2" para combinação 2 (Indicação no visor: C2, 55:45, "C 3" para combinação 3 (Indicação no visor: C3, 30:70, "C 4" para combinação 4 (Indicação no visor: C4, 55:45, Confirme a sua seleção, premindo a tecla Início/Início rápido 3) Regule o tempo de cozedura desejado com o botão rotativo O tempo de cozedura máximo é... -
Page 291: Processo De Cozedura Combinado "Ar Quente
4) Ajuste a temperatura desejada, rodando o botão rotativo , e confirme a temperatura, premindo a tecla Início/Início rápido 5) Ajuste o tempo de cozedura desejado com o botão rotativo O tempo de cozedura máximo é 95 minutos. 6) Prima a tecla Início/Início rápido para iniciar. -
Page 292: Menu Automático
Menu automático Para pratos que devem ser preparados no modo de menu automático não é necessário introduzir o tempo do processo de cozedura e o nível de potência. Basta introduzir o tipo de alimento a cozinhar, bem como o respetivo peso. AVISO - PERIGO DE INCÊNDIO! ►... - Page 293 Visor Símbolo Alimento Peso A-04 Peixe 200 - 1200 g * P1 200 - 450 g A-05 Piza P2 200 - 450 g P3 200 - 450 g A-06 Fruta/Legumes 100 - 1.000 g A-07 Batatas 100 - 800 g A-08 Aquecer 300 - 700 g...
- Page 294 NOTA ► Para conseguir uma cozedura uniforme, alguns alimentos devem ser virados após 2/3 do tempo. O micro-ondas para automaticamente depois deste tempo, são emitidos 4 sinais sonoros e é apresentado "Turn" no visor Visor Símbolo Alimento Virar após... A-01 Vitela 2/3 do tempo A-02...
- Page 295 Repetir a Visor Símbolo Alimento cozedura com... Processo de coze- A-01 Vitela dura combinado "Grelhador" - C3 Processo de coze- A-02 Porco dura combinado "Grelhador" - C3 Processo de coze- A-03 Aves dura combinado "Grelhador" - C3 Processo de coze- A-04 Peixe dura combinado...
-
Page 296: Cozer Piza
PERIGO DE FERIMENTOS! ► O prato rotativo está muito quente após um processo de cozedura! Por esta razão, deve utilizar uma pega de cozinha ou luvas resistentes ao calor para retirar o prato do micro-ondas. NOTA ► Por favor, tenha atenção que o tamanho, a forma e os tipos dos alimentos também determinam o resultado do cozinhado. - Page 297 3) Selecione o programa de piza adequado por meio do botão rotativo – "P-01" para piza congelada, temperatura aprox. 18 graus peso 200 g – 450 g ("P-01" é exibido no visor – "P-02" para piza saída do frigorífico, temperatura aprox. 5 graus, peso 200 g –...
-
Page 298: Descongelar
Descongelar Descongelar por peso NOTA ► Coloque os alimentos a descongelar sempre em loiça adequada para micro-ondas. Nunca diretamente no prato rotativo Com esta função é possível descongelar carne, aves, peixe, fruta/legumes e piza sem problemas. O tempo de descongelação e o nível de potência são calculados e regulados automaticamente após a introdução do peso. - Page 299 4) Quando aparecer o alimento desejado no visor , prima a tecla Início/ Início rápido 5) Ajuste o peso com o botão rotativo É possível ajustar os seguintes pesos: Visor Símbolo Alimento Peso d-01 Vitela 100 - 1.800 g d-02 Porco 100 - 1.800 g d-03...
-
Page 300: Descongelar Por Tempo
NOTA ► Para garantir uma descongelação ideal, é necessário virar os alimentos durante o processo de descongelação. O aparelho lembra-lhe que é altura de virar, emitindo sinais sonoros e apresentando "turn" no visor Abra a porta do aparelho, vire os alimentos e feche novamente a porta do aparelho. -
Page 301: Receitas
Receitas Hambúrgueres Preparação 1) Molde cerca de 125 g carne picada de carne de vaca num hambúrguer (diâmetro de aprox. 75 mm, altura de aprox. 35 mm). 2) Distribua os hambúrgueres uniformemente no prato rotativo 3) Obtém o melhor resultado se utilizar alternadamente ar quente e a função de micro-ondas. -
Page 302: Muffins
Preparação 1) Corte as batatas em rodelas com aprox. 3 – 4 mm de espessura. 2) Coloque aproximadamente metade das batatas, em forma de telha, na forma de gratinar. 3) Polvilhe as batatas com cerca de metade do queijo. 4) Adicione metade das especiarias, bem como cerca de 150 g de natas. 5) Coloque o resto das batatas cortadas também em forma de telha por cima. -
Page 303: Sopa De Curgete
Preparação 1) Misture todos os ingredientes muito bem. 2) Coloque a massa de muffin em formas de papel convencionais (diâmetro cerca de 45 mm, altura cerca de 28 mm) 3) Preaqueça o micro-ondas com a função de ar quente para 170 °C. NOTA ►... -
Page 304: Bolo De Chocolate E Maçã
Bolo de chocolate e maçã Ingredientes ▯ 125 g de manteiga ▯ 125 g de açúcar ▯ 1 saqueta de açúcar baunilhado ▯ 2 ovos ▯ 125 g de farinha ▯ 2 cs de cacau em pó ▯ 1/2 saqueta de fermento em pó ▯... -
Page 305: Rolo De Carne Picada
Rolo de carne picada Ingredientes ▯ 500 g de carne picada (metade/metade) ▯ 1/2 cebola ▯ 1 ovo ▯ 1/2 pãezinhos ▯ Sal, pimenta, colorau Para o molho: ▯ 75 ml de água ▯ 1 cs de mostarda ▯ 2 cs de ketchup ▯... -
Page 306: Limpeza E Conservação
Limpeza e conservação PERIGO! CHOQUE ELÉTRICO! ► Antes de limpar o micro-ondas, desligue-o e retire a ficha da tomada. Caso contrário, existe perigo de choque elétrico! Nunca mergulhar o aparelho em água ou noutros líquidos! Caso contrário, existe perigo de morte por choque elétrico e o aparelho poderia ficar danificado. -
Page 307: Eliminação De Erros
Eliminação de erros PROBLEMA CAUSA POSSÍVEL POSSÍVEIS SOLUÇÕES A ficha não está ligada à Verifique a ficha elétrica. tomada. O visor não apresenta A tomada está avariada. Experimente outra tomada. qualquer indicação. Contacte a Assistência O visor está avariado. Técnica. Desative a proteção para O aparelho não reage ao A proteção para crianças... -
Page 308: Eliminação
PROBLEMA CAUSA POSSÍVEL POSSÍVEIS SOLUÇÕES Interrompa o programa e retire a ficha da tomada. Se possível resolva o problema, O micro-ondas entrou em p. ex. metal no interior do modo de proteção contra micro-ondas, que pode No visor é apresentado anomalias, devido a um provocar o problema acima "E03"... -
Page 309: Garantia Da Kompernass Handels Gmbh
Garantia da Kompernass Handels GmbH Estimada Cliente, Estimado Cliente, Este aparelho tem uma garantia de 3 anos a contar da data de compra. No caso deste produto ter defeitos, tem direitos legais contra o vendedor do produto. Estes direitos legais não são limitados pela nossa garantia que passamos a transcrever. Condições de garantia O prazo de garantia tem início na data da compra. -
Page 310: Assistência Técnica
Assistência Técnica Assistência Portugal Tel.: 70778 0005 (0,12 EUR/Min.) E-Mail: kompernass@lidl.pt IAN 284999 Importador Por favor, observe que a seguinte morada não é a morada do Serviço de Assis- tência Técnica. Primeiro entre em contacto com o Serviço de Assistência Técnica. - Page 311 DE - 44867 BOCHUM GERMANY www.kompernass.com Stand der Informationen · Last Information Update · Version des informations Stand van de informatie · Stav informací · Estado de las informaciones · Estado das informações: 03 / 2017 · Ident.-No.: SMW900EDSB5-122016-2 IAN 284999...