Table of Contents
Advertisement
Quick Links
Advertisement
Table of Contents

Related Manuals for NI PXIe-5160


Summary of Contents for NI PXIe-5160
- Page 1 PXIe-5160/5162 Getting Started 2024-01-23...
-
Page 2: Table Of Contents
Configuring the PXIe-5160/5162 in MAX........ -
Page 3: Oscilloscopes Gsg Purpose
This document explains how to install, configure, and test the PXIe-5160/5162. The PXIe-5160 is a 500 MHz, 10-bit oscilloscope with a sample rate of up to 2.5 GS/s. The PXIe-5162 is a 1.5 GHz, 10-bit oscilloscope with a sample rate of up to 5 GS/s. -
Page 4: Other Equipment
Store the module in the antistatic package when the module is not in use. Other Equipment There are several required items not included in your device kit that you need to operate the PXIe-5160/5162. Your application may require additional items not included in your kit to install or operate your device. Required Items A PXI Express chassis and chassis documentation ■... -
Page 5: Preparing The Environment
30 A RMS, 100 MHz current probe Visit ni.com for more information about these additional items. Preparing the Environment Ensure that the environment in which you are using the PXIe-5160/5162 meets the following specifications. Temperature Operating 0 °C to 45 °C © National Instruments... -
Page 6: Installing The Software
Indoor use only. Installing the Software You must be an Administrator to install NI software on your computer. 1. Install an ADE, such as LabVIEW or LabWindows™/CVI™. 2. Download the driver software installer from ni.com/downloads. NI Package Manager downloads with the driver software to handle the installation. - Page 7 PXI Express System Timing Slot e. PXI Express Peripheral Slot PXIe-5160/5162 modules can be placed in PXI Express peripheral slots, PXI Express hybrid peripheral slots, or PXI Express system timing slots. 6. Touch any metal part of the chassis to discharge static electricity.
-
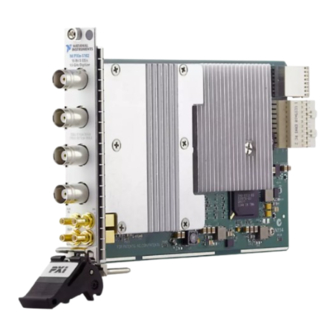
Page 8: Pxie-5160/5162 Front Panels
PXIe-5160/5162 Getting Started Figure 1. Module Installation a. Chassis b. Hardware Module c. Ejector Handle in Downward (Unlatched) Position 9. Latch the module in place by pulling up on the ejector handle. 10. Secure the module front panel to the chassis using the front-panel mounting screws. - Page 9 50 Ω : 5 Vpk MAX 1M Ω : 42 Vpk MAX TRIG CH 2 CH 3 Note PXIe-5160 shown. Table 2. PXIe-5160/5162 Signal Descriptions Signal Connector Type Description CH 0, CH 1 Analog input connection; digitizes data and triggers...
-
Page 10: Configuring The Pxie-5160/5162 In Max
Configuring the PXIe-5160/5162 in MAX Use Measurement & Automation Explorer (MAX) to configure your NI hardware. MAX informs other programs about which NI hardware products are in the system and how they are configured. MAX is automatically installed with NI-SCOPE. -
Page 11: Running Self-Calibration
Warm up the PXIe-5160/5162 for at least 15 minutes ■ When possible, disconnect the inputs ■ PXIe-5160/5162 modules are externally calibrated at the factory, but for optimal performance, use self-calibration in any of the following situations: When the module is placed in a new system ■... -
Page 12: First Measurements
PXIe-5160/5162 Getting Started self-calibration. You can also view this information by selecting the device in MAX. Self-calibrate the PXIe-5160/5162 programmatically in NI-SCOPE or on demand in MAX. Option Description NI-SCOPE Use the Self Calibrate node to self-calibrate the module. Select the device in the Devices and Interfaces menu and click the Self-Calibrate button. -
Page 13: Compensating Passive Probes
NI oscilloscopes can output a 1 kHz square wave that you can use to compensate passive probes. This procedure assumes your passive probe uses a BNC connector and has a 10× attenuation option. - Page 14 PXIe-5160/5162 Getting Started 1. Connect the probe to an input channel of your oscilloscope. PXIe-5105, PXI-5105, PCI-5105 only: ■ 1. Connect the BNC end of the probe to the BNC end of the SMB (f)-to- BNC (f) cable. 2. Connect the SMB end of the cable to an input channel of your oscilloscope.
- Page 15 PXIe-5160/5162 Getting Started Instrument Compensation Technique Description the square wave terminal. Direct connection to SMB PFI a. Attach the BNC oscilloscope PFI adapter to the tip of the probe. b. Connect the ground clip of the probe to a ground.
- Page 16 PXIe-5160/5162 Getting Started Instrument Compensation Technique Description 9-pin DIN–to- BNC cable. d. Connect the DIN end of the cable to the DIN connector on the oscilloscope. BNC PFI USB-5132 a. Attach the BNC ■ adapter to the USB-5133 ■ tip of the probe.
- Page 17 InstrumentStudio: In the instrument header menu ■ ) in the upper-right corner of the panel, select Probe Compensation » Enabled. NI-SCOPE: Call the Probe Compensation Signal Start function. ■ 5. In InstrumentStudio, configure the settings of the input channel to which you connected the probe.
-
Page 18: Programming The Pxie-5160/5162
Compensate your probes frequently. ■ Programming the PXIe-5160/5162 You can acquire data interactively using InstrumentStudio, or you can use the NI-SCOPE instrument driver to program your device in the supported ADE of your choice. Table 3. PXIe-5160/5162 Programming Options Application... - Page 19 InstrumentStudio. interactive measurements on several different device types in a single program. InstrumentStudio is automatically installed when you install the NI-SCOPE driver. You can access InstrumentStudio in one of the following ways: From the Windows ■ start menu, select National Instruments »...
-
Page 20: Ni-Scope Examples
Examples demonstrate the functionality of the device and serve as programming models and building blocks for your own applications. The NI Example Finder is a utility available for some ADEs that organizes examples into categories and allows you to easily browse and search installed examples. You can see descriptions and compatible hardware models for each example, or see all the examples compatible with one particular hardware model. -
Page 21: Troubleshooting
Visual C# or Visual Basic .NET SCOPE\examples in your NI folder. What Should I Do if the PXIe-5160/5162 Does Not Appear in MAX? 1. In the MAX configuration tree, expand Devices and Interfaces. 2. Expand the Chassis tree to see the list of installed hardware, and press <F5>... -
Page 22: Thermal Shutdown Error
NI product. Product registration facilitates technical support and ensures that you receive important information updates from NI corporate headquarters is located at 11500 N Mopac Expwy, Austin, TX, 78759-3504, USA. ni.com © 2024 National Instruments Corporation.
Need help?
Do you have a question about the PXIe-5160 and is the answer not in the manual?
Questions and answers