Advertisement
Quick Links
DVD System
Operating Instructions
SC-DT110
Model No.
RDS
AV SYSTEM
TUNER/BAND
DVD/CD
X
W
SLOW/SEARCH
SKIP
VCR
TV
TV/AV
TOP MENU/
DIRECT
MENU/
NAVIGATOR
PLAY LIST
ENTER
DISPLAY
RETURN
AUDIO ONLY
FL DISPLAY
P.MEMORY GROUP
TIMER
PLAY MODE
1
2
3
REPEAT
4
5
6
D.RE-MASTER
7
8
9
S.SRND
CANCEL
S10/-/--
0
CENTER
SUBWOOFER
FOCUS
LEVEL
PL
SFC
FM MODE
MIX 2CH
CH SELECT
TEST
SHIFT
MUTING
TV
VOLUME
SETUP
Í/I
SELECT
1
;
HighMAT
trademarks or registered trademarks of
Microsoft Corporation in the United States and/
or other countries.
EB
E
VOLUME
DOWN
UP
WAKE
<
TM
and the HighMAT logo are either
SC- SV1
SC- SV1
SC- SV1
SC- SV1
SC- SV1
SC- SV1
Region number supported by
this unit
Region numbers are allocated to DVD players and
software according to where they are sold.
≥The region number of this unit is "2".
≥The unit will play DVD-Video marked with
labels containing "2" or "ALL".
Example:
2
Before connecting, operating or adjusting this
product, please read these instructions completely.
Please keep this manual for future reference.
[Note]
"EB" on the packaging indicates the United
Kingdom.
2
3
ALL
5
RQT7035-B
Advertisement

Related Manuals for Panasonic SC-DT110


Summary of Contents for Panasonic SC-DT110
- Page 1 DVD System Operating Instructions SC-DT110 Model No. AV SYSTEM TUNER/BAND DVD/CD SLOW/SEARCH SKIP TV/AV TOP MENU/ DIRECT MENU/ NAVIGATOR PLAY LIST ENTER DISPLAY RETURN AUDIO ONLY FL DISPLAY P.MEMORY GROUP TIMER PLAY MODE REPEAT D.RE-MASTER S.SRND CANCEL S10/-/-- CENTER SUBWOOFER...
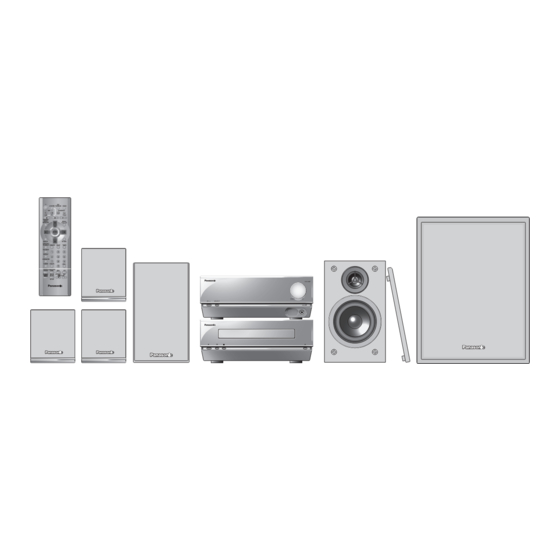
- Page 2 Dear customer System SC-DT110 Thank you for purchasing this product. DVD/CD player SL-DT110 For optimum performance and safety, please read these instructions AV control receiver SA-DT110 carefully. Front speakers SB-DT100 Center speaker SB-AFC301 Surround speakers SB-AFC301 Subwoofer SB-W300 SUOMI CAUTION! VAROITUS! THIS PRODUCT UTILIZES A LASER.
- Page 3 Changing settings......29 provided directly by Panasonic UK Ltd. Optional antenna connections ....31 ≥...
- Page 4 Caution for AC Mains Lead (For United Kingdom) (“EB” area code model only) WARNING: DO NOT CONNECT EITHER WIRE TO THE EARTH TERMINAL WHICH IS MARKED WITH THE LETTER E, BY THE EARTH SYMBOL Ó OR For your safety, please read the following text carefully. COLOURED GREEN OR GREEN/YELLOW.
- Page 5 See page 20 for more information about WMA, MP3, and JPEG. [RAM] DVD-RAM ∫ DVD-R discs § Panasonic DVD-R recorded and finalized on a Panasonic DVD video recorder are played as DVD-Video on this unit. § A process that allows play on compatible equipment.
- Page 6 Simple setup Plug in the AC mains lead after making all connections. STEP Locating CENTER SURROUND (R) FRONT (R) SUBWOOFER FRONT (L) SURROUND (L) Main unit Stacking AV control receiver VOLUME DOWN Í/I SELECT WAKE Ë ≥The center and surround speakers are the same, however the cord length of the center speaker is shorter.
- Page 7 Sheet of speaker- STEP Speakers cord stickers 1 Attach the stickers to the speaker cords. Attach the speaker-cord stickers to make connection easier. FRONT L, R SURROUND, CENTER e.g.) FRONT L e.g.) CENTER FRONT CENTER L ch speaker-cord stickers SUBWOOFER WOOFER 2 Connecting the speakers Match the labels on the speaker-cord stickers with the labels on the terminals.
- Page 8 STEP Television Video cable ∫ Connecting a television with a VIDEO IN terminal Connect directly to your television. Do not connect the unit through a video cassette recorder, because the picture may not be played correctly due to the copy guard.
- Page 9 STEP Antennas and AC mains lead AC mains lead AM loop antenna FM indoor antenna [For]Continental]Europe] [For]the]United]Kingdom] AM loop antenna [For]the]United]Kingdom]only] Stand the antenna up on its base. BE SURE TO READ THE CAUTION FOR THE AC Keep loose antenna cord away MAINS LEAD ON PAGE 4 BEFORE from other wires and cords.
- Page 10 Other speaker setup options Attaching to a wall (Center and surround speakers only) Fit the speaker securely onto the [Note] screw with the hole. The wall or pillar on which the speakers are to be attached should be capable of supporting 10 kg per screw. Speaker feet Screw a screw (not included) into the wall.
- Page 11 STEP QUICK SETUP Preparation Turn on the television and select the appropriate video input on the television to suit the connections for the unit. Press [Í] to turn on the unit. AV SYSTEM TUNER/BAND DVD/CD SKIP SLOW/SEARCH Press [DVD/CD] to select “DVD”. TV/AV Press [SHIFT]i[SETUP] to show the TOP MENU/...
- Page 12 Control reference guide Remote control 1 AV system standby/on button [Í, AV SYSTEM] ..32 2 Standby/on button [Í] ......11 AV SYSTEM TUNER/BAND DVD/CD...
- Page 13 Discs—Basic play [RAM] [DVD-A] [DVD-V] [VCD] [CD] [WMA] [MP3] [JPEG] Preparation ≥Press [Í] to turn on the unit. ≥Turn on the television and select the appropriate video input on the television to suit the connections for the unit. Press [DVD/CD] to select “DVD” as the VOLUME source.
- Page 14 Discs—Basic play When a menu appears on the television [DVD-A] [DVD-V] [VCD] Press the numbered buttons to select an item. To select a 2-digit number < Example: To select item 23, press [S10/-/--] [3]. ≥When playing DVDs, you can also use [3, 4, 2, 1] to select items.
- Page 15 Discs—Convenient functions A-B repeat play [RAM] [DVD-A] [DVD-V] [VCD] [CD] [WMA] [MP3] You can repeat a section between points A and B within a program, AV SYSTEM TUNER/BAND DVD/CD title or track. SKIP SLOW/SEARCH During play TV/AV Press [DISPLAY] until the unit TOP MENU/ DIRECT information screen is displayed...
- Page 16 Discs—Convenient functions Press the numbered buttons to select a title, chapter, group or track ( [WMA] [MP3] then press [ENTER]). AV SYSTEM TUNER/BAND DVD/CD SKIP SLOW/SEARCH P:01 TV/AV TOP MENU/ DIRECT MENU/ NAVIGATOR PLAY LIST Program No. Chapter No. Title No. 3, 4, 2, 1 ≥To select a 2-digit number ENTER...
- Page 17 ≥“–” or “– –” is displayed instead of the language number in Subtitles circumstances such as when no language is recorded on the disc. [VCD] (SVCD only) Soundtrack and subtitle numbers may change even if corresponding [DVD-A] (Motion picture parts only) soundtracks are not recorded.
- Page 18 Discs—Convenient functions [RAM] To mark the eleventh point and beyond 1 Press [2, 1] to select the marker pin icon. AV SYSTEM TUNER/BAND DVD/CD 1-10 12345678910 SKIP SLOW/SEARCH 2 Press [3, 4] to select “11–20”. TV/AV ≥The markers are ordered by time. This means that the marker numbers can change when you add and erase markers.
- Page 19 Playing the programs or play lists on DVD-RAM Using the play list menu You can play a group of scenes, a play list, created on other AV SYSTEM TUNER/BAND DVD/CD equipment such as a DVD video recorder. SKIP SLOW/SEARCH Press [PLAY LIST]. TV/AV TOP MENU/ PLAY LIST...
- Page 20 WMA/MP3, CD text and JPEG navigation menus Press [3, 4] to select “L” and press [ENTER]. AV SYSTEM TUNER/BAND DVD/CD Only uppercase appear but the search also includes lower case. SKIP SLOW/SEARCH SKIP Characters change in alphanumeric order each time you :, 9 press [3].
- Page 21 To use the tree screen to find a group [WMA] [MP3] [JPEG] Playing HighMAT discs A menu appears after you insert the disc. While the menu is displayed Press [3, 4, 2, 1] to select then press Press [1] while a track is highlighted [ENTER].
- Page 22 Using GUI (Graphical User Interface) screens Press [2, 1] to select the item. Press [3, 4] to select the setting. TUNER/BAND DVD/CD AV SYSTEM ≥Items with “3” or “4” above and below can be changed by [3, 4]. SLOW/SEARCH SKIP ≥Press [ENTER] if the setting does not change after pressing [3, 4].
- Page 23 Unless otherwise indicated, select items with [2, 1] and change with [3, 4]. Disc information Slideshow Slideshow Page 128kbps Vocal 5 sec Return 44.1kHz 12 18 < > [3, 4] PG: Program number [RAM] Track/picture number in disc PL: Play list number [RAM] [WMA] [MP3] [JPEG] Group number [ENTER]...
- Page 24 Using GUI (Graphical User Interface) screens Unit information [Audio\menu] [Picture\menu] OFF/48kHz Picture mode [RAM] [DVD-A] [DVD-V] [VCD] [JPEG] Double re-master [RAM] [DVD-A] [DVD-V] [CD] [WMA] [MP3] ≥N: Normal mode page 27) ≥S: Soft mode (Soft picture with fewer video artifacts) ≥F: Fine mode (Details are sharper) Dialogue Enhancer on/off [DVD-V] ≥C1: Mellows images and enhances detail in dark scenes...
- Page 25 The radio The tuner presets all the stations it can receive into the channels in ascending order. “SET OK” is displayed when the stations are set. The last station to be set is then played. AV SYSTEM TUNER/BAND DVD/CD Tune to “AM 522”. SKIP TUNER/BAND, SLOW/SEARCH...
- Page 26 Sound field Dolby Pro Logic Dolby Pro Logic is an active process that enhances sound DVD/CD AV SYSTEM TUNER/BAND localization through the use of a high separation decoding method providing improved spatiality and a wider listening area. The sense SLOW/SEARCH SKIP of directionality is enhanced by the Left, Center, Right and Surround channels.
- Page 27 Sound quality Sound Field Control Adjusting the bass Press [SFC] to select a setting. Press [SUBWOOFER LEVEL]. Each time you press the button: HEAVY: Adds impact to rock. SUB W 1 CLEAR: Clarifies higher sounds. SOFT: For background music. Each time you press the button: HALL: Expands sound to make you feel like you were in a hall.
- Page 28 Convenient functions Timer functions The SLEEP timer can turn the unit off after a set time and the WAKE VOLUME timer can turn it on. You can use only one timer at a time. Preparation Select the desired source. DOWN ≥Disc Í/I SELECT...
- Page 29 Changing settings This chart shows the settings for this unit. Change the settings to suit your preferences and to suit the unit to the environment in which it is being used. These settings are retained in memory until they are changed, even if the unit is turned off. See page 30 for details on menu operation.
- Page 30 Changing settings Entering a password (Ratings) [DVD-V] TUNER/BAND DVD/CD The password screen is shown when you select levels 0 to 7. AV SYSTEM DVD/CD 1 Input a 4-digit password with the numbered buttons and press SLOW/SEARCH SKIP [ENTER]. ≥If you enter a wrong number, press [CANCEL] to erase it before TV/AV you press [ENTER].
- Page 31 Optional antenna connections Use outdoor antennas if radio reception is poor. [Note] Disconnect the antenna when the unit is not in use. Do not use the outdoor antenna during an electrical storm. FM outdoor antenna (Using a television antenna) AM outdoor antenna (Using a vinyl wire) ≥Disconnect the FM indoor antenna.
- Page 32 Operating other equipment Operating a video cassette recorder TUNER/BAND AV SYSTEM DVD/CD Preparation ≥Face the remote control at this unit and press [SHIFT]i[VCR]. AV SYSTEM TUNER/BAND DVD/CD You can operate the video cassette recorder. SKIP SLOW/SEARCH SLOW/SEARCH SKIP ≥Change the video input mode on the television (“VIDEO 2” in the :, 9 6, 5 example on page 31).
- Page 33 Glossary Safety precautions Decoder Placement A decoder restores the coded audio signals on DVDs to normal. This is called decoding. Set the unit up on an even surface away from direct sunlight, high Dolby Digital temperatures, high humidity, and excessive vibration. These This is a method of coding digital signals developed by Dolby conditions can damage the cabinet and other components, thereby shortening the unit’s service life.
- Page 34 Troubleshooting guide Before requesting service, make the below checks. If you are in doubt about some of the check points, or if the remedies indicated in the chart do not solve the problem, consult your dealer for instructions. Power Page ≥Insert the AC mains lead securely into the household mains socket.
- Page 35 Sound Page ≥Check the connections. No sound. ≥Turn the volume up. Distorted sound. — ≥Turn muting off. ≥Switch off the unit, determine and correct the cause, then switch the unit on. — Causes include: –Shorting (bare wires touching) of positive and negative speaker wires. –Using speakers with an impedance lower than that rated for this unit.
- Page 36 Beam source Semiconductor laser Wavelength 658/790 nm NORSK Bølgelengde 658/790 nm Laserstyrke Ingen farlig stråling sendes ut ∫ GENERAL Dimensions (WtHtD) 190k73k335 mm Mass 1.8 kg Matsushita Electric Industrial Co., Ltd. Web Site: http://www.panasonic.co.jp/global/ RQT7035-B F0503NS0...