
Related Manuals for Viofo A229 Pro


Summary of Contents for Viofo A229 Pro
- Page 1 USER MANUAL Scan to Access User Guide Videos Scan to Access User Manual Copyright 2023 VIOFO Ltd. All Rights Reserved. V23.09.26...
-
Page 2: Table Of Contents
Mount Sticky Pads Tool Static Stickers x2 Playback Video on Dashcam Playback Video on VIOFO APP Playback Video on PC * Note: The USB data cable is only for connecting the Video File Storage Location camera with computer to transfer video files or 5. -
Page 3: Product Diagram
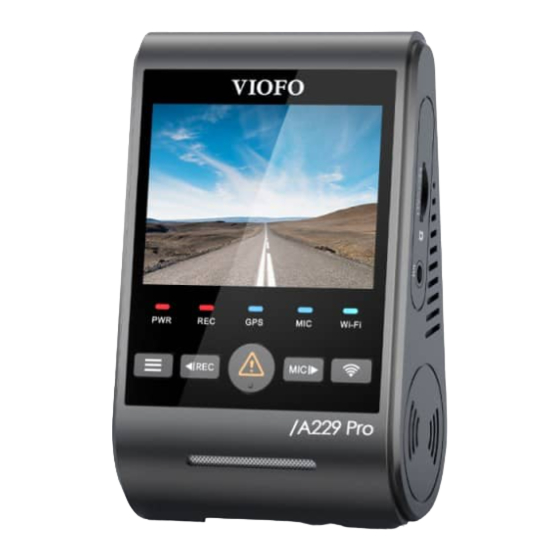
Bluetooth MicroSD Control Hardwire Kit Card Product Diagram Front Camera (Main Unit) 1 - Rear Camera Port / Power In / microSD Card Reader Mode (computer) 2 - Reset Button 3 - Power Status Indicator 4 - Recording Status Indicator 5 - GPS Status Indicator 6 - Microphone Status Indicator 7 - Wi-Fi Status Indicator... - Page 4 Rear Camera (Optional) LED Indicators Led Status Behavior Flashing Red Updating Firmware Solid Red Power On Power Off Solid Red Recording Flashing Red Not Recording 1. Bracket Flashing Blue GPS Signal Receiving 2. Power In Solid Blue GPS Signal Received 3.
- Page 5 Buttons and Icons Mode Buttons Behavior Buttons Mode Behavior Long press to power off Return to previous menu / Click once to take photo Exit playlist Click once to stop recording Menu up / Change playback speed / Delete the video Click once to lock the file being Recording recorded...
-
Page 6: Installation
Card Status HDR Status exFAT or FAT32 file system. • Please turn off the A229 Pro before inserting or GPS Speed Microphone Status removing the microSD card. -
Page 7: Install The Front Camera
Format the memory card in the camera driver’s view while driving. To format the card in the camera, either use the VIOFO App and the format option in the Settings, or alternatively long press the [ ] button. Best mounting location... -
Page 8: Install The Static Sticker (Optional)
Install the Static Sticker (Optional) 5. Fix the camera on the selected location. 1. Wipe clean the surface of the windscreen before 6. Adjust the Lens Angle installation. - Look at the live view on the LCD. - Adjust the angle of the lens up / down if necessary. 2. -
Page 9: Install The Rear Camera (Optional)
Install the Rear Camera (Optional) 1. Select an installation location on the windscreen, Front Camera without defrost grid wires, and where the camera can record the entire rear view. Rear Camera 2. Wipe clean the installation surface of the windscreen with a dry cloth. -
Page 10: Remove Cameras
5. Connecting with Interior Camera. 3. To ensure a clear view on rainy days, the lens should Use the Interior camera cable to connect the two be positioned within the windshield wiper’s sweeping cameras. Power off the product and connect the range. -
Page 11: Dash Cam Recording Operation
Dash Cam Recording Operation Initial Setup Upon the first activation of the dashcam, please perform ③ Confirm Auto Time and Date Setup the initial setup by setting the language, time zone and Press the OK [ ] button to confirm. speed unit. -
Page 12: Power On / Off
Loop Recording Insert a microSD card into the camera’s card slot and ⑤ Format microSD Card automatic loop recording will begin once the camera Memory card must be formatted before first use. detects power. Select the [ ] and press the OK [ ] button to confirm formatting the memory card. -
Page 13: Parking Mode
Note: Audio cannot be recorded in time-lapse mode. Long press the Wi-Fi button to enable Wi-Fi. Connect Wi-Fi on your phone first. Open VIOFO app and choose 3. Low Bitrate Recording "Connect your camera" to use your phone to control the dashcam. -
Page 14: Video File Storage Location
Recording Mode Behavior Connect to Smartphone Loop Recording The VIOFO app allows you to control your camera DCIM \ Movie ( Including Motion Detection ) remotely by using a smartphone. Features include full camera control, live preview, playback and video... -
Page 15: App Layout Overview
• Step 1: Use the phone to connect A229 Pro Wi-Fi. When the phone is connected with the dashcam, the LED light on the camera shows solid blue. 2023/08/30 • Step 2: Open VIOFO app and choose "Connect your camera" to use your phone to control the dashcam. -
Page 16: Install Accessories
Install Accessories Install CPL Install Bluetooth Remote Control (Optional) The CPL (Circular Polarizing Lens) can be used to reduce With the Bluetooth Remote Control (optional) mounted in a convenient location on your dashboard, you can safely reflections and glare from the window glass and road protect important videos from being overwritten, without surfaces that can otherwise damage image quality, this needing to take your eyes off the road. -
Page 17: Dashcam Settings
You can set the dashcam settings according to your replaced when microSD card storage is full. needs and preferences using the camera or the VIOFO App. To enter the settings menu, please stop recording first. - Page 18 Turn on /off the Interior camera image rotate and mirror. • Custom Text Stamp: Note: 1. We recommend that you buy VIOFO HK4 ACC hardwire Imprint the customize text on the recorded video. kit cable for parking mode recording. 2. In case you park the car outside in hot summer, we •...
-
Page 19: System Settings
• Live Video Source: • Parking Mode LED: Front Camera / Interior Camera / Rear camera / Rear All Off / All On / Power LED Only. Overlaid / Front Overlaid / All Cameras. You can enable / disable the LED lights under Parking Mode. -
Page 20: File Lists
- Take Photo - Video Start Note: - Turn On Audio - Turn Off Audio Note: Once you format the card, all information will be - Turn On Screen - Turn Off Screen deleted and unrecoverable. Make sure to back up all - Turn On Wi-Fi - Turn Off Wi-Fi files that you needed before formatting. -
Page 21: Firmware Upgrade
However, Shenzhen VIOFO Technology Co., Ltd, declares that this there is no guarantee that interference will not occur in a Radio Frequency peripheral is in compliance with the particular installation. -
Page 22: Customer Service
Customer Service Video Sharing Share videos caught on VIOFO camera with us. Let’s Thanks for choosing VIOFO! enjoy your new findings together! Gain a chance to From the date of purchase on, all products are get a mysterious gift at share@viofo.com.
Need help?
Do you have a question about the A229 Pro and is the answer not in the manual?
Questions and answers