Table of Contents
Advertisement
Advertisement
Table of Contents

Related Manuals for Viofo A118C


Summary of Contents for Viofo A118C
- Page 1 High Definition DVR User Manual Ver :15.1...
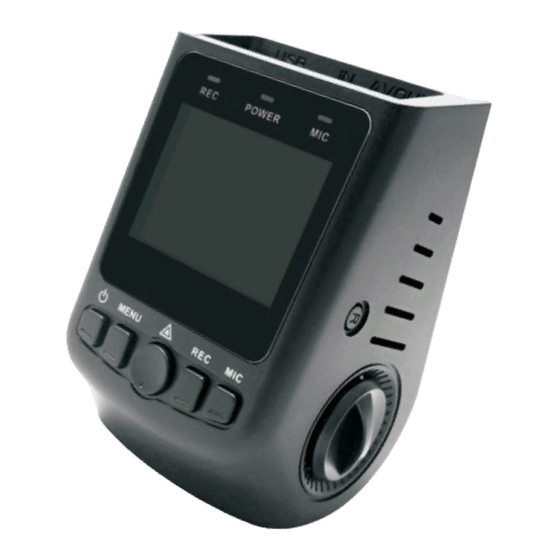
- Page 3 Diagram on Buttons 1. Diagram on Buttons 1. MIC interface 2. TF slot 3. Knob 4. USB interface 5. GPS interface 6. AV interface 7. MIC indicator 8. Power indicator 9. REC indicator 10. Screen 11. MIC button 12. REC button 13.
- Page 4 Description of Button Functions 2. Description of Button Functions 1).<Power> Button Function 1: Power on/off In power-off state, press the <Power> button to power on this DVR. Then, the DVR begins to work automatically. In power-on state, press and hold the <Power>...
- Page 5 Description of Button Functions 3).<OK> Button Function 1: Locking During the video-recording process, press the <OK> button to save the video-recording data into a separate folder in the memory card. The files in the folder will not be overwritten cyclically. [Note] In playback mode, a key-shaped icon in the miniature icon list indicates that the audio recording is locked.
- Page 6 Description of Button Functions 4).<REC> Button Function 1: Page up In the menu setting and playback modes, you can press <Up>to page up. Function 2: Fast Backward In playback state, press the <REC> button to enter the fast backward mode. Function 3: Video-recording In standby state, press the <REC>...
- Page 7 Description of Button Functions Function 4: Disable the audio-recording function In recording mode, press the <MIC> button to disable the audio-recording function. Then, the MIC indicator is turned off. Press the <MIC> button again to enable the audio-recording function. Then, the MIC indicator is turned on.
- Page 8 Operation Guide 3. Operation Guide I. Installing the DVR 1. Power off the automobile engine. 2. Insert the TF card into the TF slot. [Note] a. The 1080P format is adopted for the video- recording function, and a large amount of data is generated for the video-recording function.
- Page 9 Operation Guide 4. Fix the power cable properly by using the cable slot and cable clip, preventing the line of sight from being affected. 5. Insert the in-vehicle charger into the cigar lighter of the automobile. 6. Insert the charging interface of the in-vehicle charger into the USB interface of the data recorder.
- Page 10 Operation Guide II. Function Description 1. Automatic Recording After you start up the automobile engine, the DVR is automatically started and the recording function is enabled. In addition, the system indicator and power indicator are turned on, and the REC indicator on the screen blinks.
- Page 11 Operation Guide 3. Photographing Function In standby state, press the <MIC> button to enter the photographing mode. Then, the icon in the upper left of the screen is changed from a video camera to a still camera. You can press the <OK> button to take photos.
- Page 12 Operation Guide 5. Collision Sensing The DVR is fitted with a built-in collision sensor (G- sensor). In case of severe vehicle collision, the DVR locks the image data generated at the time of the accident, and displays a lock icon in the middle of the screen.
- Page 13 Operation Guide 7. USB Mode Connect the data recorder to the USB interface of a PC by using a data cable. Then, the screen displays two modes: memory and camera. Press the <Up> or <Down> button to select the <Memory> option. Press the <OK>...
- Page 14 Operation Guide 9. PC Camera Connect the data recorder to the USB interface of a PC by using a data cable. Then, the screen displays two modes: memory and camera. Press the <Up> or <Down> button to select the <Camera> option. Press the <OK>...
- Page 15 Technical Specifications 3. Technical Specifications Built-in Imaging 3 Megapixel Sensor Angle of View 170 wide angle Shooting Resolution FHD1920×1080 and Rate Hd1280×720 30FPS@HD1080P and Frame Rate 60FPS@HD720P Video Compression H.264 Format Video Output Mode NTSC/PAL Screen Size 1.5-inch Storage Temperature -20C to 70C -10C to 60C Operating Temperature...
Need help?
Do you have a question about the A118C and is the answer not in the manual?
Questions and answers