Table of Contents
Advertisement
Available languages
Available languages
Quick Links
Advertisement
Table of Contents

Related Manuals for meteo SP89


Summary of Contents for meteo SP89
- Page 1 PROFESJONALNA STACJA POGODOWA SP 89 Barometr Higrometr Termometr Miernik wiatru Barometr Miernik opadów Higrometr Zasilacz Termometr Bezprzewodowy Barometr Miernik wiatru przekaz z czujnika Higrometr Miernik opadów Bateria słoneczna Termometr Zasilacz...
- Page 2 FUNKCJE STACJI I SPECYFIKACJA TECHNICZNA lZegar, Budzik, Datownik z DCF (automatyczna synchronizacja z zegarem atomowym we Frankfurcie) l Kalendarz do 2099 roku l Budzik (2 mozliwe do ustawienia godziny alarmu) l Funkcja “drzemka”) (5~60min) l Temperatura – wewnętrzna– zakres pomiaru: 0°C (32°F) do 50°C (122°F) –...
-
Page 3: Wskazówki Bezpieczeństwa
Wskazówki bezpieczeństwa Niniejszy sprzęt może być użytkowany przez dzieci w wieku co najmniej 8 lat i przez osoby o obniżonych możliwościach fizycznych , umysłowych i osoby o braku doświadczenia i znajomości sprzętu, jeżeli zapewniony zostanie nadzór lub instruktaż odnośnie do użytkowania sprzętu w bezpieczny sposób, tak aby związane z tym zagrożenie było zrozumiałe. - Page 4 Ikony obrazujące dodatkowe funkcje rozładowanie baterii Sygnał DCF Alert temperaturowy max Czas letni Alert temperaturowy min Alarm 1 Alert opadów maks. dziennie Alarm 2 Alert intensywności opadów Alarm w dni robocze Alert porywów wiatru Alarm weekendowy Wiatr Drzemka Tendencja zmiany temp. i wilgotności - wzrost Sygnał...
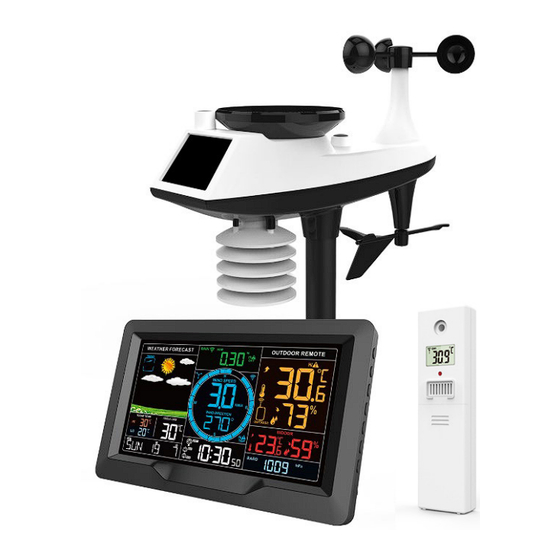
- Page 5 D1: Bateria słoneczna D10: Pokrywa baterii D2: Zbiornik - deszcz D11: wspornik zamocowania D3: Łopatki wiatromierza D12: Baza podstawy D4: Poziomica D13: Śruby mocujące D5: Obudowa miernika temperatury i D14: odpływ wody ze zbiornika opadów wilgotności D15: Wskaźnik PÓŁNOC D6: Wskaźnik kierunku wiatru D16: kierunek obrotu zbiornika wody D7: Reset D17: Nakrętka do zamocowania Multi...
-
Page 6: Szybka Instalacja
Dla uzyskania najlepszego efektu: Wyjmij wszystkie części zestawu z opakowania i rozłóż je na stole Zainstaluj baterie we wszystkich elementach, gdzie to konieczne Ustaw MULTI CZUJNIK i Stację główną w odległości ok. 30…50 cm i odczekaj ok. 15 minut , aby czujnik mógł kilkakrotnie połączyć się ze stacją i prawidłowo się zalogować Szybka instalacja 1. -
Page 7: Ustawianie Alarmu
Automatyczna synchronizacja z zegarem atomowym we Frankfurcie DCF: l Po odebraniu sygnału z czujnika zewnętrznego i ustawieniu temperatury i wilgotności na ekranie stacja rozpoczyna automatycznie poszukiwanie sygnału DCF. W tym czasie na ekranie zaczyna migać ikona a ekran gaśnie na maksymalnie 7 minut. W momencie odebrania sygnału DCF ikona pozostaje na stałe na wyświetlaczu. - Page 8 - ostatniego miesiąca kalendarzowego (np. 1 stycznia ….xx stycznia, 1 maja …xx maja itp.) (months) - od początku roku kalendarzowego (year ) Uwaga: 1HR TOP SPEED- oznacza maksymalną prędkość w czasie ostatniej godziny l W trybie obrazującym historię pomiarów wiatru, można zresetować dotychczasowe pomiary wciskając 3 sek.
-
Page 9: Prognoza Pogody
Alerty Pogodowe .Ustawienia i odczyty. l Wciskając krótko przycisk “ ” możemy odczytać ustawione aktualnie maksymalne i minimalne alerty pogodowe (temperatura, wilgotność,prędkość wiatru, wartość opadów- max/min) . Przytrzymując 3 sekundy przycisk “ ” powodujemy miganie kolejno poszczególnych funkcji na ekranie. Ustawiamy je przyciskami “ ” lub “ ” do pożądanej wartości alertu. -
Page 10: Podświetlenie Ekranu
pogodowych należy uznać prognozy serwisów za bardziej prawdopodobne. Piktogram pogodowy widoczny na ekranie stacji można skorygować i dopasować do aktualnej sytuacji postępując jak opisano w punkcie :Ustawianie czasu (przytrzymać 3 sek. przycisk “ ”, następnie wciskać go kilkakrotnie aż ukażą się migające piktogramy pogodowe, które ustawić... - Page 11 INSTRUKCJA MONTAŻU MULTI CZUJNIKA l Czujnik należy zainstalować w otwartej przestrzeni w odległości minimum 15 m od wszystkich obiektów z każdego kierunku l Należy go zamontować na stabilnej platformie lub wsporniku (pręcie) na wysokości 1,5 m ponad powierzchnią gruntu. l Przymocować śrubami czujnik do płaskiej powierzcni platformy lub ew.
-
Page 12: Warunki Gwarancji
Niniejszym, PHU METREX – Marek Chuchracki, 61-581 Poznań, ul. Ks. Wujka 9, oświadcza, że produkt: Stacja Pogodowa METEO SP89 jest zgodny z zasadniczymi wymaganiami oraz innymi stosowanymi postanowieniami dyrektywy Parlamentu Europejskiego i Rady 2014/53/UE. - Page 13 – SP89 Manual PROFESSIONAL WEATHER STATION...
- Page 14 – SP89 Manual Features: DCF Radio control time function Perpetual Calendar Up to Year 2099 Day of week in 7 languages user selectable: English, German, Italian, French, Spanish, Netherlands and Danish Two daily alarms Automatic snooze function (OFF or 5~60min) ...
- Page 15 – SP89 Manual Weather Station Appearance Part A-Positive LCD A1: Weather forecast A2: Value of wind speed A3: Wind direction steering wheel A4: Wind direction or wind top speed of 1Hr A5: Feels like temperature A6: Todays highes t and lowest temperature record...
- Page 16 – SP89 Manual Part C –Exterior Hanging hole Battery compartment C3: USB charging socket Power supply socket Support frame Multi-combination Wireless Remote Sensor Appearance Part D –Exterior D1: Solar panel Rain funnel D3: Wind cups Bubble level D5: Temperature | humidity induction box...
- Page 17 – SP89 Manual Part E –Exterior E1: Hanging hole E2: LCD display LED indicator E4: Temperature | Humidity sensing louver Manual transmit signal button “TX” E5: Battery compartment E7: “CHANNEL 1 or 2 or 3” switch Reset button...
-
Page 18: Setup Preparation
– SP89 Manual Setup Preparation Items you will need to setup your station (not included): 1. Crosshead screwdriver and hex driver for assembly. 2. Fresh Batteries: 2 (two) AA alkaline or lithium batteries for the weather station. 3 (three) AA alkaline or lithium batteries for the multi-combination sensor. - Page 19 – SP89 Manual 8. Time zone: -1 to 2 hr 9. Hour format: 24Hr | 12Hr Note: Exceeding the German signal tower 10. Hour diameter of 1500KM or more, the signal received 11. minutes by the radio clock signal is very poor. It is 12.
- Page 20 – SP89 Manual Alarm function control Press and release the “ ” button to view the alarm 1 time, press and release the button to view the alarm 2 time, the third release and release the button to exit the viewing mode.
-
Page 21: Snooze Function
– SP89 Manual button for more than 3 seconds to stop the alarm signal. Snooze function: When the time is up to the alarm, touch and release the “ ” touch button, the alarm signal stops, and enter the snooze timing mode. -
Page 22: Rain Readings | History
– SP89 Manual mode. Rain Readings | History In the main display interface, press and hold the “ ” button for 3 seconds to convert the display to cumulative value of rainfall or rate of rainfall Note: Rainfall: from current to past (1 hour | 24 hours | day | 7 days | month | year | total) total accumulated rainfall Rainfall rate: average rainfall over the past 12 hours per hour ... - Page 23 – SP89 Manual sensor power first, then follow the steps above to control the weather station. Note: When the channel icon (the position of the display A15) displays the low voltage icon “ ” , the battery of the corresponding channel wireless sensor is replaced according to the channel number of the channel icon.
-
Page 24: Weather Forecast
– SP89 Manual The flashing alert icon will indicate if is a LOW or High alert. Press any button to stop the alert sound. The alert icon will flash while value is in alert range. Note: If you want to permanently cancel the alert, enter the weather view mode, switch to the item you want to cancel, press and release the “... - Page 25 – SP89 Manual You may see the following displays: : The barometric pressure will rise. : The barometric pressure will remain constant. The barometric pressure will fall. Background lighting If the product is powered by batteries, Touch the “...
- Page 26 – SP89 Manual The base of the sensor is screwed to the platform and the support frame. Tighten the large nut that secures the support rod to the base When installing, adjust the sensor body so that the solar panel faces south, otherwise the wind direction will be wrong.
Need help?
Do you have a question about the SP89 and is the answer not in the manual?
Questions and answers