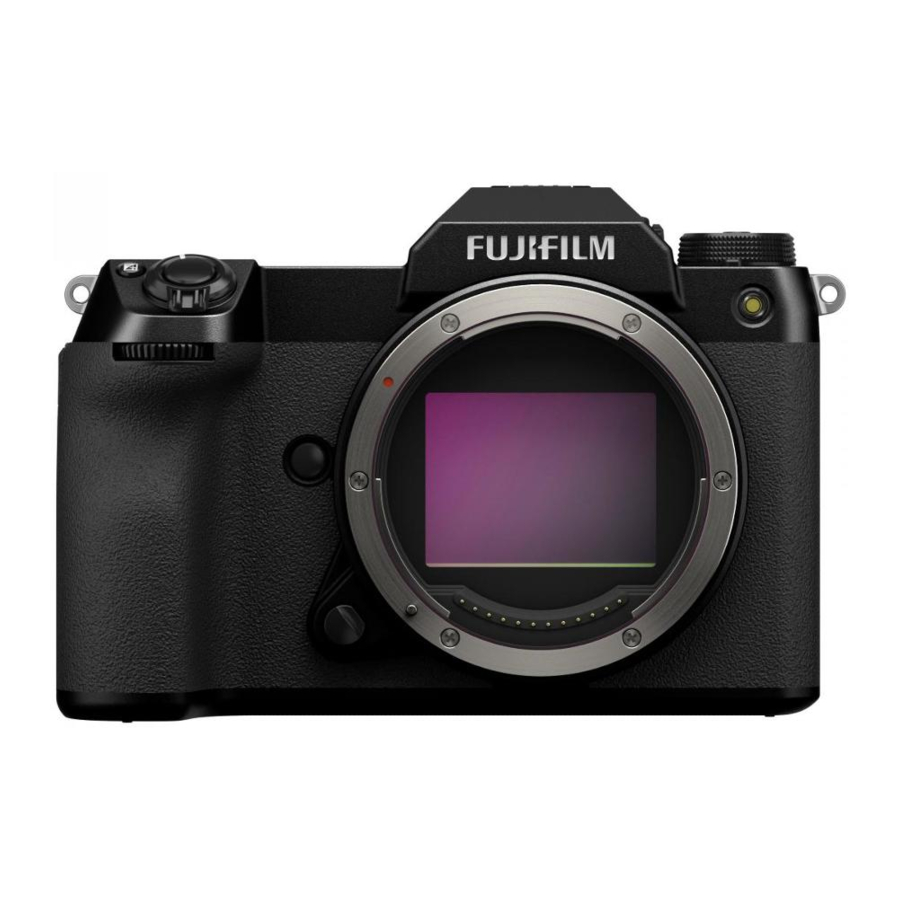
FujiFilm GFX100S - Digital Camera Manual
- Owner's manual (368 pages) ,
- Basic manual (144 pages)
Advertisement
- 1 The Electronic Viewfinder
- 2 The LCD Monitor
- 3 Customizing the Standard Display
- 4 T/S Lenses
- 5 Custom Modes
- 6 AUTO UPDATE CUSTOM SETTING
- 7 F-Log/HLG/RAW RECORDING
- 8 AREA SETTING
- 9 TIME DIFFERENCE
- 10 RESET
- 11 COMMAND DIAL SETTING
- 12 LOCATION INFO
- 13 Fn1 BUTTON SETTING
- 14 GEOTAGGING
- 15 Bluetooth/SMARTPHONE SETTING
- 16 Connecting to Smartphones
- 17 Documents / Resources

The Electronic Viewfinder
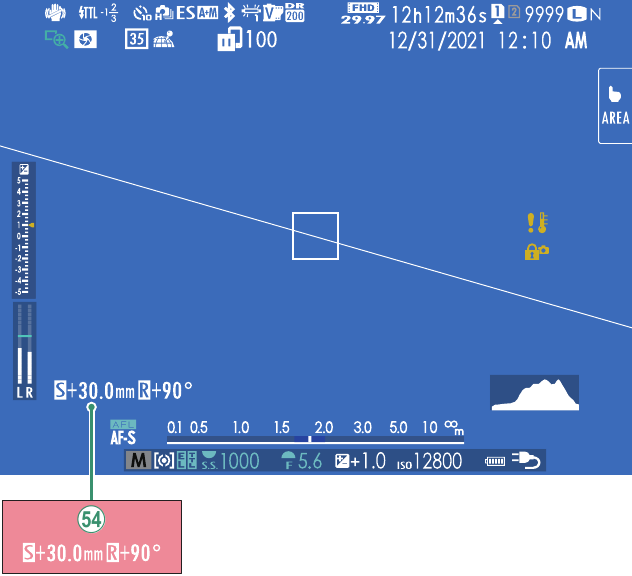
 If a T/S lens is attached, the shift and rotate amounts are displayed.
The LCD Monitor
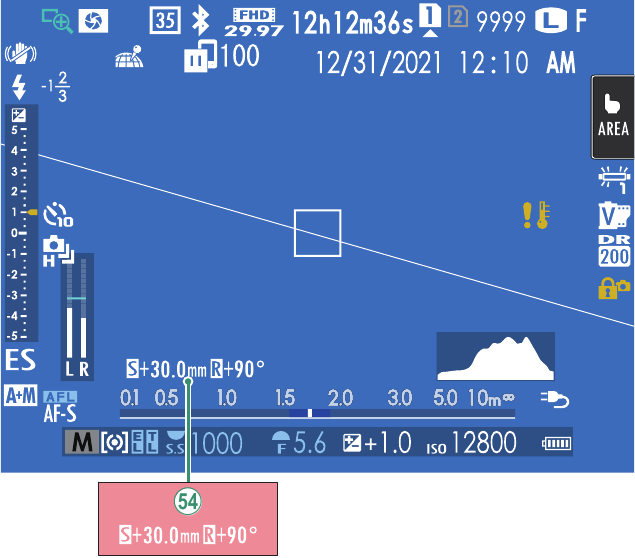
 If a T/S lens is attached, the shift and rotate amounts are displayed.
Customizing the Standard Display
To choose the items shown in the standard indicator display:
- Display standard indicators.
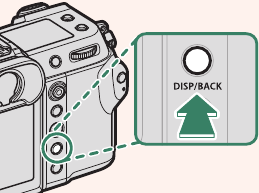
Use the DISP/BACK button to display standard indicators. - Select DISP. CUSTOM SETTING.
Select![]() SCREEN SET‑UP > DISP. CUSTOM SETTING in the setup menu.
SCREEN SET‑UP > DISP. CUSTOM SETTING in the setup menu. - Choose items.
Highlight items and press MENU/OK to select or deselect.Item Default STILL MOVIE FRAMING GUIDELINE ELECTRONIC LEVEL FOCUS FRAME ✓ ✓ AF DISTANCE INDICATOR MF DISTANCE INDICATOR ✓ ✓ HISTOGRAM LIVE VIEW HIGHLIGHT ALERT SHOOTING MODE ✓ ✓ APERTURE/S-SPEED/ISO ✓ ✓ INFORMATION BACKGROUND ✓ ✓ Expo. Comp. (Digit) Expo. Comp. (Scale) ✓ ✓ FOCUS MODE ✓ ✓ PHOTOMETRY ✓ ✓ SHUTTER TYPE ✓ − FLASH ✓ − CONTINUOUS MODE ✓ − DUAL IS MODE ✓ ✓ TOUCH SCREEN MODE ✓ ✓ WHITE BALANCE ✓ ✓ FILM SIMULATION ✓ ✓ DYNAMIC RANGE ✓ ✓ BOOST MODE ✓ ✓ SHIFT AMOUNT OF T/S LENS ✓ ✓ ROTATE AMOUNT OF T/S LENS ✓ ✓ FRAMES REMAINING ✓ − IMAGE SIZE/QUALITY ✓ − MOVIE MODE & REC. TIME − ✓ 35mm FORMAT MODE ✓ − IMAGE TRANSFER ORDER ✓ ✓ MIC LEVEL − ✓ GUIDANCE MESSAGE ✓ ✓ BATTERY LEVEL ✓ ✓ FRAMING OUTLINE - Press DISP/BACK to save changes.
- Press DISP/BACK as needed to exit the menus and return to the shooting display.
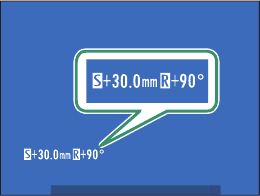
T/S Lenses
View the shift amount or rotate amount of lenses on the EVF or LCD. The shift and rotate amounts are displayed in increments of 0.5 mm and 3°, respectively.

Custom Modes
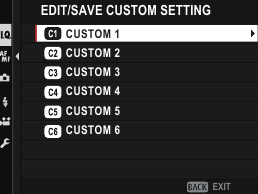
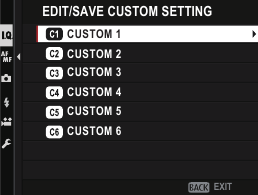
Rotate the mode dial to any of modes C1 (CUSTOM 1) through C6 (CUSTOM 6) to take pictures using previously-saved shooting menu settings. Settings can be saved or edited using  IMAGE QUALITY SETTING > EDIT/SAVE CUSTOM SETTING.
Saving Current Settings
Save current settings in a custom settings bank.
- Select
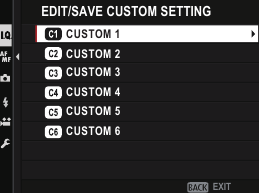
![]() IMAGE QUALITY SETTING > EDIT/SAVE CUSTOM SETTING in the shooting menu and press MENU/OK.
IMAGE QUALITY SETTING > EDIT/SAVE CUSTOM SETTING in the shooting menu and press MENU/OK. - Highlight a destination bank for current settings (C1 through C6) and press MENU/OK.
![]()
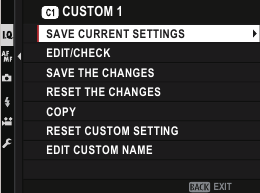
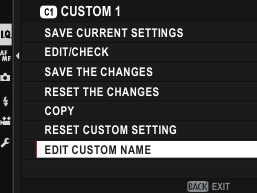
- Highlight SAVE CURRENT SETTINGS and press MENU/OK.
![]()
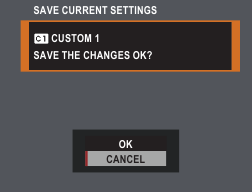
- Highlight OK and press MENU/OK. Current settings will be saved to the selected bank.
![]()
Editing Custom Settings
Edit existing custom settings banks.
- Select
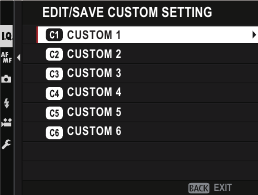
![]() IMAGE QUALITY SETTING > EDIT/SAVE CUSTOM SETTING in the shooting menu and press MENU/OK.
IMAGE QUALITY SETTING > EDIT/SAVE CUSTOM SETTING in the shooting menu and press MENU/OK. - Highlight the desired custom settings bank and press MENU/OK.
![]()
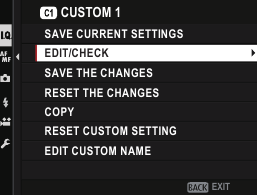
- Highlight EDIT/CHECK and press MENU/OK.
![]()
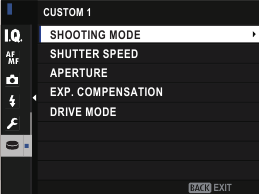
- The camera will display a list of shooting menu items; highlight an item you wish to edit and press MENU/OK.
Adjust the selected item as desired.
![]()
- Press MENU/OK to save the changes and return to the shooting menu list.
Adjust additional items as desired.
If DISABLE is selected for
![]() IMAGE QUALITY SETTING > AUTO UPDATE CUSTOM SETTING, red dots will appear next to the edited items but the changes will not be saved automatically.
IMAGE QUALITY SETTING > AUTO UPDATE CUSTOM SETTING, red dots will appear next to the edited items but the changes will not be saved automatically. - To save the changes for selected items, highlight the items in the list and press Q.
- To save changes for all items, return to Step 3 and select SAVE THE CHANGES. To cancel all changes and restore the previous settings, select RESET THE CHANGES.
- If you copy an item marked by a red dot, the item will be copied with the changes intact.
Copying Custom Settings
Copy custom settings from one bank to another, overwriting the settings in the destination bank. If the source bank has been renamed, the name will also be copied to the destination bank.
- Select
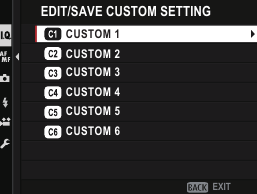
![]() IMAGE QUALITY SETTING > EDIT/SAVE CUSTOM SETTING in the shooting menu and press MENU/OK.
IMAGE QUALITY SETTING > EDIT/SAVE CUSTOM SETTING in the shooting menu and press MENU/OK. - Highlight the source bank and press MENU/OK.
![]()
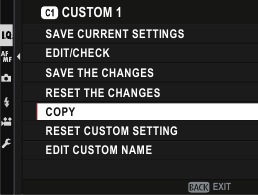
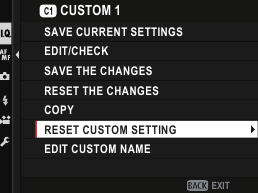
- Highlight COPY and press MENU/OK.
![]()
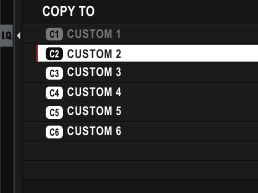
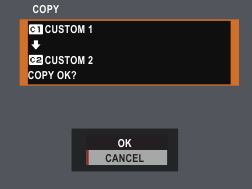
- Highlight the destination bank (C1 through C6) and press MENU/OK. A confirmation dialog will be displayed.
![]()
Any changes to custom settings in the destination bank will be overwritten.
- Highlight OK and press MENU/OK.
The selected settings will be copied to the destination bank, overwriting any existing settings.
![]()
Resetting Custom Settings
Reset selected custom settings banks.
- Select
![]() IMAGE QUALITY SETTING > EDIT/SAVE CUSTOM SETTING in the shooting menu and press MENU/OK.
IMAGE QUALITY SETTING > EDIT/SAVE CUSTOM SETTING in the shooting menu and press MENU/OK. - Highlight the desired custom settings bank and press MENU/OK.
![]()
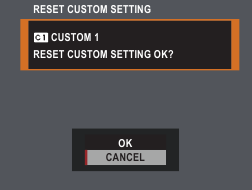
- Highlight RESET CUSTOM SETTING and press MENU/OK.
A confirmation dialog will be displayed.
![]()
- Highlight OK and press MENU/OK.
The selected bank will be reset.
![]()
Renaming Custom Settings Banks
Rename selected custom settings banks.
- Select
![]() IMAGE QUALITY SETTING > EDIT/SAVE CUSTOM SETTING in the shooting menu and press MENU/OK.
IMAGE QUALITY SETTING > EDIT/SAVE CUSTOM SETTING in the shooting menu and press MENU/OK. - Highlight the desired custom settings bank and press MENU/OK.
![]()
- Highlight EDIT CUSTOM NAME and press MENU/OK.
![]()
- Enter a new name for the custom settings bank and select SET.
The selected bank will be renamed.
AUTO UPDATE CUSTOM SETTING
Choose whether changes to saved custom settings apply automatically.
| Option | Description |
| ENABLE | Changes to custom settings banks CUSTOM 1 through CUSTOM 6 apply automatically. |
| DISABLE | Changes do not apply automatically. Any changes to custom settings must be applied manually. |
Video
AUTO UPDATE CUSTOM SETTING
Options are the same as those for still photography, but settings must be adjusted separately.
F-Log/HLG/RAW RECORDING
Choose the destination for F-Log, HLG (Hybrid Log-Gamma), or RAW movies shot while the camera is connected to an HDMI device.
| Option | Description |
 | The footage is processed using film simulation and both saved to the memory card and output to the HDMI device. |
 F-Log F-Log  F-Log F-Log | The footage is recorded to the memory card and output to the HDMI device in F-Log format. |
 F-Log F-Log | The footage is output to the HDMI device in F-Log format but saved to the memory card with film simulation applied. |
 F-Log F-Log  | The footage is recorded to the memory card in F-Log format but output to the HDMI device with film simulation applied. |
 HLG HLG  HLG HLG | The footage is recorded to the memory card and output to the HDMI device in HLG format. |
  RAW (ATOMOS) RAW (ATOMOS) | The footage is output to Atomos video recorders in RAW format but saved to the memory card with film simulation applied. |
 F-Log F-Log RAW (ATOMOS) RAW (ATOMOS) | The footage is recorded to the memory card in F-Log format and output to Atomos video recorders in RAW format. |
 HLG HLG RAW (ATOMOS) RAW (ATOMOS) | The footage is recorded to the memory card in HLG format and output to Atomos video recorders in RAW format. |
  RAW (Blackmagic) RAW (Blackmagic) | The footage is output to Blackmagic Design video recorders in RAW format but saved to the memory card with film simulation applied. |
 F-Log F-Log RAW(Blackmagic) RAW(Blackmagic) | The footage is recorded to the memory card in F-Log format and output to Blackmagic Design video recorders in RAW format. |
 HLG HLG RAW(Blackmagic) RAW(Blackmagic) | The footage is recorded to the memory card in HLG format and output to Blackmagic Design video recorders in RAW format. |
- F-Log offers a gentle gamma curve with a wide gamut suitable for further processing post-production. Sensitivity is restricted to values between ISO 800 and ISO 12800.
- The HLG (Hybrid Log-Gamma) recording format conforms to the international ITU-R BT2100 standard. When viewed on HLG-compatible displays, high-quality HLG footage faithfully captures high-contrast scenes and vivid colors. Sensitivity is restricted to values between ISO 1250 and ISO 12800. HLG recording is available when MOV/H.265(HEVC) LPCM is selected for
![]() MOVIE SETTING > FILE FORMAT in the shooting menu.
MOVIE SETTING > FILE FORMAT in the shooting menu. - Film simulation (
![]() ) footage is recorded using the option selected for
) footage is recorded using the option selected for ![]() MOVIE SETTING >
MOVIE SETTING > ![]() FILM SIMULATION in the shooting menu.
FILM SIMULATION in the shooting menu. - Footage shot with
![]() F-Log or
F-Log or ![]() F-Log
F-Log ![]() cannot be recorded to the memory card and output to the HDMI at different frame sizes (4K, Full HD). In addition, the following
cannot be recorded to the memory card and output to the HDMI at different frame sizes (4K, Full HD). In addition, the following ![]() MOVIE SETTING options are unavailable:
MOVIE SETTING options are unavailable: - MOVIE MODE frame rate options of 59.94P and 50P
![]() INTERFRAME NR
INTERFRAME NR- HDMI OUTPUT INFO DISPLAY
- RAW (ATOMOS) is used for output RAW footage to Atomos video recorders.
- RAW (Blackmagic) is used for output RAW footage to Blackmagic Design video recorders.
- RAW output cannot be recorded to the memory card.
- In-camera image enhancements are not applied to the RAW output.
- The crop (picture angle) and quality of footage output to external devices differs from that shown in the camera monitor. View footage output using RAW (ATOMOS) or RAW (Blackmagic) on the external device.
- Footage output to external devices is generated from the original RAW data and its quality, which varies with device specifications, may not be equal to that achieved as the end result of post-production or the like.
- Focus zoom is not available when RAW (ATOMOS) or RAW (Blackmagic) is selected for HDMI output.
- RAW footage output via HDMI to incompatible devices will not display correctly but will instead will display as a mosaic.
- The minimum and maximum sensitivities for
![]() , F-Log, or HLG footage recorded to the memory card when RAW (ATOMOS) or RAW (Blackmagic) is selected for HDMI output are ISO 1250 and ISO 12800, respectively.
, F-Log, or HLG footage recorded to the memory card when RAW (ATOMOS) or RAW (Blackmagic) is selected for HDMI output are ISO 1250 and ISO 12800, respectively.
AREA SETTING
Adjust settings for your current time zone.
AREA SETTING
Choose your time zone from a map.
DAYLIGHT SAVINGS
Turn daylight saving time on or off.
| Option | Description |
| ON | Daylight saving time on. |
| OFF | Daylight saving time off. |
TIME DIFFERENCE
Switch the camera clock instantly from your home time zone to the local time at your destination when traveling. To specify the difference between your local and home time zone:

 AREA SETTING to choose your home time zone before selecting a local time zone using
  LOCAL.
- Highlight
![]() LOCAL and press MENU/OK.
LOCAL and press MENU/OK. - Use the focus stick (focus lever) to choose the local time zone. Press MENU/OK when settings are complete.
Select ON to enable daylight saving time.
To set the camera clock to local time, highlight  LOCAL and press MENU/OK. To set the clock to the time in your home time zone, select
  HOME.
HOME.
| Options | |
 LOCAL LOCAL |  HOME HOME |

 LOCAL is selected,
  will be displayed in yellow for about three seconds when the camera is turned on.
RESET
Reset shooting or setup menu options to default values.
- Highlight the desired option and press MENU/OK.
Option Description STILL MENU RESET Reset all photo menu settings other than custom white balance and custom settings banks created using EDIT/ SAVE CUSTOM SETTING to default values. MOVIE MENU RESET Reset all movie menu settings other than custom white balance and custom settings banks created using EDIT/ SAVE CUSTOM SETTING to default values. SET-UP RESET Reset all setup menu settings other than DATE/TIME, ![]() AREA SETTING, TIME DIFFERENCE, and COPYRIGHT INFO to default values.
AREA SETTING, TIME DIFFERENCE, and COPYRIGHT INFO to default values.INITIALIZE Reset all settings other than custom white balance to default values. - A confirmation dialog will be displayed; highlight OK and press MENU/OK.
COMMAND DIAL SETTING
Choose the roles played by the command dials.
| Option | Description |
| FRONT COMMAND DIAL 1 | Assign shutter speed (S.S. (PROGRAM SHIFT)) or aperture (APERTURE) * to FRONT COMMAND DIAL 1. |
| FRONT COMMAND DIAL 2 | Assign shutter speed (S.S. (PROGRAM SHIFT)), aperture (APERTURE) *, sensitivity (ISO), or no role (NONE) to FRONT COMMAND DIAL 2 or FRONT COMMAND DIAL 3. |
| FRONT COMMAND DIAL 3 | |
| REAR COMMAND DIAL | Assign shutter speed (S.S. (PROGRAM SHIFT)), aperture (APERTURE) *, sensitivity (ISO), or no role (NONE) to the rear command dial. |
| EXP. COMPENSATION ASSIGNMENT | Exposure compensation can be adjusted using either or both of the front and rear command dials while the d  (exposure compensation) button is pressed. (exposure compensation) button is pressed. |
* Aperture ring rotated to A or C in mode A (aperture-priority AE) or M (manual).
- COMMAND DIAL SETTING can also be accessed by pressing and holding the center of the front command dial.
- You can also press the center of the front command dial to cycle through settings in the order FRONT COMMAND DIAL 1, FRONT COMMAND DIAL 2, and FRONT COMMAND DIAL 3.
LOCATION INFO
Select ON to display location info downloaded from a smartphone.
| Options | |
| ON | OFF |
Fn1 BUTTON SETTING
Choose the role performed by the Fn1 button during playback.
| Option | Description |
 SMARTPHONE TRANSFER ORDER SMARTPHONE TRANSFER ORDER | Pressing the button marks the current picture for transfer. If the camera is not currently paired with a smartphone, Bluetooth/ SMARTPHONE SETTING options will be displayed. |
 SELECT & SMARTPHONE TRANSFER ORDER SELECT & SMARTPHONE TRANSFER ORDER | Pressing the button displays a dialog where pictures can be selected for upload to a smartphone with which the camera is paired. If the camera is not currently paired with a smartphone, Bluetooth/SMARTPHONE SETTING options will be displayed instead. |
 WIRELESS COMMUNICATION WIRELESS COMMUNICATION | The button can be used for wireless connections. |
GEOTAGGING
If ON is selected, location data downloaded from a smartphone will be embedded in pictures as they are taken.
| Options | |
| ON | OFF |
Bluetooth/SMARTPHONE SETTING
Adjust Bluetooth settings.
| Option | Description |
| PAIRING REGISTRATION | Pair the camera with a smartphone or tablet to which the smartphone app has been installed. |
| SELECT PAIRING DESTINATION | Choose a connection from a list of devices with which the camera has been paired using PAIRING REGISTRATION. Select NO CONNECTION to exit without connecting. |
| DELETE PAIRING REG. | Delete pairing information for selected devices. Choose the device in the device list. The selected device will also be removed from the devices listed in SELECT PAIRING DESTINATION. |
| Bluetooth ON/OFF |
|
| AUTO IMAGE TRANSFER ORDER | Choose whether pictures are automatically marked for upload as they are taken. |
| SMARTPHONE LOCATION SYNC. | Choose whether to synchronize the camera to the location provided by a paired smartphone. |
| NAME | Choose a name (NAME) to identify the camera on the wireless network (the camera is assigned a unique name by default). |
| IMAGE TRANSFER WHILE POWER OFF | Choose whether the camera uploads pictures to paired smartphones while off. |
RESIZE IMAGE FOR SMARTPHONE  | Choose whether to resize images for upload to smartphones. Resizing applies only to the copy uploaded to the smartphone; the original is not affected.
|
- Be sure your smartphone is running the latest version of the applicable smartphone app. Different operating systems use different apps; for more information, visit: https://app.fujifilm-dsc.com/
- Pictures will be uploaded during shooting and playback and while the camera is off if ON is selected for both Bluetooth ON/OFF and AUTO IMAGE TRANSFER ORDER or if images are currently selected for upload using the IMAGE TRANSFER ORDER option in the playback menu.
- The camera clock will automatically be set to the time reported by paired smartphones whenever the app is launched.
Connecting to Smartphones
Access wireless networks and connect to computers, smartphones, or tablets. For more information, visit: http://fujifilm-dsc.com/wifi/
Smartphones and Tablets
Installing Smartphone Apps
Before establishing a connection between the smartphone and camera, you will need to install at least one dedicated smartphone app. Visit the following website and install the desired apps on your phone.
https://app.fujifilm-dsc.com/

Connecting to a Smartphone
Pair the camera with the smartphone and connect via Bluetooth®.
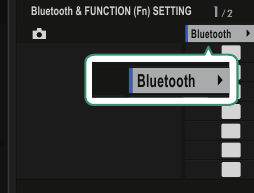
- Press DISP/BACK while shooting information is displayed.
![]()
You can also proceed directly to Step 3 by holding the DISP/ BACK button during playback.
- Highlight Bluetooth and press MENU/OK.
![]()
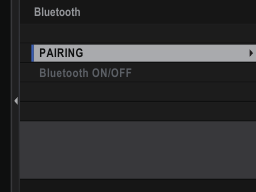
- Highlight PAIRING and press MENU/OK.
![]()
- Launch the app on the smartphone and pair the smartphone with the camera.
More information is available at the following website: https://app.fujifilm-dsc.com/
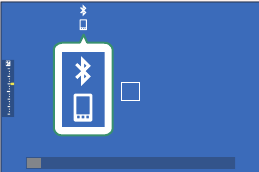
When pairing is complete, the camera and smartphone will automatically connect via Bluetooth. A smartphone icon and a white Bluetooth icon will appear in the camera display when a connection is established.
![]()
- Once the devices have been paired, the smartphone will automatically connect to the camera when the app is launched.
- Disabling Bluetooth when the camera is not connected to a smartphone reduces the drain on the battery.
Using the Smartphone App
Read this section for information on the options available for downloading pictures to your smartphone using the smartphone app.

Selecting and Downloading Pictures Using the Smartphone App
Selecting and Downloading Pictures Using the Smartphone App You can download selected pictures to a smartphone using the smartphone app.

Uploading Pictures as They Are Taken
Pictures taken with ON selected for  CONNECTION SETTING > Bluetooth/SMARTPHONE SETTING > AUTO IMAGE TRANSFER ORDER will automatically be marked for upload to the paired device.
- If ON is selected for both Bluetooth/SMARTPHONE SETTING > Bluetooth ON/OFF and IMAGE TRANSFER WHILE POWER OFF in the
![]() CONNECTION SETTING menu, upload to the paired device will continue even while the camera is off.
CONNECTION SETTING menu, upload to the paired device will continue even while the camera is off. - Selecting ON for
![]() CONNECTION SETTING > Bluetooth/SMARTPHONE SETTING > RESIZE IMAGE FOR SMARTPHONE
CONNECTION SETTING > Bluetooth/SMARTPHONE SETTING > RESIZE IMAGE FOR SMARTPHONE ![]() enables compression, reducing file size for upload.
enables compression, reducing file size for upload.
Selecting Pictures for Upload in the Playback Menu
Use IMAGE TRANSFER ORDER > SELECT FRAMES to select pictures for upload to a paired smartphone or tablet via Bluetooth®.
Features added or changed as a result of firmware updates may no longer match the descriptions in the documentation supplied with this product. Visit our website for information on the updates available for different products:
https://fujifilm-x.com/support/download/firmware/cameras/
FUJIFILM Corporation
7-3, AKASAKA 9-CHOME, MINATO-KU, TOKYO 107-0052, JAPAN
https://fujifilm-x.com

Documents / Resources
References
https://app.fujifilm-dsc.com
http://fujifilm-dsc.com/wifi/
![www.apple.com]() App Store - Apple
App Store - Apple![play.google.com]() Google Play
Google Play![fujifilm-x.com]() Firmware: Camera | FUJIFILM Digital Camera X Series & GFX – USA
Firmware: Camera | FUJIFILM Digital Camera X Series & GFX – USA![fujifilm-x.com]() FUJIFILM Digital Camera X Series & GFX – USA
FUJIFILM Digital Camera X Series & GFX – USA
Download manual
Here you can download full pdf version of manual, it may contain additional safety instructions, warranty information, FCC rules, etc.
Advertisement




Need help?
Do you have a question about the GFX100S and is the answer not in the manual?
Questions and answers