Table of Contents
Advertisement
Quick Links
KONTAKTGRILL 3-IN-1 / 3-IN-1 GRILL
GRIL 3 EN 1 SKGE 2000 C3
KONTAKTGRILL 3-IN-1
Bedienungsanleitung
GRIL 3 EN 1
Mode d'emploi
GRILL KONTAKTOWY 3 W 1
Instrukcja obsługi
KONTAKTNÝ GRIL 3 V 1
Návod na obsluhu
IAN 331049_2001
3-IN-1 GRILL
Operating instructions
CONTACTGRILL 3-IN-1
Gebruiksaanwijzing
KONTAKTNÍ GRIL 3 V 1
Návod k obsluze
Advertisement
Chapters
Table of Contents

Related Manuals for Silvercrest 331049 2001


Summary of Contents for Silvercrest 331049 2001
- Page 1 KONTAKTGRILL 3-IN-1 / 3-IN-1 GRILL GRIL 3 EN 1 SKGE 2000 C3 KONTAKTGRILL 3-IN-1 3-IN-1 GRILL Bedienungsanleitung Operating instructions GRIL 3 EN 1 CONTACTGRILL 3-IN-1 Mode d’emploi Gebruiksaanwijzing GRILL KONTAKTOWY 3 W 1 KONTAKTNÍ GRIL 3 V 1 Instrukcja obsługi Návod k obsluze KONTAKTNÝ...
- Page 2 Klappen Sie vor dem Lesen die Seite mit den Abbildungen aus und machen Sie sich anschließend mit allen Funktionen des Gerätes vertraut. Before reading, unfold the page containing the illustrations and familiarise yourself with all functions of the device. Avant de lire le mode d‘emploi, ouvrez la page contenant les illustrations et familiarisez-vous ensuite avec toutes les fonctions de l‘appareil.
-
Page 4: Table Of Contents
Inhaltsverzeichnis Einführung ..........2 Informationen zu dieser Bedienungsanleitung . -
Page 5: Einführung
Einführung Informationen zu dieser Bedienungsanleitung Herzlichen Glückwunsch zum Kauf Ihres neuen Gerätes. Sie haben sich damit für ein hochwertiges Produkt entschieden. Die Bedienungs- anleitung ist Bestandteil dieses Produkts. Sie enthält wichtige Hinweise für Sicherheit, Gebrauch und Entsorgung. Machen Sie sich vor der Benutzung des Produkts mit allen Bedien- und Sicherheitshinweisen vertraut. -
Page 6: Sicherheit
WARNUNG Ein Warnhinweis dieser Gefahrenstufe kennzeichnet eine mögliche gefährliche Situation. Falls die gefährliche Situation nicht vermieden wird, kann dies zu Verletzungen führen. ► Die Anweisungen in diesem Warnhinweis befolgen, um Verletzungen von Personen zu vermeiden. ACHTUNG Ein Warnhinweis dieser Gefahrenstufe kennzeichnet einen möglichen Sachschaden. - Page 7 Dieses Gerät kann von Kindern ab 8 Jahren sowie von Personen ■ mit reduzierten physischen, sensorischen oder mentalen Fähigkeiten oder Mangel an Erfahrung und/oder Wissen benutzt werden, wenn sie beaufsichtigt oder bezüglich des sicheren Gebrauchs des Gerätes unterwiesen wurden und die daraus resultierenden Gefahren verstanden haben.
- Page 8 Stellen Sie das Gerät möglichst in der Nähe einer Steckdose auf. ■ Sorgen Sie dafür, dass der Netzstecker bei Gefahr schnell erreich- bar ist und die Netzleitung nicht zur Stolperfalle werden kann. Sorgen Sie für einen sicheren Stand des Gerätes. ■...
- Page 9 GEFAHR DURCH ELEKTRISCHEN SCHLAG! Schützen Sie das Gerät vor Tropf- und Spritzwasser. ► Stellen Sie deshalb keine mit Flüssigkeit gefüllten Gegen- stände (z. B. Blumenvasen) auf oder neben das Gerät. Ziehen Sie bei jeder Unterbrechung sowie nach Beenden ► des Gebrauchs und vor jeder Reinigung den Netzstecker aus der Steckdose.
-
Page 10: Bedienelemente
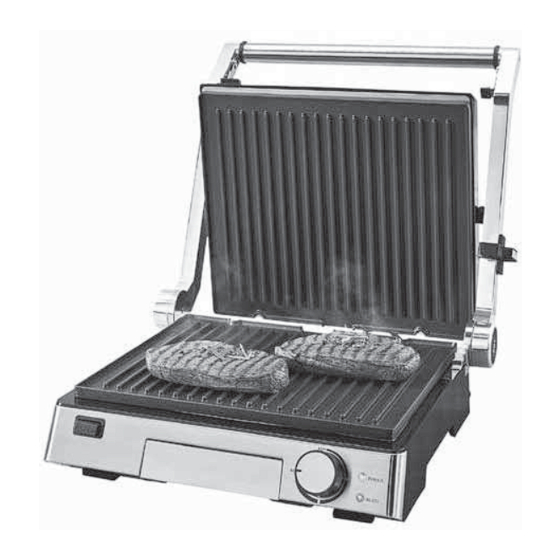
Bedienelemente Abbildung A: Stützfüße Sicherheitsverschluss Entriegelungstaste 180° rote Kontrollleuchte „Power“ grüne Kontrollleuchte „Ready“ Heizstufenregler Fett-Auffangschale Taste RELEASE (untere Heizplatte) Fettauslauf Heizplatten Taste RELEASE (obere Heizplatte) Abbildung B: Reinigungsschaber Abbildung C: Standfußerhöhungen Auspacken und Anschließen Sicherheitshinweise WARNUNG Bei der Inbetriebnahme des Gerätes können Personen- und Sachschäden auftreten! Beachten Sie die folgenden Sicherheitshinweise, um die Gefahren zu vermeiden:... -
Page 11: Lieferumfang Und Transportinspektion
Lieferumfang und Transportinspektion Das Gerät wird standardmäßig mit folgenden Komponenten geliefert (siehe Ausklappseite): ● Kontaktgrill 3-in-1 ● Fett-Auffangschale ● Reinigungsschaber ● Bedienungsanleitung HINWEIS ► Prüfen Sie die Lieferung auf Vollständigkeit und auf sichtbare Schäden. ► Bei einer unvollständigen Lieferung oder Schäden infolge mangelhafter Verpackung oder durch Transport wenden Sie sich an die Service-Hotline (siehe Kapitel „Service“). -
Page 12: Bedienung Und Betrieb
Bedienung und Betrieb In diesem Kapitel erhalten Sie wichtige Hinweise zur Bedienung und Betrieb des Gerätes. Vor dem ersten Gebrauch 1) Reinigen Sie sämtliche Zubehörteile wie im Kapitel „Reinigen und Pflegen“ beschrieben, um mögliche Rückstände aus der Produktion zu entfernen. 2) Lesen Sie diese Bedienungsanleitung aufmerksam durch. -
Page 13: Heizstufenregler
Heizstufenregler Am Heizstufenregler stellen Sie die Temperatur ein. – Heizstufenbereich 1: Aufheizbereich/niedrige Temperatur – Heizstufenbereich 2: mittlere Temperatur (z. B. Gemüse garen) – Heizstufenbereich 3: hohe Temperatur (z. B. Fleisch braten) Heizstufenbereich 1 Heizstufenbereich 2 Heizstufenbereich 3 HINWEIS ► Die grüne Kontrollleuchte „Ready“ leuchtet, wenn der Heizstufenregler auf MIN und im vorderen Bereich des Heizstufenbereichs 1steht. -
Page 14: Position „Kontaktgrill
HINWEIS Sie können diesen Grill auf 3 verschiedene Arten nutzen: – komplett aufgeklappt, so dass beide Heizplatten als Tischgrill genutzt werden können. – mit beweglicher oberer Heizplatte als Kontaktgrill, so dass z. B. Fleisch von beiden Seiten gegrillt wird. – mit festgestellter oberer Heizplatte als Panini-Grill, so dass z. -
Page 15: Position „Paninigrill
Position „Paninigrill“ 1) Öffnen Sie den Gerätedeckel und legen Sie die zu grillenden Lebensmittel auf die untere Heizplatte 2) Schließen Sie die obere Heizplatte und fixieren Sie diese in der gewünschten Höhe, indem Sie den Sicherheitsverschluss nach hinten drücken (Position MIN, II, III, IV, V). Heben Sie beim Verstellen des Sicherheits- verschlusses die Heizplatte ein wenig an. -
Page 16: Position „Tischgrill
Position „Tischgrill“ 1) Klappen Sie die beiden Stützfüße aus (Abb.1). 2) Drücken Sie die Entriegelungstaste 180° (Abb.1) und öffnen Sie den Gerätedeckel so weit, dass beide Heizplatten als Tischgrill benutzt werden können. Abb.1 3) Die Heizplatten liegen nun nebeneinander und können als Tischgrill genutzt werden (Abb. -
Page 17: Tipps Und Tricks
4) Legen Sie die zu grillenden Lebensmittel auf die Heizplatten 5) Wenden Sie das Grillgut zwischendurch und nehmen Sie es von den Heiz- platten , wenn es gar ist. ACHTUNG Beschädigung des Gerätes! ► Verwenden Sie keine spitzen oder scharfen Gegenstände, um das Grillgut zu wenden / herunterzunehmen. -
Page 18: Reinigen Und Pflegen
Reinigen und Pflegen Sicherheitshinweise WARNUNG! LEBENSGEFAHR DURCH ELEKTRISCHEN SCHLAG! Bei der Reinigung des Gerätes können Personenschäden auftreten! Beachten Sie die folgenden Sicherheitshinweise, um die Gefahren zu vermeiden: Ziehen Sie vor der Reinigung den Netzstecker und warten Sie, bis ► das Gerät vollständig abgekühlt ist. Verletzungsgefahr! Reinigen Sie das Gerät nie unter fließendem Wasser und tauchen ►... -
Page 19: Aufbewahren
Reinigen Sie die abgenommenen Heizplatten in warmem Wasser mit etwas Spülmittel. Bei starken Verkrustungen lassen Sie die Heizplatten ein wenig in dem Spülwasser einweichen. Spülen Sie die Heizplatten nach der Reinigung mit klarem Wasser ab, um Spülmittelrückstände zu beseitigen. Trocknen Sie alles gut ab. -
Page 20: Rezepte
Rezepte HINWEIS Je nach Beschaffenheit der Zutaten können die angegebenen Temperaturein- stellungen oder Zeitangaben in den Rezepten variieren! Position „Kontaktgrill“ Mexiko-Burger 900 g Rinderhackfleisch 6 EL Barbecuesauce 6 EL fein gehackte Zwiebeln 3 EL frische oder fertige Salsa 1/2 TL Chilipulver 4 große Hamburgerbrötchen 1) Vermischen Sie das Hackfleisch, die Zwiebeln, die Salsa, das Chilipulver und die Barbecuesauce in einer großen Schüssel. -
Page 21: Position „Paninigrill
Thunfisch mit Orangenscheiben (4 Personen) 4 frische Thunfischsteaks (je 170 g) 1 Orange 1 EL fein gehackte Petersilie Salz Pfeffer 1) Schälen Sie die Orange und schneiden Sie sie in etwa 5 mm dicke Scheiben. 2) Heizen Sie das Gerät vor (Heizstufenbereich 3). 3) Legen Sie die Thunfischsteaks auf den vorgeheizten Grill, streuen Sie die Petersilie darüber und würzen Sie sie mit Salz und Pfeffer. - Page 22 1) Verlesen und waschen Sie den Blattspinat. 2) Zwiebel und Knoblauchzehe schälen und fein hacken, in heißem Öl glasig dünsten. Den Spinat zufügen. Mit Zitronensaft, Salz und Pfeffer würzen. 3) Bestreichen Sie den Toast mit Kräuterbutter. 4) Schneiden Sie den Mozzarella in Scheiben. 5) Verteilen Sie den Mozzarella und den abgetropften Spinat auf 2 Toastschei- ben und betreuen Sie sie mit Pinienkernen.
- Page 23 5) Hähnchenbrustfilets der Länge nach aufschneiden und auf die Tomaten legen. 6) Bacon-Streifen auf die Hähnchenbrustfilets legen. 7) Avocado der Länge nach rundum aufschneiden und durch eine Drehbewegung vom Kern lösen. Schale abziehen und Avocado in Scheiben schneiden. Avocado mit dem Limonensaft beträufeln, damit sie nicht braun anläuft. Die Scheiben auf die Panini legen.
-
Page 24: Position „Tischgrill
Position „Tischgrill“ Hühner-/Putenbrust 200 g Hühner-/Putenbrust etwas Mehl 1) Ein wenig zum Braten geeignetes Öl auf die Heizplatten geben und das Gerät auf den Heizstufenbereich 3 aufheizen. 2) Die 200 g Hühner-/Putenbrust in Scheiben schneiden und leicht bemehlen. 3) Ca. 4 Minuten von der einen Seite braten, dann wenden, leicht salzen und die zweite Seite ca. - Page 25 Kokos-Curry-Garnelen 100 g rote Curry-Paste 50 ml Kokosmilch 400 g Garnelen (alternativ Krabben oder Shrimps) 200 g Zuckerschoten 2 Paprika 2 Zwiebeln 2 Knoblauchzehen Salz und Pfeffer Alufolie 1) Mischen Sie die Curry-Paste und die Kokosmilch. 2) Waschen Sie die Garnelen, die Zuckerschoten und die Paprika. 3) Schälen Sie die Zwiebeln und die Knoblauchzehen.
-
Page 26: Entsorgung
Gegrillte Maiskolben 2 Zucker-Maiskolben 100 g Kräuterbutter Knoblauchsalz Salz Pfeffer Alufolie 1) Bestreichen Sie ein Stück Alufolie mit der Kräuterbutter. 2) Salzen Sie den Maiskolben und wickeln diesen in die Alufolie. 3) Heizen Sie das Gerät auf Ende Heizstufenbereich 2 auf. 4) Legen Sie das Päckchen auf die Heizplatten 5) Wenden Sie es nach 15 Minuten und garen Sie die Maiskolben weitere 15 Minuten. -
Page 27: Anhang
Anhang Technische Daten Spannungsversorgung 220 – 240 V ~ (Wechselstrom), 50/60 Hz Leistungsaufnahme 2000 W Alle Teile dieses Gerätes, die mit Lebensmitteln in Berührung kommen, sind lebensmittelecht. ■ 24 │ DE │ AT │ CH SKGE 2000 C3... -
Page 28: Garantie Der Kompernaß Handels Gmbh
Garantie der Kompernaß Handels GmbH Sehr geehrte Kundin, sehr geehrter Kunde, Sie erhalten auf dieses Gerät 3 Jahre Garantie ab Kaufdatum. Im Falle von Mängeln dieses Produkts stehen Ihnen gegen den Verkäufer des Produkts gesetz- liche Rechte zu. Diese gesetzlichen Rechte werden durch unsere im Folgenden dargestellte Garantie nicht eingeschränkt. -
Page 29: Service
Abwicklung im Garantiefall Um eine schnelle Bearbeitung Ihres Anliegens zu gewährleisten, folgen Sie bitte den folgenden Hinweisen: ■ Bitte halten Sie für alle Anfragen den Kassenbon und die Artikelnummer (z. B. IAN 123456) als Nachweis für den Kauf bereit. ■ Die Artikelnummer entnehmen Sie bitte dem Typenschild am Produkt, einer Gravur am Produkt, dem Titelblatt der Bedienungsanleitung (unten links) oder dem Aufkleber auf der Rück- oder Unterseite des Produktes. - Page 30 Contents Introduction ..........28 Information concerning these operating instructions .
-
Page 31: Introduction
Introduction Information concerning these operating instructions Congratulations on the purchase of your new appliance. You have selected a high-quality product. The operating instructions are part of this product. They contain important information on safety, usage and disposal. Before using the product, familiarise yourself with all handling and safety guidelines. Use the product only as described and for the range of applications specified. -
Page 32: Safety
WARNING! A warning notice at this hazard level indicates a potentially hazardous situation. Failure to avoid this hazardous situation could result in injury. ► Follow the instructions in this warning notice to prevent injury. CAUTION A warning notice at this hazard level indicates a potential for property damage. - Page 33 This appliance may be used by children of the age of 8 years or ■ more and by persons with reduced physical, sensory or mental capabilities or lack of experience and/or knowledge if they are being supervised or have been instructed with regard to the safe use of the appliance and have understood the potential risks.
- Page 34 RISK OF ELECTRIC SHOCK! The appliance should only be connected to correctly installed ► and earthed mains power sockets. Ensure that the rating for your local power supply corresponds with the details on the rating plate of the appliance. Arrange for customer service to repair or replace connecting ►...
- Page 35 RISK OF ELECTRIC SHOCK! Protect the appliance from drips or splashes of water. Thus, ► do not place any vessels containing liquid (e.g. flower vases) on or near the appliance. Always pull the plug out of the power socket during each ►...
-
Page 36: Operating Components
Operating components Figure A: Support feet Safety catch Unlocking button 180° Red "Power" control lamp Green "Ready" control lamp Heat level control Fat collector tray RELEASE button (lower hotplate) Fat outlet Hotplates RELEASE button (upper hotplate) Figure B: Cleaning scraper Figure C: Stand extensions Unpacking and installation... -
Page 37: Package Contents And Transport Inspection
Package contents and transport inspection The appliance is supplied with the following components as standard (see fold-out page): ● 3-in-1 Grill ● Fat collector tray ● Cleaning scraper ● Operating instructions NOTE ► Check the package for completeness and for signs of visible damage. ►... -
Page 38: Handling And Operation
Handling and operation This section provides you with important information on handling and using the appliance. Before initial use 1) Clean all accessories as described in the section "Cleaning and care" to remove any production residues. 2) Read these operating instructions carefully. 3) Install the appliance in accordance with the safety instructions. -
Page 39: Heat Level Control
Heat level control The temperature is set using the heat level control – Heat level range 1: heating up range / low temperature – Heat level range 2: medium temperature (e.g. cooking vegetables) – Heat level range 3: high temperature (e.g. grill-roasting meat) Heat level range 1 Heat level range 2 Heat level range 3... -
Page 40: Contact Grill" Position
NOTE You can use this grill in 3 different ways: – fully open so that both hotplates can be used as a table grill. – with the movable upper hotplate as a contact grill so that, for instance, meat is grilled from both sides. –... -
Page 41: Panini Grill" Position
"Panini grill" position 1) Open the appliance lid and place the food to be grilled on the lower hotplate 2) Close the upper hotplate and lock it at the desired height by pressing the safety catch back (position MIN, II, III, IV, V). When adjusting the safety catch , lift the hot plate a little way. - Page 42 "Table grill" position 1) Fold out both support feet (Fig.1). 2) Press the unlocking button 180° (Fig.1) and open the appliance lid until both hotplates can be used as a table grill. Fig.1 3) The hotplates are now positioned next to each other and can be used as a table grill (Fig.
-
Page 43: Tips And Tricks
4) Place the food to be grilled onto the hotplates 5) Turn the food to be grilled from time to time and remove it from the hot- plates once it is cooked. CAUTION Damage to the appliance! ► Do not use pointed or sharp objects to turn or remove the grilled food. These could damage the surfaces of the hotplates 6) Turn the heat level control to MIN and remove the plug from the mains... -
Page 44: Cleaning And Care
Cleaning and care Safety instructions WARNING! DANGER TO LIFE DUE TO ELECTRIC SHOCK! Risk of injury when cleaning the appliance! To avoid risks, observe the following safety instructions: Before cleaning, pull out the plug and wait until the appliance ► has completely cooled down. -
Page 45: Storage
Clean the hotplates which have been removed in warm water with a little detergent in it. For severe incrustations, leave the hotplates to soak for a while in the water. After washing, rinse the hotplates with clean water to remove all detergent residues. -
Page 46: Recipes
Recipes NOTE Depending on the quality of the ingredients, the specified temperature settings or times in the recipes may vary! "Contact grill" position Mexican Burger 900 g minced beef 6 tbsp. BBQ sauce 6 tbsp. finely chopped onions 3 tbsp. fresh or ready-made salsa 1/2 tsp. -
Page 47: Panini Grill" Position
Tuna with slices of orange (4 people) 4 fresh tuna steaks (each 170 g) 1 orange 1 tbsp. finely chopped parsley Salt Pepper 1) Peel the oranges and cut them into slices that are approx. 5 mm thick. 2) Pre-heat the appliance (heat level range 3). 3) Place the tuna steaks onto the pre-heated grill, scatter the parsley on top and season with salt and pepper. - Page 48 1) Sort and wash the spinach leaves. 2) Peel and finely chop the onion and garlic, stew in hot oil. Add the spinach. Season with lemon juice, salt and pepper. 3) Spread the herb butter onto the toast. 4) Cut the mozzarella into slices. 5) Divide the mozzarella and drained spinach onto 2 slices of toast and scat- ter the pine nuts on top.
- Page 49 5) Cut the chicken breasts along their length and place them on top of the tomatoes. 6) Arrange the strips of bacon on the chicken breasts. 7) Cut open the avocados vertically and use a turning movement to remove the halves from the stone.
- Page 50 "Table grill" position Chicken/turkey breast 200 g chicken/turkey breast A little flour 1) Coat the hotplates with a little oil that is suitable for grill-roasting and heat the appliance to heat level range 3. 2) Cut the 200 g of chicken/turkey breast into slices and lightly dust with flour. 3) Grill-roast on one side for around 4 minutes, then turn, sprinkle with a little salt and grill the other side for about 4 minutes.
- Page 51 Coconut curry prawns 100 g red curry paste 50 ml coconut milk 400 g prawns (alternatively crab or shrimps) 200 g sugar snaps 2 peppers 2 onions 2 garlic cloves Salt and pepper Aluminium foil 1) Mix the curry paste and the coconut milk. 2) Wash the prawns, the sugar snaps and the peppers.
-
Page 52: Disposal
Grilled corn on the cob 2 sweet corn cobs 100 g herb butter Garlic salt Salt Pepper Aluminium foil 1) Brush a piece of aluminium foil with the herb butter. 2) Salt the corn cobs and wrap them in the aluminium foil. 3) Heat the appliance to the end of heat level range 2. -
Page 53: Appendix
Appendix Technical data Voltage supply 220 – 240 V ∼ (alternating current) 50/60 Hz Power consumption 2000 W All of the parts of this appliance that come into contact with food are food-safe. ■ 50 │ GB │ IE SKGE 2000 C3... -
Page 54: Kompernass Handels Gmbh Warranty
Kompernass Handels GmbH warranty Dear Customer, This appliance has a 3-year warranty valid from the date of purchase. If this product has any faults, you, the buyer, have certain statutory rights. Your statutory rights are not restricted in any way by the warranty described below. Warranty conditions The warranty period starts on the date of purchase. -
Page 55: Service
Warranty claim procedure To ensure quick processing of your case, please observe the following instructions: ■ Please have the till receipt and the item number (e.g. IAN 12345) available as proof of purchase. ■ You will find the item number on the type plate on the product, an engraving on the product, on the front page of the operating instructions (below left) or on the sticker on the rear or bottom of the product. - Page 56 Table des matières Introduction ..........54 Informations relatives à...
-
Page 57: Introduction
Introduction Informations relatives à ce mode d'emploi Toutes nos félicitations pour l'achat de votre nouvel appareil. Vous venez ainsi d'opter pour un produit de grande qualité. Le mode d'emploi fait partie intégrante de ce produit. Il contient des remarques importantes concernant la sécurité, l'usage et la mise au rebut. -
Page 58: Sécurité
ATTENTION Un avertissement à ce niveau de danger signale une situation potentiellement dangereuse. Si la situation dangereuse ne peut être écartée, elle peut entraîner des blessures. ► Les consignes de cet avertissement doivent être suivies pour éviter de blesser des personnes. ATTENTION Un avertissement à... - Page 59 Cet appareil peut être utilisé par des enfants à partir de 8 ans ■ et par des personnes ayant des capacités physiques, sensorielles ou mentales réduites ou un manque d'expérience et/ou de connaissances à condition qu'ils aient reçu une supervision ou des instructions concernant I’utilisation de I'appareil en toute sécurité...
- Page 60 RISQUE DE CHOC ÉLECTRIQUE ! Ne raccordez l'appareil qu'à une prise secteur correctement ► installée et reliée à la terre. La tension secteur doit corres- pondre aux indications figurant sur la plaque signalétique de l'appareil. Les cordons d'alimentation ou appareils qui ne fonctionnent ►...
- Page 61 RISQUE DE CHOC ÉLECTRIQUE ! Protégez l'appareil contre les gouttes d'eau et éclabous- ► sures. Pour cette raison, ne posez pas d'objets contenant du liquide (par exemple des vases) sur ou à côté de l'appareil. Après chaque interruption, en fin d'utilisation ou avant ►...
-
Page 62: Éléments De Commande
Éléments de commande Figure A : Pieds Fermeture de sécurité Touche de déverrouillage 180° Voyant de contrôle rouge « Power » Voyant de contrôle vert « Ready » Régulateur de température Bac collecteur de graisses Touche RELEASE (plaque chauffante inférieure) Sortie de la graisse Plaques chauffantes Touche RELEASE (plaque chauffante supérieure) Figure B :... -
Page 63: Contenu De La Livraison Et Inspection Après Transport
Contenu de la livraison et inspection après transport L'appareil est équipé de série des composants suivants (voir le volet dépliant) : ● Gril 3 en 1 ● Bac collecteur de graisses ● Racloir de nettoyage ● Mode d'emploi REMARQUE ► Vérifiez si la livraison est au complet et ne présente aucun dégât apparent. ►... -
Page 64: Utilisation Et Fonctionnement
Utilisation et fonctionnement Ce chapitre contient des remarques importantes sur l'utilisation et le fonctionne- ment de l'appareil. Avant la première utilisation 1) Nettoyez tous les accessoires comme décrit au chapitre « Nettoyage entre- tien » afin de retirer d'éventuels résidus issus de la production. 2) Veuillez lire le présent mode d'emploi attentivement et dans son intégralité. -
Page 65: Régulateur De Température
Régulateur de température Le régulateur de température vous permet de régler la température. – Niveau de cuisson 1 : niveau de préchauffage / température basse – Niveau de cuisson 2 : température moyenne (par ex. cuisson de légumes) – Niveau de cuisson 3 : température élevée (par ex. rôtir une viande) Niveau de cuisson 1 Niveau de cuisson 2 Niveau de cuisson 3... -
Page 66: Position " Gril De Contact
REMARQUE Vous pouvez choisir d'utiliser ce gril de 3 manières différentes : – entièrement rabattu, de manière à ce que les plaques chauffantes puissent être utilisées comme gril de table. – avec la plaque chauffante supérieure mobile comme gril de contact, de manière à... -
Page 67: Position " Gril À Panini
Position « Gril à panini ». 1) Ouvrez le couvercle de l'appareil et placez les aliments à griller sur la plaque chauffante inférieure 2) Fermez la plaque chauffante supérieure et fixez-la à hauteur souhaitée en poussant la fermeture de sécurité en arrière (position MIN, II, III, IV, V). -
Page 68: Position " Gril De Table
Position « Gril de table » 1) Déliez les deux pieds (fig.1) 2) Appuyez sur la touche de déverrouillage 180° (fig.1) et ouvrez le couvercle de l'appareil de manière à ce que les deux plaques chauffantes puissent être utilisées comme gril de table. Fig. -
Page 69: Conseils Et Astuces
4) Placez les aliments à griller sur les plaques chauffantes 5) Retournez les aliments à griller de temps en temps et retirez-les des plaques chauffantes , une fois cuits. ATTENTION Endommagement de l'appareil ! ► N'utilisez aucun objet pointu ou tranchant pour retourner/retirer les aliments grillés. -
Page 70: Nettoyage Et Entretien
Nettoyage et entretien Consignes de sécurité AVERTISSEMENT ! DANGER DE MORT PAR CHOC ÉLECTRIQUE ! Risque de dommages corporels pendant le nettoyage de l'appareil. Veuillez respecter les consignes de sécurité suivantes pour éviter les risques : Avant le nettoyage, retirez la fiche secteur et attendez que ►... -
Page 71: Rangement
Nettoyez les plaques chauffantes retirées à l'eau chaude avec un peu de li- quide vaisselle. En cas d'incrustations coriaces, faites tremper un peu les plaques chauffantes dans l'eau de rinçage. Rincez ensuite les plaques chauffantes à l'eau claire après le lavage afin d'éliminer les restes de liquide vaisselle. Bien sécher le tout. -
Page 72: Recettes
Recettes REMARQUE En fonction de la composition des éléments, les réglages de température ou les indications de temps données dans les recettes peuvent varier ! Position « Gril de contact » Burger Mexique 900 g de viande hachée 6 c. à soupe de sauce barbecue 6 c. -
Page 73: Position " Gril À Panini
Thon aux rondelles d'orange (4 personnes) 4 steaks de thon frais (170 g chacun) 1 orange 1 c. à soupe de persil haché Poivre 1) Épluchez l'orange et coupez-la en rondelles d'env. 5 mm d'épaisseur. 2) Chauffez l'appareil (niveau de cuisson 3). 3) Placez les steaks de thon sur le gril préchauffé, saupoudrez de persil, salez et poivrez. - Page 74 1) Équeutez les épinards et lavez-les. 2) Pelez l'oignon et la gousse d'ail, hachez-les finement puis faites-les blondir dans de l'huile bien chaude. Rajoutez les épinards. Assaisonnez avec le jus de citron, le sel et le poivre. 3) Badigeonnez le toast de beurre aux herbes aromatiques. 4) Coupez la mozarella en tranches.
- Page 75 5) Découpez les filets dans le sens de la longueur puis déposez-les sur les tomates. 6) Posez les lanières de bacon sur les blancs de poulet. 7) Coupez l'avocat en deux dans le sens de la longueur puis effectuez une rotation pour détacher le noyau.
-
Page 76: Position " Gril De Table
6) Avec la fermeture de sécurité ,réglez l'écartement souhaité de la plaque chauffante supérieure et fermez le couvercle. 7) Attendez que les baguettes aient doré / bruni. Position « Gril de table » Blanc de volaille 200 g de blanc de volaille un peu de farine 1) Versez un peu d'huile adaptée à... - Page 77 Gambas au curry et au lait de coco 100 g de pâte de curry rouge 50 ml de lait de noix de coco 400 g de gambas (ou du crabe ou des crevettes) 200 g de pois mange-tout 2 poivrons 2 oignons 2 gousses d'ail Sel et poivre...
-
Page 78: Mise Au Rebut
Épis de maïs grillés 2 épis de maïs sucré 100 g de beurre aux fines herbes Sel aromatisé à l'ail Poivre Feuille d'aluminium 1) Badigeonnez un morceau de feuille d'aluminium de beurre aux herbes. 2) Salez l'épi de maïs et enroulez-le dans la feuille d'aluminium. 3) Chauffez l'appareil à... -
Page 79: Annexe
Annexe Caractéristiques techniques Alimentation électrique 220 – 240 V ~ (courant alternatif), 50/60 Hz Puissance absorbée 2000 W Tous les éléments de cet appareil, entrant en contact avec les aliments sont approuvés pour le contact alimentaire. Garantie pour Kompernass Handels GmbH pour la Belgique Chère cliente, cher client, Cet appareil est garanti 3 ans à... - Page 80 Étendue de la garantie L’appareil a été fabriqué avec soin conformément à des directives de qualité strictes et consciencieusement contrôlé avant sa livraison. La prestation de la garantie s’applique aux vices de matériel et de fabrication. Cette garantie ne s’étend pas aux pièces du produit qui sont exposées à une usure normale et peuvent de ce fait être considérées comme pièces d’usure, ni aux dété- riorations de pièces fragiles, par ex.
-
Page 81: Garantie Pour Kompernass Handels Gmbh Pour La France
Garantie pour Kompernass Handels GmbH pour la France Chère cliente, cher client, Cet appareil est garanti 3 ans à partir de la date d’achat. Si ce produit venait à présenter des vices, vous disposez de droits légaux face au vendeur de ce produit. Vos droits légaux ne sont pas restreints par notre garantie présentée ci-dessous. - Page 82 Article L217-16 du Code de la consommation Lorsque l‘acheteur demande au vendeur, pendant le cours de la garantie commerciale qui lui a été consentie lors de l‘acquisition ou de la réparation d‘un bien meuble, une remise en état couverte par la garantie, toute période d‘immobilisation d‘au moins sept jours vient s‘ajouter à...
- Page 83 Article 1641 du Code civil Le vendeur est tenu de la garantie à raison des défauts cachés de la chose vendue qui la rendent impropre à l‘usage auquel on la destine, ou qui diminuent tellement cet usage que l‘acheteur ne l‘aurait pas acquise, ou n‘en aurait donné qu‘un moindre prix, s‘il les avait connus.
-
Page 84: Service Après-Vente
Service après-vente Service France Tel.: 0800 919270 E-Mail: kompernass@lidl.fr Service Belgique Tel.: 070 270 171 (0,15 EUR/Min.) E-Mail: kompernass@lidl.be IAN 331049_2001 Importateur Veuillez tenir compte du fait que l’adresse suivante n’est pas une adresse de service après-vente. Veuillez d’abord contacter le service mentionné. KOMPERNASS HANDELS GMBH BURGSTRASSE 21 44867 BOCHUM... - Page 85 ■ 82 │ FR │ BE SKGE 2000 C3...
- Page 86 Inhoud Inleiding ..........84 Informatie bij deze gebruiksaanwijzing .
-
Page 87: Inleiding
Inleiding Informatie bij deze gebruiksaanwijzing Hartelijk gefeliciteerd met de aankoop van uw nieuwe apparaat. U hebt hiermee gekozen voor een hoogwaardig product. De gebruiksaanwijzing maakt deel uit van dit product. Deze bevat belangrijke aanwijzingen voor veilig- heid, gebruik en afvoer. Lees alle bedienings- en veiligheidsaanwijzingen voordat u het product in gebruik neemt. -
Page 88: Veiligheid
WAARSCHUWING Een waarschuwing op dit niveau van gevaar duidt op een mogelijk gevaarlijke situatie. Als de gevaarlijke situatie niet wordt vermeden, kan dit letsel tot gevolg hebben. ► Neem de aanwijzingen in deze waarschuwingen in acht om persoonlijk letsel te voorkomen. LET OP Een waarschuwing op dit niveau van gevaar duidt op mogelijke materiële schade. - Page 89 Dit apparaat mag worden gebruikt door kinderen vanaf 8 ■ jaar en door personen met beperkte fysieke, zintuiglijke of geestelijke vermogens of gebrek aan ervaring en/of kennis, mits ze onder toezicht staan of over het veilige gebruik van het apparaat zijn geïnstrueerd en de daaruit resulterende gevaren hebben begrepen.
- Page 90 GEVAAAR VOOR EEN ELEKTRISCHE SCHOK! Sluit het apparaat uitsluitend aan op een volgens de voor- ► schriften geïnstalleerd en geaard stopcontact. De netspan- ning moet overeenstemmen met de gegevens op het type- plaatje van het apparaat. Laat aansluitleidingen resp. apparaten die niet naar behoren ►...
- Page 91 GEVAAR VOOR EEN ELEKTRISCHE SCHOK! Bescherm het apparaat tegen lek- en spatwater. Plaats ► daarom geen met vloeistoffen gevulde voorwerpen (bijv. vazen) op of naast het apparaat. Haal bij elke onderbreking van het gebruik, na gebruik en ► bij reiniging altijd de stekker uit het stopcontact. VERBRANDINGSGEVAAR! Let op! Heet oppervlak! Het oppervlak van het apparaat kan erg heet worden als...
-
Page 92: Bedieningselementen
Bedieningselementen Afbeelding A: Steunvoetjes Veiligheidssluiting Ontgrendelknop 180° Rood indicatielampje “Power” Groen indicatielampje “Ready” Warmteniveauregelaar Vetopvangbak Knop RELEASE (onderste grillplaat) Vetuitloop Grillplaten Knop RELEASE (bovenste grillplaat) Afbeelding B: Reinigingsschraper Afbeelding C: Verhogingen voor steunvoetjes Uitpakken en aansluiten Veiligheidsvoorschriften WAARSCHUWING Bij de ingebruikname van het apparaat kan per- soonlijk letsel en materiële schade optreden! Neem de volgende veiligheidsvoorschriften in acht om de gevaren te vermijden:... -
Page 93: Inhoud Van Het Pakket En Inspectie Na Transport
Inhoud van het pakket en inspectie na transport Het apparaat wordt standaard met de volgende componenten geleverd (zie uitvouwpagina): ● Contactgrill 3-in-1 ● Vetopvangbak ● Reinigingsschraper ● Gebruiksaanwijzing OPMERKING ► Controleer of het pakket compleet is en of er sprake is van zichtbare schade. -
Page 94: Bediening En Gebruik
Bediening en gebruik In dit hoofdstuk krijgt u belangrijke aanwijzingen voor de bediening en het gebruik van het apparaat. Vóór de ingebruikname 1) Reinig alle accessoires zoals beschreven in het hoofdstuk “Reiniging en on- derhoud”, om mogelijke uit de productie afkomstige resten te verwijderen. 2) Lees deze gebruiksaanwijzing aandachtig door. -
Page 95: Warmteniveauregelaar
Warmteniveauregelaar Met de warmteniveauregelaar stelt u de temperatuur in. – Warmteniveau 1: Voorverwarmen/lage temperatuur – Warmteniveau 2: Gemiddelde temperatuur (bijv. groente garen) – Warmteniveau 3: Hoge temperatuur (bijv. vlees braden) Warmteniveau 1 Warmteniveau 2 Warmteniveau 3 OPMERKING ► Het groene indicatielampje “Ready” brandt wanneer de warmteniveau- regelaar op MIN staat en het voorste bereik van het warmteniveau-... -
Page 96: Stand "Contactgrill
OPMERKING U kunt deze grill op 3 verschillende manieren gebruiken: – volledig opengeklapt, zodat u beide grillplaten kunt gebruiken als tafelgrill; – met een beweegbare bovenste grillplaat als contactgrill, zodat u bijvoorbeeld vlees aan beide zijden kunt grillen; – met vastgezette bovenste grillplaat als paninigrill, zodat u bijvoorbeeld baguettes kunt afbakken. -
Page 97: Stand "Paninigrill
Stand “Paninigrill” 1) Open het deksel van het apparaat en leg de te grillen levensmiddelen op de onderste grillplaat 2) Sluit de bovenste grillplaat en zet deze op de gewenste hoogte vast door de veiligheidssluiting naar achteren te drukken (stand MIN, II, III, IV, V). -
Page 98: Stand "Tafelgrill
Stand “Tafelgrill” 1) Klap de beide steunvoetjes uit (afb.1). 2) Druk op de ontgrendelknop 180° (afb.1) en open het deksel van het apparaat zo ver dat de beide grillplaten als tafelgrill kunnen worden gebruikt. Afb. 1 3) De grillplaten liggen nu naast elkaar en kunnen als tafelgrill worden gebruikt (afb. -
Page 99: Tips En Trucs
4) Leg de te grillen levensmiddelen op de grillplaten 5) Keer de te grillen levensmiddelen en neem ze van de grillplaten als ze gaar zijn. LET OP Beschadiging van het apparaat! ► Gebruik geen puntige of scherpe voorwerpen om het grillproduct te keren of uit het apparaat te nemen. -
Page 100: Reiniging En Onderhoud
Reiniging en onderhoud Veiligheidsvoorschriften WAARSCHUWING! LEVENSGEVAAR DOOR ELEKTRISCHE SCHOK! Bij de reiniging van het apparaat kan er persoonlijk letsel ontstaan! Neem de volgende veiligheidsvoorschriften in acht om de gevaren te vermijden: Haal voorafgaand aan de reiniging de stekker uit het stop- ►... -
Page 101: Opbergen
Reinig de verwijderde grillplaten in warm water met een beetje afwasmiddel. Bij sterk aangekoekt vuil laat u de grillplaten een tijdje weken in het warme sop. Spoel de grillplaten na het reinigen af met schoon water om afwasmiddel- resten te verwijderen. Droog alles goed af. De grillplaten moeten droog zijn voordat u het apparaat weer in elkaar zet! OPMERKING... -
Page 102: Recepten
Recepten OPMERKING Afhankelijk van de aard van de ingrediënten kunnen de in de recepten aange- geven temperatuurinstellingen en tijden variëren! Stand “Contactgrill” Mexico-burger 900 g rundergehakt 6 el barbecuesaus 6 el fijn gesneden uien 3 el verse of kant-en-klare salsa 1/2 tl chilipoeder 4 grote hamburgerbroodjes 1) Meng het rundergehakt, de uien, de salsa, het chilipoeder en de barbecuesaus... -
Page 103: Stand "Paninigrill
Tonijn met schijfjes sinaasappel (4 personen) 4 verse tonijnsteaks (elk 170 g) 1 sinaasappel 1 el fijngesneden peterselie Zout Peper 1) Pel de sinaasappel en snijd hem in ongeveer 5 mm dikke plakken. 2) Verwarm het apparaat voor (warmteniveau 3). 3) Leg de tonijnsteaks op de voorverwarmde grill, strooi er de peterselie over en kruid ze met peper en zout. - Page 104 1) Sorteer en was de bladspinazie. 2) Schil de ui en de knoflookteen, hak ze fijn, fruit ze in hete olie tot ze glazig zijn. Voeg de spinazie toe. Breng het geheel op smaak met citroensap, zout en peper. 3) Bestrijk het brood met kruidenboter. 4) Snijd de mozzarella in plakjes.
- Page 105 5) Snijd de kipfilets in de lengte open en leg ze op de tomaten. 6) Leg de baconreepjes op de kipfilets. 7) Snijd de avocado in de lengte rondom open en maak hem met een draai- beweging los van de pit. Trek de schil eraf en snijd de avocado in plakjes. Besprenkel de avocado met het citroensap, zodat deze niet bruin kleurt.
-
Page 106: Stand "Tafelgrill
Stand “Tafelgrill” Kippen-/kalkoenborst 200 g kippen-/kalkoenborst Een beetje bloem 1) Doe een beetje voor braden geschikte olie op de grillplaten en verwarm het apparaat voor op verwarmingsniveau 3. 2) Snijd de 200 g kippen-/kalkoenborst in plakken en bestrooi die licht met bloem. - Page 107 Kokos-curry-garnalen 100 g rode currypasta 50 ml kokosmelk 400 g garnalen (eventueel krabbetjes) 200 g sugarsnaps 2 paprika’s 2 uien 2 knoflooktenen Zout en peper Aluminiumfolie 1) Meng de currypasta en de kokosmelk. 2) Was de garnalen, de sugarsnaps en de paprika. 3) Pel de uien en de knoflookteentjes.
-
Page 108: Afvoeren
Gegrillde maïskolven 2 suikermaïskolven 100 g kruidenboter Knoflookzout Zout Peper Aluminiumfolie 1) Bestrijk een stuk aluminiumfolie met de kruidenboter. 2) Zout de maïskolven en wikkel ze in het aluminiumfolie. 3) Verwarm het apparaat voor op het laatste deel van verwarmingsniveau 2. 4) Leg het pakketje op de grillplaat 5) Keer het pakketje na 15 minuten en gaar de maïskolven nog 15 minuten. -
Page 109: Appendix
Appendix Technische gegevens Voeding 220 – 240 V ∼ (wisselstroom), 50/60 Hz Vermogen 2000 W Alle delen van het apparaat die in aanraking komen met levensmiddelen, zijn levensmiddelveilig. ■ 106 │ NL │ BE SKGE 2000 C3... -
Page 110: Garantie Van Kompernaß Handels Gmbh
Garantie van Kompernaß Handels GmbH Geachte klant, U hebt op dit apparaat 3 jaar garantie vanaf de aankoopdatum. In geval van ge breken in dit product hebt u wettelijke rechten tegenover de verkoper van het product. Deze wettelijke rechten worden door onze hierna beschreven garantie niet beperkt. -
Page 111: Service
Afhandeling bij een garantiekwestie Voor een snelle afhandeling van uw aanvraag neemt u de volgende aanwijzingen in acht: ■ Houd voor alle aanvragen de kassabon en het artikelnummer (bijv. IAN 12345) als aankoopbewijs bij de hand. ■ Het artikelnummer vindt u op het typeplaatje van het product, op het product gegraveerd, op de titelpagina van de gebruiksaanwijzing (linksonder) of op de sticker op de achter- of onderkant van het product. - Page 112 Spis treści Wstęp ..........110 Informacje o niniejszej instrukcji obsługi .
-
Page 113: Wstęp
Wstęp Informacje o niniejszej instrukcji obsługi Serdecznie gratulujemy zakupu nowego urządzenia. Wybrany produkt charakteryzuje się wysoką jakością. Instrukcja obsługi jest czę- ścią składową produktu. Zawiera ona ważne informacje na temat bezpieczeń- stwa, użytkowania i utylizacji. Przed rozpoczęciem użytkowania produktu należy zapoznać... -
Page 114: Bezpieczeństwo
OSTRZEŻENIE Informacja o tym stopnia zagrożenia oznacza możliwą sytuację niebezpieczną. Nieuniknięcie niebezpiecznej sytuacji może doprowadzić do powstania obrażeń. ► Należy przestrzegać instrukcji zawartych w niniejszej wskazówce ostrze- gawczej, by uniknąć obrażeń u osób. UWAGA Ostrzeżenie o tym stopniu zagrożenia oznacza możliwość powstania szkody materialnej. - Page 115 To urządzenie może być używane przez dzieci od 8 roku życia ■ oraz przez osoby o zmniejszonych zdolnościach fizycznych, sensorycznych lub umysłowych lub też osoby nieposiadające odpowiedniego doświadczenia i/lub wiedzy, wyłącznie pod nadzorem lub po przeszkoleniu w zakresie bezpiecznego uży- wania urządzenia oraz wynikających z niego zagrożeń.
- Page 116 NIEBEZPIECZEŃSTWO PORAŻENIA PRĄDEM ELEKTRYCZNYM! Podłączaj urządzenie tylko i wyłącznie do prawidłowo zain- ► stalowanego i uziemionego gniazda zasilania. Napięcie w sieci elektrycznej musi być zgodne z danymi podanymi na tabliczce znamionowej urządzenia. Urządzenia, które uległy uszkodzeniu lub nie działają ► prawidłowo, należy oddać...
- Page 117 NIEBEZPIECZEŃSTWO PORAŻENIA PRĄDEM ELEKTRYCZNYM! Urządzenie należy chronić przed kroplami i rozpryskami ► wody. Na urządzeniu lub obok niego nie należy stawiać naczyń wypełnionych wodą, np. wazonów. Przy każdej przerwie w użytkowaniu oraz po zakończeniu ► pracy i przed każdym czyszczeniem należy wyjmować wtyk kabla zasilającego z gniazda.
-
Page 118: Elementy Obsługowe
Elementy obsługowe Rysunek A: Nóżki Zamek bezpieczeństwa Przycisk odryglowania 180° Czerwona kontrolka „Power” Zielona kontrolka „Ready” Regulator mocy grzania Pojemnik na tłuszcz Przycisk RELEASE (dolna płyta grzewcza) Odpływ tłuszczu Płyty grzewcze Przycisk RELEASE (górna płyta grzewcza) Rysunek B: Skrobak do czyszczenia Rysunek C: Podwyższenia podstawy Wypakowanie i podłączenie... -
Page 119: Zakres Dostawy I Przegląd Po Rozpakowaniu
Zakres dostawy i przegląd po rozpakowaniu Urządzenie dostarczone jest standardowo z następującymi elementami (patrz odchylana okładka): ● Grill kontaktowy 3 w 1 ● Pojemnik na tłuszcz ● Skrobak do czyszczenia ● Instrukcja obsługi WSKAZÓWKA ► Urządzenie należy sprawdzić pod kątem kompletności dostawy i występo- wania widocznych uszkodzeń. -
Page 120: Obsługa I Eksploatacja
Obsługa i eksploatacja W niniejszym rozdziale podano ważne wskazówki dotyczące obsługi i użytko- wania urządzenia. Przed pierwszym użyciem 1) Oczyść wszystkie elementy osprzętu, jak opisano w rozdziale „Czyszczenie i pielęgnacja”, by usunąć możliwe pozostałości poprodukcyjne. 2) Należy dokładnie zapoznać się z niniejszą instrukcją obsługi. 3) Ustaw urządzenie zgodnie ze wskazówkami bezpieczeństwa. -
Page 121: Regulator Mocy Grzania
Regulator mocy grzania Ustaw temperaturę na regulatorze mocy grzania – Zakres mocy grzania 1: zakres nagrzewania / niska temperatura – Zakres mocy grzania 2: średnia temperatura (np. duszenie warzyw) – Zakres mocy grzania 3: wysoka temperatura (np. pieczenie mięsa) Zakres mocy grzania 1 Zakres mocy grzania 2 Zakres mocy grzania 3 WSKAZÓWKA... -
Page 122: Pozycja „Grill Stykowy
WSKAZÓWKA Z tego grilla można korzystać na 3 sposoby: – kompletnie rozłożony tak, że z obu płyt grzewczych można korzystać jak z grilla stołowego; – z ruchomą górną płytą grzewczą jako grillem stykowym tak, że można np. piec mięso z obu stron; –... -
Page 123: Pozycja „Grill Do Panini
Pozycja „grill do panini” 1) Otwórz pokrywę i połóż przeznaczone do opiekania/grillowania produkty na dolnej płycie grzewczej 2) Zamknij górną płytę grzewczą i zamocuj ją w żądanym położeniu, naci- skając do tyłu zamknięcie bezpieczeństwa w jednym z położeń MIN, II, III, IV, V. -
Page 124: Pozycja „Grill Stołowy
Pozycja „grill stołowy” 1) Rozłóż obie nóżki (rys. 1). 2) Naciśnij przycisk odryglowania 180° (rys. 1) i otwórz pokrywę urzą- dzenia na tyle, by można było korzystać z obu płyt grzewczych grilla jak z grilla stołowego. Rys. 1 3) Obie płyty grzewcze znajdują... -
Page 125: Wskazówki I Porady
4) Ułóż produkty do grillowania na płytach grzewczych 5) W trakcie grillowania obracaj produkty i zdejmij je z płyt grzewczych gdy są gotowe. UWAGA Uszkodzenie urządzenia! ► Do obracania/zdejmowania produktów nie używać żadnych spiczastych ani ostrych przedmiotów. Mogłyby one uszkodzić powierzchnie płyt grzewczych 6) Przestaw regulator mocy grzania do położenia MIN i wyjmij wtyk kabla... -
Page 126: Czyszczenie I Konserwacja
Czyszczenie i konserwacja Wskazówki bezpieczeństwa OSTRZEŻENIE! NIEBEZPIECZEŃSTWO UTRATY ŻYCIA WSKUTEK PORAŻENIA PRĄDEM ELEKTRYCZNYM! Podczas czyszczenia urządzenia może dojść do obrażeń u ludzi! Przestrzegaj następujących wskazówek bezpieczeństwa, by uniknąć zagrożeń: Przed czyszczeniem urządzenia wyjmij wtyk kabla zasila- ► jącego z gniazda i odczekaj na całkowite schłodzenie się urządzenia. -
Page 127: Przechowywanie
Umyj zdjęte płyty grzewcze ciepłą wodą z niewielkim dodatkiem środka do mycia naczyń. Przy silnych zapieczeniach namocz obie płyty grzewcze w wodzie z dodatkiem płynu do mycia naczyń. Następnie wypłucz płyty grzewcze dużej ilości czystej wody, aby usunąć ewentualne pozostałości płynu do mycia naczyń. -
Page 128: Przepisy
Przepisy WSKAZÓWKA Zależnie od właściwości składników, podane ustawienia temperatury lub czasy grillowania mogą się różnić! Pozycja „grill stykowy” Burger meksykański 900 g mielonego mięsa wołowego 6 łyżek stołowych sosu barbecue 6 łyżek stołowych drobno posiekanej cebuli 3 łyżki stołowe świeżej lub gotowej salsy 1/2 łyżeczki chili w proszku 4 duże bułki do hamburgerów 1) Wymieszaj mielone mięso, cebulę, salsę, sproszkowane chili i sos barbecue... -
Page 129: Pozycja „Grill Do Panini
Tuńczyk z plastrami pomarańczy Ilość dla 4 osób 4 świeże steki z tuńczyka (ok. 170 g każdy) 1 pomarańcza 1 łyżki stołowe posiekanej natki pietruszki Sól Pieprz 1) Obierz pomarańcze ze skórki i pokrój je na plastry o grubości ok. 5 mm. 2) Rozgrzej urządzenie (stopień... - Page 130 1) Przebierz i umyj liście szpinaku. 2) Cebulę i czosnek obierz i drobno posiekaj, zeszklij na gorącym oleju. Dodaj szpinak. Dopraw sokiem z cytryny, solą i pieprzem. 3) Posmaruj tosty masłem ziołowym. 4) Pokrój mozarellę w plasterki. 5) Rozłóż mozarellę i odsączony szpinak na dwóch tostach i posyp orzeszka- mi piniowymi.
- Page 131 5) Filety pokrój wzdłuż na plastry i ułóż na pomidorach. 6) Ułóż paski bekonu na filetach z piersi kurczaka. 7) Awokado przetnij dokoła i ruchem obrotowym oddziel od pestki. Obierz ze skórki i pokrój w plastry. Skrop sokiem z limonki, by nie zbrązowiały. Plastry ułóż...
-
Page 132: Pozycja „Grill Stołowy
6) Zamknięciem bezpieczeństwa ustaw żądaną odległość górnej płyty grzewczej i zamknij pokrywę. 7) Bagietka powinna być złoto-brązowa. Pozycja „grill stołowy” Pierś z kurczaka/indyka 200 g piersi z kurczaka/indyka nieco mąki 1) Na płytę grzewczą dodaj nieco oleju nadającego się do smażenia i rozgrzej urządzenie na stopniu mocy grzania 3. - Page 133 Krewetki curry z kokosem 100 g czerwonej pasty curry 50 ml mleczka kokosowego 400 g krewetek (alternatywnie kraby) 200 g groszku cukrowego 2 papryki 2 cebule 2 ząbki czosnku Sól i pieprz Folia aluminiowa 1) Wymieszaj pastę curry i mleczko kokosowe. 2) Umyj krewetki, groszek cukrowy i paprykę.
-
Page 134: Utylizacja
Grillowane kolby kukurydzy 2 kolby kukurydzy cukrowej 100 g masła ziołowego Sól czosnkowa Sól Pieprz Folia aluminiowa 1) Posmaruj kawałek folii aluminiowej masłem ziołowym. 2) Posól kolby kukurydzy i zawiń je w folię aluminiową. 3) Rozgrzej urządzenie (końcowy zakres stopnia mocy grzania 2). 4) Połóż... -
Page 135: Załącznik
Załącznik Dane techniczne Zasilanie 220 – 240 V ∼ (prąd przemienny), 50/60 Hz Pobór mocy 2000 W Wszystkie części tego urządzenia mające kontakt z żywnością, są do tego odpowiednio przystosowane. ■ 132 │ SKGE 2000 C3... -
Page 136: Gwarancja Kompernaß Handels Gmbh
Gwarancja Kompernaß Handels GmbH Szanowny Kliencie, To urządzenie objęte jest 3-letnią gwarancją, licząc od daty zakupu. W przypadku wad tego produktu, masz gwarantowane ustawowo prawa w stosunku sprzedawcy. Te ustawowe prawa nie są ograniczone przez nasze opisane poniżej warunki gwarancji. Warunki gwarancji Okres gwarancji rozpoczyna się... -
Page 137: Serwis
Realizacja zobowiązań gwarancyjnych W celu zapewnienia szybkiego załatwienia sprawy, postępuj zgodnie z poniż- szymi wskazówkami: ■ W przypadku wszelkich pytań przygotuj paragon fiskalny oraz numer artykułu (np. IAN 12345) jako dowód zakupu. ■ Numer artykułu można znaleźć na tabliczce znamionowej na produkcie, wy- grawerowany na urządzeniu, zapisany na stronie tytułowej instrukcji obsługi (w dolnym lewym rogu) lub na naklejce z tyłu bądź... - Page 138 Obsah Úvod ..........136 Informace k tomuto návodu k obsluze .
-
Page 139: Úvod
Úvod Informace k tomuto návodu k obsluze Gratulujeme vám k zakoupení nového přístroje. Rozhodli jste se pro vysoce kvalitní výrobek. Návod k obsluze je součástí tohoto výrobku. Obsahuje důležité informace o bezpečnosti, použití a likvidaci. Před použitím výrobku se prosím dobře seznamte se všemi provozními a bezpečnost- ními pokyny. -
Page 140: Bezpečnost
VÝSTRAHA Výstražné upozornění tohoto stupně nebezpečí označuje možnou nebezpečnou situaci. Pokud se takové nebezpečné situaci nezabrání, může vést ke zraněním. ► Za účelem zabránění zranění osob je proto nutné dodržovat pokyny uvedené v tomto výstražném upozornění. POZOR Výstražné upozornění tohoto stupně nebezpečí označuje vznik možné... - Page 141 Děti od 8 let a osoby s omezenými fyzickými, smyslovými nebo ■ mentálními schopnostmi či nedostatkem zkušeností a / nebo znalostí mohou používat tento přístroj pouze tehdy, pokud jsou pod dohledem nebo pokud byly poučeny o bezpečném pou- žívání přístroje a pokud porozuměly nebezpečí, které vyplývá z jeho použití.
- Page 142 NEBEZPEČÍ ÚRAZU ELEKTRICKÝM PROUDEM! Přístroj zapojte pouze do řádně instalované a uzemněné ► zásuvky. Síťové napětí se musí shodovat s údaji na typovém štítku přístroje. Přípojné vedení resp. přístroje, které nefungují správně nebo ► byly poškozeny, nechte okamžitě opravit nebo vyměnit zá- kaznickým servisem.
- Page 143 NEBEZPEČÍ ÚRAZU ELEKTRICKÝM PROUDEM! Chraňte přístroj před odkapávající a stříkající vodou. Na ► přístroj nebo vedle přístroje proto nestavte žádné předměty (např. vázy) naplněné tekutinou. Vytáhněte při každém přerušení, po ukončení použití a před ► každým čištěním síťový kabel ze zásuvky. NEBEZPEČÍ...
-
Page 144: Ovládací Prvky
Ovládací prvky Obrázek A: opěrné nožky bezpečnostní uzávěr odjišťovací tlačítko 180° červená kontrolní indikace „Power“ zelená kontrolní indikace „Ready“ regulátor topných stupňů odkapávací miska na tuk tlačítko RELEASE (dolní topná deska) odtok tuku topné desky tlačítko RELEASE (horní topná deska) Obrázek B: stěrka na čištění... -
Page 145: Rozsah Dodávky A Kontrola Po Přepravě
Rozsah dodávky a kontrola po přepravě Přístroj se standardně dodává s následujícími komponentami (viz výklopná stránka): ● kontaktní gril 3 v 1 ● odkapávací miska na tuk ● stěrka na čištění ● návod k obsluze UPOZORNĚNÍ ► Zkontrolujte dodávku, zda je kompletní a zda není viditelně poškozená. ►... -
Page 146: Obsluha A Provoz
Obsluha a provoz V této kapitole obdržíte důležité pokyny a informace k obsluze a provozu přístroje. Před prvním použitím 1) Vyčistěte všechny díly příslušenství tak, jak je popsáno v kapitole „Čištění a údržba“, aby se odstranily možné zbytky z výroby. 2) Tento návod k obsluze si pozorně přečtěte. 3) Umístěte přístroj v souladu s bezpečnostními pokyny. -
Page 147: Regulátor Topných Stupňů
Regulátor topných stupňů Pomocí regulátoru topných stupňů nastavte teplotu. – Topný stupeň 1: nahřívání/nízká teplota – Topný stupeň 2: středně vysoká teplota (např. pro vaření zeleniny) – Topný stupeň 3: vysoká teplota (např. pro pečení masa) Stupeň ohřevu 1 Stupeň ohřevu 2 Stupeň ohřevu 3 UPOZORNĚNÍ ►... -
Page 148: Poloha „Kontaktní Gril
UPOZORNĚNÍ Tento gril můžete používat třemi různými způsoby: – kompletně otevřený, takže obě topné desky slouží jako stolní gril. – s pohyblivou horní topnou deskou jako kontaktní gril, přičemž se např. maso griluje z obou stran. – s pevně zajištěnou horní topnou deskou jako gril na panini, takže můžete např. -
Page 149: Poloha „Gril Na Panini
Poloha „gril na panini“ 1) Otevřete víko přístroje a položte potraviny připravené ke grilování na spodní topnou desku 2) Zavřete horní topnou desku a zajistěte ji v požadované výšce tím, že po- sunete bezpečnostní uzávěr směrem dozadu (polohy MIN, II, III, IV, V). Při nastavení... -
Page 150: Poloha „Stolní Gril
Poloha „stolní gril“ 1) Vyklopte obě opěrné nožky (obr. 1). 2) Stiskněte odjišťovací tlačítko 180° (obr. 1) a otevřete víko přístroje natolik, abyste mohli obě topné desky používat jako stolní gril. Obr. 1 3) Topné desky nyní leží vedle sebe a mohou být použity jako stolní gril (obr. 2). -
Page 151: Tipy A Triky
4) Položte na topné desky potraviny, které chcete grilovat. 5) Grilované potraviny průběžně otáčejte a když jsou připravené, odeberte je z topných desek POZOR Poškození přístroje! ► Nepoužívejte špičaté nebo ostré předměty k odstranění/otáčení grilovaných potravin. Mohly by poškodit povrch topných desek 6) Otočte regulátor topných stupňů... -
Page 152: Čištění A Údržba
Čištění a údržba Bezpečnostní pokyny VÝSTRAHA! NEBEZPEČÍ OHROŽENÍ ŽIVOTA ELEKTRICKÝM PROUDEM! Při čištění přístroje může dojít ke zranění osob! Dodržujte následující bezpečnostní pokyny k omezení vzniku nebezpečí: Před čištěním vytáhněte síťovou zástrčku a vyčkejte, až přístroj ► úplně vychladne. Nebezpečí zranění! Přístroj nikdy nečistěte pod tekoucí... -
Page 153: Uložení
Uvolněné topné desky omyjte v teplé vodě s malým množstvím mycího prostředku. Je-li znečištění silnější, nechte topné desky nejprve odmočit v trošce vody. Topné desky opláchněte po vyčištění čistou vodou, aby se odstranily zbytky mycího prostředku. Vše dobře osušte. Topné desky musí být suché, než je nasadíte zpět do přístroje! UPOZORNĚNÍ... -
Page 154: Recepty
Recepty UPOZORNĚNÍ V závislosti na vlastnostech použitých přísad se mohou nastavení teplot nebo časové údaje uvedené v receptech lišit! Poloha „kontaktní gril“ Mexiko burger 900 g mletého hovězího masa 6 PL barbecue omáčky 6 PL jemně nakrájené cibule 3 PL čerstvě připravené nebo koupené salsy 1/2 lžičky čili prášku 4 velké... -
Page 155: Poloha „Gril Na Panini
Tuňák s plátky pomeranče (pro 4 osoby) 4 čerstvé steaky z tuňáka (po 170 g) 1 pomeranč 1 PL jemně nasekané petrželky sůl pepř 1) Oloupejte pomeranč a nakrájejte ho na plátky silné asi 5 mm. 2) Rozehřejte přístroj (stupeň ohřevu 3). 3) Položte steaky z tuňáka na předehřátý gril, posypte je petrželkou, osolte a opepřete. - Page 156 1) Listový špenát rozeberte a opláchněte. 2) Cibuli a stroužek česneku oloupejte, nakrájejte nadrobno a nechte zesklovatět v rozpáleném oleji. Přidejte k tomu špenát. Pokapejte citronovou šťávou a posypte solí a pepřem. 3) Potřete toast bylinkovým máslem. 4) Nakrájejte mozzarellu na kolečka. 5) Položte kolečka mozzarelly na odkapaný...
- Page 157 5) Kuřecí prsíčka podélně rozřízněte a položte na rajčata. 6) Proužky slaniny položte na kuřecí prsíčka. 7) Avokádo rozřežte podélně kolem dokola a odpeckujte jej rotačním pohy- bem. Oloupejte ho a nakrájejte na plátky. Pokapejte ho citronovou šťávou, aby nezhnědlo. Plátky položte na panini. 8) Nakrájejte salátovou okurku na kolečka a položte je na avokádo.
-
Page 158: Poloha „Stolní Gril
Poloha „stolní gril“ Kuřecí nebo krůtí prsa 200 g kuřecích nebo krůtích prsou troška mouky 1) Na topné desky naneste malé množství oleje na smažení a předehřejte přístroj na stupeň ohřevu 3. 2) 200 g kuřecích nebo krůtích prsou nakrájejte na plátky a lehce poprašte moukou. - Page 159 Kari garnáty s kokosovým mlékem 100 g červené kari pasty 50 ml kokosového mléka 400 g garnátů (alternativně krabů nebo krevet) 200 g cukrových lusků 2 papriky 2 cibule 2 stroužky česneku sůl a pepř alobal 1) Smíchejte kari pastu a kokosové mléko. 2) Omyjte garnáty, cukrové...
-
Page 160: Likvidace
Grilovaná kukuřice 2 cukrové kukuřice 100 g bylinkového másla česneková sůl sůl pepř alobal 1) Kousek alobalu natřete bylinkovým máslem. 2) Osolte kukuřici a zabalte ji do alobalu. 3) Rozehřejte přístroj na konec stupně ohřevu 2. 4) Položte balíčky na topné desky 5) Obraťte po 15 minutách a grilujte kukuřici dalších 15 minut. -
Page 161: Příloha
Příloha Technické údaje Napájení napětím 220 – 240 V ∼ (střídavý proud), 50/60 Hz Příkon 2000 W Všechny části tohoto přístroje, přicházející do styku s potravinami, jsou bezpečné pro potraviny. ■ 158 │ SKGE 2000 C3... -
Page 162: Záruka Společnosti Kompernass Handels Gmbh
Záruka společnosti Kompernass Handels GmbH Vážená zákaznice, vážený zákazníku, na tento přístroj získáváte záruku v trvání 3 let od data zakoupení. V případě závad tohoto výrobku máte zákonná práva vůči prodejci výrobku. Tato zákonná práva nejsou omezena naší níže uvedenou zárukou. Záruční... -
Page 163: Servis
Vyřízení v případě záruky Pro zajištění rychlého Vaší žádosti postupujte podle následujících pokynů: ■ Pro všechny dotazy mějte připraven pokladní lístek a číslo výrobku (např. IAN 12345) jako doklad o koupi. ■ Číslo výrobku naleznete na typovém štítku na výrobku, rytině na výrobku, na titulní... - Page 164 Obsah Úvod ..........162 Informácie o tomto návode na obsluhu .
-
Page 165: Úvod
Úvod Informácie o tomto návode na obsluhu Srdečne vám gratulujeme ku kúpe vášho nového prístroja. Touto kúpou ste sa rozhodli pre výrobok vysokej kvality. Návod na obsluhu je súčasťou tohto výrobku. Obsahuje dôležité upozornenia týkajúce sa bezpečnosti, používania a likvidácie. Pred používaním výrobku sa oboznámte so všetkými pokynmi na obsluhu a bezpečnostnými upozorneniami. -
Page 166: Bezpečnosť
VÝSTRAHA Výstražné upozornenie s týmto stupňom nebezpečenstva ozna- čuje možnú nebezpečnú situáciu. Ak sa tejto nebezpečnej situácii nezabráni, môže to mať za následok zranenia. ► Aby ste zabránili zraneniam osôb, riaďte sa inštrukciami, uvedenými v tomto výstražnom upozornení. POZOR Výstražné upozornenie tohto stupňa nebezpečenstva označuje možné... - Page 167 Tento prístroj môžu používať deti staršie ako 8 rokov, ako aj ■ osoby so zníženými fyzickými, senzorickými alebo mentálnymi schopnosťami, prípadne s nedostatočnými skúsenosťami a/ alebo znalosťami, ak sú pod dohľadom alebo boli dostatočne poučené o bezpečnom používaní prístroja a pochopili z toho vyplývajúce riziká. Deti sa nesmú...
- Page 168 NEBEZPEČENSTVO ÚRAZU ELEKTRICKÝM PRÚDOM! Prístroj zapojte iba do takej zásuvky, ktorá je nainštalovaná ► a uzemnená podľa predpisov. Sieťové napätie musí súhlasiť s údajmi uvedenými na typovom štítku prístroja. Prípojné káble alebo prístroje, ktoré sa poškodili alebo nefun- ► gujú bezchybne, nechajte okamžite opraviť alebo vymeniť v zákazníckom servise.
- Page 169 NEBEZPEČENSTVO ÚRAZU ELEKTRICKÝM PRÚDOM! Chráňte prístroj pred vniknutím kvapkajúcej a striekajúcej ► vody. Nepokladajte preto na prístroj alebo vedľa neho žiad- ne predmety naplnené tekutinami (napr. vázy na kvety). Pri každom prerušení používania, ako aj po jeho ukončení a ► pred každým čistením vytiahnite sieťovú...
-
Page 170: Ovládacie Prvky
Ovládacie prvky Obrázok A: oporné nohy bezpečnostný uzáver tlačidlo odblokovania 180° červená kontrolka „Power“ zelená kontrolka „Ready“ regulátor stupňov ohrevu zberná miska na tuk tlačidlo RELEASE (spodná vyhrievacia platňa) odtok tuku vyhrievacie platne tlačidlo RELEASE (horná vyhrievacia platňa) Obrázok B: škrabka na čistenie Obrázok C: zvýšenia nožičiek... -
Page 171: Rozsah Dodávky A Kontrola Po Doručení
Rozsah dodávky a kontrola po doručení Prístroj sa štandardne dodáva s nasledovnými komponentmi (pozri roztváraciu stranu): ● kontaktný gril 3 v 1 ● zberná miska na tuk ● škrabka na čistenie ● návod na obsluhu UPOZORNENIE ► Skontrolujte kompletnosť dodávky a prípadné viditeľné poškodenia. ►... -
Page 172: Obsluha A Prevádzka
Obsluha a prevádzka V tejto kapitole sú uvedené dôležité informácie o obsluhe a prevádzke prístroja. Pred prvým použitím 1) Na odstránenie možných zvyškov z výroby vyčistite všetky súčasti príslušen- stva podľa postupu uvedeného v kapitole „Čistenie a údržba“. 2) Pozorne si prečítajte návod na obsluhu. 3) Prístroj umiestnite podľa bezpečnostných pokynov. -
Page 173: Regulátor Stupňov Ohrevu
Regulátor stupňov ohrevu Regulátorm stupňov ohrevu nastavte teplotu. – Rozsah stupňa ohrevu 1: vyhrievací rozsah/nízka teplota – Rozsah stupňa ohrevu 2: stredná teplota (napr. dusenie zeleniny) – Rozsah stupňa ohrevu 3: vysoká teplota (napr. pečenie mäsa) Rozsah stupňov ohrevu 1 Rozsah stupňov Rozsah stupňov ohrevu 2... -
Page 174: Poloha „Kontaktný Gril
UPOZORNENIE Tento gril môžete používať 3 rôznymi spôsobmi: – kompletne rozložený, takže obidve vyhrievacie platne sa môžu používať ako stolový gril. – s pohyblivou hornou vyhrievacou platňou ako kontaktný gril, takže napr. mäso sa môže grilovať z oboch strán. – so zaaretovanou hornou vyhrievacou platňou ako Panini gril, takže sa môžu napr. -
Page 175: Poloha „Panini Gril
Poloha „Panini gril“ 1) Otvorte veko prístroja a položte potraviny určené na grilovanie na spodnú vyhrievaciu platňu 2) Zatvorte hornú vyhrievaciu platňu a zafixujte ju v požadovanej výške zatlačením bezpečnostného uzáveru dozadu (poloha MIN, II, III, IV, V). Pri prestavovaní bezpečnostného uzáveru mierne nadvihnite vyhrievaciu platňu . -
Page 176: Poloha „Stolový Gril
Poloha „stolový gril“ 1) Vyklopte obidve oporné nohy (obr. 1). 2) Stlačte tlačidlo odblokovania 180° (obr. 1) a otvorte veko prístroja na- toľko, aby sa obidve vyhrievacie platne mohli používať ako stolový gril. Obr. 1 3) Vyhrievacie platne ležia teraz vedľa seba a môžu sa používať ako stolový... -
Page 177: Tipy A Triky
4) Na vyhrievaciu platňu položte potraviny určené na grilovanie. 5) Z času na čas otočte grilované potraviny a odoberte ich z vyhrievacej platne , keď sú prepečené. POZOR Poškodenie prístroja! ► Na otáčanie/odoberanie grilovaných potravín nepoužívajte žiadne špicaté alebo ostré predmety. Mohli by poškodiť povrch vyhrievacích platní 6) Otočte regulátor stupňov ohrevu na MIN a vytiahnite sieťovú... -
Page 178: Čistenie A Údržba
Čistenie a údržba Bezpečnostné upozornenia VÝSTRAHA! NEBEZPEČENSTVO ÚRAZU ELEKTRICKÝM PRÚDOM! Pri čistení prístroja môže dôjsť k zraneniu osôb! Dodržiavajte nasledujúce bezpečnostné upozornenia, aby ste sa vyhli nebezpečenstvu: Pred čistením vytiahnite sieťovú zástrčku a počkajte na úplné ► vychladnutie prístroja. Nebezpečenstvo poranenia! Nikdy nečistite prístroj pod tečúcou vodou a nikdy ho do nej ►... -
Page 179: Uskladnenie
Umyte odobraté vyhrievacie platne v teplej vode s trochou umývacieho pro- striedku. Pri veľmi priľnavých nečistotách nechajte vyhrievacie platne trocha namočiť vo vode s umývacím prostriedkom. Po vyčistení opláchnite vyhrievacie platne čistou vodou, aby sa odstránili zvyšky umývacieho prostriedku. Všetko poriadne vytrite dosucha. Vyhrievacie platne musia byť... -
Page 180: Recepty
Recepty UPOZORNENIE Podľa vlastností prísad sa môžu uvedené nastavenia teploty alebo časy uvedené v receptoch odlišovať! Poloha „kontaktný gril“ Mexický burger 900 g hovädzieho mletého mäsa 6 PL omáčky barbecue 6 PL jemne nakrájanej cibule 3 PL čerstvej alebo hotovej salsy 1/2 ČL práškového čili korenia: 4 veľké... -
Page 181: Poloha „Panini Gril
Tuniak s pomarančovými plátkami (4 osoby) 4 čerstvé steaky z tuniaka (po 170 g) 1 pomaranč 1 PL jemne nakrájaného petržlenu soľ čierne korenie 1) Olúpeme pomaranč a pokrájame ho na približne 5 mm hrubé plátky. 2) Predhrejeme prístroj (rozsah stupňov ohrevu 3). 3) Na predhriaty gril položíme tuniakové... - Page 182 1) Preberieme a umyjeme listový špenát. 2) Olúpeme cibuľu a strúčik cesnaku, najemno ich nakrájame a opečieme ich na oleji do sklovita. Pridáme špenát. Ochutíme citrónovou šťavou, soľou a čiernym korením. 3) Toast natrieme bylinkovým maslom. 4) Mozzarellu nakrájame na plátky. 5) Rozdelíme Mozarellu a odkvapkaný...
- Page 183 5) Narežeme filé z kuracích pŕs po dĺžke a uložíme ich na paradajky. 6) Na filé z kuracích pŕs položíme plátky slaniny. 7) Rozrežeme avokádo po dĺžke a kruhovým pohybom vyberieme kôstku. Olúpeme ho a narežeme na plátky. Avokádo pokvapkáme limetkovou šťavou, aby nezhnedlo.
-
Page 184: Poloha „Stolový Gril
Poloha „stolový gril“ Kuracie/morčacie prsia 200 g kuracích/morčacích pŕs trocha múky 1) Na vyhrievaciu platňu dáme trocha oleja vhodného na pečenie a prístroj nahrejeme na rozsah stupňov ohrevu 3. 2) 200 g kuracích/morčacích pŕs narežeme na plátky a trocha poprášime múkou. 3) Pečieme na jednej strane približne 4 minúty, potom otočíme, ľahko osolíme a druhú... - Page 185 Krevety s kokosom a karí korením 100 g červenej karí pasty 50 ml kokosového mlieka 400 g kreviet (môžu byť aj kraby alebo morské raky) 200 g cukrového hrášku 2 papriky 2 cibule 2 strúčiky cesnaku soľ a čierne korenie alobal 1) Zmiešame karí...
-
Page 186: Zneškodnenie
Grilovaná kukurica 2 kusy cukrovej kukurice 100 g bylinkového masla cesnaková soľ soľ čierne korenie alobal 1) Kus alobalu natrieme bylinkovým maslom. 2) Kukuričné klásky posolíme a zabalíme do alobalu. 3) Predhrejeme prístroj na koniec rozsahu stupňov ohrevu 2. 4) Na vyhrievacie platne položíme balíčky. -
Page 187: Dodatok
Dodatok Technické údaje Napájacie napätie 220 – 240 V ∼ (striedavý prúd), 50/60 Hz Príkon 2000 W Všetky časti tohto prístroja, ktoré prichádzajú do kontaktu s potravinami, sú bezpečné pre potraviny. ■ 184 │ SKGE 2000 C3... -
Page 188: Záruka Spoločnosti Kompernass Handels Gmbh
Záruka spoločnosti Kompernass Handels GmbH Vážená zákazníčka, vážený zákazník, na tento prístroj máte záruku 3 roky od dátumu zakúpenia. V prípade nedo- statkov tohto výrobku máte práva vyplývajúce zo zákona voči predajcovi tohto výrobku. Tieto Vaše práva vyplývajúce zo zákona nie sú obmedzené našou zárukou, uvedenou nižšie. -
Page 189: Servis
Vybavenie v prípade záruky Na zaručenie rýchleho vybavenia Vašej žiadosti postupujte podľa nasledujúcich pokynov: ■ Na všetky otázky majte pripravený pokladničný doklad a číslo výrobku (napr. IAN 12345) ako doklad o nákupe. ■ Číslo výrobku nájdete na typovom štítku na výrobku, na gravúre na výrobku, na titulnej stránke návodu na obsluhu (dole vľavo) alebo ako nálepku na zadnej alebo spodnej strane výrobku. - Page 190 KOMPERNASS HANDELS GMBH BURGSTRASSE 21 44867 BOCHUM GERMANY www.kompernass.com Stand der Informationen · Last Information Update · Version des informations Stand van de informatie · Stan informacji · Stav informací · Stav informácií: 11 / 2019 · Ident.-No.: SKGE2000C3-112019-1 IAN 331049_2001...