
Related Manuals for JVC KD-G335


Summary of Contents for JVC KD-G335
- Page 1 All manuals and user guides at all-guides.com CD RECEIVER KD-G335 KD-G335 For canceling the display demonstration, see page 6. For installation and connections, refer to the separate manual. INSTRUCTIONS GET0402-005A [UT]...
- Page 2 All manuals and user guides at all-guides.com Thank you for purchasing a JVC product. Please read all instructions carefully before operation, to ensure your complete understanding and to obtain the best possible performance from the unit. IMPORTANT FOR LASER PRODUCTS 1.
-
Page 3: Table Of Contents
All manuals and user guides at all-guides.com How to use the M MODE button CONTENTS If you press M MODE, the unit goes into functions ¢ mode, then the number buttons and Control panel ........4 buttons work as different function buttons. Remote controller —... -
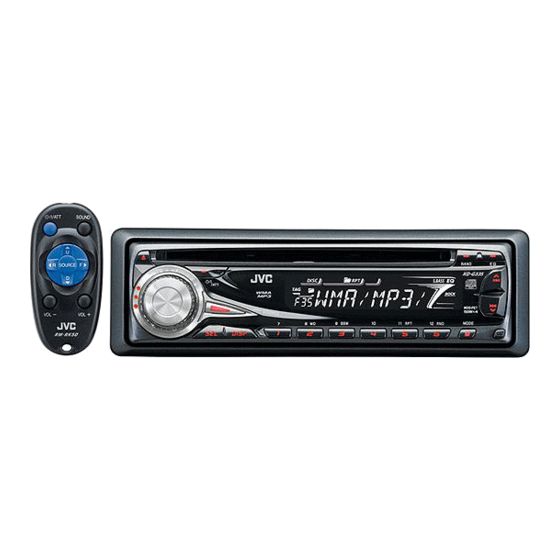
Page 4: Control Panel
All manuals and user guides at all-guides.com Control panel Parts identification Display window (eject) button RND (random) button Loading slot M MODE button (standby/on/attenuator) button (control panel release) button Remote sensor Disc information indicators— DO NOT expose the remote sensor to strong light TAG (Tag information), (track/file), (folder) -
Page 5: Rm-Rk50
All manuals and user guides at all-guides.com Remote controller — Main elements and features RM-RK50 Installing the lithium coin battery (CR2025) Aim the remote controller directly at the remote sensor on the unit. Make sure there is no obstacle (standby/on/attenuator) button in between. -
Page 6: Getting Started
All manuals and user guides at all-guides.com Getting started Basic settings • See also “General settings — PSM” on pages 11 and Basic operations Turn on the power. Ÿ * You cannot select “CD” as the playback source if there is no disc in the unit. 1 Canceling the display demonstrations Select “DEMO,”... -
Page 7: Radio Operations
All manuals and user guides at all-guides.com When an FM stereo broadcast is hard to Radio operations receive Lights up when monaural mode is activated. Ÿ Lights up when receiving an FM stereo Reception improves, but stereo effect will be lost. broadcast with sufficient signal strength. -
Page 8: Disc Operations
All manuals and user guides at all-guides.com Manual presetting Disc operations Ex.: Storing FM station of 92.5 MHz into preset number 4 of the FM1 band. Playing a disc in the unit Turn on the power. Ÿ Preset number flashes for a while. All tracks will be played repeatedly until you change the source or eject the disc. - Page 9 All manuals and user guides at all-guides.com To locate a particular track (for CD) or folder Changing the display information (for MP3 or WMA discs) directly To select a number from 01 – 06: To select a number from 07 – 12: While playing an audio CD or a CD Text •...
-
Page 10: Sound Adjustments
All manuals and user guides at all-guides.com Sound adjustments Selecting the playback modes You can use only one of the following playback modes You can select a preset sound mode suitable to the at a time. music genre (iEQ: intelligent equalizer). Select your desired playback mode. -
Page 11: General Settings - Psm
All manuals and user guides at all-guides.com Indication, [Range] General settings — PSM BAS * (bass), [–06 to +06] You can change PSM (Preferred Setting Mode) items Adjust the bass. listed in the table that follows. MID * (middle), [–06 to +06] Adjust the middle frequencies sound level. - Page 12 All manuals and user guides at all-guides.com Indications Item Selectable settings, [reference page] ( : Initial) DEMO • DEMO ON : Display demonstration will be activated automatically if no Display demonstration operation is done for about 20 seconds, [6]. • DEMO OFF : Cancels.
-
Page 13: Maintenance
All manuals and user guides at all-guides.com To keep discs clean Maintenance A dirty disc may not play correctly. If a disc does become dirty, wipe it with How to clean the connectors a soft cloth in a straight line from center Frequent detachment will deteriorate the connectors. -
Page 14: More About This Unit
All manuals and user guides at all-guides.com • MP3 and WMA “tracks” (words “file” and “track” are More about this unit used interchangeably) are recorded in “folders.” • While fast-forwarding or reversing on an MP3 or Basic operations WMA disc, you can only hear intermittent sounds. Turning on the power Playing a CD-R or CD-RW •... - Page 15 All manuals and user guides at all-guides.com • This unit can display only one-byte characters. No Changing the source other characters can be correctly displayed. • If you change the source, playback also stops • This unit can play back MP3/WMA files meeting the (without ejecting the disc).
-
Page 16: Troubleshooting
All manuals and user guides at all-guides.com Troubleshooting What appears to be trouble is not always serious. Check the following points before calling a service center. Symptoms Remedies/Causes • Sound cannot be heard from the speakers. • Adjust the volume to the optimum level. •... -
Page 17: Specifications
All manuals and user guides at all-guides.com Specifications AUDIO AMPLIFIER SECTION CD PLAYER SECTION Maximum Power Output: Type: Compact disc player Front/Rear: 50 W per channel Signal Detection Non-contact optical pickup System: (semiconductor laser) Continuous Power Output (RMS): Number of Channels: 2 channels (stereo) Front/Rear: 19 W per channel into 4 Ω, 40 Hz to 20 000 Hz at no more... - Page 18 All manuals and user guides at all-guides.com Having TROUBLE with operation? Please reset your unit Refer to page of How to reset your unit EN, CT © 2006 Victor Company of Japan, Limited 1006DTSMDTJEIN...
- Page 19 注意: Notes: • 把保險絲更換為額定負荷值的保險絲。如果保險絲經常燒壞,請向 JVC 汽車音響分銷商詢問。 • Replace the fuse with one of the specified rating. If the fuse blows frequently, consult your JVC car audio • 後置和前置揚聲器的最大輸入功率應大於 50 W,其阻抗為 4 Ω 8 Ω。如果最大功率小於 dealer. 50 W,請調校“AMP GAIN”設定值,以防止揚聲器損壞。(參閱使用說明書的第 12 頁。)...
- Page 20 INSTALLATION (IN-DASH MOUNTING) The following illustration shows a typical installation. If you have any questions or require information 下面的圖解表示了典型的安裝程序。如果您有問題,或需要有關配套元件的資料,請向 JVC regarding installation kits, consult your JVC car audio dealer or a company supplying kits. 汽車音響分銷商或配套元件供應公司詢問。 • If you are not sure how to install this unit correctly, have it installed by a qualified technician.
- Page 21 All manuals and user guides at all-guides.com 中文 ENGLISH 電路連接 ELECTRICAL CONNECTIONS Typical connections / 典型的接線方法 Before connecting: Check the wiring in the vehicle carefully. Incorrect connection may cause serious 接線前:仔細檢查汽車內的線路。不正確的接線會導致本機嚴重損壞。 damage to this unit. 電源線的引線和車身的連接器引線在顏色上可能有所不同。 The leads of the power cord and those of the connector from the car body may be different in color. 依照下圖所示之次序連接電源線的顏色導線。...
- Page 22 將“L/O MODE”設定為“REAR”(參閱使用說 To the remote lead of other equipment or automatic antenna if any 明書的第 12 頁。) 連接至其他裝置上的遙控導線或自動天線(若有裝設) You can connect a power amplifier for rear speakers. 您可為後置揚聲器連接功率放大器。 JVC Amplifier JVC 功率放大器 Rear speakers 後置揚聲器 Front speakers 前置揚聲器 Set “L/O MODE” to “WOOFER” (See page 12 of the INSTRUCTIONS.)