Table of Contents
Advertisement
Quick Links
Advertisement
Table of Contents

Related Manuals for Landice Move Series


Summary of Contents for Landice Move Series
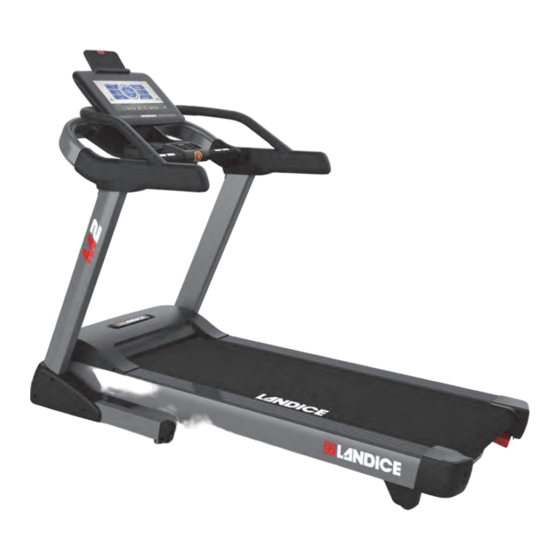
- Page 1 Move Series M2 Genesis Owner’s Manual Part Number: 12050-1...
-
Page 2: Contents Important Safety Instructions
• Use the treadmill only for its intended use as described in this manual. Do not use attachments not recommended by Landice. • Never operate treadmill if it has a damaged cord or plug, if it is not working properly, or if it has been damaged. - Page 3 Important Safety Instructions Failure to observe the following warning WARNING statements can result in serious injury! • Do not use this product without first consulting your doctor if you suffer from any illness, condition, or disability that affects your ability to run, walk or exercise.
-
Page 4: Grounding Instructions
Grounding Instructions Connect treadmill to a properly grounded, WARNING dedicated electrical outlet only. See the following Grounding Instructions. This product contains chemicals known to the WARNING state of California to cause cancer and birth defects or other reproductive harm. Grounding Instructions This product must be grounded. -
Page 5: Treadmill Quick Start Guide
Treadmill Quick Start Guide Before you Start the Treadmill: Safety Treadmill Quick Start Guide The treadmill will not operate unless the red WARNING emergency stop Safety Lanyard Block is pushed in. During operation, pulling the safety lanyard pulls the Safety Lanyard Block out, stopping the treadmill. -
Page 6: Using The M2 Genesis Control Panel
Treadmill Quick Start Guide Using the M2 Genesis Control Panel This manual covers the Landice M2 with Genesis control panel. Quick start instructions for this control panel are outlined below. See page 41 for complete instructions. A quick start guide for using the treadmill console controls is provided in the following table. -
Page 7: Turn On Child Lock
Treadmill Quick Start Guide Treadmill Controls: Quick Start Guide (Continued) To increase treadbelt speed: Press and hold SPEED (+) key to increase speed. The speed will increase faster if you hold the + key but will stop increasing when it reaches 3mph from original start speed. If higher speeds are required, repeat this process until the desired speed is displayed. -
Page 8: Wi-Fi
Treadmill Quick Start Guide Wi-Fi Connecting the Genesis console to Wi-Fi allows access to various online services under the Entertainment section. Software updates are also pushed through Wi-Fi and it is recommended that this feature is turned on to ensure you have the latest version of software. If you wish to connect to Wi-Fi, please follow the steps below. -
Page 9: Table Of Contents
Contents Contents Important Safety Instructions ..............2 Grounding Instructions ................4 Treadmill Quick Start Guide..............5 Before you Start the Treadmill: Safety..........5 Using the M2 Genesis Control Panel ............6 Turn on Child Lock .................7 Wi-Fi ......................8 1. Introduction ..................11 1.1. Before You Begin ................. 11 1.2. - Page 10 Contents 3.4. Built-in Programs ................. 43 3.4.1. Description ..............43 3.4.2. Running Programs ............44 3.5. Custom Programs................ 45 3.6. Heart Rate Control Program ............46 3.7. Goal Programs................47 3.8. Powering Down the Treadmill ............47 3.9. System Settings................48 4.
-
Page 11: Introduction
1. Introduction Landice has placed over 100,000 treadmills, ellipticals and bikes in the harshest commercial environments around the world, where our fitness equipment has proven its strength and durability. Landice products are designed by a world-class development team whose innovation defines the leading edge of fitness. - Page 12 Introduction Figure 1-1. Treadmill Features and Controls Tablet Holder Control Panel Lower Accessory Control Tray Panel Bottle Holder Pulse Incline Start/Stop Safety Speed Grip Buttons Lanyard Block Table 1-1 Treadmill Features and Controls Item Description Control Panel Provides workout displays and controls. Tablet Holder Holds tablets up to 10”...
-
Page 13: Heart Rate Monitoring
Introduction Table 1-1 Treadmill Features and Controls (Continued) Item Description Lower Control Located between the pulse grips, this area provides Panel easy-to-reach controls for stopping, starting or changing speed or incline during your workout. Incline Adjustment Raises/lowers the treadmill when pressed up/down. Performs the same function as the INCLINE (+/–) keys on the control panel. -
Page 14: What Is Maximum Heart Rate
Introduction intensity of the exercise. If your heart rate is low, exercise intensity is low; if your heart rate is high, your exercise intensity is high. 1.2.2. What is maximum heart rate? Maximum Heart Rate (MHR) is the maximum attainable heart rate your body can reach before total exhaustion. -
Page 15: How Do I Determine My Target Heart Rate Zone
Introduction efficient. According to fitness experts, exercise is more effective when you work out in a specific heart rate range or zone. This is referred to as your Target Heart Rate Zone (THRZ) and is reflected by the number of heart beats per minute. This zone can vary greatly depending on your age, fitness level and various other factors. -
Page 16: Heart Rate Monitors
THRZ during workouts. A heart rate monitor provides a reminder of the intensity and quality of each workout session. Landice heart rate monitors are used to monitor your level of exercise intensity during workouts. Pulse meters have a high margin for error. -
Page 17: Contact Heart Rate Monitoring System
Introduction 1. Before you begin working out press the settings icon on the bottom right of the home screen. 2. Tap on the words Bluetooth Heartrate. 3. Tap Search Device and the console will provide a list of detected Bluetooth devices. If a list of Bluetooth devices is not shown, check the upper right corner to confirm this feature is turned on. -
Page 18: Treadmill Program Capabilities
Introduction you release the grips, the treadmill uses the wireless chest strap signal for pulse calculation. 1.4. Treadmill Program Capabilities The treadmill has the following program capabilities: • Programs: You enter the program’s maximum time, speed and incline. • Custom Programs: Allows the user to manually edit all 20 individual workout segments by entering preferred speed and incline of each segment. -
Page 19: Installation
2. Installation 2.1. Tools Needed • M8 hex key/screwdriver tool (included in hardware kit). A wrench with an M8 socket and may also be used. • Razor knife/box cutter or scissors for removing packaging (not included). • Ratchet strap (provided) to secure the treadmill in the folded position if it must be carried through doorways or up/down stairs. - Page 20 Installation 1. Move the shipping box as close as possible to where the treadmill will be used. Allow 3-5 feet working space to safely remove box and pallet (Figure 2-1). The treadmill must be located within 8 feet of a suitable electrical outlet. Figure 2-1.
- Page 21 Installation Figure 2-3. Cut Box Corners 6. Remove remaining packing inserts. 7. Inspect package contents. If items are damaged or missing, contact Landice before continuing. 8. Open the accessory box and check for the following items: • Owner’s manual •...
-
Page 22: Moving The Treadmill Up/Down Stairs
Installation 9. With assistance, remove the protective foam pieces from beneath left and right front corners of the treadmill frame. (Figure 2-5). 10. Do one of the following, depending on the location of the treadmill: • If the treadmill is in its desired location, skip to “Assembly”... - Page 23 Installation Figure 2-6. Secure Console with Ratchet Strap 4. Tighten the strap to secure it and prevent the treadmill console from moving. Do not overtighten. 5. Unplug the wiring harness running up the treadmill’s right upright by pushing in the locking tab, then disconnecting the connector (Figure 2-7).
- Page 24 Installation Figure 2-8. Remove Upright Pivot Bolts and Nuts 7. Using two people, remove the uprights and console. 8. With one person at the console end and the other at the back, carry the uprights/ console up/down the stairs to the treadmill’s final location (Figure 2-9).
- Page 25 Installation 10. Put the ratchet strap around the base of the treadmill as shown in Figure 2-10, securing the treadbelt and legs. Figure 2-10. Secure Base with Ratchet Strap 11. Using two people, one at each end, turn the treadmill base so it is perpendicular to the floor as shown in Figure 2-11, and carry it up/down the stairs.
-
Page 26: Moving The Treadmill Through Doorways
Installation 13. Using two people, place the uprights/ console assembly into its mounting position. 14. Secure each upright by installing the bolts and nylon nuts removed in step 6. 15. Reconnect the wiring harness by plugging in the connector and pushing it together until it locks. 16. - Page 27 Installation 2. Using two people, one located at each end of the treadmill, lift the treadmill and rotate it so it is perpendicular to the floor. Unpackaged treadmill weighs 290 lb. Figure 2-13. Positioning Treadmill for Carrying 3. Carry the treadmill through the doorway to the desired final location and carefully set it down.
-
Page 28: Assembly
Installation 2.5. Assembly 1. With one person standing on either side of the treadmill, raise the console portion of the frame until the locking pin on the left upright engages.(Figures 2-14 and 2-15). Figure 2-14. Unfold Frame Uprights – Start Figure 2-15. - Page 29 Installation Figure 2-16. Upright Securing Screw Locations (Left Side) If necessary, have another person move the uprights Note: slightly in order to align the holes so the screws can be threaded properly. Do not cross-thread the screws. 3. Repeat step Note: for the right frame leg (Figure 2-17). Figure 2-17.
- Page 30 Installation Figure 2-18. Lower Handrail/Console Assembly into Place WIRING CONSOLE SECURING BRACKET (2X) 6. Locate the console securing bracket on the underside of each handrail. 7. Secure each bracket to the upright using 1 screw D, 1 lock washer B, and 1 flat washer C per side (Figure 2-19). Figure 2-19.
- Page 31 Installation To move the treadmill after it is fully assembled, perform Note: steps 9, 12, and 13. 9. There are wheels at the back of the treadmill that allow the treadmill to be moved if needed. The running surface must first be raised.
- Page 32 Installation 13. When treadmill is in desired location, release the locking pin and carefully lower the running bed down to the floor. 14. Remove the left and right finishing covers from the accessory box. Using 3 screws E per side, secure the covers to the front of the frame (Figure 2-22).
-
Page 33: Leveling The Treadmill
Installation Do not plug treadmill into a surge suppressor, WARNING GFI outlet, or extension cord. 16. Route the power cord away from walkways and plug it in. Do not route the cord under the treadmill, rugs, or furniture. Figure 2-24. Completed Assembly LOCATION OF LEVELING FEET (BOTH SIDES) -
Page 34: Check Operation
Installation Figure 2-25. Leveling Feet 2. Place a level across the rear of the machine and stand in the middle of the running surface, facing the rear of the treadmill. Check if the bubble is centered on the level. • If the bubble goes to the right (while standing on treadmill), adjust the left rear foot. - Page 35 Installation • If belt feels like it is slipping under your feet, follow tensioning instructions in “Treadbelt Tracking Adjustment” on page 51. • When belt tension and tracking are both correct, move to the next step. 3. Start treadmill and walk at 2 mph for 20 minutes, walking from front to back over the entire surface, to properly “walk in”...
- Page 36 Installation...
-
Page 37: Genesis Treadmill Operation
3. Genesis Treadmill Operation 3.1. Genesis Control Panel Table 3-1 Genesis Control Panel Functions Function Description Incline Shows the incline of the treadmill in percent. Speed Shows the current operating speed of the treadbelt in MPH. Start Press to start your workout. The treadbelt begins moving at 0.5 mph in manual mode Stop Press to stop the treadbelt and to end the workout. -
Page 38: Motivational Screens
Genesis Treadmill Operation Table 3-1 Genesis Control Panel Functions (Continued) Function Description Volume Tap the volume icon in the bottom right to raise or lower the volume of your headphones or speaker. (Speakers are not included) Express To quickly increase and/or decrease speed or incline, Speed/ tap the speed or incline number on the console and a Incline... -
Page 39: Track Screen
Genesis Treadmill Operation 3.2.3. Track Screen The Track screen offers two track options: 5 km or 400m 3.2.4. Progress Screen The Progress screen graphs speed and incline changes made during a workout. 3.2.5. Heart Rate Screen The Heart Rate screen graphs the fluctuation in heart rate throughout your workout if you are... -
Page 40: Entertainment Screen
Genesis Treadmill Operation 3.2.6. Entertainment Screen Note: This console prohibits apps from being installed due to hardware limitations and safety protocols. The entertainment screen provides online content for the user to use during a workout. Wi-Fi set-up is required for these apps to work. -
Page 41: Basic Operation
Genesis Treadmill Operation 3.3. Basic Operation 3.3.1. Getting Started 1. Read and understand this chapter before you begin. 2. From the home screen you may log in as an existing client, a guest, or create a new client. See “Creating a Client” on page 41. -
Page 42: Client Mode
Genesis Treadmill Operation 3. Set the user weight. 4. Set client’s max. speed, max. incline and target heart rate. 5. The Client Setup Screen is displayed. This screen allows you to: • Set client defaults such as Max. Speed, Max Incline and Target Heartrate. -
Page 43: Built-In Programs
Genesis Treadmill Operation 3.4. Built-in Programs 3.4.1. Description The Programs differ in speed and incline. Each lets you select a maximum speed, incline, and time (5 to 99 minutes). (Intervals Program requires a minimum speed and incline). The treadmill will not go above the maximum number unless manually overridden. -
Page 44: Running Programs
Genesis Treadmill Operation 3.4.2. Running Programs 1. From the Menu screen, select PROGRAM to view all programming options. 2. Select the built-in program that you want to run. 3. The program will prompt you to select the Time, Maximum Speed and Maximum Incline. The Intervals program requires min. -
Page 45: Custom Programs
Genesis Treadmill Operation 3.5. Custom Programs You can create and store up to 5 Custom Programs. The treadmill remembers these programs even when it is unplugged. Custom Programs allow you to customize each of the 20 individual segments. To create a Custom Program: 1. -
Page 46: Heart Rate Control Program
Genesis Treadmill Operation 3.6. Heart Rate Control Program This treadmill offers one heart rate controlled (HRC) program that automatically varies treadmill speed and elevation to keep your heart rate near the target heart rate for each segment. HRC training allows you to maximize workout performance while minimizing workout time. -
Page 47: Goal Programs
Genesis Treadmill Operation 3.7. Goal Programs The Treadmill provides Goal programs. During these programs you retain full manual control of speed and incline. 1. From the home screen select Goal. 2. Touch the desired Goal program (Calories, Time or Distance). 3. -
Page 48: System Settings
Genesis Treadmill Operation 3.9. System Settings To view or change system settings, touch the Settings icon on the bottom right corner of the home screen. Device settings are listed below. • W-Fi Setting: Tap to connect the console to your home Wi-Fi. -
Page 49: Maintenance And Troubleshooting
4. Maintenance and Troubleshooting It is important to perform maintenance on your treadmill. Failure to maintain the treadmill could void the Landice Warranty. To reduce risk of electrical shock, always turn off the treadmill using the ON/OFF switch and unplug from the power source. -
Page 50: Wireless Chest Strap
Note: For heavier home use of the treadmill (over 8 hours per week), Landice recommends lubricating beneath the treadbelt every 3 months. For average home use, Landice recommends lubricating beneath the treadbelt every 6 months. Note: Slipcoat is used exclusively for treadbelt maintenance and should not be used on any other surface. -
Page 51: Treadbelt Tracking Adjustment
Maintenance and Troubleshooting 1. With treadmill off and unplugged from power source, verify treadbelt requires lubrication. Position the M8 Allen Key at 12 o'clock, then loosen both M8 treadbelt tension bolts two full rotations counterclockwise, creating slack between belt and deck surface. Place hand, palm side up, between belt and deck. -
Page 52: Treadbelt Tensioning
Maintenance and Troubleshooting Figure 4-1. Treadbelt Tensioning Bolts (one per side) HEX KEY (SUPPLIED) 4.3.3. Treadbelt Tensioning The treadbelt is tensioned at the factory but may require adjustment after installation. Need for tensioning is indicated by uneven belt speed and may be felt as sudden stopping of the treadbelt when your foot comes down on the belt. -
Page 53: Scheduled Preventive Maintenance
4.3.4. Scheduled Preventive Maintenance Landice recommends that a qualified approved service technician perform yearly maintenance. Please contact your local service provider or visit www.landice.com/pages/service- locator to select a Landice service provider and arrange service. Lethal voltages and moving parts capable of WARNING causing serious injury are exposed when the motor cover is removed. -
Page 54: Drive Motor Belt Tensioning
Maintenance and Troubleshooting 4.3.5. Drive Motor Belt Tensioning Moving parts can cause serious injury. Always WARNING unplug treadmill before placing hands inside motor housing. DO NOT OVER-TIGHTEN THE TENSION BOLT. CAUTION CAUTION Over-tightening the drive motor belt can damage the drive motor and front roller. Note: IF YOU DO NOT FEEL COMFORTABLE PERFORMING THIS PROCEDURE, CONTACT A QUALIFIED SERVICE TECHNICIAN FOR ASSISTANCE. - Page 55 Maintenance and Troubleshooting Figure 4-4. Motor Cover Securing Screws: Front Figure 4-5. Motor Cover Securing Screws: Side 3. Lift cover off and set it aside along with the securing screws.
- Page 56 Maintenance and Troubleshooting Figure 4-6. Removing Motor Cover MOTOR COVER DRIVE BELT MOTOR 4. To increase drive belt tension, loosen, but do not remove, (4) M8 motor securing screws (Figure 4-7, circled). Figure 4-7. Drive Belt Adjustments DRIVE BELT TENSION BOLT M8 MOTOR SECURING...
-
Page 57: Additional Technical Support
9. Install the motor cover using 4 screws removed in step 2. 10. Plug the power cord back into the treadmill at the front and plug the other end into the wall outlet. 4.3.6. Additional Technical Support For technical/self-diagnostic support, please visit our website: www.landice.com/pages/technical-manuals... - Page 58 Maintenance and Troubleshooting...
- Page 59 Maintenance and Troubleshooting...
- Page 60 111 Canfield Avenue, Suite A-1, Randolph, NJ 07869 Tel. 973-927-9010 www.landice.com...
Need help?
Do you have a question about the Move Series and is the answer not in the manual?
Questions and answers