Table of Contents
Advertisement
Quick Links
Advertisement
Table of Contents

Related Manuals for CareCo Adventurer X8


Summary of Contents for CareCo Adventurer X8
- Page 1 MOBILITY SCOOTER P R OD U CT CO D E : MS03010021 USER MANUAL...
-
Page 2: Table Of Contents
1. PREFACE AND INTRODUCTION 2. SAFETY NOTICE 2.1 BEFORE DRIVING 2.2 WHILE DRIVING 2.3 EMI 3. PARTS INTRODUCTION 4. OPERATION 4.1 CONTROL PANEL 4.2 HOW TO OPERATE YOUR SCOOTER 5. BATTERY CHARGING AND CARE 5.1 CHARGING THE BATTERY 5.2 BATTERY 6. -
Page 3: Preface And Introduction
1. PREFACE AND INTRODUCTION Please carefully read this owner’s manual before using the scooter. Improper use may cause damage, injury, or traffic accidents. We recommend that you read and understand this owners manual fully to ensure you get the most out of the scooter. •... -
Page 4: Safety Notice
2. SAFETY NOTICE 2.1 BEFORE DRIVING The user must be familiar with the use and operation of this scooter before driving. Always observe the following safety precautions. The same traffic rules apply to the use of this scooter as apply to pedestrians. For the users safety, please follow the rules that apply to pedestrians. -
Page 5: While Driving
Tyres Correct tyre pressure is essential for optimum steering and stability of the scooter. • Check the air pressure every two weeks. Inflate to 30psi. • The maximum tyre pressure is 40psi. 2.2. WHILE DRIVING Please carry out daily inspections. Refer to “DAILY CHECKING” for more information. Do not move your body outside of the scooter while driving. - Page 6 Automatic Power Shut Down To prevent accidental battery discharge, the scooter is equipped with an automatic switch-off function. If the scooter is on, it will automatically power off after 30 minutes of inactivity. In this case, turn the scooter off and on again to use it again. Ramps, inclines and drops •...
- Page 7 WARNING! • Do not engage freewheel mode when driving on a gradient. • Always re-engage the anti-freewheel device before use. Failure to do so may cause injury to the user. • When descending a steep slope, the power is automatically cut off and the electromagnetic brake is activated for safety purposes.
- Page 8 Driving on the pavement • When using the scooter on pavement, ensure the 12.8 km/h limit switch is set to the slowest setting. • This limits the scooters top speed to 12.8 km/h. It is illegal to drive on paved roads at a speed of 12.8 km/h or more.
-
Page 9: Emi
2.3. EMI This portion of the content will provide the user with basic information that describes the problems with EMI, known sources of EMI, protective measures either to lessen the possibility or exposure or to minimize the degree of exposure, and suggested action should unexpected or erratic movement occur. - Page 10 The sources of radiated EMI can be broadly classified into three types: 1. Hand-held portable transceivers ( transmitter-receivers with the antenna mounted directly on the transmitting unit. Examples include: citizens band (CB) radios, “ walkie talkie”, security, fire, and police transceivers, cellular telephones and other personal communication devices.
- Page 11 WARNINGS Electromagnetic interference (EMI) from sources such as radio and TV stations, amateur radio (HAM) transmitters, two-way radios, and cellular phones can affect powered scooters and motorized scooter. Following the warnings listed below should reduce the chance of unintended brake release or powered scooter movement which could result in serious injury. 1.
-
Page 12: Parts Introduction
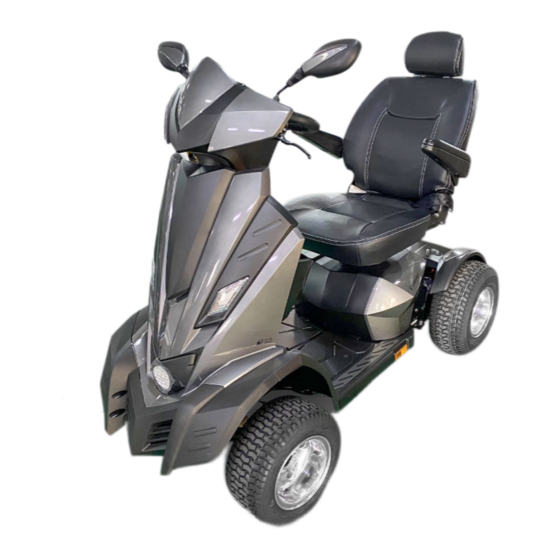
3. PARTS INTRODUCTION 1. Speed Dial 2. Rear Mirror 3. Indicator Lamp 4. Charger Socket Cover 5. Tiller Adjust Lever 6. Head Lamp 7. Seat 8. Seat Rotation Lever 9. Hand Brake Lever 10. Side Reflector 11. Rear Lamp 12. Freewheel Lever 13. -
Page 13: Operation
OPERATION CONTROL PANEL 1. Battery level indicator 2. Speed control (slow) 3. Speed control (fast) 4. Speed switch 5. Horn 6. Emergency lights 7. Lights (front and rear) 8. Indicator (left) 9. Indicator (right) Temperature Mileage Display Display High / Slow Speed Mode Display Speed Bar Battery Indicator... -
Page 14: How To Operate Your Scooter
Setting: Press to change mode, to modify time and display. Normal AM/PM hour minute Temp°C/°C SET(3 seconds) (speed)kmh/mph (distance)km/mile Normal 4.2 HOW TO OPERATE YOUR SCOOTER Power switch • Turn the key to power ON or OFF. (ON) - Power is turned on »... - Page 15 Indicator Lamp Switch • When the switch is turned left or right, the lamp flashes and the buzzer sounds. • Move the switch back to the middle to turn off the display. Horn Button • Press the horn button to sound the horn. The horn stops when the button is released. Temperature Sensor •...
- Page 16 Suggestion 1. The battery should be charged each time the scooter is used to ensure maximum range. The battery should be charged at least once a week, even when the scooter is not in use. 2. After charging or replacing a new battery, drive the scooter for 2-3 minutes to make sure the battery capacity is sufficient.
- Page 17 ATTENTION! • Return the seat to the forward facing position before driving the scooter. • Ensure the limit switch is set to the slowest setting when using the scooter on the pavement. It is an offence to drive faster than 4mph on the pavement. How to adjust the armrest height •...
- Page 18 Tiller Adjustment The tiller can be adjusted to several different positions. 1. Push the lever to adjust the tiller position. 2. Release the lever to secure the position. Push Manual Brake Squeeze the brake lever to apply the manual brake, and release the lever to release the brake.
-
Page 19: Battery Charging And Care
5. BATTERY CHARGING AND CARE 5.1 CHARGING THE BATTERY Follow the below procedure step by step. 1. Turn the power switch to [OFF] 2. Connect the charger’s power cord to a power outlet. 3. Open the charging socket cap on the scooter tiller and connect the charger to the socket. - Page 20 ATTENTION! • Beware of fingers or hands getting caught in the handle area when gripping or adjusting the handle bars. WARNING! 1. Keep away from flammable objects while charging as it may lead to fire or explosion of battery. 2. Do not smoke while charging as the battery may release hydrogen gas. Always charge your battery in a well-ventilated space.
-
Page 21: Battery
5.2 BATTERY • When charging or storing the scooter, do not expose the battery to temperatures below 10 C or above 50 C. The battery may freeze or overheat causing internal damage and shortening the battery life. • The batteries are maintenance free and do not require refilling with water. •... - Page 22 Cleaning the battery If the battery is contaminated with water, battery acid, dust or other substances, the battery will discharge rapidly. The battery supplied with the scooter is sealed, which means there are no leaks and is maintenance free. Please follow the steps below to clean the battery. 1.
-
Page 23: Inspection And Maintenance
6. INSPECTION AND MAINTENANCE 6.1 INSPECTION • Clean the scooter with a damp cloth and dust down approximately once a week to preserve the appearance of the scooter. • Adjust the tiller height and return to the original position and swivel the seat once a week to ensure the parts adjust and remove smoothly and easily when required. -
Page 24: Battery, Fuse And Tyre
6.3 BATTERY, FUSE AND TYRE Battery Refer to the section entitled “ 5.2 BATTERY” in “5. BATTERY CHARGING AND CARE ”. Fuse If the battery charger is turned on and no LED’s are lit, the fuse may be at fault. Suggestion Ask for help from your scooter dealer to inspect or replace the fuse, since the tiller shroud has to be removed first before you can replace the fuse. -
Page 25: Storage
Suggestion • Do not splash water directly to wash your scooter as this could lead to malfunction of the system electrics. • Do not use petrol, solvents or vaporizing solution as these may deform or damage the shrouds. • Do not use wax. 6.4 STORAGE Make sure the scooter is stored under the following circumstances: •... -
Page 26: Trouble Shooting And Specification
7. TROUBLE SHOOTING AND SPECIFICATION TROUBLE SHOOTING Symptom Remedy • Try recharging the battery The scooter will not switch on • Check the fuse and circuit breaker in the scooter • Ensure there is enough power in the batteries. If not, recharge the batteries. - Page 27 FAULT CODES Blink Phenomenon Solution Need to recharge the batteries Recharge the batteries 1. Recharge the batteries Battery voltage is too Low 2. Check the batteries and battery cables Battery voltage is too High Lower the speed 1. Reopen the key switch High Current being Over-headed or Over setting Time 2.
- Page 28 Model Reference MS03010021 Dimension (L x W x H) 1750 x 870 x 1400 mm (68.8” x 34.2” x 55”) Total weight (excluding battery) 148 kg (325.6 lbs.) Up to 100Ah Batteries Battery 75Ah battery x2: 50 kg (110 lbs.) Battery Weight 100Ah battery x2: 70 kg (154 lbs.) 8A Off-Board...
- Page 29 Remark: The manufacturer reserves the right to modify the specification if necessary. The final specification is subject to the individual scooter you purchase from your dealer. Note: Maximum driving distance is based on an ambient temperature of 20°C, a 100kg driver and a brand new fully charged battery by a constant driving speed at 12.8 km/h with 70% battery power discharged.
-
Page 30: Warranty
8. WARRANTY There is a comprehensive twelve-month warranty from the date on which your new scooter is delivered. The warranty covers the scooter for repairs or replacement during this period. For more detail, please see the Warranty Conditions below. Warranty Conditions: 1. - Page 31 8. Under normal circumstances, no responsibility will be accepted where the scooter has failed as a direct result of: a. The scooter part not having been maintained in accordance with the manufacturer’s recommendations. b. Failure to use the manufacturer’s specified parts c.
Need help?
Do you have a question about the Adventurer X8 and is the answer not in the manual?
Questions and answers