Table of Contents
Advertisement
ELECTRONIC ORGANIZER
OPERATION MANUAL
Instrucciones abreviadas en español
CONTENTS
Part Names and Key Assignments ..................................................... 1
Using the Organizer for the First Time ............................................... 2
Auto Power Off Function .............................................................. 3
Backlight ....................................................................................... 3
Adjusting the LCD Contrast ......................................................... 3
Turning the key sound On and Off .............................................. 3
Memory Check ............................................................................. 3
Display Symbols .................................................................................. 4
Entering Characters ............................................................................ 5
Built-in Calendar and Clock ................................................................ 6
Clock Mode .......................................................................................... 6
Alarm ................................................................................................... 8
Telephone Mode .................................................................................. 9
Calendar Mode .................................................................................. 11
Schedule Mode ................................................................................. 12
Anniversary Mode ............................................................................. 14
To Do Mode ....................................................................................... 15
Memo Mode ....................................................................................... 17
Expense Mode ................................................................................... 18
Editing Listings .................................................................................. 20
Deleting Listings ................................................................................ 20
Word Translator Mode ....................................................................... 21
Spell Checker Mode .......................................................................... 22
Diet Function Mode ........................................................................... 22
Calculator Mode ................................................................................ 28
Conversion Mode .............................................................................. 29
Secret Function ................................................................................. 31
Game Mode ....................................................................................... 32
Managing the Organizer's Memory ................................................... 33
Using the Included PC Software ....................................................... 34
Battery Replacement ......................................................................... 39
Specifications .................................................................................... 41
Appendix ............................................................................................ 43
Instrucciones abreviadas en espanõl ............................................. S-1
MODEL
OZ - 290H
II
Advertisement
Chapters
Table of Contents

Related Manuals for Sharp Wizard OZ-290HII


Summary of Contents for Sharp Wizard OZ-290HII
-
Page 1: Table Of Contents
ELECTRONIC ORGANIZER OPERATION MANUAL Instrucciones abreviadas en español CONTENTS Part Names and Key Assignments ... 1 Using the Organizer for the First Time ... 2 Auto Power Off Function ... 3 Backlight ... 3 Adjusting the LCD Contrast ... 3 Turning the key sound On and Off ... - Page 2 NOTICE • SHARP strongly recommends that separate permanent written records be kept of all important data. Data may be lost or altered in virtually any electronic memory product under certain circumstances. Therefore, SHARP assumes no responsibility for data lost or otherwise rendered unusable whether as a result of improper use, repairs, defects, battery replacement, use after the specified battery life has expired, or any other cause.
-
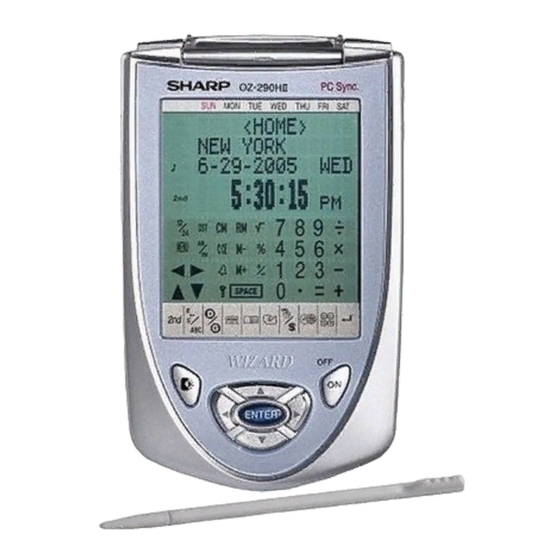
Page 3: Part Names And Key Assignments
Part Names Search keys RESET switch (on the back of the unit) Backlight key Option port Key Assignments : 2nd Function key Activates the second function specifically assigned to the next key tapped. Stylus S ABC ): English-Spanish word translator/Spell Checker Display ): Diet Function/Game mode key DIET GAME... -
Page 4: Using The Organizer For The First Time
Note: • Press the RESET switch using the stylus or similar object. Do not use an object with a breakable or sharp tip. If a malfunction occurs under abnormal conditions If the Organizer is subjected to strong extraneous electrical noise or shock during use, on rare occasions, all the functions will not work properly and data may be displayed incorrectly. -
Page 5: Auto Power Off Function
Auto Power Off Function When none of the keys has been pressed or tapped for approxi- mately 7 minutes, the Organizer automatically turns the power off to save the batteries. Backlight The Backlight allows you to view the display and use the Organizer even in low-light conditions. -
Page 6: Display Symbols
Display Symbols Display Symbols Hourly Alarm: The Hourly Alarm is ON and will sound every hour. Schedule sign: Appears when the Home clock time reaches a Reminder time or a Start time of a schedule listing. Disap- pears when the time reaches the End time of the listing. Anniversary sign: Appears when a special day will arrive within days as set in Anniversary Reminder. -
Page 7: Entering Characters
Entering Characters Moving the Cursor Move the cursor by pressing j, l, k, or m . Entering Characters Entering letters and numbers The initial setting for entering letters is small (lowercase) letters. To enter capital (uppercase) letters, turn “CAPS” on by tapping $. Touch Keyboard Alphabet entry mode Number entry mode... -
Page 8: Built-In Calendar And Clock
Built-in Calendar and Clock Precautions • Calendar, Schedule, Expense, and Clock modes allow you to enter the desired date and time between Jan. 1, 1950 and Dec. 31, 2150. • If an attempt is made to store an invalid time or date, you will not be able to move the cursor to date entering, or store the time and date by pressing x. - Page 9 10.Press x to set the Clock. The clock starts from exactly the set time. Selecting the date format (Default: Month-Day-Year) , select "DATE FORMAT" by using k or m, and press 1. Tap MENU 2. Select the desired date format by using k or m, and press x. Mode Month-Day-Year Year-Month-Day...
-
Page 10: Alarm
Alarm The Organizer has 3 kinds of alarm: 1. Daily Alarm... Sounds every day at the specified time(for approx. 1 minute), when " Up to 3 alarms can be set separately (Alarm1, Alarm2, and Alarm3). 2. Hourly Alarm...Sounds every hour precisely (every time minutes reach "00"), when "... -
Page 11: Telephone Mode
Telephone Mode There are three telephone listing categories, Unfiled, Personal, and Business. Each listing can be simply classified for easy access to the data. Tap v, select the desired category by using k or m, and press < > UNF I ED SEARCH NAME? <... - Page 12 Entry <Example> 1. Tap v , and select “BUSINESS”, then press x. The Business search display will appear. 2. Tap e. The display will change to the record input mode. 3. Enter the Last name. For example, “Smith”. 4. Press m , then enter the First name. For example, “John”. 5.
-
Page 13: Calendar Mode
Search Last Name Alphabetical Search 1. Tap v and select the Category by using k or m key, then press The search display will appear. 2. Press < or > to search for the target listing in alphabetical order. Last Name Direct Search 1. -
Page 14: Schedule Mode
Directly go to the target month 1. At the Calendar mode, tap =. Date input screen will appear. 2. Enter the target date. 3. Press x. The monthly calendar of the target date will appear. Note: • In the Calendar mode, monthly calendars from January 1950 to December 2150 are available. - Page 15 5. Press m. The End time will automatically change to 30 minutes after the Start time. (However, the End time will remain within the specified day.) 6. Enter 11:00AM for the End time, and press m. 7. Press < or > to select “Yes”...
-
Page 16: Anniversary Mode
Date search 1. Tap once or twice to enter the Schedule mode. CALENDAR/SCHEDULE 2. Set the desired date. Select the month, day and year field, and enter the desired number. 3. Press x to search for the target schedule listing of the specific date. -
Page 17: To Do Mode
5. Enter the Reminder date from 0 to 9. 6. Press m. 7. Enter “Nancy’s Birthday”. 8. Press x to store the anniversary listing. The anniversary sign ( A ) will not appear until the day is set in Reminder. Search Sequential search 1. - Page 18 5. Press m to let the status as "PENDING". 6. In the description field, enter what you have to do by the target day. Enter “Visit HK Exhibition”. Up to 96 alphanumeric characters can be entered. 7. Press x to store the To Do listing. Search Sequential search 1.
-
Page 19: Memo Mode
Memo Mode You can store memos using the Memo mode. Up to 96 alphanu- meric characters can be entered per one listing. Entry <Example> Enter your passport number: 12AB34567 1. Tap once or twice to MEMO/ANN enter the Memo mode. 2. -
Page 20: Expense Mode
Expense Mode The Expense record function is an easy-to-use method of tracking personal and business expense information. The Expense Report allows you to see the total expenses for a single day or for a certain period. 1 Expense: Item-by-item expense entry and view mode 2 Report: Display the total expenses for a single day or a certain period... - Page 21 10. Press m, and select “YES” or “NO” using < or > in the “RECEIPT” field. 11. Press m, and enter “Flight ticket” in the “MEMO” field. 12. Press x to store the data. Recall Sequential Search 1. Tap once or twice to enter the Expense mode. TO DO/EXPENSE 2.
-
Page 22: Editing Listings
Edit the Category You can change the category name for your convenience. 1. Tap once or twice to enter the Expense mode. TO DO/EXPENSE 2. Press k or m to select "CATEGORY", then press The edit category display will appear. 3. -
Page 23: Word Translator Mode
Word Translator Mode The Organizer offers an English-Spanish bi-directional word translator function. Each time is tapped, the mode switches between the Word Translator mode and the Spell Checker mode. 1. Tap once or twice to enter the English → Spanish translation mode;... -
Page 24: Spell Checker Mode
Spell Checker Mode The Spell Checker Mode can be helpful when the exact spelling of a query word is not known. Each time switches between the Spell Checker mode and the Word Translator mode. Searching a word with ambiguous spelling 1. - Page 25 Measuring your stride length In order for the Diet function to work properly, you must first measure your stride length. Note: • A “stride length” in this manual refers to the distance from the tip of your toe of one foot to the tip of your toe on the other when taking a step.
- Page 26 Positioning the unit Close the cover, and insert the unit into the carrying case as shown in the illustration, then make sure that the top flap is fastened. Secure the carrying case clip to your belt or to the top of your shorts or pants.
- Page 27 • The calculation runs once every minute to accumulate values. * Based on “ACSM’s Guidelines for Exercise Testing and Prescription”, © American College of Sports Medicine, 2000. Published by Lippincott Williams & Wilkins, 2000. • The displayed calorie value is rounded off to three decimal places. Note: •...
- Page 28 When no match is found, then a message "NOT FOUND!" is displayed. 4. Use k and m to select the entry field for each AMOUNT and the DATE of the intake to enter values. You can adjust the portion size by entering any decimal in the AMOUNT field.
- Page 29 4. Tap m, and input values for START DATE and END DATE, followed by ENTER 5. A report is displayed. • INTAKE : Use k or m to switch display the selected item report. • CONSUMPTION : The report of the selected item is displayed.
-
Page 30: Calculator Mode
Calculator Mode The Organizer’s built-in calculator can perform arithmetic calcula- tions in up to 12 digits. Calculator mode is selected by tapping q the appropriate number of times. Each time you press the key, the display switches as follows: Calculation mode ➠ Currency Conversion mode ➠ Metric Conversion mode ➠... -
Page 31: Conversion Mode
Conversion Mode Each time you tap q , the display switches as follows: Calculation mode ➠ Currency Conversion mode ➠ Metric Conversion mode ➠... Conversion Table Conversion Pattern Unit 1 5 currency conversions are available. Metric Conversion Patterns ⇔ inch ⇔... - Page 32 6. Enter the rate; 1.45. Up to 12 numeric characters can be entered for the rate. If you need to clear the rate number, tap c. 7. Press x to store the setting. Currency conversion Be sure to set the rate before starting a conversion. <e.g.
-
Page 33: Secret Function
Secret Function The Secret function allows you to protect listings with a password, so that no unauthorized person can reach them. You can use up to a 6 characters as its password. Registering a Password As a safeguard, make a written record of the password. Also, be aware that the password is case-sensitive. -
Page 34: Game Mode
Game Mode several times to display the Game mode screen and the GAME Diet Function mode screen (Diet Function → BLACKJACK → ALPHA ATTACK → Diet Function → ...). BLACKJACK (Twenty-one) Make your “hand” (the total of the numbers on the cards) close to 21, without going over 21. -
Page 35: Managing The Organizer's Memory
ALPHA ATTACK Type in characters (A to Z) displayed on the bottom line to clear them. The game is divided into 20 levels in speed. 1. Tap once, twice, or three GAME times to display the following Game mode screen. 2. -
Page 36: Using The Included Pc Software
Using the Included PC Software The CD-ROM contains software to enable exchange of data with a The software consists of: Synchronization Software: ® Can be used to synchronize Microsoft Contacts, Calendar, Tasks, and Notes, with the Organizer. Desktop Utilities: Can be used to backup/restore data in the Organizer, and export/ import data to different file formats. - Page 37 Limitations when using with Windows ® Windows • Log onto your PC with administrator privileges; the software may not be installed properly otherwise. Upon using the software, you will need to log on as an administrator. If you are logged in as a non-administrative account, then you must first log off to log into an administrator's account.
- Page 38 Serial Port Setup The serial port setting dialog box appears after you have finished software installation. Connecting the Organizer to your PC 1. Turn off the Organizer. 2. Connect the other end of the USB PC- Link cable to the Organizer’s option port.
- Page 39 The Conflict Resolution Tab The Synchronization software’s Conflict Resolution tab allows you to select the way data conflicts are resolved when data modifica- tions are made and the “Synchronize” option is selected on the General tab. • Add all conflicting items: Each modification on both the unit and the PC is reflected and saved respectively after synchronization.
- Page 40 Export/Import The Export/Import menu of the Desktop Utilities allows you to import data created by each PC application to the unit, or export data out of the unit. • Export: Select the desired item (application data, Food Database, Consumption Record, or Intake Record), then click “Export...” and enter the desired filename to which you wish to export data.
-
Page 41: Battery Replacement
2. When the Install Shield program screen appears, select “Remove”, then click “Next”. 3. For the verification prompt, click on the “OK” button. When the Uninstall window for the USB driver is displayed, disconnect the USB cable and click “Next” to execute the un-installation procedure. 4. - Page 42 3. Remove one used battery using a ball-point pen or similar object. • Do not use a mechanical pencil or sharp pointed object. 4. Install one new battery with the positive side (+) facing up.
-
Page 43: Specifications
Specifications Model: OZ-290H Product name: Electronic Organizer Display: 14 columns x 5 lines with the Backlight Memory capacity: 1.5 MB Equivalent* User area: Approx. 896 KB Clock mode Accuracy: ±60 seconds/month (at 25°C/77°F) Display: Year, month, day, day of the week, hour, minute, second, AM/PM, city name Clock system: 12-hour/24-hour format (switchable), 3 types of... - Page 44 Secret function: Protects listings with a password Power consumption: 0.13 W Operating temperature: 0°C ~ 40°C (32°F ~ 104°F) Power supply: 3.0V ... – (DC) (Lithium battery CR2032 x 2) Auto Power Off Function: Approx. 7 minutes Battery life: (at 25°C/77°F) •...
-
Page 45: Appendix
Appendix Names and zone numbers of the cities in the clock Zone No. City TONGA AUCKLAND WELLINGTON NOUMEA GUAM SYDNEY 3. 3 ADELAIDE TOKYO SINGAPORE HONG KONG BEIJING BANGKOK 6. 3 YANGON DHAKA 7. 3 NEW DELHI KARACHI 8. 3 KABUL DUBAI 9. - Page 46 (2) this device must accept any interference received, including interference that may cause undesired operation. Responsible Party: SHARP ELECTRONICS CORPORATION Sharp Plaza, Mahwah, New Jersey 07430-1163 TEL: 1-800-BE-SHARP Tested To Comply With FCC Standards FOR HOME OR OFFICE USE WARNING –...
-
Page 47: Instrucciones Abreviadas En Espanõl
Instrucciones abreviadas en español ÍNDICE Empleo del organizador por primera vez ... S-1 Función de desconexión automática ... S-2 Luz de fondo ... S-2 Ajuste del contraste de LCD ... S-2 Activación y desactivación del sonido de las teclas ... S-2 Comprobación de la memoria ... -
Page 48: Función De Desconexión Automática
Función de desconexión automática Cuando ninguna de las teclas haya sido pulsada o tocada durante aproximadamente 7 minutos, el Organizador desconectará automáticamente la alimentación para ahorrar energía de las pilas. Luz de fondo La luz de fondo le permitirá ver el visualizador y utilizar el Organizador incluso en condiciones de baja iluminación. -
Page 49: Teclado Táctil
Teclado táctil Modo de introducción de letras Modo de introducción de números • Cada vez que se pulse f, el teclado táctil cambiará entre el modo de introducción de letras y el modo de introducción de números. Para pulsar las teclas táctiles, utilice el lapicero (incluido en el paquete). -
Page 50: Modo De Teléfono
Modo de teléfono Entrada <Ejemplo> 1. Pulse v , seleccione “BUSI- NESS”, y luego pulse x. 2. Pulse e. El visualizador cambiará al modo de introducción de registro. 3. Introduzca el apellido. Por ejemplo, “Smith”. 4. Pulse m y luego introduzca el nombre. Por ejemplo, “John”. 5. -
Page 51: Modo De Calendario
Modo de calendario Navegación en la visualización del calendario mensual 1. Pulse una o dos veces para entrar en el modo CALENDAR/SCHEDULE de calendario. Aparecerá el calendario mensual del mes actual. Parpadeará el día actual. Navegue por el calendario utilizando las teclas siguientes: <... - Page 52 1. Pulse una o CALENDAR/SCHEDULE dos veces para entrar en el modo de programa de actividades. Aparecerá la visualización de búsqueda del programa de actividades. La fecha actual se visualizará y el cursor situado en el primer número parpadeará. El primer número depende de su elección del formato de la fecha. Estos ejemplos están en el formato MM-DD-AAAA.
-
Page 53: Modo De Aniversario
Búsqueda Búsqueda del programa de actividades para hoy 1. Pulse una o dos veces para entrar en el modo CALENDAR/SCHEDULE de programa de actividades. 2. Pulse < o > para buscar la lista del programas de actividades deseada. Las listas guardadas en el Organizador se visualizarán en orden cronológico. -
Page 54: Modo De Cosas A Hacer ("To Do
Búsqueda Búsqueda secuencial 1. Pulse una o dos veces para entrar en el modo de MEMO/ANN aniversario. 2. Pulse < o > para buscar las listas. Búsqueda de fechas Introduzca la fecha para ir a la fecha deseada en el paso 2 de arriba y luego pulse x. -
Page 55: Modo De Apuntes
Búsqueda de fecha 1. Pulse una o dos TO DO/EXPENSE veces para entrar en el modo de cosas a hacer. 2. Seleccione el campo del mes, el día o el año y luego introduzca la fecha deseada. 3. Pulse x para buscar la lista de cosas a hacer deseada de una fecha especificada. -
Page 56: Modo De Gastos
Búsqueda Búsqueda secuencial 1. Pulse una o dos veces para entrar en el modo de MEMO/ANN apuntes. Aparecerá la visualización de búsqueda del modo de apuntes. 2. Pulse < o > para buscar las listas. Búsqueda directa 1. Pulse una o dos veces para entrar en el modo de MEMO/ANN apuntes. - Page 57 6. Seleccione la categoría de gastos utilizando < o >. Hay 8 categorías preajustadas para elegir. Meals ➠ Hotel ➠ Car ➠ Phone ➠ Fares ➠ (Enter’t ) Entertainment ➠ Tips ➠ (Misc) Miscellaneous ➠... 7. Pulse m e introduzca 1200. Se puede introducir un máximo de 12 dígitos.
-
Page 58: Edición De Listas
Edición de listas 1. Edición 1. Recupere una lista en el modo deseado. 2. Pulse e. La visualización cambiará al modo de edición. 3. Edite los datos. j l k m: mueve el cursor a la izquierda, derecha, arriba o abajo respectivamente. -
Page 59: Modo De Corrector Ortográfico
Notas: • Las abreviaturas indican lo siguiente: (Am): Inglés americano (Br): Inglés británico (adj): Adjetivo (adv): Adverbio (n): Nombre (pron): Pronombre (v): Verbo (f.): Género femenino (m.): Género masculino • Algunas veces es posible que aparezcan dos palabras idénticas en la lista de palabras. -
Page 60: Modo De Función Dieta
Modo de función dieta La función de dieta podrá organizar su consumo diario de calorías al caminar, así como administrar su toma diaria de calorías. Usted también podrá calcular su índice de masa del cuerpo (BMI), una guía para su salud en términos de obesidad, introduciendo su estatura y su peso. - Page 61 3. Rellene el campo de introducción de STRIDE (zancada) con el valor de la longitud de su zancada obtenido con el método anteriormente indicado, y toque 4. Introduzca el valor del peso de su cuerpo en el campo WEIGHT (peso), y toque m. 5.
- Page 62 • Cerciórese de que la presilla haya quedado firmemente asegurada en su lugar. Si colocase inadecuadamente la unidad, podría desprenderse u ofrecer mediciones incorrectas. • La presilla para el cinturón ha sido diseñada para sujetar la unidad mientras camine. La presilla puede no sujetar la unidad o puede romperse si la expone a una condición de fuerte impacto, como cuando corra o juegue al béisbol.
- Page 63 Modo de consumo Usted podrá ver el consumo diario de calorías y el cómputo de pasos del día. 1. Toque una, dos o tres veces para entrar en el modo de dieta. DIET 2. Seleccione “CONSUMPTION” (consumo) utilizando k o m, y presione ENTER 3.
- Page 64 Búsqueda y edición 1. Toque una, dos o tres veces para entrar en el modo de dieta. DIET 2. Seleccione “FOOD DATABASE” (bd alim.) utilizando k o m, y presione ENTER 3. Presione < o > para seleccionar el nombre del alimento deseado.
-
Page 65: Modo De Conversión
Modo de cálculo del BMI Usted podrá calcular su índice de masa del cuerpo (BMI), una guía para su salud en términos de obesidad, introduciendo su estatura y su peso. 1. Toque una, dos, o tres veces para entrar en el modo de DIET función de dieta. -
Page 66: Modo De Juego
6. Introduzca la tasa; 1,45. Para la tasa se puede introducir un máximo de 12 caracteres alfanuméricos. Si necesita borrar el número de la tasa, pulse c. 7. Pulse x para almacenar el ajuste. Conversión de divisas Asegúrese de ajustar la tasa antes de iniciar una conversión. <Ej. - Page 67 4. Pulse @ para ver su mano. Cada vez que pulsa @ , se le entrega una carta nueva. • ”J”, “Q” y “K” cuentan como 10. • ”A” puede contar como 1 o como 11. • Cuando las 2 primeras cartas sean “A”...
-
Page 68: Utilización Del Software De Pc Incluido
Utilización del software de PC incluido El CD-ROM contiene software para activar el intercambio de datos con un PC. El software consiste en: Software de sincronización: Puede resultar útil para sincronizar datos de Microsoft como, por ejemplo, contactos, calendarios, tareas y apuntes, con el Organizador. - Page 69 ® Windows 2000 • Cuando instale o utilice el software, tendrá que entrar en sesión como administrador. Si es necesario, tendrá que ponerse en contacto con el administrador del PC en un entorno de trabajo. Instalación Precauciones: • Antes de instalar el software de sincronización, cerciórese de haber instalado y configurado Microsoft caso contrario, instale y configure en primer lugar Outlook y después el software de sincronización.
- Page 70 Conexión del Organizador al PC 1. Apague el Organizador. 2. Conecte el otro extremo del cable USB PC-Link al puerto para opciones del Organizador. 3. Encienda el Organizador. Haga clic en “Auto Detect...” para permitir que la sincronización detecte automáticamente el puerto serial apropiado. Asegúrese primero de que la unidad esté...
- Page 71 La ficha PIM La ficha PIM le permite configurar los ajustes de descarga de los datos PIM • Utilización de Outlook HOME “Address” y “Fax number”: Descarga o sincroniza solamente los datos de las direcciones HOME y los números de FAX. •...
- Page 72 • Importar: Seleccione el nombre de la aplicación deseada, y luego haga clic en “Import...”, y a continuación introduzca el nombre del archivo deseado del que usted quiere importar datos. Para importar la base de datos de alimentos: 1. Seleccione “Food Database”. 2.
-
Page 73: Reemplazo De Las Pilas
2. Cuando aparezca la pantalla del programa Install Shield, seleccione “Remove”, y después haga clic en “Next”. 3. Cuando aparezca el mensaje de verificación, haga clic en el botón “OK”. Cuando aparezca la ventana Uninstall para el controlador USB, desconecte el cable USB y haga clic en “Next” a fin de ejecutar el procedimiento de desinstalación. - Page 74 Cuando se visualice Reemplace inmediatamente la pila de funcionamiento por otra nueva cuando se visualice “B ”. El portapila de la pila de funcionamiento se indica con la palabra “For OPERATION” en el compartimiento de las pilas. Si la pila tiene poca carga, puede que no suene la alarma, o que la luz de fondo no funcione o funcione durante menos tiempo que el establecido.
- Page 75 8. Ajuste el reloj a la hora correcta. (Consulte la página S-3.) Precaución: • Los ajustes del reloj y/u otros ajustes y listines podrán perderse cuando las pilas sean retiradas durante mucho tiempo. Reemplace las pilas lo más rápidamente posible. •...
- Page 76 MEMO S-30...
- Page 77 MEMO S-31...
- Page 78 MEMO S-32...
-
Page 79: Limited Warranty
Product which were caused by repairs or attempted repairs performed by anyone other than an authorized servicer. Nor shall Sharp be liable or in any way responsible for any incidental or consequential economic or property damage. - Page 80 SHARP ELECTRONICS CORPORATION Sharp Plaza, Mahwah, New Jersey 07430-1163 PRINTED IN CHINA/IMPRESO EN CHINA 05AT (TINSE0818EHZZ)