Table of Contents
Advertisement
Quick Links
Advertisement
Table of Contents

Related Manuals for Next Wave CNC SHARK


Summary of Contents for Next Wave CNC SHARK
- Page 1 SHARK 3 HP Spindle kit with speed control Installation Manual ®...
- Page 2 Copyright 2021 Next Wave CNC - All Rights Reserved. CNC SHARK is the registered trademark of Next Wave CNC. All other trademarks are the property of their respective owners. Information in this manual is subject to change without notice. The most recent version of this manual can be found at www.NextWaveCNC.com/downloads-links...
-
Page 3: Table Of Contents
SHARK Water-cooled Spindle. This manual has been written with the assumption that you are experienced with the basic operation of a computer, your CNC SHARK as well as the knowledge required to safely operate power tools. 3HP Spindle Installation Manual... -
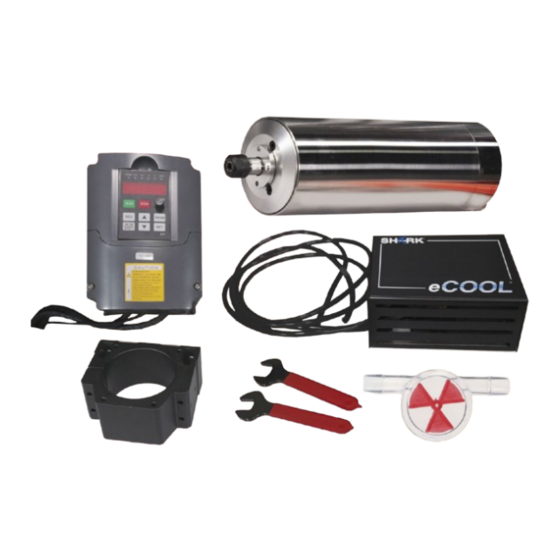
Page 4: Parts Overview
Parts Overview 3HP Spindle Motor (with Inverter (VFD) with ER20 ¼”, ½” collets) spindle interface cable eCool System Inline Flow ER20 Collet Spindle clamp with Indicator Wrenches mounting hardware... -
Page 5: Ecool Setup
eCool Setup 1. Remove the eCool unit from the box. Loosen but don’t remove the four Phillips head screws attaching the cover to the aluminum mounting plate. After the four screws are loosened, remove the cover. Please note that the pump’s power socket is connected to the cover, so it will need to remain near the pump. - Page 6 Setup 2. Using the slot nuts on the back of the eCool mounting plate, mount the eCool unit to the upper t-slot on back of Shark gantry. Tighten the Phillips head bolts to secure the mounting plate to the gantry. Note: The eCool unit should be mounted to the X- drive motor end of the gantry ( the right side, when facing the back of the gantry –see image)
- Page 7 4. Once the cable track is open, run the hoses through the track. Let the excess hose run over the top of the sign towards the front of the machine Keep your SHARK clean with a Part #20170 HD SERIES DUST BOOT Available at www.NextWaveCNC.com...
-
Page 8: Spindle Installation
Spindle Installation Remove the router mount 5. Loosen the two bolts on the left side of the mount and then remove your router. Next remove the two bolts on the right side and remove the mount. Install the spindle mount 6. -
Page 9: Coolant Hose Hookup
Hose hookup 7. Once the spindle is secured in the clamp, attach the hoses from the cooling system to the fittings on the top of the spindle. First remove the nuts from the fittings on the spindle and then slide one onto onto the end of each hose. -
Page 10: Priming The Plumb
NOTE: After the pump is primed, the pumps power cord should be move to the power strip that is attached to the back of the Shark Control Box. See page 12 for details. 9. Re-attach the eCool enclosure using the 4 screws that were previously loosened. -
Page 11: Electrical Connections
Electric cable connections Alignment notch Alignment tap 10. Attach the spindle power cable to the top of the spindle. Now take the spindle power cord from the inverter (VFD) and plug it into the top of the spindle. There is a groove on the plug that that matches a tab on the spindle socket. - Page 12 Electric cable connections 11. Plug a power strip (not included) into the back of the Shark controller. Then plug the VFD and eCool power cords into the power strip. NOTE: For the eCool system and VFD to function correctly they must be connected to the plug on the back of the Control box via a power strip or similar multi-plug connector.
-
Page 13: Vcarve Spindle Speed Setup
DO NOT EXCEED Router Bit manufacturer’s RPM recommendations 14. You must save your toolpath using Next Wave CNC (inch)(*.tap) post processor (shown at the right). If you dd not have this post process, it can be downloaded at: www.nextwavecnc.com/postprocessor. -
Page 14: Maintenance/Troubleshooting
Maintenance/Troubleshooting The Flow indicator is not turning • Is the Control Box turned on? • Is the digital interface cable securely attached to the front of the Control Box? • Is the pump plugged into the power strip on the back of the Control Box? •... - Page 15 Maintenance/Troubleshooting Spindle not starting • Is your Shark controller and pendant on the latest firmware? • Check that all cables are plugged in as specified in the installation instructions • Was the correct file selected in the USB screen? NOTE: If a laser file is selected, the eCool system and VFD will power off.
- Page 16 SHARK 3 HP Spindle kit with speed control Installation Manual Version – 2021 12 03...
Need help?
Do you have a question about the SHARK and is the answer not in the manual?
Questions and answers