Kimberly-Clark MIC-KEY - Transgastric-Jejunal Feeding Tube Manual
- Manual (2 pages)
Advertisement
- 1 DIRECTIONS FOR USE
- 2 PRODUCT DESCRIPTION
- 3 INDICATIONS FOR USE
- 4 PLACEMENT OF THE MIC-KEY* TRANSGASTRIC-JEJUNAL FEEDING TUBE
- 5 STOMA MEASURING PROCEDURE
- 6 ENDOSCOPIC PLACEMENT THROUGH AN EXISTING GASTROSTOMY TRACT
- 7 FLUOROSCOPIC PLACEMENT THROUGH AN EXISTING GASTROSTOMY TRACT
- 8 HOW TO CONNECT THE EXTENSION SET FOR JEJUNAL FEEDING
- 9 HOW TO CONNECT THE EXTENSION SET FOR GASTRIC DECOMPRESSION
- 10 KIT CONTENTS
- 11 Documents / Resources
DIRECTIONS FOR USE
Disposable, for single patient use only. Do not resterilize.
PRODUCT DESCRIPTION

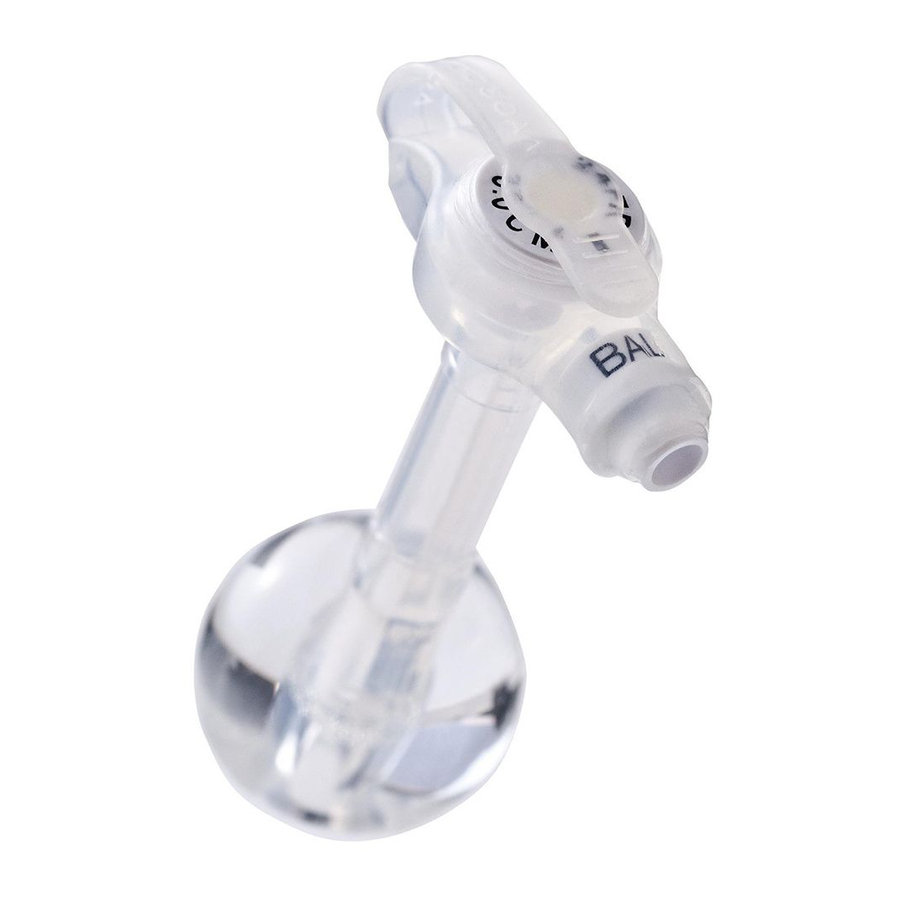
The MIC-KEY Low-Profile Transgastric-Jejunal Feeding Tube is a single unit feeding/drainage device (Fig. A). It enters the stomach through a gastric stoma.
The tube is held in place (within the stoma tract) by means of a water filled balloon (Fig. A-1) and a low-profile external bolster (Fig. A-2). The external bolster contains two ports; one labeled "JEJUNAL" and one labeled "GASTRIC". Incorporated within each port is a one-way valve which is opened by attaching the appropriate MIC-KEY Extension Set.
MIC-KEY Extension Sets (Figs. B & C) connect to the feeding and drainage ports. The JEJUNAL port is used for feeding into the small intestine. The GASTRIC port is used to drain the stomach with the use of low suction or gravity drainage and to administer medications. A third port labeled BAL is used to fill and remove fluid from the balloon.

INDICATIONS FOR USE
The use of this tube is clinically indicated when simultaneous gastric decompression and jejunal feeding are needed.
FOR ENTERAL NUTRITION ONLY
PLACEMENT OF THE MIC-KEY* TRANSGASTRIC-JEJUNAL FEEDING TUBE
Endoscopic or fluoroscopic placement of the MIC-KEY Transgastric-Jejunal Feeding Tube is intended for patients with an established gastrostomy tract. Be sure the stoma has been measured properly and you have the proper tube size and length before beginning the placement procedure. The length of the tube should be sufficient to be placed 10–15 cm beyond the Ligament of Treitz.
STOMA MEASURING PROCEDURE

Use the MIC-KEY* Stoma Measuring Device (Fig. D) to find the depth of the gastrostomy stoma. The shaft length is the distance in centimeters between the bottom of the external bolster and the proximal balloon surface when the balloon is filled to 5 ml.
- Moisten the tip of the measuring device with water-soluble lubricant or water.
- While the patient is in an upright position, insert the device through the stoma into the stomach. DO NOT USE FORCE.
- Fill the balloon with 5 ml distilled or sterile water.
- Gently pull up on the Stoma Measuring Device until you feel resistance against the inside stomach wall.
- Slide the plastic disc down to the stoma.
- Read the mark above the plastic disc. This adds 1 to 2 millimeters to the exact measurement. This much vertical movement is considered optimal.
- Repeat steps 4 through 6 with the patient in the supine position.
- Take an average of the two readings. This is the desired length.
- Record the measured centimeter shaft length on the MIC-KEY Transgastric-Jejunal Feeding Tube Patient Information Record.
- Remove water from the balloon and remove the device.
ENDOSCOPIC PLACEMENT THROUGH AN EXISTING GASTROSTOMY TRACT

DO NOT USE MINERAL OIL OR PETROLEUM PRODUCTS
This kit does not contain a guidewire.
- Remove the MIC-KEY Transgastric-Jejunal tube from the package and fill the balloon with 5 ml water using the 6 ml luer slip-tip syringe. The balloon should be symmetrical and should not leak. The silicone may adhere to itself causing the balloon to partially fill. If this occurs, roll and bend the balloon with your fingers until the balloon is round. Remove water from the balloon.
- Using the 6 cc luer slip-tip syringe, instill water into the gastric decompression port and jejunal feeding port to confirm tube patency.
- Perform standard flexible gastroscopy. Insufflation of the stomach facilitates tube placement.
- Withdraw the endoscope until the indwelling gastrostomy tube is in the visual field.
- Remove the gastrostomy tube.
- Lubricate the distal end of the MIC-KEY Transgastric-Jejunal Tube and insert it into the stoma.
- Grasp the end of the tube with an atraumatic forceps. If needed, use a floppy-tip guidewire or stylet to stiffen the tube. Protect the anti-reflux valve by placing the introducer cannula (Fig. E) into the jejunal feeding port before you insert the guidewire or stylet.

- Feed the tube through the pylorus and through the upper duodenum. Continue to advance the tube using the forceps until the tip of the tube is positioned 10–15 cm beyond the Ligament of Treitz and the balloon is inside the stomach.
- Release the tube and withdraw endoscope and forceps.
- Ensure the external bolster is flush with the skin surface. Fill the balloon:
- For pediatric sized tubes (REF numbers ending in –15, –22, or –30), fill the balloon with 3–5 ml distilled or sterile water. DO NOT EXCEED 5 cc TOTAL BALLOON VOLUME. DO NOT USE AIR. DO NOT INJECT CONTRAST INTO THE BALLOON.
- For adult sized tubes (REF numbers ending in –45), fill the balloon with 7–10 ml distilled or sterile water. DO NOT EXCEED 10 cc TOTAL BALLOON VOLUME. DO NOT USE AIR. DO NOT INJECT CONTRAST INTO THE BALLOON.
- Remove any introducer cannula and guidewire used.
- Flush the tube to confirm patency.
- To avoid potential placement complications (e.g., bowel irritation or perforation), ensure the tube is not looped within the stomach or small bowel. Verify proper tube placement radiographically. THE JEJUNAL PORTION OF THE TUBE CONTAINS TUNGSTEN WHICH IS RADIOPAQUE AND CAN BE USED TO RADIOGRAPHICALLY CONFIRM TUBE POSITION.

FLUOROSCOPIC PLACEMENT THROUGH AN EXISTING GASTROSTOMY TRACT
To perform this procedure, obtain the following additional supplies:
- .035 Floppy-Tipped (atraumatic) Guidewire
- Water soluble lubricant
- Remove the MIC-KEY Transgastric-Jejunal tube from the package and fill the balloon with 5 ml water or sterile water using the 6 ml luer slip-tip syringe. If the balloon is asymmetrical, roll it between your fingers and squeeze it gently until the balloon is round. Remove water from the balloon.
- Using the 6 cc luer slip-tip syringe, instill water into the gastric decompression port and jejunal feeding port to confirm tube patency.
- Under fluoroscopic guidance, insert a floppy-tipped (atraumatic) guidewire through the indwelling gastrostomy tube.
- Remove the gastrostomy tube over the wire.
- Advance the guidewire until the tip is at the pylorus.
- Negotiate the pylorus and advance the guidewire into the duodenum.
- Advance the guidewire tip to a point 10–15 cm beyond the Ligament of Treitz.
- Using the 6 cc syringe, instill water into the jejunal feeding port and flush the entire tube length with water. Lubricate the distal portion of the MIC-KEY Transgastric-Jejunal tube with a water soluble lubricant.
- Insert the Introducer Cannula (Fig. E) into the jejunal feeding port until the Introducer hub is in contact with the jejunal feeding port and the introducer cannula is visible inside the tube. The introducer cannula opens the
- Advance the distal end of the tube over the guidewire until the proximal end of the guidewire exits the introducer. NOTE: Direct visualization and manipulation of the introducer and guidewire may be required to pass the guidewire through the end of the introducer.
- Hold the introducer hub and jejunal feeding port while advancing the tube over the guidewire into the stomach.
- Rotate the tube as it is advanced to facilitate passage through the pylorus and into the jejunum.
- Advance the tube until the tip of the tube is 10–15 cm beyond the Ligament of Treitz and the balloon is inside the stomach.
- Ensure the external bolster is flush with the skin surface. Inflate the balloon:
- For pediatric sized tubes (REF numbers ending in –15, –22, or –30), fill the balloon with 3–5 ml distilled or sterile water. DO NOT EXCEED 5 cc TOTAL BALLOON VOLUME. DO NOT USE AIR. DO NOT INJECT CONTRAST INTO THE BALLOON.
- For adult sized tubes (REF numbers ending in –45), fill the balloon with 7–10 ml distilled or sterile water. DO NOT EXCEED 10 cc TOTAL BALLOON VOLUME. DO NOT USE AIR. DO NOT INJECT CONTRAST INTO THE BALLOON.
- Remove the guidewire through the introducer cannula while holding the cannula in position. Remove the introducer cannula and flush the tube with water to verify tube patency.
- To avoid potential placement complications (e.g., bowel irritation or perforation), ensure the tube is not looped within the stomach or small bowel. Verify proper tube placement radiographically. THE JEJUNAL PORTION OF THE TUBE CONTAINS TUNGSTEN WHICH IS RADIOPAQUE AND CAN BE USED TO RADIOGRAPHICALLY CONFIRM TUBE POSITION.
HOW TO CONNECT THE EXTENSION SET FOR JEJUNAL FEEDING
- Remove the feeding port cover (Fig. A-3) from the top of the MIC-KEY Transgastric-Jejunal Feeding Tube.
- Insert the MIC-KEY Extension Set (Fig. B) into the port labeled "JEJUNAL" by aligning the lock and key connector. Align the black orientation marking on the set with the corresponding black orientation line on the jejunal feeding port.
- Lock the set into the jejunal feeding port by pushing in and rotating the connector CLOCKWISE until you feel a slight resistance (approximately a 3/4 turn).
NOTE: DO NOT rotate the connector past the stop point. - Remove the extension set by rotating the connector COUNTER-CLOCK- WISE until the black line on the set aligns with the black line on the jejunal feeding port. Remove the set and cap the MIC-KEY gastric and jejunal ports with the attached feeding port cover.

HOW TO CONNECT THE EXTENSION SET FOR GASTRIC DECOMPRESSION
- Remove the feeding port cover (Fig. A-3) from the top of the MIC-KEY Transgastric-Jejunal Feeding Tube.
- Insert the MIC-KEY Bolus Extension Set (Fig. C) into the port labeled "GASTRIC" by aligning the lock and key connector. Align the black orientation marking on the set with the corresponding black orientation line on the gastric port.
- Lock the set into the gastric decompression port by pushing in and rotating the connector CLOCKWISE until you feel a slight resistance (approximately a 3/4 turn).
NOTE: DO NOT rotate the connector past the stop point. - Remove the extension set by rotating the connector COUNTER-CLOCK- WISE until the black line on the set aligns with the black line on the gastric port. Remove the set and cap the MIC-KEY gastric and jejunal ports with the attached feeding port cover.
KIT CONTENTS
1 Low-Profile Transgastric-Jejunal Feeding Tube
1 Introducer Cannula
1 6 ml Luer-Slip Syringe
1 35 ml Catheter Tip Syringe
1 MIC-KEY Extension Set with Secur-Lok Right Angle Connector and 2 Port "Y" and Clamp-12"
1 MIC-KEY Bolus Extension Set with Cath Tip, Secur-Lok Straight Connector and Clamp-12"
4 Gauze Pads
1 Directions For Use
1 Use and Care Instructions
* Registered Trademark or Trademark of Kimberly-Clark Worldwide, Inc. or its affiliates. © 2003 KCWW. All rights reserved.
Manufactured by Ballard Medical Products, Draper, Utah 84020 USA
Distributed in the U.S. by Kimberly-Clark Global Sales, Inc. Roswell, GA. 30076 USA
Kimberly-Clark N.V., Belgicastraat 17, 1930 Zaventem, Belgium

Documents / ResourcesDownload manual
Here you can download full pdf version of manual, it may contain additional safety instructions, warranty information, FCC rules, etc.
Download Kimberly-Clark MIC-KEY - Transgastric-Jejunal Feeding Tube Manual
Advertisement


Need help?
Do you have a question about the MIC-KEY and is the answer not in the manual?
Questions and answers