Table of Contents
Advertisement
Advertisement
Table of Contents

Related Manuals for Honda CB Unicorn 160


Summary of Contents for Honda CB Unicorn 160
- Page 1 CB Unicorn 160 OWNER’S MANUAL © Honda Motor Co., Ltd. 2021...
- Page 2 WELCOME Congratulations on your purchase of a new Honda vehicle. Your selection of a Honda makes you part of a worldwide family of satisfied customers who appreciate Honda’s reputation for building quality into every product. To ensure your safety and riding pleasure: ●...
- Page 3 OWNER’S MANUAL All information in this publication is based on the latest production information available at the time of approval for printing. Honda Motor Co., Ltd. reserves the right to make changes at any time without notice and without incurring any obligation.
- Page 4 A FEW WORDS ABOUT SAFETY Your safety, and the safety of others, is very important. Operating this vehicle safely is an important responsibility. To help you make informed decisions about safety, we have provided operating procedures and other information on safety labels and in this manual. This information alerts you to potential hazards that could hurt you or others.
-
Page 5: Table Of Contents
CONTENTS Page Page SAFETY GUIDELINES Left Handlebar Controls FEATURES Image label (Not required for operation) Battery label Steering Lock Safety precautions Headlight Aim Vertical Adjustment Riding precautions Seat PARTS LOCATION Helmet Holder Instruments and Indicators Left Side Cover MAJOR COMPONENTS Right Side Cover (Important Information to operate this vehicle) - Page 6 Page Page MAINTENANCE Front and Rear Suspension Inspection The Importance of Maintenance Side Stand Maintenance Safety Wheel Removal Maintenance Schedule Brake Pad Wear (Only Front Brake) Tool Kit and First Aid Kit Brake Shoe Wear Serial Numbers Battery Colour Code Fuse Replacement Replacing Parts Main Fuse...
-
Page 7: Safety Guidelines
SAFETY GUIDELINES Before Riding Follow these guidelines to enhance your Make sure that you are physically fit, safety: mentally focused and free of alcohol Perform all routine and regular and drugs. Check that you and your ● inspections specified in this manual. passenger are both wearing an Stop the engine and keep sparks approved helmet and protective... - Page 8 Make Yourself Easy to See Keep Your Honda in Safe Condition Make yourself more visible, especially It’s important to keep your vehicle at night, by wearing bright reflective...
- Page 9 loss of consciousness and may lead to take time to assess the severity of the death. injuries and whether it is safe to continue riding. Call for emergency If you run the engine in confined or assistance if needed. Also follow even partly enclosed area, the air you applicable laws and regulations if breathe could contain a dangerous...
-
Page 10: Image Label
Read instructions contained in IMAGE LABELS Owner’s Manual carefully. The following pages describe the label meanings. Some labels warn you of Read instructions contained potential hazards that could c ause in Shop Manual carefully. In serious injury. Others provide important the interest of safety, take s a f e t y i n f o r m a t i o n . -
Page 11: Battery Label
BATTERY LABEL DANGER • Keep flame and spark away from the battery. Battery produce explosive gas that can cause explosion. • Wear the eye protection and rubber gloves when handling the battery, or you can get burned or lose your eyesight by the battery electrolyte. -
Page 12: Safety Precautions
Face shield with unobstructed field of ● SAFETY PRECAUTIONS vision or other approved eye protection WARNING Ride cautiously and keep your hands ● on the handlebar and feet on the footpegs. Keep passenger’s hands onto the ● Not wearing a helmet increases grab rail or your waist, passenger’s the chance of serious injury or feet on the footpegs while riding. -
Page 13: Riding Precautions
► Where possible, reduce speed RIDING PRECAUTIONS before turning; otherwise you risk sliding out. Running-in Period Exercise caution on low traction ● During the first 500 km (300 miles) of surfaces. running, follow these guidelines to ► The tyres slip more easily on such ensure your vehicle’s future reliability surfaces, and braking distances are and performance. - Page 14 Engine Braking Parking Park on a firm, level surface. ● Engine braking helps slow your vehicle If you must park on a slight incline or ● down when you release the throttle. For loose surface, park so that the vehicle further slowing action, downshift to a cannot move or fall over.
- Page 15 Parking with the Side Stand or Centre Refuelling and Fuel Guidelines Stand Follow these guidelines to protect the 1. Stop the engine. engine, fuel system and catalytic 2. Using the side stand converter: Push the side stand down. Use only unleaded petrol. ●...
- Page 16 Honda or make modifications to your vehicle from Follow all instructions in this owner’s its original design. Doing so can make it manual regarding accessories and unsafe.
- Page 17 WARNING Loading Overloading or improper loading can Carrying extra weight affects your cause a crash and you can be seriously ● vehicle’s handling, braking and hurt or killed. stability. Always ride at a safe speed for the Follow all load limits and other loading load you are carrying.
-
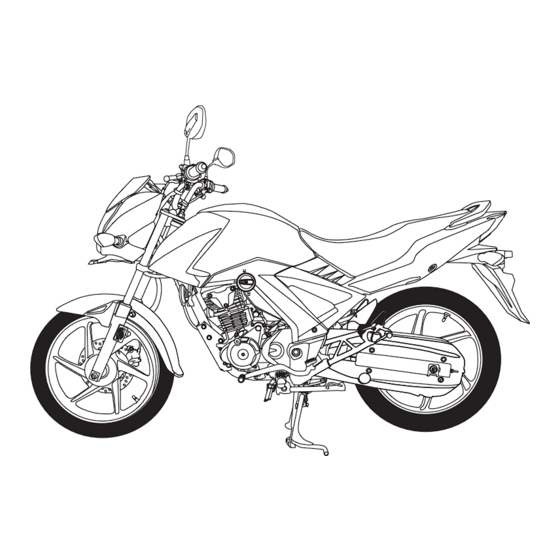
Page 18: Parts Location
PARTS LOCATION Tachometer Front brake fluid Speedometer Rearview mirror reservoir Fuel guage Passing-light switch Rearview mirror Set Button Select Button Clutch lever Front brake lever Headlight switch Throttle grip Horn button Turn signal switch Starter button Ignition switch Headlight dimmer switch Fuel filler cap... - Page 19 Storage compartment Kickstarter Air cleaner Reflector Footpeg Passenger footpeg Rear brake pedal Oil filler cap/Dipstick...
- Page 20 Fuel valve License Plate Lamp Main fuse Seat Lock Choke Knob Reflector Battery Footpeg Passenger footpeg Side stand Gearshift pedal Engine oil drain plug Center stand...
-
Page 21: Instruments And Indicators
INSTRUMENT AND INDICATORS indicators contained instrument panel. Their functions described in the tables on the following pages. (1) Tachometer (2) Speedometer (3) Digital clock (4) Odometer (5) Fuel gauge (6) High beam indicator (7) Turn signal indicator (8) Neutral indicator (11) (10) (9) Trip meter... - Page 22 (Ref.No.) Description Function (1) Tachometer Shows engine revolution per minute (2) Speedometer Shows riding speed. (3) Digital clock Shows hour and minutes (4) Odometer Shows accumulated mileage. (5) Fuel meter Shows approximate fuel supply available. (6) High beam indicator (blue) Indicate when the headlight is glowing on high beam.
- Page 23 Fuel Gauge Tripmeter When the fuel gauge indicator enters the To reset the tripmeter proceed as follows: last band (2), it shows the less fuel in Press the select button to select Tripmeter. the tank. Turn the fuel valve to the RES position and you should refill the tank as soon as possible.
- Page 24 Digital Clock 3. To set the hour, press the set button until the desired hour is displayed. The digital clock will show hours and • Quick setting - press and hold the minutes up to 11:59. button until desired hour To adjust the time, proceed as follows: appears.
-
Page 25: Major Components
NOTICE The clock will be reset 1:00 if the battery is For rear shock absorber adjustment visit disconnected. to your nearest Honda dealer. MAJOR COMPONENTS Standard position: 2 (Information you need to operate this vehicle) SUSPENSION... -
Page 26: Brakes
(page 71), there is probably air in the brake system and it must be bleed. See your Honda dealer for this service. (1) Lower level mark Front Brake Fluid Level: With the vehicle in an upright position, check the fluid level. - Page 27 REAR BRAKE 3. If adjustment is necessary, turn the rear brake adjusting nut (2). Adjustment: Make sure the cut-out on the adjusting nut 1. Place the vehicle on its center stand. is seated on the brake arm pin (3) after 2.
- Page 28 If proper adjustment cannot be obtained by this method, see your Honda dealer. After adjustment, push the brake arm to confirm that there is a gap between the rear brake adjusting nut and the brake arm pin.
-
Page 29: Clutch
CLUTCH 1. Loosen the lock nut (2) at the lower end of the cable. Turn the adjusting nut (3) Clutch adjustment may be required if the to obtain the specified free play. Tighten vehicle stalls when shifting into gear or the lock nut and check the adjustment. -
Page 30: Fuel
If proper adjustment cannot be obtained or the clutch does not work correctly, see your Honda dealer. Other Checks: Check the clutch cable for kinks or signs of wear that could cause sticking or failure. Lubricate the clutch cable with a commercially available cable lubricant to prevent premature wear and corrosion. - Page 31 With the fuel valve in this OFF position, fuel cannot flow from the tank to the carburetor. Turn the valve OFF whenever the vehicle is not in use. With the fuel valve in this RES position, fuel will flow from the reserve fuel supply to the (1) Fuel valve carburetor.
- Page 32 If ‘‘spark knock’’ or ‘‘pinking’’ occurs at a steady engine speed under normal load, change brands of petrol. If spark knock or pinking persists, consult your Honda dealer. Failure to do so is considered (1) Fuel fill cap misuse, and damage caused by misuse is (2) Ignition key not covered by Honda’s Limited Warranty.
- Page 33 Check the engine oil level each day before considered as misuse, damage caused riding the vehicle. by misuse is not covered under Honda The level must be maintained between the warranty. upper (1) and lower (2) level marks on the oil filler cap/dipstick (3).
-
Page 34: Tyres
TYRES (Inspecting/Replacing) 5. Reinstall filler cap/dipstick. Check for oil leaks. Checking the Air Pressure NOTICE Visually inspect your tyres and use an air pressure gauge to measure the air pressure Running engine with insufficient at least once a month or any time you oil pressure may cause serious engine think the tyres look low. - Page 35 Inspecting for Damage when the vehicle has been ridden for even a few miles the readings will be higher than Inspect the tyres for cuts, if the tyres were ‘‘cold’’. This is normal, slits, or cracks that exposes so do not let air out of the tyres to match fabric or cords, or nails the recommended cold air pressures given or other foreign objects...
- Page 36 Inspecting Tread Depth WARNING Inspect tread wear indicators. Riding on tyres that are excessively they become visible, replace the tyres worn or improperly inflated can cause a immediately. crash in which you can be seriously hurt For safe riding, you should replace the tyres or killed.
- Page 37 CAUTION WARNING With the fuel knob in the OFF position, fuel Riding your vehicle with a temporary Repair/Replacement of tubeless tyre by tyre repair can be risky. If the temporary unauthorized person may render the repair fails, you can crash and be tyre useless or tyre can fail while driving.
-
Page 38: Essential Individual
ESSENTIAL INDIVIDUAL COMPONENTS IGNITION SWITCH The ignition switch (1) is below the speedometer. Lock (1) Ignition switch ¼bfXu”ku fLop½ Key Position Function Key Removal LOCK Steering is Locked. Engine and lights Key can be removed (steering lock) cannot be operated. Engine and lights cannot be operated. -
Page 39: Right Handlebar Controls
LEFT HANDLEBAR CONTROLS RIGHT HANDLEBAR CONTROLS Headlight Switch (1) Starter Button (1) The headlight switch (1) has three positions; The starter button (1) is next to the throttle grip. and (•) When the starter button is pressed the : Headlight, position light, taillight starter motor cranks the engine. - Page 40 Passing Light Control Switch (3) When this switch is pressed, the headlight flashes on to signal approaching cars or when passing. Turn Signal Switch (4) Move to (L) to signal a left turn, to signal a right turn. Press to turn signal off.
-
Page 41: Features (Not Required For Operation)
FEATURES HEADLIGHT AIM VERTICAL ADJUSTMENT (Not required for operation) Vertical adjustment can be made by moving STEERING LOCK the headlight assembly as necessary. To move the headlight assembly, loosen the To lock the steering, turn the handlebar all bolt (1). the way to the left or right, turn the key (1) to LOCK while pushing in. -
Page 42: Seat
SEAT The seat (1) must be removed for air cleaner inspection, to remove the right & left side cover or to access the tool kit, first aid kit and owner’s manual. Removal: 1. Insert the ignition key (2) into the seat lock (3) and turn it clockwise. -
Page 43: Helmet Holder
HELMET HOLDER The helmet holder (1) is on the left side below the seat. Hang the helmet D-ring (2) on the holder hook. The helmet holder is designed to secure your helmet while parked. WARNING Riding with a helmet attached to the holder can interfere with the rear wheel or suspension and could cause a crash in which you can be seriously hurt or... -
Page 44: Left Side Cover
LEFT SIDE COVER The left side cover must be removed for battery & fuse maintenance. Removal: 1. Remove the seat (page 36). 2. Remove the left side cover pan screw and one screw from rear cowl. 3. Remove 3 side cover bosses from the grommets. -
Page 45: Right Side Cover
RIGHT SIDE COVER The right side cover must be removed for accessing the carburetor. Removal: 1. Remove the seat (page 36). 2. Remove the right side cover pan screw and one screw from rear cowl. 3. Remove 3 side cover bosses from the grommets. -
Page 46: Document Bag
STORAGE COMPARTMENT DOCUMENT BAG The documents bag (1) is in the document The storage compartment (1) is located compartment (2) on the reverse side of the under the seat (page 36) . This compartment seat (3). is for light weight items. The owner’s manual and other documents The first aid kit and tool kit should be stored should be stored in the document bag. -
Page 47: Operation
If you detect any problem, be sure you 5. Drive chain - check condition and take care of it, or have it corrected by your slack (page 61). Adjust and lubricate if Honda dealer. necessary. 6. Throttle - check for smooth opening and WARNING full closing in all steering positions. - Page 48 Preparation To protect the catalytic converter in your vehicle’s exhaust system, avoid extending Before starting, insert the key, turn the idling and the use of leaded petrol. ignition switch ON and confirm the following: Your vehicle’s exhaust contains poisonous ● The transmission is in NEUTRAL (neutral carbon monoxide gas.
- Page 49 Flooded Engine 3. When engine speed begins to pick up, operate the choke knob to keep fast idle. If the engine fails to start after repeated 4. Continue warming up the engine until attempts, it may be flooded with excess it runs smoothly and responds to the fuel.
-
Page 50: Running-In
RUNNING-IN Coordination of the throttle and clutch lever will assure a smooth positive start. Help assure your vehicle’s future reliability 4. When the vehicle attains a moderate and performance by paying extra attention speed, close the throttle, pull in the to how you ride during the first 500 km clutch lever and shift to 2nd gear by (300 miles). -
Page 51: Braking
BRAKING Important Safety Reminders: • Independent operation of only the brake Your vehicle equipped with lever or brake pedal reduces stopping hydraulically activated disc brake in front performance. and mechanically operated rear brakes. • Extreme application of the brake controls Operating the brake lever applies the front may cause wheel lock, reducing control of disc brake. -
Page 52: Parking
• Continuous brake application Make sure flammable materials such as overheat the brakes and reduce their dry grass or leaves do not come in contact effectiveness. with the exhaust system when parking your vehicle. • Riding with your foot resting on the brake pedal or your hand on the brake ANTI-THEFT TIPS lever may actuate the brakelight, giving... -
Page 53: Maintenance
MAINTENANCE MAINTENANCE SAFETY Always read the maintenance instructions THE IMPORTANCE OF MAINTENANCE before you begin each task, and make sure that you have the tools, parts, and Keeping your vehicle well-maintained is skills required. We cannot warn you of absolutely essential to your safety and to every conceivable hazard that can arise in protect your investment, obtain maximum performing maintenance. -
Page 54: Maintenance Schedule
Should be serviced by your Honda dealer, unless the owner has the proper tools and service data and is mechanically qualified. Refer to the Official Honda Shop Manual. ** In the interest of safety, we recommend these items be serviced only by your Honda dealer. - Page 55 REFER X 1000Km 6 12 18 24 30 36 ANNUAL PRE-RIDE REGLAR NOTE CHECK CHECK REPLACE ITEMS X 1000mi 0.6 4 8 12 16 20 24 PAGE * FUEL LINE FUEL LEVEL * FUEL STRAINER SCREEN * THROTTLE OPERATION * CHOKE OPERATION * AIR CLEANER NOTE (2) CRANKCASE BREATHER NOTE (3)
- Page 56 PRE- REFER X 1000Km 6 12 18 24 30 36 ANNUAL REGULAR NOTE RIDE CHECK REPLACE ITEMS X 1000mi 0.6 4 8 12 16 20 24 CHECK PAGE BRAKE SHOES/PADS 71-72 WEAR BRAKE SYSTEM 20-22 BRAKE LIGHT SWITCH HEAD LIGHT AIM LIGHTS/HORN CLUTCH SYSTEM SIDE STAND...
-
Page 57: Tool Kit And First Aid Kit
TOOL KIT AND FIRST AID KIT The tool kit (1) and first aid kit (2) is in the storage compartment under the seat. A special marking is also given on the rear fender for the first aid kit. Some roadside repairs, minor adjustments and parts replacement can be performed with the tools contained in the kit. -
Page 58: Serial Numbers
SERIAL NUMBERS The engine number (2) is stamped on the left side of the crankcase. The frame and engine serial numbers are required when registering your vehicle. They may also be required by your dealer ENGINE NO. when ordering replacement parts. Record the numbers here for your reference. -
Page 59: Colour Code
COLOUR CODE REPLACING PARTS The colour table helps in providing the Always use Honda Genuine Parts or their correct colour part as per your vehicle colour equivalents to ensure reliability and safety. during the parts ordering for replacement. WARNING Installing non-Honda parts may make S.No. -
Page 60: Engine Oil
ENGINE OIL ENGINE OIL Refer to the Safety Precautions on page 6. Engine oil quality is the chief factor affecting engine service life. Change the engine oil Good engine many desirable as specified in the maintenance schedule qualities. Use only high detergent, quality (page 48). - Page 61 If a torque wrench is not used for this 3. Check that the sealing washer on the drain bolt is in good condition and install installation, see your Honda dealer as soon the bolt. Replace the sealing washer as possible to verify proper assembly.
-
Page 62: Crankcase Breather
CRANKCASE BREATHER SPARK PLUG Refer to the Safety Precautions on page 6. Refer to the Safety Precautions on page 6. 1. Remove the left side cover (page 38). Recommended plug: 2. Remove the crankcase breather tube Standard: plug (1) from the tube and drain CPR8EA - 9 (NGK) deposits into a suitable container. - Page 63 (3) Spark plug gap (4) Side electrode (1) Spark plug cap 6. Tighten the spark plug: (2) Spark Plug wrench • If the old plug is good: 4. Check spark plug 1/8 turn after it seats. using wire-type feeler gauge. •...
-
Page 64: Idle Speed
10 minutes of stop-and-go riding is sufficient. Do not attempt to compensate for faults in other systems by adjusting idle speed. See your Honda dealer for regularly scheduled carburetor adjustments. 1. Warm up the engine, and shift to (1) Throttle stop screw... -
Page 65: Throttle Operation
THROTTLE OPERATION AIR CLEANER Refer to the Safety Precautions on page 6. Refer to the Safety Precautions on page 6. 1. Check for smooth rotation of the The air cleaner element should be replaced throttle grip from the fully open to the at regular intervals (page 59). - Page 66 Use Honda genuine air cleaner element specified for your model. Using the wrong Honda air cleaner element or a non-Honda air cleaner element which is not of equivalent quality may cause premature engine wear or performance problem.
-
Page 67: Drive Chain
DRIVE CHAIN Refer to the Safety Precautions on page 6. The service life of the drive chain is dependent upon proper lubrication and adjustment. Poor maintenance can cause premature wear or damage to the drive chain and sprockets. The drive chain should be checked and lubricated as part of the Pre-ride Inspection (page 41). - Page 68 Chain Case Removal 1. Remove bolts A (1) from both side of the rear wheel hugger (2) and slide it backwards to remove from the stay. 2. Remove the bolts B (3) and screw (4) of the upper chain case. Slide the upper chain case (5) backwards away from the engine and remove it carefully.
- Page 69 Lower Chain Case Installation 3. Inspect the sprocket teeth for possible wear or damage. Replace if necessary. 5. Install the lower chain case on to the swingarm carefully and tighten bolts B to secure the chain case. Worn sprocket Teeth Damaged sprocket Teeth Upper Chain Case Installation Replace...
- Page 70 If the drive chain requires adjustment, the procedure is as follows: 1. Place the vehicle on its center stand with the transmission in neutral and the ignition switch off. 2. Loosen the rear axle nut (1) 3. Loosen the drive chain lock nuts (2). 4.
- Page 71 Lubrication: If a torque wrench is not used for this installation, see your Honda dealer as soon Lubricate every 1,000 km (600 miles) or as possible to verify proper assembly. sooner if chain appears dry. 6. Tighten the adjusting nuts lightly, then...
- Page 72 Removal and Cleaning: Never use petrol or low flash point solvents for cleaning the drive chain. A When the drive chain becomes dirty, it should fire or explosion could result. be removed and cleaned prior to lubrication. 3. Inspect the sprocket teeth for possible 1.
-
Page 73: Drive Chain Slider
(2). For 2. Swingarm bearings should be checked replacement, visit your Honda dealer. by pushing hard against the side of the rear wheel while the vehicle is on the center stand. Free play indicates worn bearings. -
Page 74: Side Stand
The caliper piston will be forced out of the cylinder with subsequent loss of brake fluid. If this occurs, servicing of the brake system will be necessary. Visit your Honda dealer for this service. (1) Side stand spring... - Page 75 If a torque wrench was not used for installation, see your Honda dealer as soon as possible to verify proper assembly. Improper assembly may lead to loss of braking capacity.
- Page 76 2. Remove the rear axle nut. 3. Remove the drive chain (1) from the driven sprocket by pushing the rear wheel forward. 4. Remove rear axle shaft (2), side collar and rear wheel from the swingarm. (1) Rear axle nut (2) Brake adjusting nut (1) Drive chain (3) Brake rod...
-
Page 77: Brake Pad Wear (Only Front Brake)
Visit After installing the wheel, apply the brake your Honda dealer for this service. several times and then check if the wheel rotates freely. Recheck the wheel if the brake drags or if the wheel does not rotate freely. -
Page 78: Brake Shoe Wear
NOTICE Visit your Honda dealer for this service. Your battery is maintenance-free type and can be permanently damaged if the cap strip is removed. This symbol on the battery means that this product must not be treated as household waste. - Page 79 What to do in an emergency WARNING If any of the following occur, immediately The battery gives off explosive hydrogen see your doctor. gas during normal operation. ● Electrolyte splashes into your eyes: A spark or flame can cause the battery - Wash your eyes repeatedly with cool to explode with enough force to kill or water for at least 15 minutes.
- Page 80 Removal 1. Make sure the ignition switch is OFF. 2. Remove the left side cover (page 38). 3. Remove the bolt (1) and open the battery holder (2). 4. Disconnect the negative (-) terminal lead (3) from the battery, first. 5.
-
Page 81: Fuse Replacement
When frequent fuse failure occurs, it usually (+) terminal first, then the negative (-) indicates a short circuit or an overload in terminal. the electrical system. See your Honda 2. Check all bolts and other fasteners are dealer for repair. secure. -
Page 82: Main Fuse
Fuse Box: MAIN FUSE: The fuse box (1) is located behind the left The main fuse (1) is located behind the left side cover. side cover. The specified fuse is: 15A The specified fuse is : 20A 1. Remove the seat (page 36). 1. -
Page 83: Stoplight Switch Adjustment
STOPLIGHT SWITCH BULB REPLACEMENT ADJUSTMENT Refer to the Safety Precautions on page 6. Refer to the Safety Precautions on page 6. The light bulb becomes very hot while the light is ON, and remains hot for a while Check the operation of the stoplight switch after it is turned OFF. - Page 84 Position Light Bulb Headlight Bulb 1. Remove the front cowl (Page 78). 1. Remove the front cowl (1) by removing the screws (2) and Pan Screws (3). 2. Disconnect the connector. 2. Disconnect the head light connector. 3. Remove the dust cover (1). 3.
- Page 85 Stop/tail light is a LED unit (1). If there is by removing the screws (2). a LED which does not turn ON, visit your Honda dealer for this service. 2. Slightly press the bulb (3) and turn it counterclockwise. 3. Install a new bulb in the reverse order of removal.
-
Page 86: Cleaning
Front/Rear Turn Signal Bulb CLEANING 1. Remove the turn signal lens (1) by Clean your vehicle regularly to protect the removing the screw (2). surface finishes and inspect for damage, 2. Slightly press the bulb (3) and turn it wear, and oil or brake fluid leakage. counterclockwise. - Page 87 Washing the Vehicle 4. After cleaning, rinse vehicle thoroughly with plenty of clean water. 1. Rinse the vehicle thoroughly with cool Strong detergent residue can corrode water to remove loose dirt. alloy parts. 2. Clean the vehicle with a sponge or soft 5.
- Page 88 1. Clean the vehicle using cool water If a surface on your vehicle is chipped or (page 80). scratched, your Honda dealer has touch up Do not use warm water. paint to match your vehicle’s colour. Be sure This worsens the effect of the salt.
-
Page 89: Storage Guide
STORAGE GUIDE WARNING Extended storage, such as for winter, Petrol highly flammable requires that you take certain steps to explosive. burned reduce the effects of deterioration from seriously injured when handling fuel. non-use vehicle. addition, • Stop engine keep heat, necessary repairs should be made BEFORE sparks, and flame away. -
Page 90: Removal From Storage
REMOVAL FROM STORAGE • Pour a table spoon (15-20 cm of clean engine oil into the 1. Uncover and clean the vehicle. cylinder and cover the spark plug hole with a piece of cloth. 2. Change the engine oil if more than 4 months have passed since the start of •... -
Page 91: Specifications
SPECIFICATIONS DIMENSIONS Overall length 2045 mm (80.5 in) Overall width 757 mm (29.8 in) Overall height 1,060 mm (41.7 in) Wheel base 1,324 mm (52.1 in) WEIGHT Dry weight 135 kg (297.6 lbs) CAPACITIES Engine oil After draining 1.0 L (1.0 US qt, 0.9 lmp qt) After disassembly 1.2 L (1.3 US qt, 1.1 lmp qt) Fuel tank... - Page 92 ENGINE Bore and stroke 57.30 x 63.096 mm (2.26x2.48 in) Compression ratio 10:1 Displacement 162.71 cm (9.93 cu-in) Spark plug Standard CPR8EA-9 (NGK) Spark plug gap 0.8-0.9 mm (0.03-0.04 in) Idle speed 1,400 ± 100 min (rpm) Valve clearance (Cold) Intake 0.08 mm (0.003 in) Exhaust 0.24 mm (0.009 in)
- Page 93 ELECTRICAL Battery 12V-4Ah (M.F) ETZ5 Generator 0.14 kW/ 5,000 min (rpm) LIGHTS Head light 12V-35/35W Position light 12V-5W Stop/tail light(LED) 12V-1.8/0.3W License plate lamp 12V-5W Turn signal light 12V-10W x 4 Instrument lights Tachometer lamp Neutral indicator Turn signal indicator High beam indicator Fuse Main fuse...
-
Page 94: Catalytic Converter
The catalytic converter acts on HC, CO and NOx. A replacement unit must be an • Keep your engine tuned-up. original Honda part or its equivalent. • Have your vehicle diagnosed replaced if it is misfiring, backfiring,...
Need help?
Do you have a question about the CB Unicorn 160 and is the answer not in the manual?
Questions and answers
Unicorn 160 disc chenging time
MEANING OF SIMBOL SHOW IN DISPLAY
The Honda CB Unicorn 160 displays several symbols on its instrument panel, each with a specific meaning:
- Tachometer: Shows engine RPM.
- Speedometer: Shows riding speed.
- Digital clock: Shows current time.
- Odometer: Shows total distance traveled.
- Fuel gauge: Shows approximate fuel level.
- High beam indicator (blue): Lights up when the high beam is on.
- Turn signal indicator (green): Flashes when turn signals are active.
- Neutral indicator (green): Lights up when the transmission is in neutral.
- Trip meter: Shows distance traveled since last reset.
- Select/Set buttons: Used to adjust display settings.
Each symbol or indicator provides specific information to the rider about the bike’s status or performance.
This answer is automatically generated
WHATS A MEANING OF SIGN SPANNER SHOW IN DISPLAY
The spanner sign on the display of a Honda CB Unicorn 160 indicates that the motorcycle is due for maintenance or service.
This answer is automatically generated