Table of Contents
Advertisement
Advertisement
Table of Contents

Related Manuals for Rollei AFM 35


Summary of Contents for Rollei AFM 35
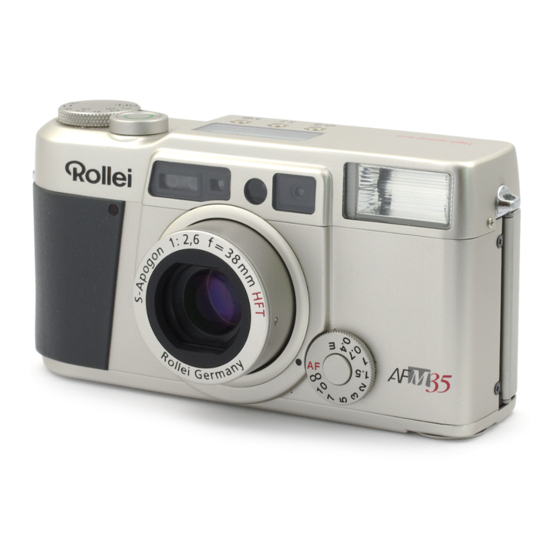
- Page 1 Rollei AFM 35 Operating Instructions...
- Page 2 GENERAL Congratulations on your sophisticated new 35 mm camera! Please read these instructions carefully before using your camera, so you will be able to make optimum use of its many features. Precautions › Do not tamper with the camera’s internal compo- nents.
- Page 3 GENERAL The shutter of your camera will not release, if … › no battery is loaded or the battery is exhausted; › the lens cover is closed (camera OFF); › the film is being rewound. Your camera is electronically controlled by a microprocessor.
-
Page 4: Table Of Contents
CONTENTS Getting ready › Controls › Description of parts › LCD panel › Viewfinder frame › Loading the battery › Testing the battery › Preparing your camera for shooting › Loading film › Removing the film › Mid-roll rewind Picture taking ›... -
Page 5: Controls
CONTROLS Primary functions of components Control Purpose Main dial Master switch (see p. 15) Programmed AE (see p. 17) Aperture-priority AE (see p. 21) Focusing dial Autofocus (p. 17)/manual focus selector (p. 35) Button (7) Flash-mode selector (see p. 25) [AEB/ ] button Bracketing selector (see p. -
Page 6: Description Of Parts
DESCRIPTION OF PARTS 1 Strap lug 2 Main dial (ON/OFF, programmed and aperture-priority AE) 3 Self-timer lamp 4 Shutter release 5 Autofocus window 6 Exposure-meter window 7 Flash button 8 Bracketing/ exposure-compensation button (AEB/ ) 9 Self-timer/ bulb-exposure button (BULB) 10 Viewfinder window 11 Flash unit 12 Focusing dial... - Page 7 DESCRIPTION OF PARTS 16 Viewfinder eyepiece 25 Take-up spool 17 Focus indicator 26 Film-leader mark 18 Red warning LED 27 Battery-compartment cover 19 Date select button (SEL) 28 Camera back 20 Date set button (SET) 29 Pressure plate 21 Mid-roll rewind button 30 Film type window 22 Camera-back release 23 Film-cartridge compartment...
-
Page 8: Lcd Panel
LCD PANEL LCD panel AEB compensation in EV AEB mode Self-timer Bulb exposure Date imprint Anti-red-eye mode Slow sync Flash OFF Flash ON Frame counter Manual focusing Backlight compensation Battery status... -
Page 9: Viewfinder Frame
VIEWFINDER FRAME The viewfinder This is your guide to what will be recorded on film. 1 Autofocus frame The camera will automatically focus on the subject detail covered by this frame. 2 Parallax marks These mark the upper and left frame lines of your picture at distances between 0.4 m and 0.9 m. -
Page 10: Loading The Battery
LOADING THE BATTERY Loading the battery Your camera is designed for use of a type CR2 or CR2/ DL 3V lithium battery with an average capacity of around 360 exposures. Please do NOT load any film as long as there is no battery in the camera. -
Page 11: Testing The Battery
TESTING THE BATTERY Battery notes › Should the battery fail during rewinding, load a new one and repeat rewinding by pressing button (21). In this case, it is possible that a figure will be blinking in the frame counter instead of “E” after rewinding. However, you may open the camera back as soon as the figure in the frame counter starts blinking. -
Page 12: Preparing Your Camera For Shooting
PREPARING YOUR CAMERA FOR SHOOTING Attaching the wrist strap › Thread the thin end of the strap through the camera’s strap lug and pull the long end through the loop. Loading film Your camera has been designed for the use of DX- coded 35mm film (size 135). -
Page 13: Loading Film
LOADING FILM › Push the camera-back release as shown, and open the back. › A battery must be loaded BEFORE you load a film. › Be sure NOT to open the camera back as long as there is a film in the camera that has not been rewound. -
Page 14: Removing The Film
REMOVING THE FILM/MID-ROLL REWIND Removing the film After the last frame, the camera will rewind the film automatically. The frame counter then reads “E” (for “empty”). › Before opening the camera back, make sure that there is no more rewinding sound and that the frame counter reads “E”. -
Page 15: Switching The Camera On/Off
SWITCHING THE CAMERA ON/OFF Switching the camera on › Turn the main dial to “P”. The lens cover will open. › If you do not use any of the camera’s functions for five minutes, it will switch off automatically. To switch it on again, simply press the shutter release halfway. -
Page 16: Holding The Camera
HOLDING THE CAMERA Holding your camera properly › Grasp your camera firmly with both hands to avoid camera shake. › If possible, brace your elbows against your body. › Keep the camera close to your eye so you can see the entire viewfinder frame. -
Page 17: Shooting On Full Auto
SHOOTING ON FULL AUTO/PURPOSE OF VIEWFINDER LEDS Shooting on full auto › Your picture will be focused automatically (AF). › Exposure will be controlled automatically. › Flash will likewise be controlled automatically. In other words, the camera will do all the “work”, leaving you to frame your subject and press the shutter release. -
Page 18: When Autofocus Might Fail
WHEN AUTOFOCUS MIGHT FAIL/RELEASING THE SHUTTER When autofocus might fail The autofocus system has its natural limits, and in some cases it may be advisable to use focus lock (see p. 19). Alternatively, you may focus manually (see p. 35). Difficult subjects for autofocus are, among others, the following: ›... -
Page 19: Focus Lock
FOCUS LOCK Focus lock In the left-hand photo above, the AF area is on the background. As a result, the camera would focus on the latter. › To do better, sight one of the persons with the AF area. › With the camera in this position, press the shutter release halfway. -
Page 20: Depth Of Field
DEPTH OF FIELD What is depth of field? › Any optical system can actually focus on only one distance. However, the size of the lens aperture (f- stop) has a decisive effect on the depth range which the eye will still accept as “sharp”. The following optical laws apply: ›... -
Page 21: Aperture-Priority Ae
APERTURE-PRIORITY AE Aperture-Priority AE If you select the aperture, the camera will automatically set a suitable shutter speed for appropriate exposure. Which aperture you select will have the following effect on your pictures: Choosing a larger aperture (smaller f-number) Depth of field will be shallow. In other words, details in front of and behind the plane of best focus will be increasingly blurred –... -
Page 22: Purpose Of Viewfinder Leds
PURPOSE OF VIEWFINDER LEDS IN PROGRAMMED AND APERTURE-PRIORITY AE Purpose of viewfinder LEDs (with shutter release pressed halfway) Display Information Green Focus has been set focus indicator blinking Subject too close Automatic focusing impossible Use focus lock or focus manually (see pages 19 and 25) Red warning lamp blinking Programmed AE... - Page 23 PURPOSE OF VIEWFINDER LEDS IN PROGRAMMED AND APERTURE-PRIORITY AE MODES › The red warning LED will also blink in cases other than those described above if a shutter speed slower than 1/45 s will be used with the flash switched off or in the slow-sync (night-flash) mode. In this case, mount your camera on a tripod to avoid camera shake.
-
Page 24: Flash Range
FLASH RANGE Flash range Flash range varies as a function of film speed and – in aperture-priority AE – of the f-stop selected. The following ranges apply to programmed AE: ISO film speed Flash range 50/18 0.4 – 3.0 m 100/21 0.4 –... -
Page 25: Flash Modes
SELECTING A FLASH MODE / AUTOFLASH Choosing a flash mode The camera has seven flash modes that cover a wide range of applications. To choose a flash mode, press the flash button. › The flash mode selected will stay active even after an exposure and will be canceled only when the camera is switched off. -
Page 26: Red-Eye Reduction
RED-EYE REDUCTION The phenomenon of red eyes In low light, the pupils of people and animals tend to dilate. The flash entering the eye through the wide pupils strikes the (red) retina which thus stands out in your pictures. To reduce this phenomenon as far as possible, the camera will fire four preflashes. -
Page 27: Flash Off
FLASH OFF/FILL FLASH Flash OFF For available-light photography or shooting at distances beyond the flash range – for example, in a theater or stadium – switch the flash off. However, this will result in relatively slow shutter speeds carrying the risk of camera shake. -
Page 28: Backlight Compensation
BACKLIGHT COMPENSATION Backlight compensation This mode avoids underexposure of your main subject in strong backlight. It is intended for subjects that are too far away for flash. The camera will automatically compensate exposure by +2 EV. › To activate backlight compensation, press button (7), until the corresponding icon is displayed. -
Page 29: Slow Sync (Night Flash)
SLOW SYNC (NIGHT FLASH) Slow sync This is a combination of flash to light your foreground and a slower shutter speed to coax out atmospheric illumination in the background of night or dusk shots. › To activate this mode, press button (7) until the corresponding icon is displayed. -
Page 30: Self-Timer
SELF-TIMER Self-timer › To activate the self-timer, press button (9) until the corresponding icon is displayed. › Place the AF area over your main subject and frame your picture, if necessary locking focus (see p. 19). Both the focus and the exposure setting will be locked in as you press the shutter release halfway. -
Page 31: Bulb Exposures
BULB EXPOSURES/CHOOSING THE EXPOSURE TIME Bulb exposures In this mode, the shutter will stay open for as long as you keep the shutter release depressed. It is thus ideal for night photography or fireworks. The flash is normally disabled in the bulb mode, but autoflash and red-eye reduction can be activated via button (7). -
Page 32: Automatic Exposure Bracketing (Aeb)/ Exposure Compensation
AUTOMATIC EXPOSURE BRACKETING (AEB)/EXPOSURE COMPENSATION Automatic exposure bracketing (AEB)/ Exposure compensation In this mode, the camera will take three successive pictures with different exposure: as metered, underexposed and overexposed. Exposure compen- sation may be limited to one or two shots. Exposure bracketing is particularly useful with slide film and in difficult lighting situations. -
Page 33: Exposure Bracketing
EXPOSURE BRACKETING › To activate the AEB mode, press button (8). › The mode and the compensation selected will appear on the LCD panel. › The flash will be disabled automatically because it is incompatible with this mode. › Press the shutter release halfway. AEB will light up in the viewfinder to confirm your setting. - Page 34 EXPOSURE BRACKETING Exposure compensation with one or two shots › Press button (8) until the desired compensation (e.g. 0.5 or 1.0) is displayed. Hold the button down and select the desired combination by pressing the flash button (7). Release button (8) as soon as this combination is displayed.
-
Page 35: Retaining Your Bracketing Amount
RETAINING YOUR BRACKETING AMOUNG/MANUAL FOCUSING Retaining the bracketing amount selected Repeated series with the same bracketing amount are possible if the exposure compensation is set in the following manner: › Press button (8) until the bracketing amount ( 0.5 or 1.0) is displayed. -
Page 36: Selecting The Date Format
SELECTING THE DATE FORMAT Selecting the date format The date (Year-Month-Day/Hour-Minute) is imprinted in the lower right-hand corner of the horizontal frame. Please keep in mind that a bright background might cover up the date. Y: Year M: Month D: Day T: Hour Switch the camera on and select the desired date format by pressing the SEL button. -
Page 37: Setting The Date
SETTING THE DATE Setting the date (Year-Month-Day/Hour-Minute) › Your camera allows the date or the hour to be imprinted in your pictures. › To set the date, switch the camera on, then hold the SEL button down for at least two seconds until the date display starts blinking. -
Page 38: Camera Care And Storage
CAMERA CARE AND STORAGE Camera care Your camera is a precision instrument and merits proper care. 1. Cleaning the camera body › Be sure never to use organic solvents, such as thinner or alcohol, for cleaning. › Use a soft, fluffless cloth to clean the camera body. ›... - Page 39 CAMERA CARE AND STORAGE 4. Batteries › The output of any battery will drop at low temperatures. However, it will return to normal at room temperature. Always use fresh batteries when shooting at low temperatures. Keep spare batteries warm in an inside pocket of your clothing and periodically exchange them for the one in the camera.
-
Page 40: Troubleshooting
TROUBLESHOOTING Problem Possible cause Shutter cannot be released. Battery icon blinking. Camera switched off. Is “0” blinking in frame counter? “E” displayed in frame counter. Is self-timer counting down? AEB blinking on LCD panel? Frame counter does No battery loaded. not read “1”... - Page 41 TROUBLESHOOTING Problem Possible cause Picture blurred. Did you obstruct AF windows with your fingers? Are you sure the AF area was on your main subject? Is the front lens dirty? Did you shake the camera during exposure? Did you use manual focusing and set the proper distance? Did you overlook blinking of the green focus indicator?
- Page 42 TROUBLESHOOTING Problem Possible cause Pictures too dark. Did you overlook red warning lamp during exposure? Subject too far away for flash. Did you obstruct flash reflector with your finger? Was your subject standing in front of or beside a window? Pictures too light.
-
Page 43: Specifications
SPECIFICATIONS Camera type: Fully automatic 35mm camera; nega- tive size 24 mm x 36 mm on size 135 film Lens: S-Apogon 38 mm f/2.6 HFT (four elements in three components); field of view: 59.3 Shutter: Programmed electronic shutter (for programmed and aperture-priority AE) Shutter-speed range: B (with settings from 1 s to 60 s), 1/2 s –... - Page 44 SPECIFICATIONS Flash unit: – Built-in electronic flash unit – Recycling time approx. 4 s – Guide number 11 (ISO 100/21 ) – Autoflash – Red-eye reduction – Fill flash – Flash OFF – Slow sync – Slow sync with red-eye reduction LCD panel: - Frame counter - Flash mode...
-
Page 45: Ae Program Diagram
AE PROGRAM DIAGRAM AE program diagram * The flash will fire regardless of film speed as soon as shutter speed is slower than 1/45 s. Example: ISO 100/21 film, subject brightness less than EV 9.5. 1000 (1/T) -
Page 46: Aperture-Priority Ae Diagram
APERTURE-PRIORITY AE DIAGRAM Aperture-priority AE diagram * The flash will fire regardless of film speed as soon as shutter speed is slower than 1/45 s. 1/290 1/400 1/550 Example: ISO 100/21 film, subject brightness less than EV 9.5. 1/650 1/850 1/1000 1000 (1/T) -
Page 47: Lens Cross Section
LENS CROSS SECTION... - Page 48 MTF DIAGRAM F 2.6 5.00 10.00 15.00 18.00 20.00 20 LP/MM (sagittal) 20 LP/MM (tangential) 25.00...
- Page 49 MTF DIAGRAM F 8 5.00 10.00 15.00 18.00 20.00 20 LP/MM (sagittal) 20 LP/MM (tangential) 25.00...
-
Page 50: Depth-Of-Field Table
DEPTH-OF-FIELD TABLE 0.4 m 0.7 m 1.0 m 1.5 m 2.0 m F 2.6 0.39~0.41 0.68~0.73 0.95~1.06 1.39~1.64 1.80~2.25 0.39~0.41 0.67~0.74 0.93~1.09 1.33~1.72 1.71~2.42 F 5.6 0.39~0.42 0.65~0.76 0.90~1.13 1.28~1.83 1.61~2.64 0.38~0.42 0.63~0.79 0.86~1.19 1.20~2.01 1.49~3.06 F 11 0.37~0.43 0.61~0.82 0.82~1.29 1.12~2.31 1.36~3.83... - Page 51 NOTES...
- Page 52 Rollei Fototechnic GmbH P.O. Box 3245 D-38022 Braunschweig www.rollei.de Germany 80214.75.901 • AFM 35 PA / HPS / 08-01 •...
Need help?
Do you have a question about the AFM 35 and is the answer not in the manual?
Questions and answers