Advertisement
How to activate the Fridge-tag®
You receive the device in "sleep mode". The LCD screen is blank. To activate the device press the SET and the READ buttons simultaneously for more than 2 sec. Four zeros will appear on the screen. The first zero will flash.

Setting the time
Use the READ button to adjust the time. Each time you press the READ button, the number in the flashing digit will increase by 1. For example, if you want to set the time to 13:47 you have to perform the following steps:
- The first digit is flashing: Press READ once. "1" will appear as the first digit. Press SET to save.
- The second digit will start flashing. Press READ three times, when "3" appears as the second digit press SET to save.
- The third digit will start flashing. Press READ four times to set the digit as "4". Press SET to save.
- The last digit will start flashing. Press READ seven times to obtain "7". Press SET to save.
If you press READ more than necessary continue pressing the READ button until you obtain the desired number, then press SET button to save your settings.

Setting the temperature measurement unit
After finishing the time setting, the "°C" sign will appear at the right bottom corner. If you would like to record and read temperatures in Centigrade, press SET. This will complete your activation. The device starts recording. If you want to record in Fahrenheit, press READ once and the "°F" sign will appear, then press SET to complete the activation. Once the device is fully activated, the "OK" sign and current temperature reading will appear on the screen.

Changing the time setting
If you made a mistake or wish to change the time setting, it can be readjusted. The number of possible time adjustments during a day is unlimited. But after any time adjustment and the next midnight date shift, the adjustment mode is locked for 24 hours following the midnight date shift. This is for security reasons. Thus, a new setting is possible only after the 2nd date shift again.
To adjust the time after the device has been activated, you need to press and hold the SET button and then press the READ button shortly. Then you need to repeat the steps as described in "Setting the time". Additional time adjustments have no effect on the recording. Once the device is activated, it cannot be stopped. Adjustments can only be made for time setting and for changing the temperature measurement unit.
Violations
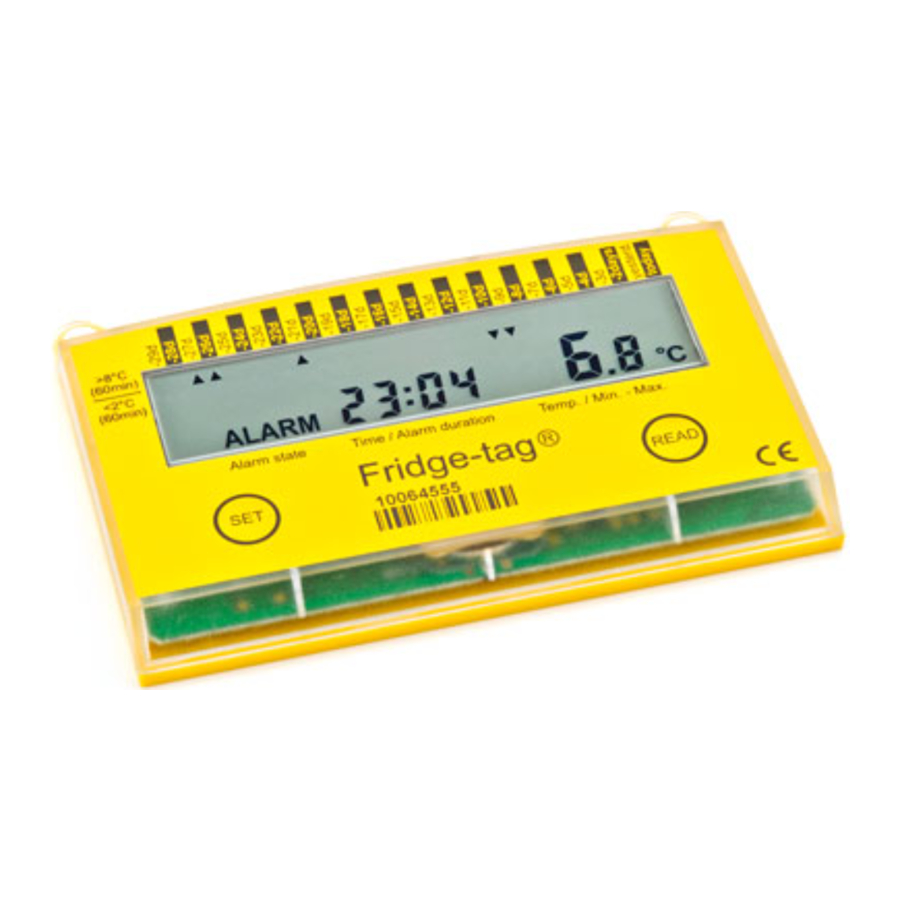
The Fridge-tag® has two temperature/time limits to indicate a high and a low alarm. When a temperature/time violation occurs, the "OK" sign on the screen will be replaced by the "ALARM" sign.
As an example, the high alarm shall be set at >8°C for more than 60 minutes. The high alarm will then appear if the device is exposed to temperatures above 8°C for more than 60 consecutive minutes. The low alarm will appear if the device is exposed to temperatures below 2°C for 60 consecutive minutes. If the continuous exposure is less than the time limit, an alarm will NOT be triggered. For example, if the device is exposed to temperatures >8°C for 50 minutes, then the temperature returns to an acceptable range for 2 hours and then the temperature returns to >8°C for another 50 minutes, this will NOT trigger an alarm since the time required for a high alarm has not been reached in one go. However, the cumulative exposure can always be seen in the history mode even if there has not been an alarm (see below).
How to read the history
The Fridge-tag® continuously records the temperatures and indicates with the "ALARM" sign on the screen if any violation of the temperature/time limits has occurred. This information can always be viewed for the past 30 days.
When there was no alarm (no violation of set temperature/time limits), the "OK" sign on the screen continues to be seen. Even when the "OK" sign is on, the highest and lowest temperatures reached during the last 30 days can be seen. The time duration of the temperature exposures can also be seen.
Pressing READ once displays the highest temperature reached and the cumulative time duration (hrs: min) that the temperature was above the given upper limit for the current day ("today"). During this operation a high or low arrow flash indicates the high and low temperature setting and the day it corresponds to.

Pressing READ a second time displays the lowest temperature reached and the cumulative time duration that the temperature was below the given lower limit for the current day. ("today")

If you continue pressing READ the details of older days such as "yesterd.", "-2 days", "-3d" and so on for the previous 30 days can be viewed.
If the temperature/time limits are violated the OK sign disappears and ALARM sign appears. Without using the history mode, the day the alarm occurred and type of alarm can also be seen on the screen.
The below example indicates three alarms on the days "yesterd". (high alarm), "-2days" (high alarm) and "-5d" (low alarm).

As previously explained you have to press READ button to have access to the information of highest and lowest temperature recorded and the period of the exposure above and/or below the set temperature limits. The example below shows 12 hours and 15 minutes exposure to temperatures above the upper limit on the day "-2days", and 25.0°C as the highest temperature recorded.

The example below shows 2 hours and 45 minutes exposure to temperatures below the lower limit on the day "-5d", and -5.7°C as the lowest temperature recorded.

Read out mode
In order to avoid incorrect data, the Fridge-tag® does not collect any readings while in the Read out mode. Fridge-tag® will fall back into normal operation after 30 seconds without pressing any buttons.
Time adjustment
The number of possible time adjustments during a day is unlimited. But after any adjustment and the next midnight date shift the adjustment mode is locked for 24hrs. This is for security reasons. Thus, a new setting is possible only after the 2nd date shift again.
Liability
The manufacturer shall not be held liable:
- If the device was used beyond the manufacturer's given limitations.
- For any claims due to the improper storage and use of the device.
- For any problems with the cooling unit.
- For the bad quality of the monitored goods, if any.
- For incorrect readings if the device was used with activated low battery sign.
Battery
The Fridge-tag® does contain a CR Lithium battery, therefore please:
- Dispose or recycle the battery in accordance to your local regulations.
- Do not expose the device to extreme temperatures as it may lead to the destruction of the battery and may cause injuries.
- Keep out of reach of children.
- The end of the battery life is indicated by a low battery sign. Make sure to replace the device within 30 days when the low battery sign appears.
Useful life
The operational life time of the unit is approx. 2 years after activation on the condition that:
- The device was not stored for over 1⁄2 year prior to activation.
- The read out mode is not excessively used e.g. several times a day.
- Storing & operating of the device remains inside the recommen dations of the manufacturer, especially very low temperatures shall be avoided.
Attention: The Fridge-tag® monitors temperature exposure and not the product quality. Its purpose is to signal if product quality evaluation/testing is required.
Documents / ResourcesDownload manual
Here you can download full pdf version of manual, it may contain additional safety instructions, warranty information, FCC rules, etc.
Download Berlinger Fridge tag - Temperature Data Logger Manual
Advertisement


Need help?
Do you have a question about the Fridge tag and is the answer not in the manual?
Questions and answers