Table of Contents
Advertisement
Owner's Manual
Thank you for purchasing the Roland GK-2A divided pickup.
Before using this unit, carefully read the sections entitled:
• USING THE UNIT SAFELY (page 2–3)
• IMPORTANT NOTES (page 7)
These sections provide important information concerning the proper
operation of the unit.
Additionally, in order to feel assured that you have gained a good grasp of
every feature provided by your new unit, Owner's manual should be read in
its entirety. The manual should be saved and kept on hand as a convenient
reference.
Copyright © 2000 Roland CORPORATION
All rights reserved. No part of this publication may be reproduced in any form
without the written permission of Roland CORPORATION.
GUITAR
MIX
SYNTH
Advertisement
Table of Contents

Related Manuals for Roland GK-2A


Summary of Contents for Roland GK-2A
- Page 1 Owner’s Manual Thank you for purchasing the Roland GK-2A divided pickup. Before using this unit, carefully read the sections entitled: • USING THE UNIT SAFELY (page 2–3) • IMPORTANT NOTES (page 7) These sections provide important information concerning the proper operation of the unit.
-
Page 2: Using The Unit Safely
Refer all servicing to your retailer, the nearest Roland Service Center, or an autho- rized Roland distributor, as listed on the "Information" page. • Never use or store the unit in places that are: •... - Page 3 • Protect the unit from strong impact. (Do not drop it!) • Try to prevent cords and cables from becoming entangled. Also, all cords and cables should be placed so they are out of the reach of children. • Never climb on top of, nor place heavy objects on the unit.
-
Page 4: Table Of Contents
Roland Service Center if repairs become necessary. Roland cannot be responsible for any damage caused to your guitar or the GK-2A as a result of your attempt to install or remove the GK-2A. If you are not confident with your ability to... -
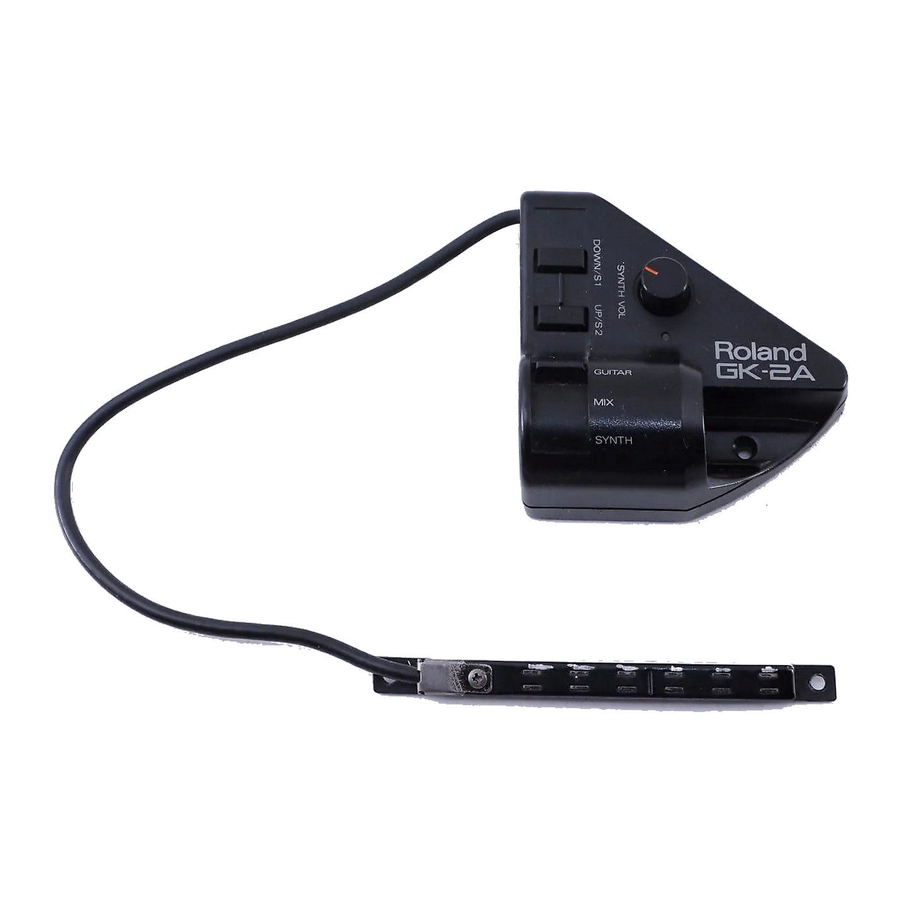
Page 5: Panel Descriptions
(8) S2 Switch (7) S1 Switch Controller (3) Power Indicator This indicator lights when the [GR] and GK-2A are connected using the C-13A/B cable. (4)Normal Guitar Input Jack Normal output signals from an electric guitar are fed into the Controller Unit via this jack. - Page 6 PANEL DESCRIPTIONS (6) Select Switch The functions provided by the Select switches will differ depending on the [GR] model you are using. Please refer to the owner’s manual for your [GR]. (7) S1 Switch (8) S2 Switch The functions provided by the S1/S2 switches will differ depending on the [GR] model you are using.
-
Page 7: Sensitivity Adjustment
IMPORTANT NOTES Sensitivity Adjustment • To properly drive the [GR] with the GK-2A, you must adjust the height of the Divided Pickup and the sensitivity of the [GR]. These adjustments are very important if you want to take full advantage of the [GR]’s superior tracking ability. - Page 8 IMPORTANT NOTES Divided Pickup • To avoid damage, be sure there is no unnecessary strain on the cable that connects the Pickup and the Controller. • Never bend, twist or otherwise place undue pressure on the Pickup. Be especially careful when removing it.
-
Page 9: Power Supply
291a In addition to the items listed under “USING THE UNIT SAFELY” on page 2–3, please read and observe the following: Power Supply • Before connecting this unit to other devices, turn off the power to all units. This will help prevent malfunctions and/or damage to speakers or other devices. -
Page 10: Installation
INSTALLATION Before installing the GK-2A , read the following “INSTALLATION NOTES.” INSTALLATION NOTES • Even when properly installed, the GK-2A will not work with 12-string guitars, guitars with unusual or customized string setups, nylon-string guitars, gut-string guitars, or bass guitars. -
Page 11: Supplied Parts
Check that you have all of the supplied parts: fig.05 Tapping Flat A13 x 16 mm x 1 (for installing the Contoroller) Tapping Pan A13 x 20 mm (for installing the Divided Pickup) Spring (for installing the Divided Pickup) LP spacer x 6 (for installing the Contoroller) -
Page 12: Attaching The Pickup Controller Unit
Holder A 2. Loose the guitar end pin. and insert the Holder “A.” fig.10-2 3. Attach the Holder “B.” fig.10-3 GK-2A 4. Tighten the Holder “A”and “B” with Wing Nut, Spring Washer,Washer. Wing nut Holder B Washer Spring Washer... -
Page 13: Attaching The Divided Pickup With Double-Sided Tape/Screws
This will help prevent damage to cables and connectors should the guitar bump against something. 2. Use the GK-2A as a template to mark the anchor point on the guitar. Then very carefully drill a hole into the guitar on the mark. -
Page 14: Attaching The Divided Pickup
The Divided Pickup can be attached to your guitar using double–sided tape or screws. Attaching the Divided Pickup with screws requires a little more skill (and care), but it will allow you to easily adjust the height of the Divided Pickup later. - Page 15 Play the guitar (especially in the upper range) to be sure the strings do not touch the Pickup Spacer Pickup. 7. If the Divided Pickup is too high or too Pickup Cushion low... (1) Remove the strings from the guitar.
- Page 16 (7) Put the strings back on the guitar and tune them properly. Again check the height of the Divided Pickup. * Afterwards, you will need to adjust the Pickup sensitivity on the [GR]. If the signal level from the Divided Pickup is too high, lower the Pickup slightly.
-
Page 17: Attaching The Divided Pickup With Screws
“a. Attaching the Divided Pickup with double–sided tape”. Refer to that section before proceeding. * When attaching the Divided Pickup with screws, you need a 13 mm space between the body of the guitar and the strings. -
Page 18: Operation
1. Make sure that the [GR] is switched off. Then connect the [GR] to the GK-2A using the C-13A/B cable. fig. 15... - Page 19 The Power indicator on the Controller will light and you’re ready to go. * The Power Indicator will not light unless... (1) the GK-2A is connected to the [GR] using the C-13A/B and (2) the [GR] is switched on. OPERATION...
-
Page 20: Divided Pickup
SPECIFICATIONS GK-2A: Divided Pickup SYNTH VOL Control x 1 DOWN/S1 Switch x 1 UP/S2 Switch x 1 Select Switch x 1 GK-2 Connector (13 pin type) Normal Guitar Input Jack Power Indicator Divided Pickup Weight: Accessories: Standard Guitar Cable x 1... - Page 21 Information When you need repair service, call your nearest Roland Service Center or authorized Roland distributor in your country as shown below. SINGAPORE AFRICA AFRICA Swee Lee Company 150 Sims Drive, EGYPT SINGAPORE 387381 TEL: 846-3676 Al Fanny Trading Office P.O.
Need help?
Do you have a question about the GK-2A and is the answer not in the manual?
Questions and answers