Table of Contents
Advertisement
Quick Links
Advertisement
Table of Contents

Related Manuals for Miele PDW 909 GB


Summary of Contents for Miele PDW 909 GB
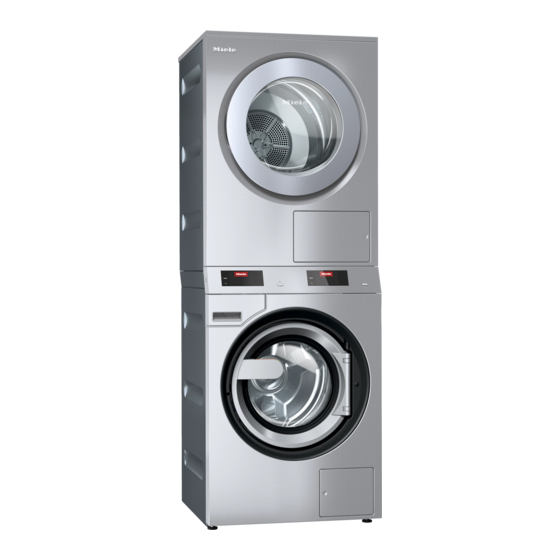
- Page 1 Operating and installation instructions Commercial washer-dryer stack PDW 909 GB Always read the operating instructions before en-GB setting up, installing and commissioning the ma- chine. This prevents both personal injury and damage to the machine. M.-Nr. 12 380 090...
-
Page 2: Table Of Contents
Contents Caring for the environment .................... Disposing of your old machine..................Warnings and safety notes ..................... Explanation of the safety notes and warnings on the machine......... Appropriate use ......................... 10 Foreseeable misuse......................12 Technical safety......................... 13 Correct use........................16 Chlorine and component damage..................19 Accessories ........................ - Page 3 Contents Special features in the programme sequence..............42 Spinning ........................42 Anti-crease ........................42 Skip ..........................43 Manual control ......................43 Drying ..........................47 1. Notes on correct laundry care..................47 Washing before drying ....................47 Removing foreign objects ..................... 47 Care symbols ........................
- Page 4 Contents Opening the door in the event of a blocked drain outlet and/or power cut ...... 67 Cleaning and care ......................69 Build-up of rust........................69 Cleaning the detergent drawer, detergent compartments and siphons......70 Cleaning the water inlet filters ................... 72 Cleaning the fluff filter .......................
- Page 5 Contents Operation/display ......................106 Language ........................106 Language access ......................106 Set languages ....................... 106 Display brightness......................106 Time ..........................107 Date..........................107 Volume .......................... 107 Visibility parameters ...................... 107 Appliance off status ...................... 107 Delay start ........................107 Memory ......................... 108 Manual control ......................
- Page 6 Additional fan ........................ 125 Pressure sensor ......................125 Peak load signal ......................125 Peak load prevention ....................125 COM module selection ....................126 Availability of Miele digital products................126 WiFi / LAN ........................126 Network time......................... 126 Remote.......................... 127 Remote update ......................127 SmartGrid........................
- Page 7 Contents Technical data........................130 PDW 909 machine data..................... 130 Electrical connection..................... 130 Installation dimensions....................130 Weight and floor load ....................130 Plumbing ........................130 Air intake ........................131 Vented system....................... 131 Emission values ......................131 Product safety ....................... 131 WiFi ..........................131 UK declaration of conformity ....................
-
Page 8: Caring For The Environment
Caring for the environment Disposal of the packing material The packaging is designed to protect the appliance from damage during transportation. The packaging materials used are selected from materials which are environmentally friendly for disposal and should be recycled. Recycling the packaging reduces the use of raw materials in the man- ufacturing process and also reduces the amount of waste in landfill sites. -
Page 9: Warnings And Safety Notes
Miele cannot be held liable for injury or damage caused by non- compliance with these instructions. Keep these operating instructions in a safe place and pass them on to any future owner. -
Page 10: Appropriate Use
If using, do so at your own risk, and follow the instruc- tions provided on the packaging. Any other applications may be dan- gerous. Miele cannot be held liable for damage resulting from incor- rect or improper use or operation. - Page 11 Warnings and safety notes Always supervise any children in the vicinity of the washer-dryer stack. Never allow children to play with the washer-dryer stack. Disinfection programmes must not be interrupted, as this can have a limiting effect on the disinfection result. It is the operator’s respons- ibility to ensure that the standard of disinfection in thermal as well as chemo-thermal procedures is maintained by carrying out suitable val- idation tests.
-
Page 12: Foreseeable Misuse
Warnings and safety notes Foreseeable misuse Never use solvent-based cleaning agents, e.g. those containing benzine, in the washer-dryer stack. Doing so may result in damage to component parts and create toxic steam and fumes. Risk of fire and explosion! ... -
Page 13: Technical Safety
Faulty components must only be replaced by genuine Miele spare parts. Miele can only guarantee the safety standards of the machine when Miele spare parts are used. All relevant national provisions and regulations (DGUV in Germany) relating to accident insurance are applicable to this washer-dryer stack. - Page 14 Warnings and safety notes Please observe the instructions in “Installation and connection” and “Technical data”. The plugs for the washer-dryer stack must always be kept access- ible so that the washer-dryer stack can be easily disconnected from the power supply. ...
- Page 15 Warnings and safety notes If multiple tumble dryers are to be connected to one vent ducting, a non-return flap must be installed directly on the duct for each tumble dryer. If this requirement is not observed, the tumble dryers may be dam- aged and their electrical safety could be affected.
-
Page 16: Correct Use
If, however, you do wish to de- scale your washing machine, only use proprietary non-corrosive de- scaling agents. Special descaling agent is available from your Miele dealer or from the Miele Customer Service Department. Strictly ob- serve the instructions for the descaler. - Page 17 Warnings and safety notes Do not store chemicals (liquid detergents, additives) on the ma- chine lid. They may cause discolouration or lacquer damage. Acci- dently spilled chemicals should be removed from the surface immedi- ately with a wet cloth. ...
- Page 18 (e.g. a timer or a peak-load switch-off device). The tumble dryer may only be operated with a peak-load device if this is connected to the tumble dryer via the Miele XCI box and the relev- ant settings have been configured on the tumble dryer.
-
Page 19: Chlorine And Component Damage
Warnings and safety notes Chlorine and component damage Frequent use of chlorine products increases the risk of damage to components. The use of substances containing chlorine, such as sodium hypo- chlorite and chlorine bleach in powder form, can result in damage to the protective layer of stainless steel and corrosion on components. -
Page 20: Accessories
Warnings and safety notes Accessories Accessory parts may only be fitted when expressly approved by Miele. If other parts are used, warranty, performance and/or product liability claims will be invalidated. Disposing of your Ensure that the door locks are unusable when disposing of or old machine scrapping old washer-dryer stacks. -
Page 21: Description Of The Machine
Description of the machine Description of the machine ⑧⑨ ⑦ ⑯ ⑥ ⑯ ⑩ ⑪ ⑯ ⑤ ⑫ ⑱ ④ ⑰ ⑬ ⑭ ③ ② ⑮ ⑮ ① ⑯... - Page 22 Description of the machine Access flap to drain filter and drain pump Washing machine drum door Door handle Detergent drawer Display (further information can be found in the “Operation” section) Fluff filter flap Tumble dryer drum door Tumble dryer electrical connection Interface for communication box Exhaust duct Ø 100 mm Hot water connection...
-
Page 23: Operation
Operation Control panel ① ② ③ ④ ⑤ ⑥ ⑦ ⑧ ⑨ ⑩ ⑪ ⑫ Tumble dryer language sensor con- Washing machine language sensor trol control For selecting the current user language. For selecting the current user language. The supervisor language is displayed The supervisor language is displayed again at the end of the programme. -
Page 24: Sensor Controls And Touch Display
Operation Sensor controls and touch display The sensor controls , and Start/Stop and the elements in the display respond to finger tip contact. Every touch of a sensor control is confirmed with an audible keypad tone. You can adjust the volume of the keypad tone or switch it off (see “Supervisor level”). -
Page 25: Main Menu
Operation Main menu After switching on the tumble dryer, the main menu will appear in the display. You can access all the important submenus from the main menu. Touch the sensor control at any time to return to the main menu. ... - Page 26 Operation 11:02 Overview 9,0/9,9 kg 1300 Whites °C Extras 0:56 h Timer Details Extras 11:02 Pre-wash Rinse plus Soak Rinse hold Touch one or several Extras to select it/them. Currently selected Extras are marked orange. To deselect an Extra, simply touch the Extra again.
- Page 27 Operation Setting numerical You can set numerical values in some menus. values The following example shows how to set the time of day. The “Su- pervisor level” section describes how to get to this level. Time 12 00 Enter the numbers by swiping up or down.
-
Page 28: Operating A Launderette Machine
Operation Pull-down menu The following example describes the display for an ongoing wash programme. The “Programme start – programme end” section de- scribes how to get to this level. Status 11:02 2:27 Time left Whites Washing and heating If an orange bar appears at the top of the screen in the middle of the display, you can open the pull-down menu. - Page 29 Operation Up to 12 pre-set programmes are available. The first 3 programmes can be selected directly. The remaining programmes are selected from a list . These programmes cannot be changed by the user.
-
Page 30: Washing
Washing Preparing for use Emptying pockets Empty all pockets. Damage due to foreign objects. Nails, coins, paper clips, etc. can cause damage to garments and components inside the machine. Check laundry before washing and remove any foreign objects. Sorting laundry Sort the laundry according to colour and the garment care label. - Page 31 Washing Loading the Prepare the washing machine. washing machine Switch on the washing machine with the button. The welcome screen will light up. Open the drum door with the handle. Unfold the laundry and load loosely into the drum. ...
- Page 32 Washing Make sure that no items are caught between the drum door and the opening. Close the drum door by pressing it until the pre-latch engages. The drum door engages, but is not locked yet. The drum door locks automatically as soon as the machine starts.
-
Page 33: Washing With Detergent Drawer
Washing Washing with detergent drawer Adding detergent using the deter- gent drawer For the standard programmes, add powder detergent to the drawer for the main wash. If desired, add detergent for a pre- wash to the drawer. Add fabric conditioner to the front of the drawer. -
Page 34: Detergent Dispensing
Washing Detergent dis- pensing Detergent dispens- Avoid dispensing more than the required amount as this can cause excessive foaming. - Only use low foaming detergents. - Dispense according to the detergent manufacturer’s recommenda- tions. The dispensing amount will depend on: - The amount of laundry - The water hardness - How dirty the laundry is... -
Page 35: Selecting A Programme
Washing Selecting a programme Programmes There are different ways to select a programme. 11:02 Programmes Favourites Supervisor Programmes You can select a programme from the menu. Programmes Touch the selection area. Programmes 11:02 ... -
Page 36: Selecting Programme Settings
Washing The display will change to the standard menu for that wash pro- gramme. In the case of favourite programmes, the majority of the programme settings are already fixed and cannot be changed. Selecting programme settings Selecting the load To enable load-specific external dispensing and an adapted pro- size gramme sequence, you can specify the load size for some pro- grammes. - Page 37 Washing Selecting a tem- You can alter the pre-set temperature of a wash programme. perature Temperature (°C) Touch the selection area. 11:02 Overview 9,0/9,9 kg 1300 Whites °C Extras 0:56 h Timer Details 11:02 Temperature in °C Finer adjustment Select the desired temperature from the presets.
- Page 38 Washing Selecting a spin You can alter the pre-set spin speed of a wash programme. speed Spin speed (rpm) Touch the selection area. 11:02 Overview 9,0/9,9 kg 1300 Whites °C Extras 0:56 h Timer Details ...
-
Page 39: Selecting Extras
Washing Selecting Extras Selecting Extras You can select Extras for some wash programmes. Extras Touch the selection area. 11:02 Overview 9,0/9,9 kg 1300 Whites °C Extras 0:56 h Timer Details Extras 11:02 Pre-wash Rinse plus ... -
Page 40: Programme Start - Programme End
Washing Programme start – programme end Starting a pro- The programme can be started as soon as the Start/Stop sensor con- gramme trol is flashing on and off. Touch the Start/Stop sensor control. The door will lock ( symbol) and the wash programme will start. ... -
Page 41: Timer
Washing Items left in the drum could discolour other items in the next wash or become discoloured themselves. Remove all items from the drum. Check the door sealing ring for any foreign objects. Switch the washing machine off with the button. ... -
Page 42: Special Features In The Programme Sequence
Washing After the programme has started, the selected delay start period can only be changed or cancelled by interrupting the programme. The programme can be started immediately at any time. Start immediately Touch the selection area. Special features in the programme sequence Spinning Final spin speed When a programme is selected, the maximum spin speed for this... -
Page 43: Skip
Washing Skip The Skip function enables users to skip forwards or backwards in the programme sequence. The programme sequence is continued from the selected step. If a programme is interrupted using the Start/Stop sensor control, the Skip function is available in the programme stop screen. ... - Page 44 Washing Confirm the password entry with the sensor control. Manual control menu is displayed: Manual control 11:02 Water intake Dispensing Washing and heating Unlock the door Exit The current level, spin speed and temperature statuses of the ma- chine appear orange.
- Page 45 Washing This function is only possible if the Connector Box, the dispensing pumps and automatic dispensing have been selected in the super- visor level, see “Supervisor level” section. Press the Dispensing function button. Select the desired dispensing pump and dispensing quantity, e.g. ...
- Page 46 Washing Water inlet Dispensing Washing and heat- Drainage Spinning with agitation * possible function combinations ...
-
Page 47: Drying
Drying 1. Notes on correct laundry care Washing before Heavily soiled laundry must be washed particularly thoroughly. Use drying sufficient detergent and select a high wash temperature. If in doubt, wash the items several times. The tumble dryer must not be used for drying items of laundry which have been cleaned using industrial chemicals. -
Page 48: Loading The Tumble Dryer
Drying 2. Loading the tumble dryer Loading laundry Textiles may be damaged. into the tumble Before loading, read chapter “1. Notes on correct laundry care” dryer first. Open the door. Load laundry into the tumble dryer. Risk of damage with laundry getting trapped. Laundry can be damaged by getting trapped when closing the door. -
Page 49: Selecting Programme Settings
Drying With your finger, swipe to the left until you reach the required pro- gramme. Touch the sensor control for that programme. The display will change to the standard menu for that drying pro- gramme. Alternatively, you can select a programme from the Favourites list. The preset programmes under ... - Page 50 Drying Extras 11:02 Gentle tumble Anti-crease Touch the sensor control for the extra you want. Only press when the extra appears on the display. The relevant symbol for the required extra ( or ) lights up. Low temperat- Delicate fabrics (with the symbol on the care label, e.g.
-
Page 51: Starting A Programme
Drying 5. Starting a programme Payment device If your machine is connected to a payment device, the amount of (optional) payment required will appear in the display. Money may be lost if the drum door is opened or the programme is cancelled. -
Page 52: End Of The Programme
Drying vary or “jump”. The tumble dryer’s electronic module adapts during the ongoing drying programme. The displayed programme running time becomes more and more accurate. When using the programmes for the first time, the displayed time sometimes deviates significantly from the real time left. The differ- ence between the estimated and achieved time becomes smaller if the corresponding programme is run more often. -
Page 53: Changing The Programme Sequence
Changing the programme sequence Washing machine Changing a pro- gramme Altering the wash You will need to cancel the current programme before you can select programme a new one. Cancelling a pro- You can cancel a wash programme at any time after it has started. gramme The payment programmes or the disinfection programmes can only be cancelled by entering a code. -
Page 54: Adding Or Removing Laundry
Changing the programme sequence Adding or remov- You can add or remove laundry items during the first few minutes ing laundry after the programme has started. Status 11:02 0:49 Time left Washing and heating Coloured items prog. info Add laundry Add laundry Touch the... -
Page 55: Tumble Dryer
Changing the programme sequence Tumble dryer Changing a pro- You cannot change to another programme once a programme has gramme once it started (this prevents unintentional alterations). You will need to can- has started cel the current programme before you can select a new one. ... -
Page 56: Time Left
Changing the programme sequence Close the door. Touch the Start/Stop sensor control so that the Delay start period continues. Time left Altering the programme sequence can cause the programme duration shown in the display to be adjusted. -
Page 57: Problem Solving Guide
Problem solving guide Troubleshooting Opening the door in an emergency in the event of a power failure The drum door cannot be opened. Warning! Danger from rotating drum and danger of scalding. Before inserting the Torx wrench, make sure that the machine is disconnected from the electricity supply, the drum has stopped and there is no water in the machine. -
Page 58: Customer Service Department
Please also pass on the fault message appearing in the machine display to the Customer Service Department. Use only original Miele spare parts. The Miele Customer Service Department will also re- quire the model, serial number (SN) and material number (mat. no.) when ordering. - Page 59 Problem solving guide Problem Cause and remedy The display is dark and the The display has switched off automatically to save energy. Start/Stop sensor control Touch any of the controls. The display switches back on. is flashing slowly. The programme is on the The drum door has been pushed to but is not closed cor- pre-start screen and the rectly.
-
Page 60: Programme Cancellation And Fault Message
Problem solving guide Programme cancellation and fault message Problem Cause and remedy F - Water drainage fault. If The drain is blocked or restricted. The drain hose has been restart fails, call Service. fixed too high. Clean the drain filter and the drain pump. ... -
Page 61: A Fault Message Appears In The Display
Check that the washing machine is level. Start the spin cycle again. Machine is leaking The washing machine or drain valve is leaking. Close the stopcock. Contact the Miele Customer Service Department. ... -
Page 62: Insufficient Wash Results
Problem solving guide Insufficient wash results Problem Cause and remedy Liquid detergent does not Liquid detergents usually contain no bleaching agents. give the required result. They do not remove fruit, coffee or tea stains. Use a general purpose powder detergent containing a ... -
Page 63: Insufficient Drying Results
Problem solving guide Insufficient drying results Problem Cause and remedy Adjust the load The drum This is not a fault. In some programmes, if the drum has is empty or the laundry is been underloaded or is empty, the programme will be can- too dry. - Page 64 Problem solving guide Problem Cause and remedy There is a build-up of fluff. Fluff is principally the result of friction when garments are being worn and to some extent when they are being washed. By contrast, the tumble dryer exerts barely any stress on the garments, which means it hardly affects their lifespan.
-
Page 65: General Problems With The Washer-Dryer Stack
Problem solving guide General problems with the washer-dryer stack Problem Cause and remedy The washer-dryer stack The machine feet are not level and not secured. shakes during the spin Level the washer-dryer stack and adjust the feet cor- cycle. rectly. -
Page 66: The Door Will Not Open
Cool down Comfort cool- The following appears in The door lock has jammed. F -Door lock the display: Contact the Miele Customer Service Department. fault. Call Service. -
Page 67: Opening The Door In The Event Of A Blocked Drain Outlet And/Or Power Cut
Problem solving guide Opening the door in the event of a blocked drain outlet and/or power cut Disconnect the machine from the mains electricity supply. There is a lever behind the detergent drawer panel which opens the access panel to the ... - Page 68 Problem solving guide Unscrew the drain filter to let the water out. Tighten the drain filter back up again if you need to interrupt the flow of water. If no water flows out, unscrew the drain filter completely. ...
-
Page 69: Cleaning And Care
Cleaning and care Disconnect the washer-dryer stack from the mains electricity supply. Carry out cleaning and maintenance of the washer-dryer stack after use if possible. Do not use a pressure washer or water jet to clean the washer- dryer stack. -
Page 70: Cleaning The Detergent Drawer, Detergent Compartments And Siphons
Cleaning and care Cleaning the detergent drawer, detergent compart- ments and siphons Clean the detergent drawer and the detergent compartments thor- oughly with hot water as required to remove detergent residues and incrustations. If the machine is not going to be used for a long time, leave the flap ... - Page 71 Cleaning and care Refit the siphon. Clean the fabric conditioner channel using a brush and warm water. Clean the siphon and fabric conditioner channel particularly thor- oughly after using liquid starch a few times. Liquid starch results in clogging. Use a bottle brush to remove detergent residues and limescale from ...
-
Page 72: Cleaning The Water Inlet Filters
Cleaning and care Cleaning the water inlet filters The washing machine has filters to protect the water intake valves. You should inspect the filters approximately every 6 months. Perform this check more often if there are frequent interruptions to the external water supply. -
Page 73: Cleaning The Fluff Filter
rungsbereich fängt anfallende Flusen nicht drehen, da sons auf. Es wird zur Reinigung entnommen tage des Flusensiebes und demontiert. Cleaning and care Kontrollieren und reinigen Sie Cleaning the fluff filter das Flusensieb spätestens bei der A two-part fluff filter in the air supply area collects fluff released by Prüfmeldung: Luftwege reinigen. -
Page 74: Cleaning The Fluff Filter Parts (Dry)
^ Ziehen Sie das Flusensieb an seinem Griff heraus. Cleaning and care Flusensieb demontieren Dismantling the fluff filter m Öffnen gegen die Flusenfilterklappe. Reinigung un Flusensiebteile trocken reinigen Flusensieb einsetzen Mit dem Staubsauger können Sie Flu- Hold the fluff filter by the handles. Bei einer starken, sich ... - Page 75 Cleaning and care Inserting the fluff If there is a lot of visible fluff, clean the air supply area before rein- filter serting the cleaned fluff filter. See next page. Insert the inner fluff filter part into the outer part. ...
-
Page 76: Cleaning The Air Supply Area
Luftführungsbereich reinigen Zusätzliche Reinigung Cleaning and care Den Luftführungsbereich von Zeit zu – Gebläserad Zeit kontrollieren und reinigen, wenn Cleaning the air supply area Das Gebläserad hinter der F eine starke Verschmutzung vorliegt! klappe kann mit Waschmitte Check the air supply area from time to time and clean it if there is a Flusen verklebt sein. - Page 77 Cleaning and care Reinigung Using a damp cleaning cloth, carefully remove the coating on the fan impeller. Reinigung – Abdeckung im Einfüllbereich Also clean the area in front of the fan impeller. ^ Reinigen Sie den Luftf Use a vacuum cleaner to remove fluff. ...
- Page 78 Cleaning and care Reach under the edge of the cover (see arrows) and lift off the cover. Clean the air supply area underneath the cover with a vacuum cleaner. Clean the cover. Clean the air supply area in front of the fan impeller (open the fluff ...
-
Page 79: Installation
Installation To avoid the risk of frost damage, the washer-dryer stack must not be located in rooms which may be subject to very low temperat- ures. General operating conditions This washer-dryer stack is intended only for use in a commercial en- vironment and must only be operated indoors. -
Page 80: For Ease Of Maintenance
Installation For ease of maintenance For ease of future maintenance and servicing, the minimum dimen- sions and distance to the wall must be observed to enable access. The minimum dimensions and distance to the wall must be ob- served. Minimum safety distance to the wall approx. -
Page 81: Installing The Washer-Dryer Stack
Installation Installing the washer-dryer stack The washer-dryer stack must be installed by the Miele Cus- tomer Service Department or by an authorised dealer. Please ob- serve the information on the installation plan. This washer-dryer stack is only intended for items of laundry that have not been proofed with dangerous or inflammable substances. - Page 82 Installation The assembled washer-dryer stack weighs 209 kg. During transportation of the complete washer-dryer stack, en- sure its stability. The height and centre of gravity present a risk of tipping over.
-
Page 83: Transit Bars
Installation Transit bars Removing the transit bars Release the catch and turn the left-hand transit bar 90° clockwise. Pull out the transit bar. Release the catch and turn the right-hand transit bar 90° anti-clock- wise. - Page 84 Installation Pull out the transit bar. Fit the supplied stoppers onto the two holes. Retain the transit bars. They need to be refitted should the machine ever need to be moved again. Refitting the transit bars Refitting is carried out by reversing the procedure. ...
-
Page 85: Levelling
Installation Levelling Ensure that the machine feet and the installation surface are dry to prevent the machine from slipping during the spin cycle. Incorrect installation may increase water and energy consumption and may cause the washing machine to move about. The four adjustable feet are used to level the washing machine. -
Page 86: Securing The Machine
Installation Use a spirit level to check the washing machine is standing level. Hold the foot (1) securely with a pipe wrench. Turn the counter nut (2) again using the open spanner supplied until it sits firmly up against the casing. All four counter nuts must sit firmly up against the housing. -
Page 87: Installing The Tumble Dryer At The Top
Installation Secure all four feet of the washer-dryer stack with the tensioning strips that are included. Follow the installation instructions supplied. Installing the tumble dryer at the top Undo the 2 screws for the washing machine control panel. ... - Page 88 Installation Take the cables that protrude from under the tumble dryer out of the packaging. Lift the dryer onto the designated points. Pay attention to the dis- tance from the rear wall. During this work, make sure to wear personal protective equip- ment such as gloves.
- Page 89 Installation Enlist a suitable second person to help you lift the tumble dryer onto the washing machine. Using lifting equipment (such as a scissor lift) if it is available and it is possible to use it.
- Page 90 Installation Place the rear guides for the tumble dryer base plate between the guide rails of the washing machine.
- Page 91 Installation Risk of crushing and trapping Pay attention to your hands when installing the tumble dryer.
- Page 92 Installation Push the tumble dryer as far back as it will go on the guide rails. Secure the tumble dryer on the guide rails of the washing machine using 4 screws and washers (provided in the companion pack). Connect the washing machine and tumble dryer plugs to the appro- ...
- Page 93 Installation Screw the control panel onto the washing machine using the 2 screws. Screw the connecting bracket to the rear of the washing machine using the 4 screws.
-
Page 94: Water Connection
Installation Water connection For compliance to The Water Supply (Water Fittings) Regulations 1999, please fit the double check valves included in the scope of supply to the on-site water supply for every water inlet hose used. The double check valves prevent water from the inlet hoses flowing back into the on-site drinking water supply. -
Page 95: Cold Water Connection
Installation Cold water con- For the cold water connection one stopcock each with a ¾" screw nection thread is required. If a water connection is not available, only a qualified installer may connect the washing machine to the mains water supply. The water inlet hose for cold water is not suitable for connection to a hot water supply. -
Page 96: Electrical Connection
Service Department or your Miele dealer. For a drain height of more than 1 m, a replacement drain pump for a delivery head of max. 1.8 m is available from the Miele Customer Ser- vice Department or from your Miele dealer. Special regula-... -
Page 97: Supply Air And Exhaust Air Management
Installation Preventing hazards If one of the mains connection cables for this machine is damaged, it must be replaced by the manufacturer, its Customer Service De- partment or a similarly qualified person to avoid risks. Observe the enclosed wiring diagram. Supply air and exhaust air management Ventilation The air required for drying is taken from the room where the tumble... -
Page 98: Calculating The Total Ducting Length
Installation The opening of the vent ducting (e.g. a wall pipe) must be arranged in such a way that the humid exhaust air: - Does not flow back into the room where the tumble dryer is in- stalled. - Does cause damage or unacceptable disturbance. The air required for drying is taken from the room where the dryer is installed. -
Page 99: Exhaust Duct Dimensions
Installation Table I Components Relative pipe length Exhaust air hose (flexible aluminium)* / pipe (temperature resistance min. 80 °C) – 1 m laid straight or 1 m straight pipe 1.0 m – 45° bend (radius of bend = 0.25 m) 0.6 m – 90° bend (radius of bend = 0.25 m) 0.8 m Non-return flap* 14.3 m... -
Page 100: Exhaust Air Management With Plug-In Pipes
Bemaßung Abluftanschluss spiel Bemaßung Abluftanschluss spiel bei der Auslegung Draufsicht Installation bei der Auslegung Draufsicht ng sind gemäß Bau- ng sind gemäß Bau- nder auszuführen. nder auszuführen. Bezirksschornstein- Bezirksschornstein- e Bezirksschornstein- e Bezirksschornstein- Rückansicht Rear view Rückansicht t Gittereinsatz t Gittereinsatz gleichsrohrlänge = 3,8 m rgleichsrohrlänge = 3,8 m gleichsrohrlänge = 1,6 m... -
Page 101: Exhaust Air Management With Flexible Aluminium Hose
Es dürfen nur wärmebeständige Ma- terialien mit einer Temperaturbestän- digkeit von min. 80°C verwendet Installation werden. ^ Installieren Sie den Ad den Alu-Flex Abluftsch rung und Abluftführung Steckstellen müss festen Metallklebeban ung mit gesteckten Abluftführung mit Alu-Flex werden. Install the connector (1) and the pipe (2). ... -
Page 102: Reference To External Machines
The washing machine must be disconnected from the mains to do this. Then start the commissioning process. Optional accessories Only use genuine Miele spare parts and accessories with this ma- chine. Using spare parts or accessories from other manufacturers will in- validate the warranty, and Miele cannot accept liability. - Page 103 Installation The Connector Box is supplied with mains voltage by the Miele Pro- fessional washing machine. The separately available set consists of the Connector Box and fasteners for installation on the machine or on the wall. Peak load / energy...
-
Page 104: Tumble Dryer Accessories
Payment systems This tumble dryer can be fitted with a payment system (optional Miele accessory). In this case, a Miele Customer Service technician must programme the relevant settings in the tumble dryer’s electronics and connect the payment system. -
Page 105: Washing Machine Supervisor Level
You can alter the supervisor level access code to protect the wash- ing machine from unauthorised access. Please inform the Miele Customer Service Department if you have forgotten your new code. The Customer Service Department will have to reset the code. -
Page 106: Operation/Display
Washing machine supervisor level Operation/display Language The display can be set to appear in one of several different lan- guages. To select the permanent supervisor language you want, go to the Languages sub-menu. When a programme is running, you can change the user language us- ing the sensor control. -
Page 107: Time
Washing machine supervisor level Time After selecting the clock format, you can set the time of day. Time format - 24 h clock - 12 h clock - No clock - The time can be set. Date The date can be set after selecting the date format. Date format - DD.MM.YYYY - YYYY.MM.DD... -
Page 108: Delay Start
Washing machine supervisor level Delay start The delay start (timer) display can be switched on or off. Factory default: on Memory The washing machine will save the settings (temperature, spin speed and some of the options) which have been selected for a wash pro- gramme after the programme has started. - Page 109 Washing machine supervisor level – The WiFi connection will be reset to the factory default setting...
-
Page 110: Programme Selection
Washing machine supervisor level Programme selection Controls Tip: Start by configuring all necessary settings and changes to the washing machine before adjusting any of the options below. If “Laundrette, basic” or “Laundrette Logo” is selected, the supervisor level can no longer be opened from the display after the Supervisor level menu is closed. -
Page 111: Programme Packages
Washing machine supervisor level Programme pack- The selection of programmes can be expanded by activating single ages programmes from the target group programme packages. The programmes selected from the programme packages (marked in orange) are displayed during programme selection. Favourite pro- After switching on, you can also select a programme via: Favour- grammes ites. -
Page 112: Process Technology
Washing machine supervisor level Process technology Anti-crease The Anti-crease function reduces creasing after the end of the pro- gramme. At the end of the programme, the drum continues to turn at intervals for up to 30 minutes. The washing machine door can be opened at any time. Factory default: on... -
Page 113: Automatic Drainage
Washing machine supervisor level Automatic drain- Automatic water drainage can be switched on or off. Automatic water drainage means that the suds are always drained away after the end of a programme. This is also the case for programmes that reach the programme end with water still in the drum. -
Page 114: Peak Load Prevention
Washing machine supervisor level - Deactivate disp. pump - Calibration - Flow rate (new): ml/min - Correction factor - Container size - Adv. warning level reminder - Reset adv. warning - Level reminder - Flow meter Peak load preven- The peak-load prevention function can be switched on or off. With tion this function, the execution of a wash programme is not affected when a peak-load signal is in place. -
Page 115: Tumble Dryer Supervisor Level
Be careful when entering a new code. You will need to inform Miele Service if you forget your new code. Miele Service will have to reset the code. Make a note of your new code and store it in a safe place. -
Page 116: Set Languages
Tumble dryer supervisor level International 6 languages are available. The sensor control is not active. Note the setting Set languages Language setting The sensor control can be used to select a language. All lan- guages are available (factory default). You can change the order of the first 4 languages. These slots are al- located to the most commonly used languages. -
Page 117: Volume
Tumble dryer supervisor level The date is set. Volume The volume for various sounds can be changed. The volume can be changed for the following tones: Finish tone The finish tone signals the end of the drying programme. Keypad tone Welcome tone Fault alarm The fault tone signals a fault and can be switched off. -
Page 118: Machine Off Status
Tumble dryer supervisor level On (30 min.) Not curr.prog. The display will remain on during the programme sequence but will go out 30 minutes after the end of the programme. Logo (30 min.) Not curr.prog. The display will remain on during the programme sequence but the logo will light up 30 minutes after the end of the programme. -
Page 119: Controls
Tumble dryer supervisor level Controls You can select whether the tumble dryer is operated as a “launder- ette” machine. Shortcuts are the easiest way to operate the ma- chine. Operating staff are unable to change pre-set programmes. Tip: Start by configuring all necessary settings and changes to the tumble dryer before adjusting any of the options below. -
Page 120: Programme Packages
Tumble dryer supervisor level External prog. selection A communication module can be used to select the programme from an external terminal. Programme pack- This allows you to specify the scope of the tumble dryer programme. ages You can select all of the programmes or individual programmes from the relevant programme packages. - Page 121 Tumble dryer supervisor level The special programmes are added to the programme packages. Enter the name and settings of your special programme into the “Special programmes” table in the “Programme overview” chapter. Res. moisture programme Final residual moisture 6 % (dry) – 40 % (damp) Extra drying time 0–60 minutes Temperature...
-
Page 122: Sort Programmes
Tumble dryer supervisor level Drum reversal – 0–500 seconds Pause – 100–300 seconds Sort programmes Programmes can be moved within the programme list and in the Fa- vourites list. - Factory default: Off - On Moving pro- You can move/change the order of the programmes (programme grammes/favour- menu –... -
Page 123: Further Cooling
If the message appears on the display even though the fluff filter is clean, the vent ducting is regarded as borderline. Miele recommends improving the vent ducting. Poor vent ducting will result in longer programme running times and greater energy consumption. -
Page 124: Clean The Filters
Tumble dryer supervisor level Clean the filters The fluff filter in the air duct area must be cleaned on a regular basis. You can set an hourly interval for the reminder. The selected hourly interval depends on how much fluff tends to build up and how often you wish to clean the filter, e.g. -
Page 125: External Applications
Tumble dryer supervisor level External applications External exhaust External hardware is connected via the Miele Connector Box. flap The time delay between the external exhaust air flap's activation point and the switch-on time for the drum/fan motor is regulated. A message appears in the display while the exhaust air flap is open. -
Page 126: Com Module Selection
The internal WiFi module is used. External mod. Professional An XKM module is inserted into the module slot. Availability of The ability of Miele digital products depends on the availability of the Miele digital services in your country. products The different services are not available in all countries. -
Page 127: Remote
However, Miele recommends installing RemoteUpdates. Miele’s RemoteUpdate function can only be used if the tumble dryer is connected to a WiFi/LAN network and you have an account in the Miele Professional app. The tumble dryer must be registered in the app. -
Page 128: Smartgrid
SmartGrid setting is only visible if a WiFi network has been set up and activated. This function can be used for starting your Miele Professional machine automatically at a time when your en- ergy supplier’s electricity tariffs are most economical. Activating... -
Page 129: Machine Parameters
Open source li- You can view information here. cences Copyright and li- For the purpose of operating and controlling the machine, Miele uses cences proprietary or third-party software that is not covered by open source licensing conditions. This software/these software components are protected by copyright. -
Page 130: Technical Data
Technical data PDW 909 machine data Electrical connection Supply voltage See data plate Frequency See data plate Power rating See data plate Current consumption See data plate Fuse rating See data plate Heater rating See data plate Installation dimensions Casing width (without add-on components) 692 mm Casing height (without add-on components) 1940 mm... -
Page 131: Air Intake
Technical data Air intake Recommended free air intake cross-section into the room: 237 cm² (equivalent to 3 times the exhaust air cross-section of an appliance). There must be sufficient air intake to the installation site to match the air outlet volume. Vented system Maximum nominal volume flow rate 320 m³/h Maximum permitted pressure loss... -
Page 132: Uk Declaration Of Conformity
The Supply of Machinery (Safety) Regulations 2008 EU declaration of conformity Miele hereby declares that this washer-dryer stack complies with Directive 2014/53/EU. The complete text of the EU declaration of conformity is available from one of the following Internet addresses: - Under “Products”, “Download”... -
Page 133: Wifi Data Protection
Copyright and licences For the purpose of operating and controlling the communication mod- ule, Miele uses proprietary or third-party software that is not covered by open source licensing terms. This software/these software com- ponents are protected by copyright. The copyrights held by Miele and third parties must be respected. - Page 136 United Kingdom Malaysia Miele Sdn Bhd Miele Co. Ltd., Fairacres, Marcham Road Suite 12-2, Level 12 Abingdon, Oxon, OX14 1TW Menara Sapura Kencana Petroleum Professional Sales, Tel: 0845 365 6608 Solaris Dutamas No. 1, Jalan Dutamas 1 E-mail: professional@miele.co.uk 50480 Kuala Lumpur, Malaysia Internet: www.miele.co.uk/professional...