Schlage BE499WB - Encode Plus Smart WiFi Deadbolt Manual
- Also fits for
- Be499wb cen 619
- Be499wb cam 619
Advertisement
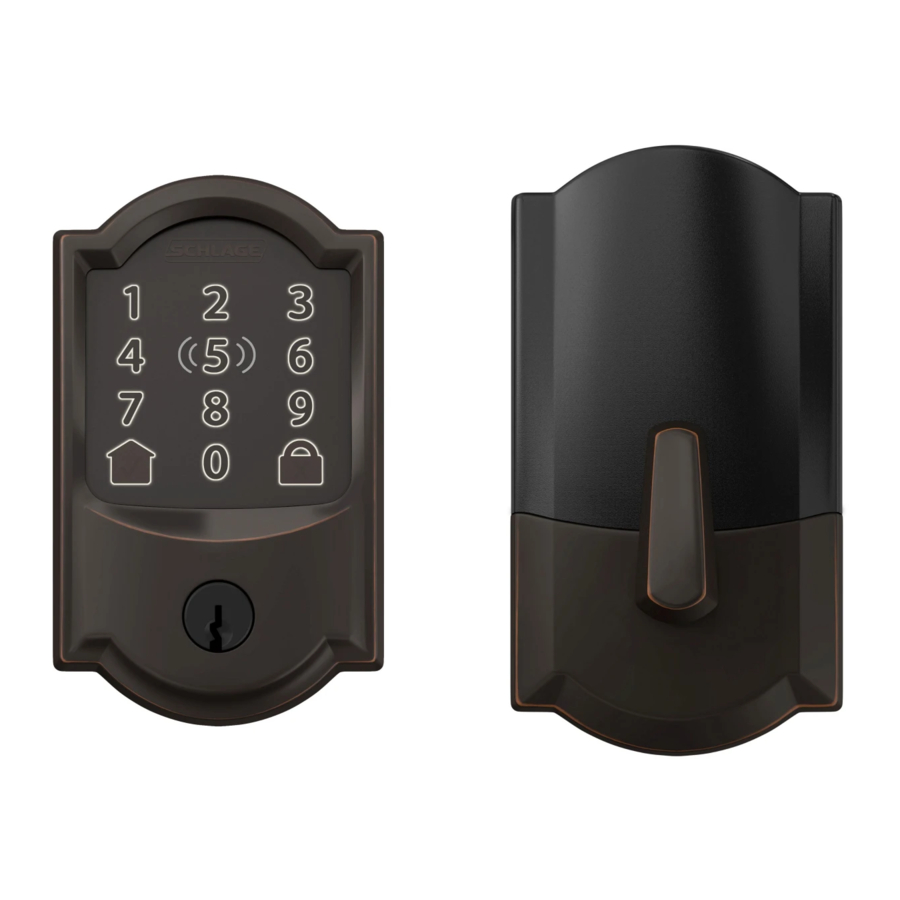
Parts

Start here!
Visit alle.co/encodeplus for an improved installation experience. Access online interactive instructions, user guide, warranty, and reference information.

Touchscreen

 Communication Icon
- Flashes when lock is connecting to WiFi to check for updates.
 Low Battery Icon
- Flashes after code is entered when battery is low.
- Solid when battery is critical. The lock will not work without new batteries.
 Programming and Input LED
- Amber when using manual programming mode.
 Home Button and Checkmark Icon
- Turns on keypad backlight.
- Checkmark flashes when code entry is correct.
- Checkmark flashes when manual programming is successful.
 Lock Button and "X" Icon
- Locks the lock.
- "X" flashes for a wrong user code.
Tools

Phillips screwdriver
Don't use a power drill!
Installation
Remove existing lock
Remove the entire deadbolt, including the bolt. You may also want to remove the strike. A standard Schlage deadbolt is shown. Check with your specific deadbolt manufacturer if you need help.

Need Help? Visit alle.co/encodeplus
Install the bolt
You may have to adjust your bolt length. Make sure the slot in the bolt is centered in the hole.

Need Help?
Trouble installing the strike reinforcer?
Visit alle.co/encodeplus
Install the strike into the door frame
If you have a window next to your door, you may not be able to use the longer wood screws to install the strike. Do not reuse existing strike for proper operation.

Is it hard to install the touchscreen?
Is the tailpiece not installing correctly?
If your through hole seems too small, you may need to remove the hole adapter.
Visit alle.co/encodeplus.
Install the touchscreen
Route the cable through the door BELOW the bolt. Align the tailpiece as shown and push the touchscreen onto the door.


Phillips screwdriver
Don't use a power drill!
You may damage your lock!
Install the backplate
Route the cable under the bolt and through the hole on the bottom of the backplate. Secure the backplate with screws. Make sure the outside touchscreen is straight before tightening screws all the way.

Connect the cable
Tuck the cable and connector in the space above the spindle.

Phillips screwdriver
Don't use a power drill!
You may damage your lock!
Secure the lock to the door
If the bump on the tailpiece doesn't align with the slot in the back of the inside assembly, make sure your thumbturn is vertical (up and down).

Install batteries and slide the cover on

That wasn't so bad, was it?
Your lock is now installed! Remember, you still have to set up your lock to use it.
Set up your lock
- Open your door!
- Enter one of the two default user codes. Codes are on a label on under the battery cover and on the back of this guide.
- Your lock will enter a setup routine. When the bolt stops moving, setup is complete.
Final test!
- Close your door.
- Extend and retract the bolt using the inside thumbturn. Make sure the bolt retracts smoothly.
- Open your door.
- Extend the bolt using the inside thumbturn.
- Now enter a user code at the touchscreen.

Need Help?
If the bolt doesn't extend or retract during testing, visit alle.co/encodeplus.
Now that your lock is installed
you can use the Schlage Home app to lock and unlock your door from anywhere and add codes for guests and household members.


Or set it up using the Apple Home app
First, press the button as shown below. Then, turn the page for instructions specific to your iPhone model. Your lock will be in pairing mode for 5 minutes.

For iPhone XS and newer
Tap your iPhone to the HomeKit label
Tap the top of your phone to the label. Follow directions on your phone. If this doesn't work right away, try pairing using the 8 digit HomeKit setup code (printed on the label) in the Apple Home app.

Note: Your lock must be fully installed on door with batteries before pairing with an app. The pairing button must have been pressed within 5 minutes of pairing.
For iPhone 7 - iPhone X
- Open Apple Home app
Press "+" and Add Accessory. Follow directions on your phone. - Tap the top of your phone to the HomeKit label when directed
Tap the top of your phone to the label as shown in the picture to the left. If this doesn't work right away, try pairing using the 8 digit HomeKit setup code in the Apple Home app.
For older than iPhone 7 or iPad
- Open Apple Home app
Press "+" and Add Accessory. Follow directions. - Scan the HomeKit QR code label
Scan the label on the back of this Quick Start Guide when directed.

Lock and unlock
To lock your door just tap the  lock icon.
You can also lock your door from inside by turning the thumbturn toward the door edge.

To unlock your door enter a user code.
Once paired with a smart home system, the default codes will not work. You can also unlock your door from inside by turning the thumbturn away from the door edge.

Apple HomeKit
Apple HomeKit technology provides an easy, secure way to control your home's doors and more using the Apple Home app and Siri on your iPhone, iPad, Apple Watch, HomePod, or Mac.
A customer who owns an Apple TV (4th generation or later) with tvOS 10 or later, an iPad with iOS 10 or later, or a HomePod can control HomeKit-enabled accessories away from home and automatically,
Controlling this HomeKit-enabled accessory automatically and away from home requires a HomePod, Apple TV, or iPad set up as a home hub. It is recommended that you update to the latest software and operating system.
Use of the Works with Apple badge means that an accessory has been designed to work specifically with the technology identified in the badge and has been certified by the developer to meet Apple performance standards. Apple is not responsible for the operation of this device or its compliance with safety and regulatory standards. Apple, App Store, Apple Home, iPhone, iPad, Apple Watch, HomePod, Mac, and Siri are trademarks of Apple Inc. registered in the U.S. and other countries. Google Play and the Google Play logo are trademarks of Google Inc.
Questions about your new Schlage Encode Plus smart wifi deadbolt?
Please don't return it to the store!
Let us help you first!

alle.co/encodeplus

Documents / Resources
References
Download manual
Here you can download full pdf version of manual, it may contain additional safety instructions, warranty information, FCC rules, etc.
Download Schlage BE499WB - Encode Plus Smart WiFi Deadbolt Manual
Advertisement


Need help?
Do you have a question about the BE499WB and is the answer not in the manual?
Questions and answers