Table of Contents
Advertisement
Advertisement
Table of Contents
Troubleshooting

Related Manuals for Sealed Air Instapak 901


Summary of Contents for Sealed Air Instapak 901
- Page 1 Instapak 901/970 ® Foam-in-Place Packaging System User's Guide...
- Page 2 Original instructions.
-
Page 3: Table Of Contents
Table of Contents Instapak 901/970 System User's Guide ® TABLE OF CONTENTS PAGE IMPORTANT SAFETY PRECAUTIONS 1.0 OVERVIEW 1 - 1 System Description 1 - 1 System Operation 1 - 1 Electrical Requirements 1 - 2 Space Requirements 1 - 2 2.0 OPERATION 2 - 1 The Console Control Panel... - Page 4 Table of Contents 3.0 PACKAGING SUGGESTIONS 3 - 1 Foam-in-Place Packaging Method 3 - 1 Pre-Molding Packaging Method 3 - 5 4.0 MAINTENANCE 4 - 1 Preventive Maintenance Schedule 4 - 1 Holster Maintenance 4 - 2 Cartridge and Dispenser Maintenance 4 - 3 Chemical Container Replacement 4 - 14...
-
Page 5: Important Safety Precautions
If additional copies of the "RECOMMENDATIONS FOR THE SAFE USE AND HANDLING OF INSTAPAK ® FOAM-IN-PLACE CHEMICALS" bulletin or MSDSs are needed, please contact your local Sealed Air sales or account ® representative. WARNING: To avoid overexposure to MDI vapors, never "A"... - Page 6 All controls and indicators function properly. If operation of the system differs from the descriptions in this guide, turn the system off and disconnect the main power until the unit can be inspected by a Sealed Air representative. ®...
- Page 7 901/970 SYSTEM THAT YOU CANNOT FIX WITH THE HELP OF THIS MANUAL, PLEASE CALL SEALED AIR FOR TECHNICAL ASSISTANCE. In accordance with the provisions of the EC Machinery Directive (2006/42/ EC), EC Low Voltage Directive (2006/95/EC) and EC Electromagnetic Directive...
- Page 8 70 dB(A) during normal operations. NOTICE © Copyright 2006 by Sealed Air Corporation (US). All rights reserved. This document is copyrighted. The material contained herein is protected under the US Copyright Act of 1976. This document, in whole or in part, may not...
-
Page 9: Overview
Overview Instapak 901/970 System User's Guide ® 1.0 OVERVIEW The Instapak 901/970 foam packaging system dispenses a mixture of ® Component "A" and Component "B". When mixed, the "A" and "B" components react with each other to produce high quality polyurethane packaging foam. -
Page 10: Electrical Requirements
1,5 m from the floor to the center of the console, to allow easy access by the operator. • A structure at least 3,5 m high, strong enough to hang the tool balancer and component hoses. workstation is also available for ease of • An Instapak ® installation. Ask your Sealed Air account representative for details. ® 1 - 2... - Page 11 Overview Instapak 901/970 System User's Guide ® 1,5 m MAX 4 m PUMP COMPONENT "B" COMPONENT "A" DRUM DRUM 1,5 m 4 m PUMP UMBILICALS Fig 1-1 Typical Layout of the Instapak 901 System ® 1,5 m Tool Balancer 5 Ft. Max. Console Power Instapak®...
- Page 12 Overview NOTES 1 - 4...
-
Page 13: Operation
Operation Instapak 901/970 System User's Guide ® 2.0 OPERATION 2.1 THE CONSOLE CONTROL PANEL To operate the Instapak 901/970 system, push the main power switch ® (1), on the right side of the console, to the "ON" position. Reset Instapak ®... - Page 14 Operation The controls are located on the front of the console. See the figure below. SYSTEM STATUS WARM-UP DISPENSER: A DRUM: 3/4 FULL B DRUM: FULL Reset Instapak ® The Display. The Adjust PLUS + and Adjust MINUS - keys. This window displays messages from the system and a number of These keys allow you to change...
-
Page 15: System Start-Up
Operation Instapak 901/970 System User's Guide ® 2.2 SYSTEM START-UP CAUTION SAFETY GLASSES WITH SIDES MUST BE WORN WHILE OPERATING INSTAPAK EQUIPMENT. ® When the system is first turned on, the displays will read all zeros, then change to all ones. Then the display will read: SYSTEM STATUS WARM-UP DISPENSER: OK A DRUM: FULL... -
Page 16: Timer Modes
Operation 2.3.1 TIMER MODES You can choose between two modes, Manual Shot and Single Shot. 2.3.1.1 Manual Shot Mode In Manual Shot mode the shot will last as long as you pull the trigger. Use Manual Shot mode when you wish to manually control the foam dispensing process. - Page 17 Operation Instapak 901/970 System User's Guide ® • Squeeze the trigger on the dispenser. Foam will be dispensed and the timer will count up from 0.00 seconds until you release the trigger. The actual time of the shot will be shown in the LAST SHOT WINDOW, for example: LAST SHOT WAS 2.33 SECONDS...
- Page 18 Operation • Press the PLUS (+) or MINUS (-) key to select Single Shot Mode: TIMER MODE *SINGLE SHOT* USE (+) OR (-) KEY TO SELECT • Press the Menu UP key and the display will read: ▲ TIMER SET FOR: 5.00 SECONDS USE (+) OR (-) KEY TO ADJUST • Press the PLUS (+) or MINUS (-) key to set the desired length (in seconds) of the single shot. You can now dispense a timed shot. When you pull the trigger on the dispenser, foam will be dispensed and the display will count down to 0.00 seconds.
-
Page 19: Setting Flow Rate
Operation Instapak 901/970 System User's Guide ® 2.3.2 SETTING FLOW RATE - THE FLOW RATE WINDOW The flow rate should be set to suit your particular packaging applica- tions. A small box will use a slower flow rate; a large box will use a faster rate. - Page 20 Operation 2.3.3.2 The "B" Temperature Window • From the "A" TEMPERATURE WINDOW, press the Menu UP ▲ to move to the "B" TEMPERATURE WINDOW. B TEMPERATURE 60°C USE (+) OR (-) KEY TO ADJUST • Press the PLUS (+) or MINUS (-) key to adjust the "B" component temperature value. 2 - 8...
-
Page 21: Additional Features
Operation Instapak 901/970 System User's Guide ® 2.4 ADDITIONAL FEATURES The following additional features are available when enabled by your account representative: Shot Sequence Mode - A series of timed shots, up to 16, can be stored in memory. Each shot will last for as long as the timer setting, and then be ready for the next shot in the sequence. - Page 22 Operation TIMER MODE *SHOT SEQUENCE* USE (+) OR (-) KEY TO SELECT Several additional windows are now used to set the desired number and length of shots as follows: 2.4.1.1 Setting Number of Shots • Press the Menu UP key to change the Number of Shots Window: ▲...
- Page 23 Operation Instapak 901/970 System User's Guide ® Shot Number 2 Window • Press the Menu UP key and the display will read: ▲ SHOT 2 OF 3 TIMER SET FOR 3.00 SECONDS USE (+) OR (-) KEY • Press the PLUS (+) or MINUS (-) key to set the time of the second shot. Shot Number 3 Window • Press the Menu UP key and the display will read:...
-
Page 24: Shot Storage Feature
Operation and the PLUS (+) or MINUS (-) key to change the setting. This new setting will then control subsequent shots. 2.4.2 SHOT STORAGE FEATURE The Shot Storage Feature allows up to 10 different single shots, shot sequences, or any combination of the two to be entered into memory. Use the Shot Storage Feature when you make several different types of molded cushions. - Page 25 Operation Instapak 901/970 System User's Guide ® • Press the RESET key and the display will read: PRESS RESET KEY TO TURN SHOT STORAGE "OFF" Shot storage is now "ON". 2.4.2.2 Storing Shot or Shot Sequence Number 1 • Press the Menu UP key ONCE and the display will read: ▲ RUN SHOT # 1 FROM STORAGE USE (+) OR (-) KEY...
- Page 26 Operation 2.4.2.3 Storing Shot or Shot Sequences Numbers 2-10 • Press the Menu UP or Menu DOWN key, several times if ▲ ▼ necessary, until the display reads: RUN SHOT # 1 FROM STORAGE USE (+) OR (-) KEY TO SELECT A SHOT • Press the PLUS (+) or MINUS (-) key to select the next shot or shot sequence to store.
- Page 27 Operation Instapak 901/970 System User's Guide ® 2.4.2.5 Modifying Stored Shots Any of the stored information can be changed while in the Shot Storage Mode. Just move to the window containing the information you wish to change, and use the PLUS (+) or MINUS (-) key to make the change. The information is automatically updated in memory.
-
Page 28: Language Selection
Operation 2.4.3 LANGUAGE SELECTION • From the SYSTEM STATUS WINDOW press the Menu DOWN key. ▼ The display will read: SELECT LANGUAGE *ENGLISH* USE (+) OR (-) KEY TO SELECT • Press the PLUS (+) OR MINUS (-) key to select the language you will see while using your Instapak 901/970 system. You may have a ® choice of: * ENGLISH * * SPANISH - EUROPEAN * * SPANISH - AMERICAN * * JAPANESE *... - Page 29 Operation Instapak 901/970 System User's Guide ® NOTES 2 -17...
- Page 30 Packaging Suggestions...
-
Page 31: Packaging Suggestions
Instapak 901/970 System User's Guide Packaging Suggestions ® 3.0 PACKAGING SUGGESTIONS 3.1 FOAM-IN-PLACE PACKAGING METHOD Instapak foam is dispensed into a carton lined with high strength ® Instamate packaging film. ® 3 - 1... - Page 32 Packaging Suggestions The Instamate packaging film is folded over and the item to be ® packaged is placed on top of the rising foam. 3 - 2...
- Page 33 Packaging Suggestions Instapak 901/970 System User's Guide ® A second sheet of Instamate packaging film is placed over the item, ® and more Instapak foam is dispensed. ® 3 - 3...
- Page 34 Packaging Suggestions The customer receives the item undamaged. 3 - 4...
-
Page 35: Pre-Molding Packaging Method
Packaging Suggestions Instapak 901/970 System User's Guide ® 3.2 PRE-MOLDING PACKAGING METHOD A simple wood mold is used to produce the desired cushion shape. 3 - 5... - Page 36 Packaging Suggestions Instamate packaging film is placed into the mold and ® Instapak foam is dispensed into the mold cavity. The film ® is folded over the rising foam. Make sure enough film is used to cover the lid of the mold. Close the lid. The foam rises into the proper shape, and the cushion is removed.
- Page 37 Instapak 901/970 System User's Guide Packaging Suggestions ® The product as packaged in pre-molded cushions. 3 - 7...
- Page 38 Packaging Suggestions NOTES 3 - 8...
-
Page 39: Maintenance
Instapak 901/970 System User's Guide Maintenance ® 4.0 MAINTENANCE 4.1 PREVENTIVE MAINTENANCE SCHEDULE Dispenser cleaning Once a week Holster cleaning Once a week Check hoses for damage Before turning on system Check system for loose parts Before turning on system Check component levels Once a week (Do not leave pumps in empty drums!) -
Page 40: Holster Maintenance
Maintenance 4.2 HOLSTER MAINTENANCE Refill the 901/970 dispenser holster with Instapak Dispenser Solution ® when the level falls 6 mm below the top of the wire bristles. Replace the wire bristle brush when the bristles become worn or bent: (Part Number 3476AB-01) 6 mm NOTE: Follow the disposal procedures outlined in the "Recommendations for the Safe Use and Handling of Instapak Foam-in-Place Chemicals"... -
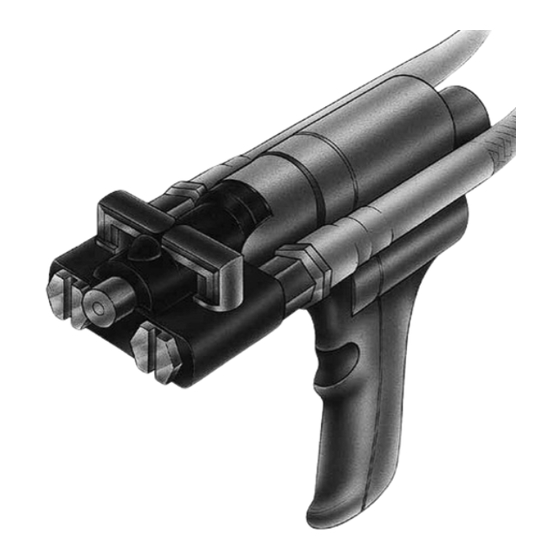
Page 41: Cartridge And Dispenser Maintenance
Instapak 901/970 System User's Guide Maintenance ® 4.3 CARTRIDGE AND DISPENSER MAINTENANCE CAUTION SAFETY GLASSES AND PROTECTIVE GLOVES (BUTYL RUBBER, NITRILE RUBBER, POLYVINYL ALCOHOL, OR OTHER SUITABLE MATERIAL) MUST BE WORN WHILE PERFORMING THE FOLLOWING PROCEDURE. Y-Handle Wrench • Turn the console "OFF". • Turn each dispenser component valve to the "OFF" position to stop component flow to the cartridge. - Page 42 Maintenance • Loosen the top clamp retaining screws with the Y-handle wrench. • Open the top clamp. • Remove the cartridge from the dispenser manifold. (Note how the valving rod fits into the slot, the retaining ring fits into the groove, and the aligning stud fits into the aligning hole.) 4 - 4...
- Page 43 Instapak 901/970 System User's Guide Maintenance ® • Unscrew the handle of the cartridge opening tool enough to allow the cartridge to fit in the tool. Hold the cartridge by the aligning stud and place the cartridge in the cartridge opening tool. (Align the valving rod end with the retaining slot, and the retaining ring with the groove.) •...
- Page 44 Maintenance • Remove any debris from each port and the cartridge opening with the Instapak port cleaning tool. ® • Follow each cleaning with a solvent flush using Instapak Port Cleaner. ® 4 - 6...
- Page 45 Instapak 901/970 System User's Guide Maintenance ® • Using the Instapak port cleaning tool and/or toothpicks, remove any ® remaining debris from each port. • Follow with a solvent flush using Instapak Port Cleaner. ® 4 - 7...
- Page 46 Maintenance • Hold the cartridge by the aligning stud and place the cartridge in the cartridge opening tool. (Align the valving rod end with the retaining slot, and the retaining ring with the groove.) • Turn the handle (as illustrated), fully close the cartridge, and remove. Do not force the handle, as it will damage the tool and cartridge. • NEVER leave the cartridge in the "OPEN" position. 4 - 8...
- Page 47 Instapak 901/970 System User's Guide Maintenance ® • Unscrew one of the filter screen retainers, using the Y-handle wrench, and remove the filter screen. • Flush the filter screen with Instapak Port Cleaner. ® 4 - 9...
- Page 48 Maintenance • Inspect and replace the Filter Screen if damaged or clogged. • Remove the blue O-ring. 4 - 10...
- Page 49 Instapak 901/970 System User's Guide Maintenance ® • Clean the chemical passage using the Instapak port cleaning tool. ® • Clean the cartridge mounting surface thoroughly. • Use Instapak Port Cleaner to flush the chemical passage after each ® cleaning. • Reassemble the screen and retainer. • Repeat steps 9 - 13 for the other side. • Replace the two blue O-rings at the chemical passages. 4 - 11...
- Page 50 Maintenance • Install a clean cartridge. (Align the Valving Rod with the Slot, the Retaining Ring with the Groove, and the Aligning Stud with the Aligning Hole.) NOTE: If the cartridge Valving Rod will not align with the Slot (Slot too far back) turn on power to system to reset dispenser. Turn system back off and try to reinstall cartridge.
- Page 51 Instapak 901/970 System User's Guide Maintenance ® Y-Handle Wrench • Close the top clamp. • Tighten the top clamp retaining screws. • Make sure that the hose fittings are tight. • Open the component valves one at a time and check for leaks. • Turn console power "ON". • Allow system to go through the warm up procedure. Dispense foam and check quality. • If problems persist, call your Sealed Air account representative for ® service assistance. 4 - 13...
- Page 52 Maintenance 4.4 CHEMICAL DRUM REPLACEMENT CAUTION SAFETY GLASSES AND PROTECTIVE GLOVES (BUTYL RUBBER, NITRILE RUBBER, POLYVINYL ALCOHOL, OR OTHER SUITABLE MATERIAL) MUST BE WORN WHILE PERFORMING THE FOLLOWING PROCEDURE. When one of the chemical containers is empty, one of the following messages will be shown in the display: SHUTDOWN CODE 41 A SIDE DRUM...
- Page 53 Instapak 901/970 System User's Guide Maintenance ® • Examine the filter on the bottom of the pump. Remove any clogs or dirt. Flush the filter with Instapak Port Cleaner. ® • Immediately put the pump into the full chemical drum. Be careful not to place an "A" pump in a "B" drum or vice versa. This will cause damage to the pump and will contaminate the full drum of chemical.
- Page 54 Maintenance NOTES 4 - 16...
-
Page 55: Troubleshooting
Troubleshooting Instapak 901/970 System User's Guide ® 5.0 TROUBLESHOOTING 5.1 EQUIPMENT/SYSTEM ISSUES This section lists some problems that might occur while dispensing foam, along with recommended solutions. 5.1.1 EFFICIENT USE OF FOAM • Avoid dispensing foam into rising foam. This will break the cell walls of the cured foam and not allow the foam to expand properly. • Mold tools heat-up when used repeatedly. Foam will expand more in a warm mold than a cold one. -
Page 56: Troubleshooting Charts
Troubleshooting 5.2 TROUBLESHOOTING CHARTS CAUTION SAFETY GLASSES AND PROTECTIVE GLOVES (BUTYL RUBBER, NITRILE RUBBER, POLYVINYL ALCOHOL, OR OTHER SUITABLE MATERIAL) MUST BE WORN WHILE PERFORMING THE FOLLOWING PROCEDURE. POSSIBLE SYMPTOM RECOMMENDED SOLUTION CAUSE 1) Dispenser • Dirty cartridge. • Clean cartridge. Refer to Section 4.3. (cartridge) will not open or close •... - Page 57 Troubleshooting Instapak 901/970 System User's Guide ® POSSIBLE SYMPTOM RECOMMENDED SOLUTION CAUSE 3) Only light amber • Dirty dispenser. • Clean dispenser. Refer to Section 4.3. or white Component "B" is being • "A" pump filter • Clean "A" pump filter: Turn the dispensed. is clogged. system OFF . Remove "A" pump from drum and wipe clean the filter on bottom of "A"...
- Page 58 RESET key to work trapped air through the system. Also see symptom # 9. • The Component • Warm the drum of Component "B" has been "B". Call your Sealed Air ® stored or is account representative. being used at temperatures • Store Instapak drum in an area ®...
- Page 59 See also symptom # 9. System will not • There is an error • Call your local Sealed Air ® RESET. which requires representative for service. service by a Sealed Air ® • For "A" or "B" drum shutdowns representative. ONLY or as noted above, turn the console OFF, then ON again. 5 - 5...
- Page 60 Troubleshooting POSSIBLE SYMPTOM RECOMMENDED SOLUTION CAUSE 10) Foam shrinks. • Dirty cartridge or • Clean and/or replace cartridge. Refer to dispenser manifold. Section 4.3. • Temperature of • Adjust the Component "A" and "B" components too temperatures lower by 3°C. high. 11) Foam is too • Temperature of • Adjust the Component "A" and "B" coarse. components too temperatures higher by 3°C. low.
- Page 61 Troubleshooting Instapak 901/970 System User's Guide ® POSSIBLE SYMPTOM RECOMMENDED SOLUTION CAUSE 15) Component "A" • The drum is • Refer to Section 4.4 to change drum is empty. drums. empty. Component "B" • Pump screen is • Turn the system OFF. Remove pump drum is clogged. from drum and wipe clean the filter empty.
- Page 62 Troubleshooting POSSIBLE SYMPTOM RECOMMENDED SOLUTION CAUSE 18) Cartridge • Dirty cartridge. • Clean cartridge. Refer to Section 4.3. unable to Close. • Jammed or • Replace cartridge and O-rings. Refer to improperly Section 4.3. installed cartridge. • Call your local Sealed Air ® representative for service. 19) System has gone • The system has • Press RESET key to restart system. into Energy not been used for Conservation a certain amount...
-
Page 63: Appendix
Appendix Instapak 901/970 System User's Guide ® 6.0 APPENDIX ACCESSORIES 1108AJ-01 Dispenser Holster Assembly 3476AB-01 Holster Brush 2038AB-01 Velcro Strap, (1) ® 3466AA-01 Protective Gloves, Box of 100 3436AA-01 Safety Glasses 3307AA-01 Poly Knife 3315AA-02 Bung Wrench 3315AG-01 Work Apron, (Pack of 12) 5105AA-01 Material Safety Data Sheet (Dispenser Solution) 5105AA-04... -
Page 64: Customer Service Locations
Appendix Customer Service Locations Sealed Air Protective Packaging Lindenhoutseweg 45, 6545 AH Nijmegen, The Netherlands Tel: +31 (0)24 3710111 Fax: +31 (0)24 3710101 Customer Service Locations • Czech Republic, Prague +420 2 20199551 • France, Joigny +33 (0)3 86920431 • Germany, Alsfeld +49 (0)6631 96680 • Greece, Shimatari Viotias +30 2620 32551 • Hungary, Újhartyán +36 29 573300 •... - Page 66 rev. 03-11 Our Products Protect Your Products ® 5010LN-03...
Need help?
Do you have a question about the Instapak 901 and is the answer not in the manual?
Questions and answers