Table of Contents

Related Manuals for Sealed Air Fill-Air Rocket


Summary of Contents for Sealed Air Fill-Air Rocket
- Page 1 Fill-Air Rocket™ Inflatable Packaging System User’s Guide Standard Tabletop Version Optional Stand with Fill-Air Rocket Integrated Bin ™ Inflatable Packaging System User’s Guide Original Instructions © Sealed Air Corporation (US) 2014 Rev. C...
- Page 2 © Sealed Air Corporation (US) 2014 Rev. C...
- Page 3 Fill-Air Rocket ™ Inflatable Packaging System User’s Guide For Toll Free Service Information Call 1-800-243-1102 (U.S.) Fill-Air Rocket™ Inflatable Packaging System Model: _____________________________________________________________ Serial No: _____________________________________________________________ Accessories: _____________________________________________________________ _____________________________________________________________ Please attach the business card of your Sealed Air Representative here ® © Sealed Air Corporation (US) 2014...
-
Page 4: Table Of Contents
5.2 System Controls ........................... 36 5.3 Control Panel ..........................38 5.4 Producing Air-Filled Bags ......................40 5.5 Producing Air-Filled Bags in Auto Replenish Mode ..............42 5.6 Producing Air-Filled Bags in Batch Mode ................... 44 © Sealed Air Corporation (US) 2014 Rev. C... - Page 5 Table of Contents Fill-Air Rocket ™ Inflatable Packaging System User’s Guide Table of Contents (cont.) 6.0 Maintenance and Repair 6.1 Preventative Maintenance ......................47 6.2 Replacing the Edge Seal ......................48 7.0 Troubleshooting 7.1 There is no power to the system and the control panel Power LED is OFF ......... 50 7.2 Displayed Fault Messages ......................
- Page 6 Fig. 5-1 Loading the Material Roll - Steps 1 and 2 .................34 Fig. 5-2 Loading the Material Roll - Step 3 ..................35 Fig. 5-3 System Controls .........................37 Fig. 5-4 Control Panel ........................39 Fig. 5-5 Producing Air-Filled Bags ....................41 © Sealed Air Corporation (US) 2014 Rev. C...
- Page 7 Table of Contents Fill-Air Rocket ™ Inflatable Packaging System User’s Guide List of Tables and Illustrations 5.0 Operation (cont.) Fig. 5-6 Producing Air-Filled Bags into a Bin in Auto Replenish Mode .........43 Fig. 5-7 Producing Air-Filled Bags in Batch Mode .................45 6.0 Maintenance and Repair...
-
Page 8: 1.0 About This Guide
Inflatable Packaging System User’s Guide is written and illustrated to easily familiarize the operator with system component locations, system operation, and basic troubleshooting procedures. ™ This guide covers the Fill-Air Rocket Inflatable Packaging System. U.S. and other patents pending. Information symbols used throughout this guide: This “... - Page 9 • Qualified Service Personnel is defined as those individuals who have been trained by a Sealed Air ® representative and are authorized to: operate the system and to perform most maintenance and repair procedures.
- Page 10 (intentionally blank) © Sealed Air Corporation (US) 2014 Rev. C...
-
Page 11: Safety
Safety Important Safety Precautions Read and thoroughly understand this guide. Before operating the Fill-Air Rocket™ System, be sure of the following: • The operator has received full training by an authorized Sealed Air Representative. ® • The operator has read and understood all safety instruction labels attached to the system. The system is plugged into a properly rated, grounded outlet - see 3.3 Electrical Power •... - Page 12 Turn the main power switch to the OFF position, unplug the power cord, and follow proper Lockout/Tagout procedures when instructed. Warning! Do not attempt to repair or modify the Fill-Air Rocket™ system other than the procedures contained in the 4.0 Set-up, 5.0 Operation, or 6.0 Maintenance and Repair sections Representative or qualified service of this guide.
- Page 13 Residual Risk: Safety guarding is incorporated into the Fill-Air Rocket™ system, however minimal access is present at the edge seal assembly. Care and avoidance need to be taken to prevent possible contact with or entrapment by the hot roller.
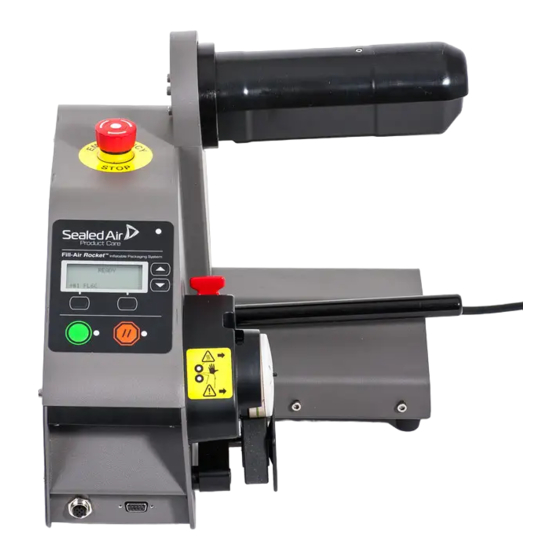
- Page 14 2.0 Safety Important Safety Precautions (cont.) E-Stop Button Material Roll Edge Seal Assembly Warning! Hot Roller and Risk of Entrapment ON/OFF Switch Safety Devices - Section View Figure 2-1 © Sealed Air Corporation (US) 2014 Rev. C...
- Page 15 2.0 Safety Fill-Air Rocket ™ Inflatable Packaging System User’s Guide Important Safety Precautions (cont.) 10. Safety Devices - see Figure 2-1: Warning! Do not remove or tamper with the following built-in safety devices. • Emergency Stop Button (E-Stop) - This red button, when pushed, disables all system functions. It is located above the control panel.
-
Page 16: Compliance
2.0 Safety Compliance The Fill-Air Rocket™ System is eligible to bear the CSA mark shown with adjacent indicators ‘C’ and ‘US’, the PSE mark, and the CE mark. The Fill-Air Rocket™ system has been designed and constructed to fulfill all the relevant provisions of the 2006/42/EC Machinery Directive, 2006/95/EC Low Voltage Directive, the 2004/108/EC Electromagnetic Compatibility (EMC) Directive, and the 2011/65/EU RoHS Directive. - Page 17 2.0 Safety Fill-Air Rocket ™ Inflatable Packaging System User’s Guide Compliance (cont.) EN 61000-6-4: Generic Emissions, Industrial Environment EN 55011: Radio interference characteristics of ISM equipment EN 55014: Radio interference characteristics of Household equipment EN 61000-6-2: Generic Immunity, Industrial Environment...
-
Page 18: Overview
3.0 Overview Overview System Description The Fill-Air Rocket™ Inflatable Packaging System creates on-demand air-filled packaging from a compact/uninflated pre-formed roll of bags. The inflated bag chain is perforated between bags and can easily be separated by the operator as needed. - Page 19 3.0 Overview Fill-Air Rocket ™ Inflatable Packaging System User’s Guide Sequence of Operation (cont.) Material Material Bar Roll Start Key Inflation Nozzle Edge Seal Sequence of Operation Figure 3-1 © Sealed Air Corporation (US) 2014 Rev. C...
-
Page 20: Electrical Power Requirements
15 Amp Service 50/60 Hz Grounded (2.2 avg.) 230 VAC Version CEE 7/7 220 - 240 VAC Single Phase 13 Amp Service 50/60 Hz Grounded (1.1 amps avg.) Electrical Power Requirements Table 3-2 © Sealed Air Corporation (US) 2014 Rev. C... -
Page 21: Material
3.0 Overview Fill-Air Rocket ™ Inflatable Packaging System User’s Guide Material Note: The use of non-Sealed Air materials will cause production problems, may damage the ® equipment, and will reduce the quality of the packaging protection. • For available US Material types see 8.5 Film - US. -
Page 22: System Components
Sealed Air representative. ® Material Mandrel This mount provides an unwind position for the material roll. Inflation Nozzle The open side of the material is pulled around this nozzle to inflate the bag. © Sealed Air Corporation (US) 2014 Rev. C... - Page 23 3.0 Overview Fill-Air Rocket ™ Inflatable Packaging System User’s Guide System Components (cont.) Component Locations - 1 Figure 3-3 © Sealed Air Corporation (US) 2014 Rev. C...
- Page 24 This sensor, when active, will monitor the bag supply in a bin located below it - see 5.2 System Controls. 11. Accessories Port This connection is for optional accessories - see 5.2 System Controls. © Sealed Air Corporation (US) 2014 Rev. C...
- Page 25 3.0 Overview Fill-Air Rocket ™ Inflatable Packaging System User’s Guide System Components (cont.) Warning! Hot Roller and Risk of Entrapment AUGUST Fill-Air Rocket ™ Inflatable Packaging System 10001 FAR - Serial #: 100-120V / 220-240V Electrical: 2.2A / 1.1A ~ Single Phase...
- Page 26 3.0 Overview System Components (cont.) 12. Stand (Optional Accessory) This stand provides for an on-line, overhead, or large bin dispense position. 13. Integrated Bag Bin (Optional Accessory) This bin holds the supply of inflated bags. 14. User’s Guide © Sealed Air Corporation (US) 2014 Rev. C...
- Page 27 3.0 Overview Fill-Air Rocket ™ Inflatable Packaging System User’s Guide System Components (cont.) g Sys ™ Infl r Ro Fi ll- s Gu ions er’ Inst ruct inal Orig Component Locations - 3 Figure 3-5 © Sealed Air Corporation (US) 2014...
-
Page 28: Set-Up
4.0 Set-up Set-up System Set-up Be sure to review your packaging application needs with your distributor or Sealed Air representative to ® determine the most effective Fill-Air Rocket™ Inflatable Packaging System solution. Unpack the system. Warning! The system weighs 25 lb / 11.3kg - (not including the optional stand.) The Fill-Air Rocket™... - Page 29 4.0 Set-up Fill-Air Rocket ™ Inflatable Packaging System User’s Guide System Set-up (cont.) 17.5" / .44m 17.75" .45m Power Cord (10' / 3.05m) 24" / .61m Service 18.0" / .46m (with roll max) 24" / .61m Service 24" / .61m Service 20"...
- Page 30 Operation and Service 29.5" / .75m 24" / .61m Operation Service 42.25" / 1.07m Operation w. Bin 32" / .81m 2'-0" / .61m Operation Operation System Set-up - Stand Version Figure 4-2 © Sealed Air Corporation (US) 2014 Rev. C...
-
Page 31: Applications
4.0 Set-up Fill-Air Rocket ™ Inflatable Packaging System User’s Guide Applications Small Accumulation Bin Customer Provided (Optional) Work Table 36.25" x 20.75" x 28.5" .92m x .53m x .72m Customer Provided Work Table Typical Application - Remote Inflation Figure 4-3 ©... - Page 32 Integrated Bin 23.5" x 30.0" x 42.25" .60m x .76m x 1.07m Customer Provided Conveyor Customer Provided Case Sealer Typical Application - On-Line Inflation with Optional Stand with Integrated Bin Figure 4-4 © Sealed Air Corporation (US) 2014 Rev. C...
- Page 33 4.0 Set-up Fill-Air Rocket ™ Inflatable Packaging System User’s Guide (intentionally blank) © Sealed Air Corporation (US) 2014 Rev. C...
-
Page 34: Operation
Spread the material layers open and wrap around the inflation Clamp Handle nozzle. (Open) • Between the two wheels on the edge seal assembly. Loading the Material Roll - Steps 1 and 2 Figure 5-1 © Sealed Air Corporation (US) 2014 Rev. C... - Page 35 5.0 Operation Fill-Air Rocket ™ Inflatable Packaging System User’s Guide 5.1 Loading the Material Roll (cont.) Close the clamp. • While maintaining tension on the material, raise the red handle clamp to close the edge seal. Proceed to 5.4 Producing Air-Filled •...
-
Page 36: System Controls
This ultrasonic sensor, located inside the power cabinet, when activated in the Auto Replenish Mode detects the amount of inflated bags in the bin. When the bag supply is low, the system automatically resumes to create more air-filled bags. Service Port For use by qualified service personnel or a Sealed Air representative. ® Accessory Port This connection is for optional accessories. - Page 37 5.0 Operation Fill-Air Rocket ™ Inflatable Packaging System User’s Guide System Controls (cont.) System Controls Figure 5-3 © Sealed Air Corporation (US) 2014 Rev. C...
-
Page 38: Control Panel
Stop / Reset Key This red key when pushed, stops air-filled bag production or resets the system once a fault is cleared. Fault Warning LED This amber light indicates a system fault that requires attention. Hot Key 1 Hot Key 2 © Sealed Air Corporation (US) 2014 Rev. C... - Page 39 5.0 Operation Fill-Air Rocket ™ Inflatable Packaging System User’s Guide Control Panel (cont.) Fill-Air Rocket ™ Inflatable Packaging System READY #1 BL6T Control Panel Figure 5-4 © Sealed Air Corporation (US) 2014 Rev. C...
-
Page 40: Producing Air-Filled Bags
Warning! Risk of Entrapment - Keep fingers, loose hair, clothing and jewelry away from the edge seal roller when material is inflating and sealing. Press the Start Key to begin air-filled bag production. • Once the system is ON and the Start Key is pressed, the Fill-Air Rocket™ system will: • Start to produce bags. Adj ust the air fill amount, as desired, while bags are being produced. - Page 41 5.0 Operation Fill-Air Rocket ™ Inflatable Packaging System User’s Guide Producing Air-Filled Bags (cont.) Fill-Air Rocket ™ Inflatable Packaging System READY Air Fill Adjust Keys #1 BL6T Start Key Stop Key Producing Air-Filled Bags Figure 5-5 © Sealed Air Corporation (US) 2014...
-
Page 42: Producing Air-Filled Bags In Auto Replenish Mode
® representative. Press the Start Key to begin air-filled bag production. • Verify that Auto Replenish Mode is selected Once the system is ON and the Start Key is pressed, the Fill-Air Rocket™ system will: • • Start to produce bags. • Automatically pause bag production when the bin is full or a pause signal from an accessory is received. - Page 43 5.0 Operation Fill-Air Rocket ™ Inflatable Packaging System User’s Guide Producing Air-Filled Bags in Auto Replenish Mode (cont.) Bin Sensor High The bin sensor automatically pauses The bin sensor automatically The system automatically bag production when the bin is senses when the bag supply starts bag production to at the preset "high"...
-
Page 44: Producing Air-Filled Bags In Batch Mode
Using the ( / ) Up/Down Keys set the batch length in feet. • Press the Start Key to start the batch. Once the system is ON and the Start Key is pressed, the Fill-Air Rocket™ system will: • Start to produce bags to fill the batch. - Page 45 5.0 Operation Fill-Air Rocket ™ Inflatable Packaging System User’s Guide Producing Air-Filled Bags in Batch Mode (cont.) Fill-Air Rocket ™ Inflatable Packaging System READY Up/Down Batch Size Keys #1 BL6T BATCH ON Batch Mode Select Key Start Key Stop Key...
- Page 46 (intentionally blank) © Sealed Air Corporation (US) 2014 Rev. C...
-
Page 47: Maintenance And Repair
6.0 Maintenance and Repair Fill-Air Rocket ™ Inflatable Packaging System User’s Guide Maintenance and Repair Preventative Maintenance Warning! Turn the main power switch to the OFF position, unplug the power cord, and follow proper Lockout/Tagout procedures when instructed while performing maintenance and repair procedures. -
Page 48: Replacing The Edge Seal
With the clamp handle open, Press “//” Reset Key and then Start Key to calibrate the new edge seal - 3’ / 1m of uninflated material will automatically feed out. Load material - see 5.1 Loading the Material Roll. © Sealed Air Corporation (US) 2014 Rev. C... - Page 49 6.0 Maintenance and Repair Fill-Air Rocket ™ Inflatable Packaging System User’s Guide Replacing the Edge Seal (cont.) Finger Knurled Drive Edge Seal Edge Seal Receptacle Slot Roller Wheel Wheel Holes (3) Clamp Release (Shown Open) Button Side Seal Replacing the Edge Seal Figure 6-2 ©...
-
Page 50: Troubleshooting
Power LED is OFF. 2. Main power cord is unplugged at • Verify the main power cord is plugged into a properly rated outlet - see 3.3 Electrical the outlet. Power Requirements. 3. Facility power supply is interrupted. • Verify facility power supply - see 3.3 Electrical Power Requirements. 4. Electrical component failure. • Contact your Sealed Air representative. ® © Sealed Air Corporation (US) 2014 Rev. C... -
Page 51: Displayed Fault Messages
7.0 Troubleshooting Fill-Air Rocket ™ Inflatable Packaging System User’s Guide Displayed Fault Messages Note: If your displayed message is not listed below - contact your Sealed Air representative. ® DISPLAYED MESSAGE POSSIBLE CAUSE RECOMMENDED SOLUTION E-Stop Pressed 1. E-Stop switch pressed. • Twist E-Stop to release. Check Film Path 1. Out of film. • Load new roll - see 5.1 Loading the Material Roll. 2. Material roll is improperly loaded. - Page 52 POSSIBLE CAUSE RECOMMENDED SOLUTION Clamp Open 1. Edge seal clamp is open. • Hinge the clamp handle up to close the edge seal and press Reset Key. Edge Seal Open 1. Edge seal wheel is missing or not • Check condition of edge seal and verify that fully seated. it is fully seated. • Replace as required - see 6.2 Replacing the 2. Edge seal failure. Edge Seal. • Contact your Sealed Air representative. ® © Sealed Air Corporation (US) 2014 Rev. C...
-
Page 53: Problems With Making Inflated Bags
7.0 Troubleshooting Fill-Air Rocket ™ Inflatable Packaging System User’s Guide Problems with Making Inflated Bags PROBLEM POSSIBLE CAUSE RECOMMENDED SOLUTION 7.3.1 The material will not 1. Material roll is empty. • Load a new roll as required - see 5.1 advance when the start button is Loading the Material Roll. pressed - the control panel Power LED is ON. -
Page 54: The Material Advances And Edge Seals Are Present But The Bags Do Not Fill With Air
5.1 Loading the Material Roll. 2. The air-fill level is set too low. • Increase the air-fill amount - see 5.3 Control Panel. 3. Faulty material roll. • Load new material - see 5.1 Loading the Material Roll. • Return material roll - contact your Sealed representative. ® 4. Electrical or mechanical failure. • Contact your Sealed Air representative. ® © Sealed Air Corporation (US) 2014 Rev. C... -
Page 55: The Material Advances, The Bags Fill With Air, But Do Not Seal Or Seal Fully
7.0 Troubleshooting Fill-Air Rocket ™ Inflatable Packaging System User’s Guide Problems with Making Inflated Bags (cont.) PROBLEM POSSIBLE CAUSE RECOMMENDED SOLUTION 7.3.3 The material advances, the 1. Faulty edge seal. • Check condition of edge seal on the bag. • Check condition of edge seal and verify that bags fill with air, but do not seal it is fully seated. - Page 56 • Change as required. or seal fully (cont.). • Contact your Sealed Air representative. ® 7. Electrical or mechanical failure. • Remove, re-install, and calibrate the edge seal - see 6.2 Replacing the Edge Seal. • Contact your Sealed Air representative. ® © Sealed Air Corporation (US) 2014 Rev. C...
-
Page 57: 7.3.4 The Inflated Bags Leak Air
7.0 Troubleshooting Fill-Air Rocket ™ Inflatable Packaging System User’s Guide Problems with Making Inflated Bags (cont.) PROBLEM POSSIBLE CAUSE RECOMMENDED SOLUTION 7.3.4 The inflated bags leak air. 1. Faulty edge seal. • Check condition of edge seal on the bag. • Check condition of edge seal assembly and that it is fully seated. • Replace as required - see 6.2 Replacing the Edge Seal. - Page 58 6. The incorrect film is selected in the • Verify film setting. (cont.). settings. • Change as required. • Contact your Sealed Air representative. ® 7. Seal power out of adjustment. • Remove, re-install, and calibrate the edge seal - see 6.2 Replacing the Edge Seal. • Contact your Sealed Air representative. ® 8. Electrical or mechanical failure. • Contact your Sealed Air representative. ® © Sealed Air Corporation (US) 2014 Rev. C...
-
Page 59: The Inflated Bags Have An Inconsistent Air-Fill Amount
7.0 Troubleshooting Fill-Air Rocket ™ Inflatable Packaging System User’s Guide Problems with Making Inflated Bags (cont.) PROBLEM POSSIBLE CAUSE RECOMMENDED SOLUTION 7.3.5 The inflated bags have an 1. Material roll improperly loaded. • Reload material roll - see 5.1 Loading the inconsistent air-fill amount. Material Roll. 2. Faulty material roll. -
Page 60: The System Does Not Stop Producing Bags When The Bin Is Full - Creating A Pile-Up Or A Material Jam
• Verify auto replenish mode is selected - selected. see 5.5 Producing Air-Filled Bags in Auto Replenish Mode. 3. External bin sensor is not • Verify that the connections at the sensor connected, is out of calibration, or and at the receptacle are fastened and tight. has failed. • Contact your Sealed Air representative. ® 4. Faulty internal bin sensor. • Contact your Sealed Air representative. ® 5. Electrical or mechanical failure. • Contact your Sealed Air representative. ® © Sealed Air Corporation (US) 2014 Rev. C... -
Page 61: Customer Service
Who to Contact in the United States To Our Customers: This Fill-Air Rocket™ Inflatable Packaging System has been manufactured for Sealed Air Corporation and has been thoroughly tested. If any problems occur while operating this equipment and you desire a phone consultation, call the appropriate number below. -
Page 62: Using Technical Support In The United States
System serial number - the “FAR - _ _ _ _ _ ” number located on the serial number label on the back of the system. • System application type - a description of your system setup. 3. A detailed description of the symptoms that the Fill-Air Rocket™ System is exhibiting. • Any faults the system displays. © Sealed Air Corporation (US) 2014 Rev. C... -
Page 63: Who To Contact In Europe
8.0 Customer Service Fill-Air Rocket ™ Inflatable Packaging System User’s Guide Who to Contact in Europe Sealed Air Protective Packaging Lindenhoutseweg 45, 6545 AH Nijmegen, The Netherlands Tel: +31 (0)24 3710111 Fax: +31 (0)24 3710101 Customer Service Locations: • Czech Republic, Prague +420 2 20199551 •... -
Page 64: Spare Parts
8” x 8” / 200mm x 200mm 5,900’ / 1,798m FA250NHE-8 100802554 10” x 8” / 250mm x 200mm 5,900’ / 1,798m FA300NHE-8 100802556 12” x 8” / 300mm x 200mm 5,900’ / 1,798m © Sealed Air Corporation (US) 2014 Rev. C... -
Page 65: Film - Eu
8.0 Customer Service Fill-Air Rocket ™ Inflatable Packaging System User’s Guide Film - EU Fill-Air Extreme Film ® Film SAP# Bag Size Roll Length Rolls per Pallet FA200NHS-5 100715985 200mm x 130mm 1,280m FA200NHS-8 100715987 200mm x 200mm 1,280m FA250NHS-5 100716032... -
Page 66: Notesx
Notes Notes © Sealed Air Corporation (US) 2014 Rev. C... - Page 67 Notes Fill-Air Rocket ™ Inflatable Packaging System User’s Guide Notes © Sealed Air Corporation (US) 2014 Rev. C...
- Page 68 10 Old Sherman Turnpike Danbury, CT 06810-4173 P: 800.648.9093 F: 203.791.3618 SealedAir.com Fill-Air Rocket ™ Inflatable Packaging System User’s Guide T-339 P/N 5010PVR-01 Rev. C 03-14 © Sealed Air Corporation (US) 2014 Rev. C...
Need help?
Do you have a question about the Fill-Air Rocket and is the answer not in the manual?
Questions and answers