Advertisement
- 1 LOCATION AND DESCRIPTION OF CONTROLS
- 2 POWER SUPPLY
- 3 SETTING THE TIME
- 4 TURNING UNIT ON/OFF
- 5 LISTENING TO THE RADIO
- 6 SETTING THE ALARM AND THE ALARM MODE
- 7 STOPPING THE ALARM
- 8 SLEEP FUNCTION
- 9 NAP FUNCTION
- 10 CONNECTING AUXILIARY SOURCE
- 11 DIMMER
- 12 TIME PROJECTION
- 13 TECHNICAL SPECIFICATIONS
- 14 MORE INFORMATION
- 15 Documents / Resources
Read the instructions carefully before operating the unit.
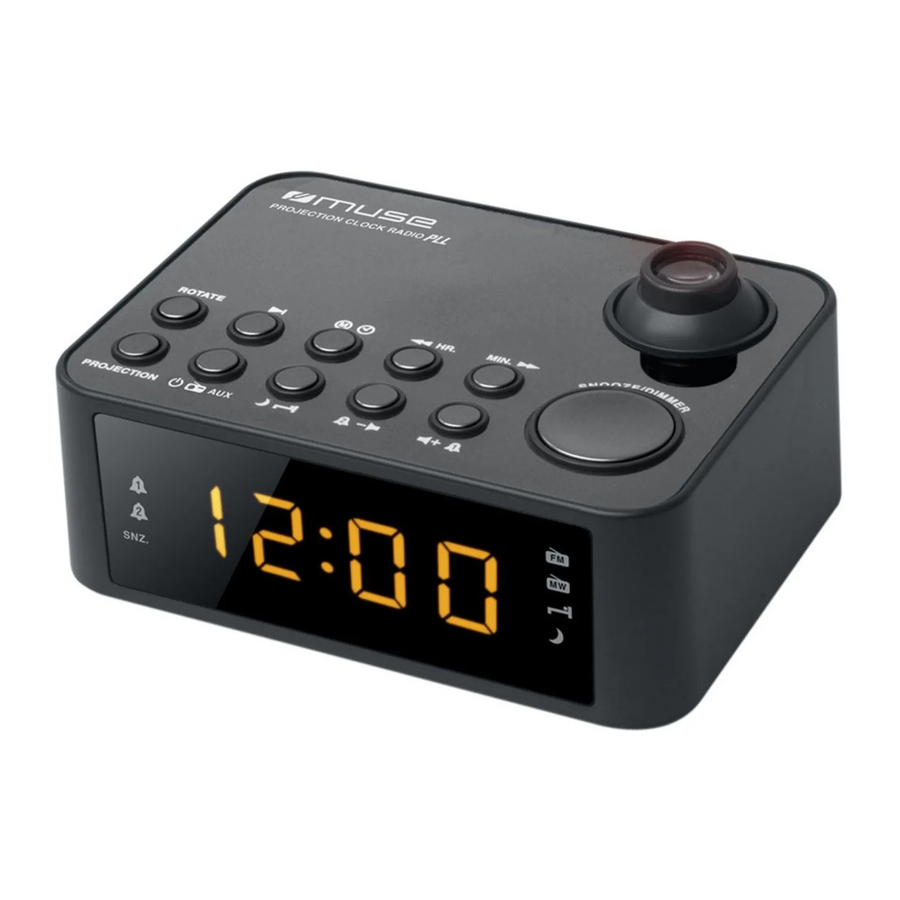
LOCATION AND DESCRIPTION OF CONTROLS

- LED display
- Time projector
- FM wire antenna
- Speaker
- AC power cord
- LINE IN jack
- ROTATE: To rotate the projected time.
![]() Auto scan and preset radio stations
Auto scan and preset radio stations![]() Setting the clock
Setting the clock
![]() Memorization
Memorization- HR. Hour setting
![]() Setting down
Setting down - MIN. Minute setting
![]() Setting up
Setting up - PROJECTION: Projector on/off
![]() To turn unit on/off
To turn unit on/off
![]() AUX : To select FM, MW or AUX mode
AUX : To select FM, MW or AUX mode![]() Nap
Nap
![]() To fall asleep with the radio
To fall asleep with the radio![]() Volume down
Volume down
![]() Alarm 2
Alarm 2![]() Volume up
Volume up
![]() Alarm 1
Alarm 1- DIMMER: Dimmer light intensity of the screen
SNOOZE: Interval alarm repetition - Battery compartment


 Setting down
 Setting up
 To turn unit on/off
 AUX : To select FM, MW or AUX mode


POWER SUPPLY
AC: 230V ~50 Hz (CE)
DC: 2x1.5V, battery type AAA/R03/UM4 (not provided) for back-up.
For optimal performance, alkaline batteries are recommended. These batteries must be replaced every six months.
- Insert the plug of power cord into a standard wall outlet.
- Install the batteries in their compartment. Use only the size and type of batteries specified. Respect the polarity indicated in the compartment. Improper polarity can cause damage to the device. Do not attempt to recharge the batteries, they can catch fire or explode. The batteries need to be replaced when: The volume decreases, or sound is distorted during operation.

Danger of explosion if battery is incorrectly replaced. Replace only with the same or equivalent type.
BACKUP SYSTEM: All settings are memorized, however, the clock time could occasionally need to be readjusted. In case of power failure, if backup batteries are not installed, the screen will flash to indicate this power failure and the necessity to redo your settings.
SETTING THE TIME
- In standby mode, press and hold
![]() button, the display will flash, set the time with HR. hour and/or MIN. minutes.
button, the display will flash, set the time with HR. hour and/or MIN. minutes. - Press again
![]() to confirm.
to confirm.
NOTE:
If during the adjustment time no key is activated in 5 seconds, the current display will be automatically stored.
 button, the display will flash, set the time with HR. hour and/or MIN. minutes.
 to confirm.
TURNING UNIT ON/OFF
In standby mode, press  once to turn on the unit. Press and hold
  for 2 seconds to turn off the unit.
LISTENING TO THE RADIO
Selecting band
When the unit is ON, press  repeatedly to select FM or MW mode. The corresponding indicator lights up.
Manual search
- Choose your radio station with
![]() or
or ![]() .
. - Adjust the volume by
![]() or
or ![]() to the desired level.
to the desired level. - To stop listening to the radio, press and hold
![]() for 2 seconds to turn off the unit.
for 2 seconds to turn off the unit.
 or
or  .
. or
or  to the desired level.
Automatic search
Press and hold for few seconds  or
or  . The automatic search locates strong stations. A station with a weak signal can be set manually by repeatedly pressing
  or
or  .
.
NOTE: During the search operation, the sound level is automatically muted.
To enhance radio reception ability:
FM: Extend the antenna.
MW: Rotate the unit horizontally for optimum reception.
Preset stations
This unit can store 10 FM and 10 MW stations.
Manual storage
- Select a radio station manually or in automatic search.
- Press
![]() . "P 01" blinks on the screen.
. "P 01" blinks on the screen. - Press
![]() or
or ![]() to select a channel.
to select a channel. - Press
![]() to save it.
to save it. - Repeat steps 1-4 to store other stations.
 . "P 01" blinks on the screen.
 or
or  to select a channel.
 to save it.
Automatic storage
Press and hold for few seconds  and the unit will automatically save the first 10 FM stations or 10 MW stations. When you store on a channel already been preset, the previous station will automatically be cleared and replaced by the new station.
Listen to station presets
Press  and repeat the operation as many times as necessary to select your station. Press
  or
or  to adjust sound level.
SETTING THE ALARM AND THE ALARM MODE
- In standby mode, press and hold
![]() for a few seconds, the display blinks.
for a few seconds, the display blinks. - Press
![]() or
or ![]() to select the source of wake up: FM (FM frequency and indicator blinking), MW (MW frequency and indicator blinking) or Buzzer
to select the source of wake up: FM (FM frequency and indicator blinking), MW (MW frequency and indicator blinking) or Buzzer ![]() .
. - Press
![]() then press HR. and/or MIN. to set the time of wake up.
then press HR. and/or MIN. to set the time of wake up.
 for a few seconds, the display blinks.
 or
or  to select the source of wake up: FM (FM frequency and indicator blinking), MW (MW frequency and indicator blinking) or Buzzer
  .
. then press HR. and/or MIN. to set the time of wake
 - Press
![]() to confirm, the alarm indicator
to confirm, the alarm indicator ![]() lights up.
lights up.
Note: Same procedure applies for Alarm 2 with![]() button.
button.
Note:- The previous level of listening is stored, the volume of the alarm will be identical. If you wake up with the radio, do not forget to check the volume level.
Press![]() once to turn on the unit. Adjust the volume with
once to turn on the unit. Adjust the volume with ![]() or
or ![]() . Then press and hold
. Then press and hold ![]() for 2 seconds to turn off the unit.
for 2 seconds to turn off the unit. - If you use the sleep mode with low sound level, you should use the buzzer to wake you up.
- The previous level of listening is stored, the volume of the alarm will be identical. If you wake up with the radio, do not forget to check the volume level.
 to confirm, the alarm indicator
  lights up.


STOPPING THE ALARM
- Alarm repetition
Press SNOOZE. The alarm stops and will sound again 9 minutes later. The snooze indicator blinks during the snooze time. - Alarm stop
Press![]() or
or ![]() . The alarm will sound again the next day at the same time.
. The alarm will sound again the next day at the same time. - Alarm Cancellation
In standby mode, press![]() to cancel the alarm permanently. The alarm indicator lights off.
to cancel the alarm permanently. The alarm indicator lights off.
Note: Same procedure applies for Alarm 2 with![]() button.
button.


SLEEP FUNCTION
To fall asleep with the radio, press  repeatedly to select FM or MW mode, then press
  to select 120-90-60-30-15- 10 or 5 minutes of listening.
  indicator lights up. The unit will automatically turn off after the specified time. To cancel the sleep function, press or
  to
to  OFF.
OFF.
NAP FUNCTION
This function wakes you up after a short period of time. Only the buzzer may be selected.
- In standby mode, press
![]() to select 120-90-60-30-15-10 or 5 minutes for your nap. The
to select 120-90-60-30-15-10 or 5 minutes for your nap. The ![]() indicator lights up.
indicator lights up. - To stop the alarm, press
![]() or
or ![]() .
. - To cancel the function, press
![]() repeatedly until "OFF" is displayed.
repeatedly until "OFF" is displayed.
 to select 120-90-60-30-15-10 or 5 minutes for your nap. The
  indicator lights up.
 or
or  .
. repeatedly until "OFF" is displayed.
CONNECTING AUXILIARY SOURCE
- Connect your auxiliary source (e.g. mp3 player) to the LINE IN jack on the right side of unit (cable not included).
- Press
![]() AUX repeatedly to select AUX mode. "AU" appears on display.
AUX repeatedly to select AUX mode. "AU" appears on display. - Start playback from your auxiliary source.
- Adjust the volume to desired level.
- To stop playback, disconnect your auxiliary source from the LINE IN jack.
 AUX repeatedly to select AUX mode. "AU"
 DIMMER
Press DIMMER to select the brightness of the screen: high or low.
TIME PROJECTION
- Turn on or off the projector with the PROJECTION button.
- Rotate the projected time by 180º with the ROTATE button.
- Swivel the projector to position the projected time.
TECHNICAL SPECIFICATIONS
POWER SUPPLY: AC 230V 50Hz, 4W consumption
DC 2x1.5V, battery type AAA/R03/UM-4 (not provided) for back-up
RADIO: FM 87.5-108MHz
MW 522-1620kHz
MORE INFORMATION

To reduce the risk of electric shock, do not open the device, there is no party inside for the user. Refer all servicing to qualified personnel.
 The lightning with the arrow symbol in the triangle is a warning sign alerting the user to "dangerous voltage" inside the unit.
 The exclamation point in the triangle is a warning sign alerting the user of important instructions accompanying the product.

- The use of apparatus in moderate climates.
- The Marking plate is located at the bottom of the device.
- Make sure to have a minimum distance of 5 cm around the unit for sufficient ventilation.
- Ensure that the ventilation openings is not covered with items such as newspapers, tablecloths, curtains, etc.
- Do not place naked flame sources, such as lighted candles on the apparatus.
- Do not expose this appliance to dripping or splashing water.
- Do not place objects filled with liquids, such as glass, vase on the device.
- Do not throw batteries into fire! Respect the environment when disposing of used batteries.
- Batteries should not be exposed to excessive heat such as sunshine, fire or other similar heat source.
- The power plug is used as a disconnect device and must be easily accessible. To be completely disconnected from the power, the plug of the appliance should be disconnected completely. The socket must not be obstructed and should be easily accessible during intended use.
- Under the influence of fast transient and / or electrostatic electric phenomenon, the product may malfunction and the user must perform a power reset of the device

If in the future, you need to get rid of this product, please note that Waste electrical products should not be disposed of with household waste. Recycling facilities exist. Check with your municipality or ask your dealer for advice. (Directive for Waste Electrical and Electronic Equipment)
NEW ONE S.A.S
10, Rue de la Mission, 25480 Ecole Valentin, France


Documents / ResourcesDownload manual
Here you can download full pdf version of manual, it may contain additional safety instructions, warranty information, FCC rules, etc.
Download Muse M-178 P, M-178 PW - Projection Clock Radio Manual
Advertisement


Need help?
Do you have a question about the M-178 P and is the answer not in the manual?
Questions and answers