Table of Contents
Advertisement
Quick Links
Advertisement
Table of Contents
Troubleshooting

Related Manuals for Miller Augmented Arc


Summary of Contents for Miller Augmented Arc
- Page 1 OM-278680F 2021-11 Processes Stick (SMAW) Welding MIG (GMAW) Welding Flux Cored (FCAW) Welding TIG (GTAW) Welding Description Arc Welding Training System Augmented Arc ® Welding Training System OWNER’S MANUAL For product information, Owner’s Manual translations, and more, visit www.MillerWelds.com...
- Page 2 We know you don’t have time to do it any other way. That’s why when Niels Miller first started building arc welders in 1929, he made sure his products offered long-lasting value and superior quality.
-
Page 3: Table Of Contents
TABLE OF CONTENTS SECTION 1 – SAFETY PRECAUTIONS – READ BEFORE USING..............1 Symbol Usage . -
Page 5: Section 1 - Safety Precautions - Read Before Using
SECTION 1 – SAFETY PRECAUTIONS – READ BEFORE USING Protect yourself and others from injury—read, follow, and save these important safety precautions and operating instructions. 1-1. Symbol Usage DANGER! – Indicates a hazardous situation which, if not avoided, will result in death or serious injury. The possible hazards are shown in the adjoining symbols or explained in the text. -
Page 6: Section 2 - Consignes De Sécurité - Lire Avant Utilisation
SECTION 2 – CONSIGNES DE SÉCURITÉ - LIRE AVANT UTILISATION Pour écarter les risques de blessure pour vous-même et pour autrui — lire, appliquer et ranger en lieu sûr ces consignes relatives aux précautions de sécurité et au mode opératoire. 2-1. -
Page 7: Proposition Californienne 65 Avertissements
2-3. Proposition californienne 65 Avertissements AVERTISSEMENT – Cancer et troubles de la reproduction — www.P65Warnings.ca.gov. 2-4. Principales normes de sécurité Safety Requirements for Electrical Equipment for Measurement, Con- Audio/Video, Information And Communication Technology Equipment trol, and Laboratory Use — Part 1: General requirements, CAN/CSA - Part 1: Safety Requirements, UL 62368-1:2014 Ed.2 from Global Standard C22.2 No. -
Page 8: Section 3 - Definitions
SECTION 1 DEFINITIONS SECTION 1 DEFINITIONS 1-1. Miscellaneous Symbols And Definitions SECTION 1 DEFINITIONS SECTION 1 DEFINITIONS 1-1. Miscellaneous Symbols And Definitions SECTION 1 DEFINITIONS SECTION 1 − DEFINITIONS 1-1. Miscellaneous Symbols And Definitions 1-1. Miscellaneous Symbols And Definitions 1-1. Miscellaneous Symbols And Definitions 1-1. -
Page 9: Section 4 - Specifications
The AugmentedArc instruction is complementary to training with live welding equipment. To complete their welding training, students should also practice their acquired skills by welding under the supervision of qualified persons in a safe welding environment. NOTICE – Do not install or use the Augmented Arc in the same area as live welding equipment. 4-2. -
Page 10: Unit Specifications
On-Screen Help Guides Provide Corrective Feedback To User During Simulation Teacher Software Standalone Application Helmet Miller Black Infinity Helmet With Premium Headgear. Includes Integrated 4.8 in. LCD display (1024 x 600), and integrated speakers. MIG Guns/TIG Torches Miller Brand Stick Electrode And TIG Filler Rod... -
Page 11: Information About Default Weld Parameters And Settings
Information About Default Weld Parameters And Settings NOTICE – Each welding application is unique. Although certain Miller Electric products are designed to determine and default to certain typical welding parameters and settings based upon specific and relatively limited application variables input by the end user, such default settings are for reference purposes only;... -
Page 12: Section 5 - Installation
SECTION 5 – INSTALLATION 5-1. Selecting A Location Do not move or operate unit where it could tip. Only qualified persons should in- stall, operate, maintain, and repair this unit. Installation must meet all National, State, and Local Codes - have only qualified persons make... -
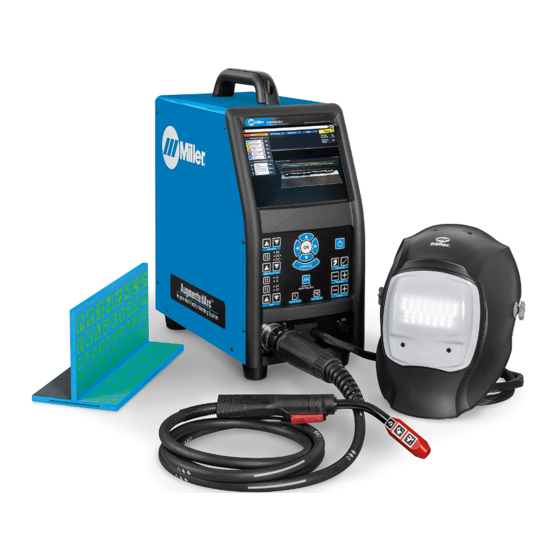
Page 13: Simulator Components
5-2. Simulator Components 5 MIG / Flux Cored (FCAW) And TIG Ca- 10 Wireless (WiFi) Antenna Receptacles 1 Display Screen ble Receptacle 11 USB Receptacle 2 Control Panel (See Section 6-1) 6 Input Power Switch 12 Ethernet Receptacle 3 Electrode Holder And TIG RJ45 Foot 7 120 Volt AC Input Receptacle Pedal Receptacle 13 Display Port Receptacle... -
Page 14: Installing The Training System-Standalone Configuration
5-3. Installing The Training System—Standalone Configuration � Press and release the Power On/Off 5 Simulator Power Cable � Use standalone configuration when button and wait 90 seconds for control- system is not set up with optional ler to start up. Connect one end of simulator power cable controller. -
Page 15: Installing The Training System With Optional Controller - Classroom Configuration
5-4. Installing The Training System With Optional Controller - Classroom Configuration 15 Simulator Power Cable 1 Classroom Router � The controller must have the same ver- sion of the software as the simulator Connect one end of power cable to simula- �... -
Page 16: Connecting Simulator To An External Monitor
(HDMI cable is not supplied.) The external monitor must be con- nected to the simulator at start-up for the HDMI output to be enabled. If the simulator is already turned on, con- 5-5. Connecting Simulator To An External Monitor nect the external monitor via HDMI and then restart the simulator 1 HDMI Receptacle Due to the various resolution set-... -
Page 17: Assembling Ar Tig Torch
5-7. Assembling AR TIG Torch 1-3. Assembling AR TIG Torch 1 AR TIG Torch 2 Backcap 3 Gas Lens 4 Collet Body 5 Tungsten Electrode 6 Collet 7 Insulator Remove backcap (counterclockwise). � The original backcap is not used in the AR TIG torch assembly and can be discarded. -
Page 18: Assembling Ar Stick Electrode/Tig Filler Rod
1-4. Assembling AR Stick Electrode/TIG Filler Rod 5-8. Assembling AR Stick Electrode/TIG Filler Rod 1 Marker Tip 2 Marker Block Screw the marker tip into the marker block. 3 Marker Assembly 4 Electrode Press fit the marker assembly over the tip of the electrode. -
Page 19: Ar Stick Electrode, Mig Gun, Tig Torch, And Workpieces
5-9. AR Stick Electrode, MIG Gun, TIG Torch, And Workpieces 1 AR Stick Electrode And Holder Markers on the stick electrode allow it to work with the AR system. The electrode is similar in shape, weight, and size to a real electrode. -
Page 20: 5-10. Ar Welding Helmet
3-10. AR Welding Helmet 5-10. AR Welding Helmet AR Welding Helmet 1 AR Welding Helmet Left Micro-Camera 2 Left Micro-Camera Right Micro-Camera The AR welding helmet has two high reso- 3 Right Micro-Camera lution micro-cameras and a 4.8 in. (122 mm) internal display screen. -
Page 21: Installing Optional Magnifying Lens
SECTION 8 INSTALLING OPTIONAL MAGNIFYING LENS 5-12. Installing Optional Magnifying Lens The magnifying lens can improve the visibil- The magnifying lens can improve the ity of the helmet display. visibility of the helmet display. Magnifying Lens 1 Magnifying Lens See Parts List (Section 10) Magnifying Lens Holder See Parts List (Section 12) Helmet Lens Assembly... -
Page 22: 5-13. Connecting Weld Cables
5-13. Connecting Weld Cables 3-12. Connecting Weld Cables MIG/ Flux Cored (FCAW)Connections MIG/ Flux Cored (FCAW) Connections 1 Gun Cable Connector Gun Cable Connector 2 Gun Receptacle Gun Receptacle Align pins in connector with holes in re- Align pins in connector with holes in recep- ceptacle. -
Page 23: Section 6 - System Controls And Components
SECTION 6 – SYSTEM CONTROLS AND COMPONENTS 6-1. Simulator Controls Do not use the welding simulator if 6 System Settings Button Use button to select the weld parameter you are light sensitive or affected by (amperage or wire feed speed) to be ad- video, flashing lights, or other visual justed (see Item 11). -
Page 24: Section 7 - Operation
SECTION 7 – OPERATION Do not use the welding simulator if you are light sensitive or affected by video, flashing lights, or other visual stimuli. Stop using simulator and consult your physician if you experience vision problems, nausea, headaches, dizziness, vertigo, or other conditions. -
Page 25: Getting Started
SECTION 5 OPERATION 7-2. Getting Started Do not use the welding simulator if you are light sensitive or affected by video, flashing lights, or other visual stimuli. Stop using simu- lator and consult your physician if you experience vision problems, nausea, headaches, dizziness, vertigo, or other conditions. A. - Page 26 B. Course Selection Use System Navigation buttons to select desired course (Figure 7-3). Press OK. � Course selection will vary for each user. The figure reflects default factory-installed courses. � Press the Cancel button at any time to stop the program and return to the previous screen. Figure 7-3.
- Page 27 Use Navigation buttons to select (Start) a new exercise session or review previous sessions (under the History tab). See Figure 7-5. Press OK. � The History feature is not available to Guest users. Figure 7-5. Activity Selection Screen Use Navigation buttons to select or acknowledge the difficulty level (Beginner, Intermediate, Advanced), slag removal requirements, joint type, position, material type/thickness, weld process, electrode type/diameter, gas composition, and other parameters as applicable (Figure 7-6).
- Page 28 C. NCCER Course Selection NCCER is a not-for-profit 501(c)(3) education foundation created by the construction industry to develop standardized curriculum and assess- ments with portable credentials and certifications for skilled craft professionals. NCCER provides a comprehensive workforce development sys- tem that includes accreditation, training, assessment, certification and career development solutions for the construction and maintenance industries.
- Page 29 NCCER Welding Level 2 focuses on the GMAW, FCAW-G, and GTAW processes with Bead on Plate, T Joint, V-Groove with Backing, and V- Groove without Backing exercises. Figure 7-9. NCCER Welding Level 2 In Open Exercise, users can complete the NCCER exercises. The exercises are divided by Welding Level 1 and Welding Level 2. All exercises are set at the intermediate difficulty level.
- Page 30 Figure 7-11. NCCER Welding Levels 1 And 2 Select the desired joint type. Then select Next. Figure 7-12. Selecting Joint Type OM-278680 Page 26...
- Page 31 Select the desired position. Then select Next. Figure 7-13. Selecting Position Review welding assignment WPS. Select Start exercise to begin simulation. Figure 7-14. Starting Exercise OM-278680 Page 27...
- Page 32 D. Lighting Calibration Lighting calibration adjusts the video device settings (temperature, intensity) based on the room lighting conditions. Ensure helmet LEDs are turned on (see Section 6-1). Default setting is full intensity. Figure 7-5. Welding Parameters Screen Follow the on-screen prompts. Figure 7-6.
- Page 33 Figure 7-7. Lighting Calibration Circles Figure 7-8. Lighting Calibration In Progress Figure 7-17. Lighting Calibration In Progress A notification indicates when the process has completed successfully. OM-278680 Page 17 Figure 7-18. Lighting Calibration Successful Figure 7-9. Lighting Calibration Successful To repeat the Lighting Calibration process, press the Settings button (see Section 8-7). A.
- Page 34 E. Correcting Improper Weld Setting Look at the workpiece through the AR helmet and tap the gun trigger (MIG/FCAW/TIG) or press the AR button (MIG/FCAW/Stick/TIG). It may be necessary to adjust video device settings or helmet lighting to compensate for ambient conditions (see Section 6-1). The Display screen shows current weld voltage, wire feed speed, gas flow, and trigger control selection settings.
- Page 35 � All weld settings are at ideal values. Figure 7-21. Example Of Ideal Weld Settings OM-278680 Page 31...
- Page 36 F. Determining Correct Position Of MIG Gun/Electrode And AR Helmet Place the gun/electrode at the simulated weld joint (visible through the helmet). The screen will display an error message if the system cannot track the gun/electrode. Adjust gun/electrode position and helmet position to clear the tracking error. Use the simulated guides to adjust the gun/ electrode angle, direction, and contact tip to work distance (CTWD) to acceptable limits.
- Page 37 Figure 7-4. Gun/Electrode Positioning Guides Displayed While Welding 1 Work Angle Guide 2 Travel Angle Guide Figure 7-24. Gun/Electrode Travel Angle Error Figure 7-5. Gun/Electrode Travel Angle Error OM-278680 Page 9 OM-278680 Page 33...
- Page 38 � The entire length of the outlined area must be welded before results can be assessed. � Red arrows indicate AR helmet position should be adjusted for best tracking results. Figure 7-6. Arrows Indicating Error In Helmet Position And Completing The Weld Figure 7-25.
- Page 39 G. Course Analysis After completing the welding exercise, examine scores to determine areas of improvement. Passing scores are shown in blue. Scoring is based A. Course Analysis on the techniques and tolerances settings for the assignment. Use the right/left buttons for WPS Summary, Replay and Change View options. A.
-
Page 40: Section 8 - Administrator System Settings
SECTION 8 – ADMINISTRATOR SYSTEM SETTINGS SECTION 6 ADMINISTRATOR SYSTEM SETTINGS 8-1. Accessing Administrator Home Screen Log in as administrator to access the Administrator home screen (Section 7-2). Select System Settings (Figure 8-1) and press OK. SECTION 6 ADMINISTRATOR SYSTEM SETTINGS Figure 8-1. - Page 41 B. Changing System Units And Standards Select Change Units and Standards and press OK to change the units of measure (Imperial or Metric) or to change naming conventions. Se- lect Apply and press OK after making changes, or press Cancel to exit the menu without saving. �...
- Page 42 H. Restoring Factory Configuration To reset system to the original factory configuration, select Restore Factory Defaults and then press OK (Figure 8-3). A confirmation message will be displayed. Make a selection to either proceed or cancel. Figure 8-3. Restoring Factory Configuration Figure 8-3.
-
Page 43: Software Updates
8-3. Software Updates � Software update files and detailed update instructions can be found online at https://www.millerwelds.com/aasoftware. A. Software Updates—Standalone Mode During start-up, the system automatically installs software updates provided through an Internet connection (if available) or USB memory stick (if connected). -
Page 44: Troubleshooting
Troubleshooting Select Connect to Technical Support and press OK to allow Miller technical support personnel to access the system for troubleshooting (Fig- ure 8-7). Select Yes (to request assistance) or No (to cancel request for assistance), and then press OK. Press Cancel to exit the menu without saving. - Page 45 Select Check Camera Set to verify the left and right cameras are functioning properly (Figure 8-10). Press OK. � Do not make video adjustments unless instructed by Miller technical support. Figure 8-10. Checking Camera Set Figure 8-10. Checking Camera Set Figure 8-10.
- Page 46 Select Calibrate Electrode Retraction (Figure 8-11) and press OK to perform the following functions for the AR Stick electrode: � Recalibrate the electrode retraction rate. (Recalibrate electrode retraction rate only when instructed by Miller technical support.) � Test electrode retraction functionality.
-
Page 47: Cameras
6-1. Cameras 8-6. Cameras Figure 8-13. Camera Settings Figure 8-13. Camera Settings Figure 8-14. Configuring Camera Set OM-278680 Page 29 OM-278680 Page 43... - Page 48 A. Configure Camera Set Selecting Configure Camera Set begins the processes required to calibrate the helmet’s cameras. The processes include Configure Camera Set, Check Camera Set, Focusing Cameras, and Calibrating the Cameras. Confirm the left and right camera views are displayed properly (Left and right are from the perspective of the user wearing the helmet). If the camera views are swapped, select Swap Left and Right Cameras.
- Page 49 a flat surface. Hold the helmet over the calibration sheet so that the helmet cameras are facing straight down. Orient the helmet so that the Align- ment Guide Reference Line and the Calibration Sheet Reference Line are aligned. Move the helmet closer to or farther from the calibration sheet until the Alignment Guide Border and the Calibration Sheet Border match (This should occur when the helmet is about 14 in.
- Page 50 Figure 8-17. Hold Position Figure 8-18. Confirming Focus Figure 8-18. Confirming Focus 4. Capture Calibration Samples To calibrate the helmet, you will be required to capture eight samples with the helmet facing the calibration sheet at a variety of orientations and distances.
- Page 51 Figure 8-19. Capturing Calibration Samples Figure 8-20. Helmet In Proper Position For Capturing Calibration Sample 1 Figure 8-20. Helmet In Proper Position For Capturing Calibration Sample 1 When the helmet is positioned properly, the border of the calibration sheet will turn green and a message will appear that says Hold Position. OM-278680 Page 32 Hold the helmet still for a few moments until the calibration sample is captured.
- Page 52 B. Restore Factory Camera Calibration Selecting Restore Factory Camera Calibration will replace the current calibration data with the original data capturing during factory calibra- tion. Do this only as directed by Miller technical support. OM-278680 Page 33 OM-278680 Page 48...
-
Page 53: Video Device Settings
8-7. Video Device Settings The video device settings may need to be adjusted for specific lighting conditions to optimize the AR tracking. To access the Video Settings menu, press the Settings button on the front panel after an exercise has been started. A. - Page 54 B. Temperature Setting Use the up/down Navigation buttons to select the Temperature setting. Use the left/right Navigation buttons to select either Cold, Neutral, or Warm. Choose the setting that corresponds to the color of light in the room (cold = bluish, neutral = white, warm = yellow). If the Lighting Calibra- tion process fails to result in the best settings, they can be adjusted manually.
- Page 55 D. Custom Settings If the existing options for lighting intensity and temperature do not resolve AR tracking issues, custom settings can be created. To create a custom Light Intensity setting, use the up/down arrows to select the light intensity setting, and press OK (Figure 8-27). Use the up/ down Navigation buttons to scroll to a light intensity setting (Exposure, Gamma, Brightness, etc.), and then use the left/right Navigation buttons to adjust.
-
Page 56: Distance Learning Mode
� Activity synchronization with the controller is done when the student returns the simulator to the school (if not connected to the internet). � Virtual classroom is not available if system has no internet connection. � Virtual Classroom is available only if the school and student have internet access and the procedure indicated by Miller technical support has been followed. - Page 57 B. Enabling Distance Learning Mode In The Simulator Tools needed: � USB keyboard Requirements: � Controller must be turned on. � The network between the simulators and controller must be connected, using either the supplied router (WiFi or wired) or local network. �...
- Page 58 � Enter the serial number of the controller in the Remote Server SerialNumber field and press Enter. (The serial number is located on the right side of the controller.) � If the configuration was successful, before the simulator reboots the two Checking connection… messages will be marked OK. �...
- Page 59 C. Syncing An Off-site Simulator With The Controller When a simulator is taken off-site (student’s home), the progress information (exercises performed and quizzes taken) will be saved in the unit. To see the student’s progress and save it with the progress reports of the entire class, the simulator must be returned to where the controller is lo- cated and then synced with the controller.
-
Page 60: Section 9 - Using The Teacher Software
SECTION 9 – USING THE TEACHER SOFTWARE 9-1. Installing The Teacher Software Program Download the teacher software from the Miller website at https://www.millerwelds.com/aasoftware Computer requirements: � Windows 7 (64 Bits), Windows 8 (64 Bits), Windows 10 (64 Bits) � Processor: 2.2GHz 3MB �... - Page 61 4-1. Installing The Teacher Software Program Figure 9-3. AUGMENTED-ARC Network Connection Figure 9-1. AUGMENTED-ARC Network Connection Open Teacher Software on computer. The Login screen appears (Figure 9-4). � Available languages are English, Spanish, and French. � Click Trouble logging in? to see helpful videos on logging in. Figure 9-2.
- Page 62 Figure 9-1. AUGMENTED-ARC Network Connection Figure 9-5. System Settings Screen Figure 9-2. System Settings Screen Enter the user Email (default@augmentedarc.com) and password (augmentedarc). Enter Ethernet IP address. Click Login. � Email is default@augmentedarc. com and Password is augmentedarc. Email and password are case sensitive. �...
-
Page 63: Instructional Help Videos
9-2. Instructional Help Videos When entering the Teacher Software the first time, instructors have the option of touring the application. Click Take Tour to proceed. � Select the Help icon at any time to access instructional videos. Figure 9-8. Instructional Help Videos Figure 9-8. -
Page 64: Using The Teacher Software
9-3. Using The Teacher Software The navigation header contains options to select between the Course, Students, Modules, and Virtual Classroom sections of the software. Figure 9-9. Teacher Software Navigation Header � As long as you do not log out, you can continue using the Teacher Software offline. The changes you make offline will be automatically ap- plied to the simulator when you reconnect to the network. - Page 65 A. Student Home Page A list of existing students is displayed in the middle of the screen. Select All Courses in the course filter to display all of the students. Select a course to see a list of students assigned only to that course. Double-click a student to view the student overview. The student overview shows the list of enrolled courses with associated progress and statistical analysis.
- Page 66 Figure 9-11. Student Overview Page OM-278680 Page 62...
- Page 67 B. Adding A Student Click + New Student and the student personal information entry screen is displayed. The Email is optional, but all other fields are required (only numerals 1-4 can be used for Password). Assign a picture to a student by clicking the Attach photo box and then selecting the desired photo to be added to the student profile.
- Page 68 C. Editing Student Information From the student overview screen of the desired student, click Edit Student to edit the student’s profile. The student profile data is displayed. Edit the data fields as desired. Click Done to save changes. Figure 9-13. Editing Student Data Screen OM-278680 Page 64...
-
Page 69: Module Management
Figure 9-13. Student Data Screen D. Deleting A Student Select the student to be deleted and click Delete Student. A confirmation window will be displayed. To permanently delete the student and all data related to the student, click Delete. Figure 9-14. Delete Student Screen Figure 9-14. - Page 70 A. Task Information The task screen displays all the instructional units and exercises included in a particular module. The relationship between courses, modules, and units is displayed in Figure 9-16. � A course is composed of one or more modules. �...
- Page 71 B. Adding A Module Click + New Module to add a new module. Enter the module name and description (optional) and click Done. The new module will then be dis- Figure 9-8. Module Screen played on the right side. Click + within the module to add a unit to the module. Enter the module name and description (optional) and click Done. Click the + within the unit to add a task to the unit.
- Page 72 Figure 9-20. Adding A Theory Screen Figure 9-20. Adding A Theory Screen Quiz Enter the quiz name, description (optional), and passing score (Figure 9-21). Click Continue. Click + to add a new question to the quiz. Enter the question. Enter an answer option. Click + to add additional answer options (maximum of six). Click the toggle slider to indicate at least one correct answer.
- Page 73 Delete answer option. Indicate correct answer C. Designing The Welding Exercise To add a new welding exercise, select Exercise in the task field. The New Exercise General Info screen displays. Enter the exercise name and description (optional). Attach a WPS .pdf document (optional), which will be viewed by the student in the simulator before starting the welding exercise.
- Page 74 drop-down menu. Figure 9-23. Exercise Parameter Selection Screen Figure 9-24. Exercise Parameter Summary Screen Figure 9-24. Exercise Parameter Summary Screen The Scoring & Guides screen allows you to select the parameters you want the system to evaluate for the exercise, and also the real-time guide parameters you want the system to display during the exercise.
- Page 75 D. Scoring The AugmentedArc system provides three difficulty levels: beginner, intermediate, and advanced. The parameter tolerances for each level are as follows: Beginner Intermediate Advanced V (volts) ±2 ±1.5 ±1 A (amps) ±20 ±15 ±10 WFS (inches/min) ±20 ±15 ±10 Gas (cubic feet/hour) ±10 ±7...
- Page 76 E. Copy Module Figure 9-25. Exercise Scoring And Guides Equipment Settings Screen To access options to copy or delete a module, unit, or task, click the ⋮symbol. To edit a task, click the Edit icon. Copy or delete Edit Figure 9-14. Modules Management Screen Figure 9-26.
-
Page 77: Course Management
9-5. Course Management A. Adding Courses Click + New Course. The New Course screen is displayed. You must enter data in the Course Name field. The remaining fields are optional. If the Course Visible option is enabled, the selected course will appear in the simulator to students that are enrolled in it. After completing the data fields, click Continue. - Page 78 4-4. Course Management Figure 9-16. Adding A Module To A Course Figure 9-31. Adding A Module To A Course B. Editing A Course To edit a course, select the course. Click the Edit Course Content button to edit the list of modules within the course. Click the Manage Stu- dents button to edit the list of students enrolled in the course.
- Page 79 C. Course History To view course history, select the course. Click View Course. The course overview screen is displayed (Figure 9-33). This shows the completion progress for each student assigned to the course, a list of all the modules included within the course, and statistics related to student perform- ance in the course.
-
Page 80: Reviewing Student Activity And Results
9-6. Reviewing Student Activity And Results Figure 9-34. Course Overview Screen A. Student Information 7-6. Reviewing Student Activity And Results To view student progress, select the student. Click View Student. The student overview screen is displayed. This shows the completion prog- ress for each enrolled course and statistics related to student performance in the enrolled courses. - Page 81 4-5. Reviewing Student Activity And Results Figure 9-36. Student Course History Screen Click the Play icon to view the analysis module for an exercise attempt. This displays the detailed test results including the graphs and scores. Options exist to show the 3D view, view a replay of the simulation, view the WPS for the exercise, and capture a screenshot to be included in the Figure 9-17.
- Page 82 Capture Screenshot 3D View Replay Figure 9-18. Reviewing Recent Activity 80 Page 24 Figure 9-37. Reviewing Recent Activity Figure 9-18. Reviewing Recent Activity 0 Page 24 OM-278680 Page 78...
- Page 83 B. Virtual Classroom This screen allows the teacher to monitor real-time activity on the simulator. Select the student from the list of online students. The graphs and scores will update in real-time to reflect the student’s current activity. Figure 9-38. Virtual Classroom Figure 9-38.
-
Page 84: Account And Settings
7-7. Account And Settings 9-7. Account And Settings Click the Account and Settings icon to access options related to Teacher Software user accounts and settings. 7-7. Account And Settings Figure 9-40. Manage Accounts Figure 9-40. Manage Accounts A. Manage Accounts Select + New Instructor to add a new instructor account to the Teacher Software. - Page 85 B. Settings The Settings screen displays information and settings related to charts, system, server, and standards. The complete data from a system can be backed up by selecting Export Database to save the database file to your PC. That backup can be re- stored at a later date by selecting Import Database and browsing to the appropriate backup database file.
-
Page 86: Section 10 - Routine Maintenance And Storage
Allow to air dry. Occasionally, the lens covers and display screen should be cleaned by gen- tly wiping with a soft, dry cloth. Store the AugmentedArc system in a clean, dry, cool place free of solvent-based vapors. Use Miller transportation case 951775 to store or trans- port the equipment. -
Page 87: Section 11 - Troubleshooting Table
SECTION 11 – TROUBLESHOOTING TABLE � Always be certain software is updated to the current version. � For Classroom mode systems, be sure both the simulator and controller are updated to the current version of software. � The AugmentedArc system will reboot after eight hours of inactivity. �... -
Page 88: Section 12 - Parts List
SECTION 12 – PARTS LIST Figure 12-1. AugmentedArc Components OM-278680 Page 84... - Page 89 12-1. AugmentedArc Components Item No. Part No. Description Quantity ♦301395 Controller 278181 —Router, Classroom ♦277196 Heavy Duty Transportation Case - Accessories (Not Shown) ♦277197 Heavy Duty Transportation Case - Simulator (Not Shown) AR Helmet Assembly *276240 Cover, LED AR Helmet *284218 Headgear, Gray 256178...
- Page 90 Notes...
-
Page 91: Warranty
Effective January 1, 2021 (Equipment with a serial number preface of NB or newer) This limited warranty supersedes all previous Miller warranties and is exclusive with no other guarantees or warranties expressed or implied. LIMITED WARRANTY − Subject to the terms and conditions TIG Torches (No Labor) below, Miller Electric Mfg. - Page 92 Appleton, WI 54914 USA tact your distributor and/or equipment manu- facturer’s Transportation Department. International Headquarters–USA USA Phone: 920-735-4505 USA & Canada FAX: 920-735-4134 International FAX: 920-735-4125 For International Locations Visit www.MillerWelds.com ORIGINAL INSTRUCTIONS – PRINTED IN USA © Miller Electric Mfg. LLC 2021-11...
Need help?
Do you have a question about the Augmented Arc and is the answer not in the manual?
Questions and answers