Advertisement
- 1 OVERVIEW
- 2 GET STARTED
- 3 GET TO KNOW YOUR PHONE
- 4 CALLS
- 5 CONTACTS
- 6 SOS/112 CALLS
- 7 ASSISTANCE BUTTON
- 8 CAMERA
- 9 MESSAGES
- 10 WI-FI CONNECTION
- 11 BROWSER
- 12 E-MAIL
- 13 CUSTOM SETTINGS
- 14 BLUETOOTH
- 15 ALARM
- 16 MYDORO
- 17 RESPONSE BY DORO
- 18 WHATSAPP
- 19 FACEBOOK
- 20 ORGANISER
- 21 MEDIA
- 22 TORCH
- 23 Help
- 24 Videos
- 25 Documents / Resources
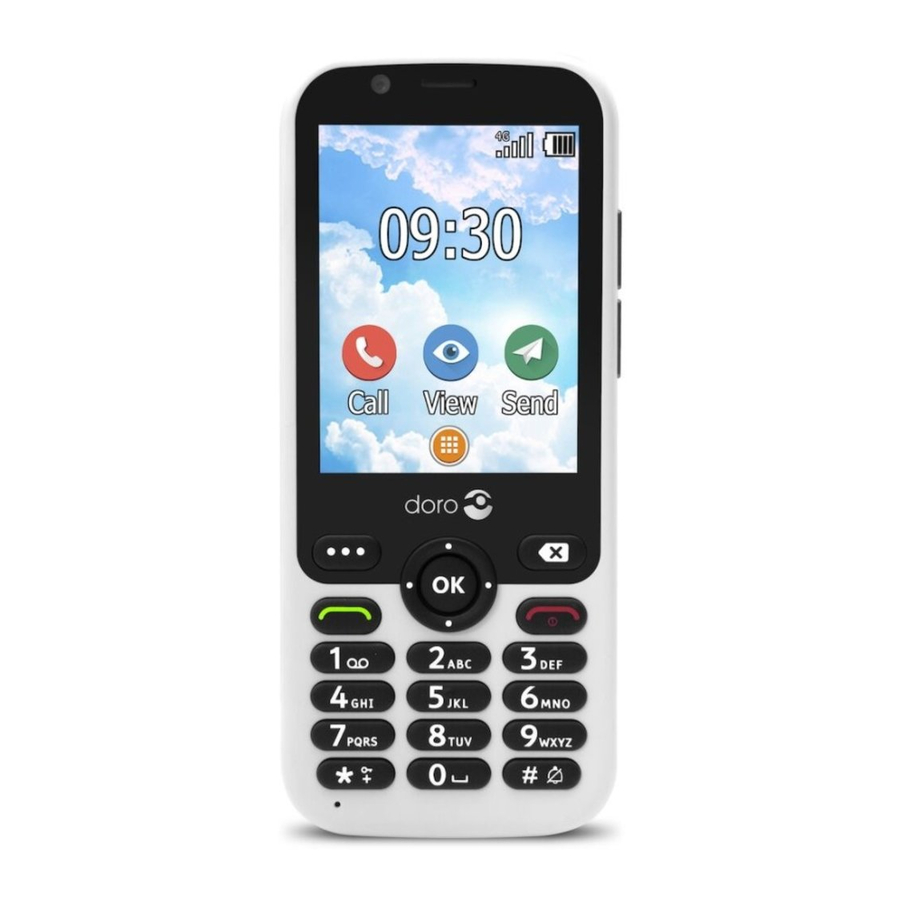
OVERVIEW


- Front camera
- Speaker
- Menu button
- Four-way navigation keys
- Call button
- Voicemail
- International prefix/ Symbols
- Microphone
- Charging socket
- Headset socket
- Volume keys
- Clear button
- End call / Back / Power on/off
- OK-button
- Input method/ Silent mode
- Second microphone
- Assistance button
- Main camera
- Camera flash and Flashlight
- Loudspeaker
Note! All illustrations are for illustrative purposes only and may not accurately depict the actual device.
The items supplied with your phone might vary depending on the software and accessories available in your region or offered by your service provider. You can obtain additional accessories from your local Doro dealer. The supplied accessories provide the best performance with your phone.
GET STARTED
When you first get your phone, there is a few actions that you need to take before starting to use it.
Tip: Remove the plastic screen protector.
Unbox your new phone
The first step is to unbox the phone and assess the items and equipment included in the delivery. Make sure to read through the manual so you can familiarize yourself with the equipment and the basic functions.
- The items supplied with the device and any available accessories may vary depending on the region or service provider.
- The supplied items are designed only for this device and may not be compatible with other devices.
- Appearances and specifications are subject to change without prior notice.
- You can purchase additional accessories from your local Doro retailer.
- Make sure they are compatible with the device before purchase.
- Only use batteries, chargers and accessories that have been approved for use with this particular model. Connecting other accessories may be dangerous and may invalidate the phone's type approval and warranty.
- Availability of all accessories is subject to change depending entirely on manufacturing companies. For more information about available accessories, refer to the Doro website.
Insert the memory card, SIM card and battery

Turn off the phone and disconnect the charger before removing the battery cover.
Remove the battery cover:

Be careful not to damage your fingernails when you remove the battery cover. Do not bend or twist the battery cover excessively as it may get damaged.
Insert the SIM card:

Note! Take care not to scratch the metallic contacts on the cards when inserting them into the card holders.
Insert the micro SIM or USIM card provided by the mobile service provider.
You can insert a second micro SIM or USIM card so you can have two phone numbers or service providers on a single device. Data transfer speeds may be slower, in some cases, if two SIM cards are inserted in the device than when one SIM card is inserted.
Note! This device only accepts micro SIM/USIM cards (3FF). Use of incompatible SIM cards may damage the card or the device, and may corrupt data stored on the card. If you are using only one SIM card, we recommend using SIM1.
Insert the memory card:
You may optionally install a memory card in the phone to increase the storage space of your phone to be able to store more files, pictures, videos etc. Make sure that the memory card's contacts are facing downwards, as shown above. Compatible card type: MicroSD, MicroSDHC, MicroSDXC. Incompatible cards may damage the card itself, the device and corrupt data stored on the card.
Insert the battery:

Insert the battery by sliding it into the battery compartment with the contacts facing downwards to the left.
Replace the battery cover.
Charge
While it's possible that your phone will already come with enough charge to be powered on right out of the box, we recommend to give it a full charge before first use.

Only use batteries, chargers and accessories that have been approved for use with this particular model. Connecting other accessories may be dangerous and may invalidate the phone's type approval and warranty.
When the battery is running low,  appears and a warning signal is heard. Connect the mains adapter to a wall socket and to the charging socket
 or place the device in a charging cradle.
Alternatively connect the cable to the charging socket on the phone to a USB port on a computer.
Save energy
When the battery is fully charged, disconnect the charger from the device and unplug the charger from the wall socket.
To save power the screen goes off after a while. Press any button to wake the screen up. Batteries degrade over time, which means that call time and standby time will normally decrease with regular use. During extended operation, the device may feel warm. In most cases, this is normal. To avoid getting too warm, the device may switch off during charging.
Turn the phone on and off
- Press and hold
![]() (red) to turn on and off.
(red) to turn on and off. - If the SIM card is valid but protected with a PIN code (Personal Identification Number), Enter SIM PIN appears. Enter the PIN code and press the center key OK. Delete any mistyped number using
![]() .
.
 .
.Note! If PIN and PUK codes were not provided with your SIM card, please contact your service provider.
Please also note that if you use more that one SIM card, the PIN and PUK codes might differ between SIM1 and SIM2.
Attempts: # shows the number of PIN attempts left. When no more attempts remain, PIN blocked appears. The SIM card must now be unlocked with the PUK code (Personal Unblocking Key).
- Enter the PUK code and confirm with OK.
- Enter a new PIN code and confirm with OK.
- Re-enter the new PIN code and confirm with OK.
GET TO KNOW YOUR PHONE
When starting the telephone for the first time, you are guided by the Start-up wizard to set some basic settings.
Select the setting you would like to change.
When ready, scroll to the end and press Finish.
Descriptions in this document
Descriptions in this document are based on your phone's setup at the time of purchase. Instructions normally start from the home screen. Press  (red) to reach the home screen. Some descriptions are simplified.
The arrow (→) indicates next action in step-by-step instructions.
Handle the phone
Call  (green):
- Dial a number or answer an incoming call.
- Enter the call log.
End call/Back/Power on and off (red):
- Press to end calls or return to the home screen.
- Return to the previous screen (
![]() ).
). - Long press to power on or off.
 ).
).Menu/options button/notifications  :
:
- If the phone is locked, press the menu button to unlock.
- From the Home screen, press
![]() to view notifications.
to view notifications. - From other screens, press
![]() for to see more options available in that menu.
for to see more options available in that menu.
Assistance  :
:
- Press to make an assistance call.
Clear  :
:
- Press to clear the previous character.
Navigation keys:
- (A) Use the Four-way navigation keys to navigate up, down, left and right. These keys will be shown as
![]() in the rest of this document.
in the rest of this document. - (B) Use the centre button to select items and confirm actions. This button will be shown as OK in the rest of this document
 in the rest of this document.
Note! Navigation in some third party apps might work differently.
Easy mode actions
"Easy mode" is Doro's unique telephone menu which is action-based and allows you to navigate your phone, by just asking yourself, "What do I want to do?". Select one of the avaiable actions as a shortcut for your next step.

Volume control:
Use + and - on the side of the device to adjust the sound volume. During a phone call, it adjusts the earpiece volume.
Set the language:
The default language is determined by the SIM card.
 → Settings→System →Languages & input →Language
Set the time and date:
The time and date can automatically set from.
→Settings→System →Date & time.
Enter text
- Press the button corresponding to the letter until the appropriate character appears.
- Press
![]() for a list of special characters. Select the desired character using the Four-way navigation key and press OK to enter it.
for a list of special characters. Select the desired character using the Four-way navigation key and press OK to enter it. - Use the Four-way navigation key to move the cursor within the text.
- Press Clear to erase characters.
- Press
![]() to cycle upper case, lower case, numerals and predictive text.
to cycle upper case, lower case, numerals and predictive text.
Change the writing language:
- 1Press and hold
![]() for a list of available languages.
for a list of available languages. - Select language with
![]() and press OK to confirm.
and press OK to confirm.
Enter text with predictive text:
For fast and accurate typing, you can use the intelligent predictive text input method.
While texting, press  to select input method.
Enter phone numbers:
Note: For international calls, always use + before the country code for best operation. Press and hold  for the international prefix +.
You can dial or save phone numbers with pauses for use with automated systems, such as voicemail or credit card billing numbers. There are two types of pauses available on your phone, press and hold until desired character is shown. Comma (,) is for pause and semicolon (;) is to wait for user activation.
CALLS
Make a call
- Enter the phone number.
- Press
![]() (green) to call.
(green) to call. - Press
![]() (red) to end the call.
(red) to end the call.
 (red) to end the call.
Note! There is no dial tone. As long as the phone is turned on, it is ready for use.
Make a call from the contacts list
- Press
![]() →Contacts.
→Contacts. - Use
![]() to scroll through the contacts, or press
to scroll through the contacts, or press ![]() to search the phonebook.
to search the phonebook. - Select the wanted contact and press OK.
- Press
![]() (green) to dial the selected entry.
(green) to dial the selected entry.
 to search the phonebook.
Receive a call
- Press
![]() (green) to answer.
(green) to answer.
Silence an incoming call
- When a call comes in, press Volume keys to silence the ring tone.
Call log
Received, missed, and dialed calls are saved in a call log.
Retrieving and dialing:
- Press
![]() (green).
(green). - Use
![]() to scroll through the call log
to scroll through the call log
![]() = Incoming call
= Incoming call
![]() = Outgoing call
= Outgoing call
![]() = Missed call
= Missed call - Press
![]() (green) to dial the highlighted number.
(green) to dial the highlighted number.
 = Incoming call
  = Outgoing call
  = Missed call
 CONTACTS
Create a contact
- Press
![]() →Contacts →Create new contact →
→Contacts →Create new contact → - Enter relevant contact information.
- When done, press
![]() and the select Save.
and the select Save.
Tip: Depending on the selected storage location, the types of information you can save may vary.
Press  to see more options for the contact.
Create ICE entry (In Case of Emergency)
First responders can access additional information such as medical information from the victim's phone in case of emergency. In the event of a trauma, it is critical to have this information as early as possible to increase the chances of survival. All fields are optional, but the more information provided the better.
- Press
![]() →Contacts→ICE.
→Contacts→ICE. - Fill in as much information as possible.
- Add ICE contacts from the list of contacts.
- Press
![]() → Save when done.
→ Save when done.
SOS/112 CALLS
As long as the phone is switched on, it is always possible to place an SOS call by entering the main local emergency number for your present location followed by  (green). Some networks accept calls to emergency numbers without a valid SIM card. Contact your service provider for more information.
Note! Sometimes an emergency call cannot be placed due to network, environment or interference issues.
ASSISTANCE BUTTON

The Assistance button on the back of the phone allows easy access to contact your predefined help numbers should you need help. Make sure that the assistance function is activated before use. See the full manual on how to activate, how to enter recipients in the numbers list, and how to edit the text message.
 →Settings → Assistance
See also "Response by Doro"
CAMERA
Note: To get sharp photos, wipe the lens clean with a dry cloth.
- Press the shortcut button
![]() , or, press
, or, press ![]() → Camera.
→ Camera. - Press
![]() or OK to take a photo.
or OK to take a photo.
 , or, press
 MESSAGES
Create a message
Create, edit and read messages. A text message will be converted to a picture message automatically when media files (music, video, etc.) are attached.
- Press
![]() →Messaging →
→Messaging →![]() →New message.
→New message. - Enter the recipients phone number in the To field.
Or select![]() to select one or more recipients from your contacts. When done press
to select one or more recipients from your contacts. When done press ![]() →OK.
→OK. - Scroll down and type your message.
- Press
![]() for further options.
for further options. - When done, press
![]() → Send or
→ Send or ![]() .
.
 to select one or more recipients from your contacts. When done press
  .
.Note! If you choose to send to multiple contacts, you will be charged for each one.
Some features uses Internet data services and that can be costly. We recommend that you check your data service rates with your service provider.
WI-FI CONNECTION
You need an Internet connection to use the Internet and the e-mail features. To reduce data traffic costs, it is recommended to use Wi-Fi connections when available, instead of using the more costly Mobile Data Connection. Contact your service provider for detailed subscription costs before activating.
You may already have Wi-Fi in your home and it's often available at workplaces. Take advantage of free networks in coffee shops, hotels, trains and libraries. Connecting to the Internet with Wi-Fi doesn't incur additional data traffic costs, unless you have to pay to get on the wireless network.
- Press
![]() →Settings→Network & Internet → Wi-Fi.
→Settings→Network & Internet → Wi-Fi. - Select On.
- Select the available network you want to connect to.
- If the network is secured with a password, enter the password and select Connect.
Tip:  is shown in the status bar when connected.
Note! Keep in mind that your phone remembers Wi-Fi networks you connect to. If Wi-Fi is turned on, the phone automatically connects to the network next time you are within reach. Some open networks require you to log in to a webpage before gaining access to the network.
BROWSER
Use the web browser to access the Internet.
- Press
![]() →Browser.
→Browser. - Select any of the available sites or navigate to Search or type URL.
E-mail accounts, like Gmail and Yahoo may require that you modify some of the account settings before you are able to access e-mails on your new Doro phone. To avoid problems signing in from your phone, you may need to log-into your Gmail / Yahoo account from a computer first.
Press →E-mail.
Gmail & Yahoo Mail
- Use a computer / tablet web browser to log in to your Gmail/Yahoo account.
- Click your name (top right corner) →My Account → (Under the security section click) Connected apps & sites/ Account security → Allow less secure apps → Set the switch to ON.
- Try to log in with your phone again.
CUSTOM SETTINGS
Silence the ring tone
Press and hold to activate/deactivate silent.
During an incoming call, press Volume keys to silence the ring tone.
Configure the audio setup
Press → Settings →Sound →Audio setup.
BLUETOOTH®
Bluetooth technology for hands free use. Connect wirelessly to other Bluetooth compatible devices such as headsets.
- Press
![]() → Settings →Connected devices→ Bluetooth.
→ Settings →Connected devices→ Bluetooth. - Select On →
- Select Pair new device→ OK.
- Select an available device that must be in pairing mode.
- Select Connect. When connecting to another Bluetooth device you may need to enter a password or confirm a shared pairing code.
ALARM
Set alarms for timings you shouldn't miss.
MYDORO
Create a MyDoro account to get the most out of your phone. Administer the phone using any web browser, www.mydoro.com.
RESPONSE BY DORO
Note! This service is only available on some markets/countries.
Response by Doro is a new, easy-to-use service from Doro, created to give seniors and relatives extra security, every day. By pressing the assistance button on the Doro phone, the user can easily call for help. First the alarm contacts the relatives, and if no relative is able to answer it is automatically sent to one of our alarm centres, where there is staff on duty 24/7. Your as relatives can use any iOS or Android smartphone.
Read more at www.doro.com.
WhatsApp is a cross-platform messaging and Voice over IP (VoIP) service. The application allows you to send and receive text messages, voice calls, video calls, images and other media, documents, and user location. The service requires you to provide your mobile number. For more information, see www.whatsapp.com.
Use Facebook to check you social network. For more information, see www.facebook.com.
ORGANISER
On the home screen, press →Organizer→
Calculator:
Perform basic math operations.
Calendar:
Enter your upcoming tasks and events.
File manager:
Access and manage various files stored in the phone or in the memory card.
MEDIA
On the home screen, press →Media → Gallery:
View photos taken with the camera and other saved images or downloaded images.
Music:
Use the music player to listen to music or other audio files.
FM Radio:
Listen to FM radio which has a frequency range from 87.5 to 108.0 MHz. You need to connect a compatible headset that works as antenna.
Sound Recorder:
Record and store voice recordings.
Videos:
View recorded, other saved or downloaded videos.
TORCH
Use the torch when you need extra lighting.
Note! The torch will drain the battery very quickly. Remember to switch off after use.
Help
To get help:
- Download the full manual at www.doro.com
- Update your phone's software
Your phone checks for available software updates automatically. Please follow the on-screen instructions when you are notified of a software update.
Tip: Always download and install phone software updates to increase your phone's performance.
- Reset your phone
On the home screen, press![]() →Settings→ System →Reset options →select the wanted reset
→Settings→ System →Reset options →select the wanted reset
The reason to perform a reset might be a persistent problem that is impossible to solve or if you want to pass the phone to someone else. Note that everything added to the phone since you got it will be erased. SIM card and memory card are not affected.

VideosCheap vs Expensive 'Dumb' Phones: DORO 7010 vs ALCATEL 1068D Video
Documents / Resources
References
Download manual
Here you can download full pdf version of manual, it may contain additional safety instructions, warranty information, FCC rules, etc.
Advertisement


Need help?
Do you have a question about the 7010 and is the answer not in the manual?
Questions and answers