Advertisement
SAFETY AND SET-UP
- This device is designed for the playback of audio signals. Any other use is expressly prohibited.
- Protect the device from moisture (water drops or splashes). Do not place any vessels such as vases on the device. These may be knocked over and spill fluid on the electrical components, thus presenting a safety risk.
- Do not place any naked flames such as candles on the device.
- Make sure the device is adequately ventilated. Do not cover the ventilation slots with newspapers, table cloths, curtains, etc.
- When deciding where to place the device, please note that furniture surfaces are covered by various types of varnish and plastic, most of which contain chemical additives. These additives can corrode the device supports, leaving residues on the furniture surfaces which can be difficult or impossible to remove.
- Do not use any cleaning agent, as this may damage the casing. Clean the device with a clean, moist leather cloth.
- Do not expose the back-up battery to extreme heat, caused for example by direct sunlight, heaters or fire.
- Never open the device casing. No warranty claims are accepted for damage caused by incorrect handling.
- The type plate is located on the bottom of the device.
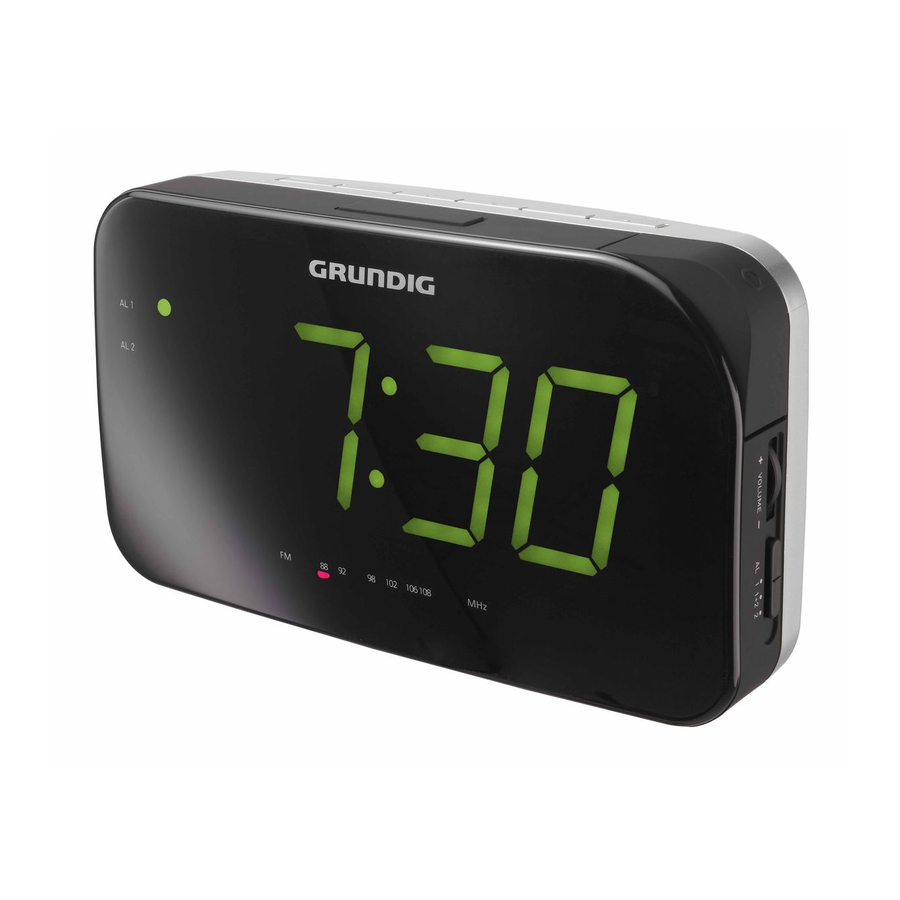
OVERVIEW

| Controls on the top | |
| TIME | Press and hold down: to set the time. |
| ALARM | Press and hold down: to set the alarm time. Press briefly: to display the alarm time. |
| UP | To set the clock and alarm time with the time running quickly forwards. |
| SNOOZE | Interrupts the alarm function. Displays the seconds. |
| DOWN | To set the clock and alarm time with the time running slowly backwards. |
| SLEEP | Activates the sleep timer. To display the current sleep timer setting. |
| RADIO ON | Switches the radio on from stand-by mode. |
 | Switches the radio to stand-by mode; cancelling the alarm for the day; switching off the sleep timer. |
| Controls on the left side | |
 | Sliding switch, switches the alarm between a signal and radio and cancels the alarm. |
| For tuning to radio stations. |
| Sliding switch, switches the display between two brightness levels. |
| Controls on the right side | |
| + VOLUME - | Adjusts the volume. |
| AL 1 1+2 2 | Sliding switch, switches between alarm time 1 or 2; activates alarm time 1 or 2 or 1+2. |
| Controls on the back | |
 | Mains cable. |
 | Wire antenna for FM reception. |
| Controls on the bottom | |
| Battery compartment for 9V back-up battery. | |
| The display | |
 | Sensor for the automatic dimmer. |
| AL 1 | Indicates that the alarm setting is activated with alarm time 1. |
| AL 2 | Indicates that the alarm setting is activated with alarm time 2. |
 | Displays the time, the alarm time and the sleep timer time. |
| FM 88 108 MHz | Shows the frequency of the selected radio station on the frequency scale. |
 | Indicates that the radio is switched on. |
POWER SUPPLY
Mains operation
Check that the mains voltage on the type plate (on the bottom of the device) corresponds to your local mains supply. If this is not the case, contact your specialist dealer.
- Plug the mains cable into the socket (230V ~, 50 Hz Sonoclock 490, 230V ~, 50/60 Hz Sonoclock 490 Q).

- The device is connected to the mains with the power plug. To fully disconnect the device from the mains, pull out the plug.
- The mains plug is used to disconnect the device. It shall remain readily operable and should not be obstructed during intended use.
Inserting the back-up battery
During mains operation, the back-up battery ensures that stored settings are not lost in the case of a power failure or when the device is briefly disconnected from the mains.
- Open the battery compartment lid by pressing on the arrow and pushing down the lid.
- When inserting the battery (9 V, 6LF 22), observe the polarity marked on the base of the battery compartment.
- Close the battery compartment.
Note:
- Remove the back-up battery when it is flat or when you know that the device will not be used for a long period of time.
Environmental note:
- Batteries, including those which do not contain heavy metal, should not be disposed of with household waste. Always dispose of used batteries in accordance with local environmental regulations.
SETTINGS
Setting the clock
When you switch on the device for the first time, the time flashes in the display to indicate that you must set the clock. The same thing applies after a power failure, or if the device has been plugged out and no backup battery is inserted.
The time at Sonoclock 490 will be synchronized by the mains frequency and for the Sonoclock 490Q it is controlled by an integrated quartz crystal.
- Press and hold down »TIME«.
- Press »UP« (hold down) to set the clock with the time running quickly forwards; or press »DOWN« (hold down) to set the clock running slowly backwards
- Release »TIME« to end setting.
Note:
- Using »SNOOZE« (press and hold down), display the seconds (time e.g. »
![]() « and 20 seconds, display: »
« and 20 seconds, display: » ![]() «).
«).


Setting the alarm time
- Using »
![]() « sliding switch set the desired alarm (»
« sliding switch set the desired alarm (» ![]() «= radio station, »
«= radio station, » ![]() « = signal).
« = signal). - When the alarm is switched off push the sliding switch »AL 1 1+2 2« to »1« or »2«.
 « sliding switch set the desired alarm (»
  «= radio station, »
  « = signal).
- Display: the »AL 1« or »AL 2« LED glows.
- Press and hold down »ALARM«.
- Using »DOWN« (hold down), set the alarm time with the time running slowly backwards;
or
using »UP« (hold down), set the alarm time with the time running quickly forwards. - Release »ALARM« to end the setting.
- The device switches on at the set alarm times with the selected alarm signal.
OPERATION
Switching on and off
- Press »RADIO ON« to switch on the device.
- Press »
![]() « to switch off (stand-by) the device.
« to switch off (stand-by) the device.
 « to switch off (stand-by) the device.
Radio operation
For the best FM (VHF) reception, it is sufficient to direct the wire antenna accordingly.
Tuning radio stations
- Find and tune the station using »- TUNING +«.
Adjusting the volume
- Adjust the volume using »+ VOLUME -«.
Adjusting the brightness of the display
- Increase the brightness of the display with »- DIMMER +«.
- Decrease the brightness of the display with »- DIMMER +«.
Note:
- Your device is equipped with an automatically adjusts for the brightness of the display.
Alarm mode
Selecting the alarm times
The alarm stand-by (»  « or »
  « ) must be activated.
- Push the »AL 1 1+2 2« sliding switch to »1« or »2«. – Display: the »AL 1« or »AL LED glows;
or
activate both alarm times by placing the »AL 1 1+2 2« sliding in the »1+2« position.
- Display: the »AL 1« and »AL 2« LEDs glow.
Displaying the alarm times
Depending on the setting (»AL 1« »AL 2«) either alarm time 1 or alarm time 2 is displayed.
- Press »ALARM« and hold it down.
- Display: the last alarm time set.
- Release »ALARM« to end the display of the alarm time.
- Display: the current time.
Note:
- If the »AL 1 1+2 2« sliding switch is set to »1+2«, the alarm times cannot be displayed.
Alarm with radio station
- Press »RADIO ON« to switch on the device.
- Find and tune the station using the »- TUNING +«.
- Set the required alarm volume with »- VOLUME +«.
- Select the radio alarm (»
![]() « ) with »
« ) with » ![]() «.
«.
 « ) with »
  «.
«.- The device switches the radio on at the set times (alarm duration 59 minutes).
Alarm with signal tone
- Set the signal alarm (» « ) with »
![]() «.
«.
- The device switches on at the set alarm times with the alarm signal (alarm duration 59 minutes).
Interrupting the alarm
- Press »SNOOZE« while the alarm is sounding.
- The alarm (signal or radio) stops.
- The alarm comes again at 6-minute intervals (alarm duration - 59 minutes).
Cancelling the alarm for the day
- During the alarm press »
![]() «.
«.
 «.
«.- The alarm (signal or radio) stops, the alarm stand-by retains the set time for the next day.
Cancelling/activating alarm stand-by
- Switch »
![]() « to » AL OFF « stand-by to cancel the alarm function.
« to » AL OFF « stand-by to cancel the alarm function.
- Display: The »AL 1« and »AL 2« LEDs stop glowing.
- The set alarm times are saved.
- To activate the alarm function, switch »
![]() « from »AL OFF« (stand-by) to »
« from »AL OFF« (stand-by) to » ![]() « or »
« or » ![]() «.
«.
 « or »
  «.
«.- Display: The »AL 1« and »AL 2« LEDs glow.
Timer mode
The device possesses a sleep timer, which switches it off in radio mode at a preset time. It is possible to set the switch-off time for between 0 minute (off) and 59 minutes.
Setting the sleep timer
- Press »SLEEP« to switch on the device.
- Display: The switch-off time »0:59« (59 minutes).
- You will hear the selected radio station.
- To set the required switch-off time press »SLEEP« and hold it down.
- Use »DOWN« (hold down) to set the switch-off time with the time running slowly backwards;
or
use »UP« (hold down) to set the switch-off time with the time running quickly forwards.
Note:
- If only »SLEEP« is pressed for longer than 3 seconds, the remaining switch-off time reduces in 1 minute steps.
- Release »SLEEP« to end the setting.
- After the selected switch-off time has elapsed, the device switches off automatically.
Switching off the sleep timer
- To switch off the sleep timer before the set time press »
![]() «;
«;
or
use »DOWN« (hold down) to set the switch-off time to »![]() «.
«.
 «;
«; «.
«.- The device switches off (standby).
INFORMATION
Environmental note

This product has been manufactured with high quality parts and materials which can be reused and are suitable for recycling.
Therefore, do not dispose the product and battery with normal domestic waste at the end of its service life.
Take it to a collection point for the recycling of electrical and electronic equipment.
This is indicated by this symbol on the product, in the operating manual and on the packaging.
Please consult your local authorities to learn the nearest collection point.
Help protect the environment by recycling used products.
Technical data
This device is noise-suppressed according to the applicable EU directives.

This product fulfils the European directives 2004/108/EC, 2006/95/EC, 2009/125/EC and 2011/65/EU.
Power supply:
230 V, 50 Hz (Sonoclock 490)
230 V, 50/60 Hz (Sonoclock 490 Q)
Max. power consumption:
< 4 W (operation), < 1 W (standby)
Output:
400 mW
Frequency bands:
FM 87,5...108,0 MHz
Dimensions:
W x H x L 55 x 115 x 200 mm
Weight:
650 g
Technical and design modifications reserved.

Documents / ResourcesDownload manual
Here you can download full pdf version of manual, it may contain additional safety instructions, warranty information, FCC rules, etc.
Advertisement


Need help?
Do you have a question about the Sonoclock 490 and is the answer not in the manual?
Questions and answers