
Related Manuals for Grundig Sonoclock 1000


Summary of Contents for Grundig Sonoclock 1000
- Page 1 CLOCK RADIO SCN 120 SCN 130 Sonoclock 1000 Sonoclock 1500...
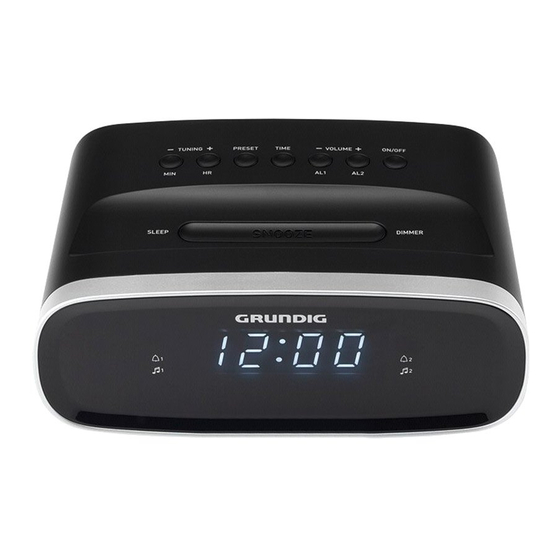
- Page 3 ___________________________________________________________ TIME PRESET TUN-/AL1 TUNING+/HR TUN+/AL2 TUNING-/MIN ON/OFF SNOOZE SLEEP DIMMER (SCN130) 3 ENGLISH...
- Page 4 ENGLISH 16-26 DEUTSCH 05-15 FRANÇAIS 27-37 ITALIANO 38-48 DANSK 93-103 SVENSKA 104-114 POLSKI 115-125 ESPAÑOL 61-72 TÜRKÇE 61-72 4 ENGLISH...
-
Page 5: Safetyandset-Up
SAFETYANDSET-UP _ ___________________________ T his device is designed for the N ote, prolonged listen- playback of audio signals. Any ing at loud volumes with other use is expressly prohibited. the earphones can dam- age your hearing. P rotect the device from moisture (water drops or splashes). - Page 6 OVERVIEW ______________________________________ See the figure on page 3. VOLUME-/ Adjusts the volume. AL1 Indicates that Controlsonthetop alarm setting is acti- vated with alarm time TUNING-/ For tuning to radio sta- tions. For setting the min- Adjusts the volume. VOLUME+/ utes.
- Page 7 OVERVIEW ______________________________________ Controlsonthebottom Battery compartment for 5V back-up battery. Thedisplay AL1 Displays that the alarm is activated with a signal tone or radio for alarm time 1. AL2 Displays that the alarm is activated with a signal tone or radio for alarm time 2.
-
Page 8: Power Supply
POWERSUPPLY ________________________________ Mainsoperation Insertingtheback-up Check that the mains voltage on battery the type plate (on the bottom of the During mains operation, the back-up device) corresponds to your local battery ensures that stored settings mains supply. If this is not the case, are not lost in the case of a power contact your specialist dealer. -
Page 9: Radio-Controlledclock
SETTINGS ________________________________________ Radio-controlledclock The installed microprocessor of the radio-controlled clock processes the With your built-in radio-controlled received time telegrams and controls clock, you are in possession of an the quartz clock fully automatically. absolutely precise alarm and meet- After the clock is first activated, the ing clock which is automatically set DCF synchronisation is performed to the radio-transmitted time signals of... -
Page 10: Setting The Time Zone
SETTINGS ________________________________________ Settingtimeanddayofthe Set the day of the week (» « = Monday, » «, » «, » «, » «, week » « or » « = Sunday) using If the device has been switched on »TUNING+/ « for the first time – if no time signal has been received –... -
Page 11: Settingalarmtime
SETTINGS ________________________________________ Settingalarmtime2 Note: If a back-up battery has not been Press »VOLUME+/AL2« three inserted, the time is automatically times. reset by DCF time synchronisa- – Display: the last alarm time set tion as long as the DCF recep- flash alternately. tion is strong enough. -
Page 12: Operation
OPERATION _____________________________________ Switchingonandoff Savingradiostationson Press » ON/OFF« to switch on the program-places device from standby mode. You can save this radio-program on 10 program places. Press » ON/OFF« to switch the device to standby mode. 1Set the radio station by pressing and holding down »TUNING+/ «... -
Page 13: Alarm Mode
OPERATION _____________________________________ Alarmmode Set the radio station you want as an alarm signal (» «), and press The device has a dynamic alarm tone »AL1« or »AL2« twice. that starts at a low volume and reach- – Display: the corresponding LED es its maximum volume within 30 to »AL... -
Page 14: Timer Mode
OPERATION _____________________________________ Cancelling the alarm for the Deactivatingthesleeptimer To deactivate the sleep timer ear- ly, press » ON/OFF«. Press »ON/OFF« while the alarm is sounding. – The device switches to stand-by. – The alarm signal (radio station Note: or signal tone) stops, the alarm The device realize the switch-off remains at the set time for the time and offer this time for the... -
Page 15: Compliance With Rohs Directive
Grundig Homepage the end of its service life. Take it to the www.grundig.com/downloads/doc. collection center for the recycling of elec- Powersupply:... - Page 16 INFORMATION _________________________________ Dimensions: W x H x L 95 x 150 x 75 mm Weight: 565 g Technical and design modifications re- served. 1 6 ENGLISH...
- Page 17 Grundig Intermedia GmbH Thomas-Edison-Platz 3 D-63263 Neu-Isenburg www.grundig.com 18/35...
Need help?
Do you have a question about the Sonoclock 1000 and is the answer not in the manual?
Questions and answers