Table of Contents
Advertisement
Advertisement
Table of Contents

Related Manuals for Enel X Way JuiceBox


Summary of Contents for Enel X Way JuiceBox
- Page 1 JuiceBox User Manual ENGLISH...
-
Page 2: Table Of Contents
Table of contents Welcome to JuiceBox Package Contents Required Tools Installation Installation Prerequisites Installation Load Balancing Wi-Fi Setup JuiceBox Configuration Know Before Charging Troubleshooting Common Solutions Indicator Lights Audible Error Codes Using the Dashboard Enterprise Dashboard Manual Business Dashboard Manual Important Safety Information... -
Page 3: Welcome To Juicebox
Welcome to JuiceBox Package Contents › JuiceBox › Enclosure mounting bracket › Enclosure screws (x4) › Wall mounting bracket › Wall screws (x3) › EV charging cable holder › EV charging cable holder screws (x4) Required Tools › Phillips screwdriver ›... -
Page 4: Installation
Installation Installation Prerequisites OVERVIEW JuiceBox requires one of the following to be installed by a qualified technician: › NEMA 14-50 outlet › Hardwired electrical connection › The JuiceBox may require a disconnecting means if: › Not within line of sight of the Electrical Panel ›... -
Page 5: Installation
WIRING AND CIRCUIT REQUIREMENTS OUTPUT 32A Max 7.7 kW at 40A Max 9.6 kW at 80A Max 19.2kW at POWER 240V 1-phase 240V 1-phase 240V 1-phase CIRCUIT 40 Amp 50 Amp 100 Amp REQUIREMENTS 2 pole breaker 2 pole breaker 2 pole breaker NOTE: For the installation wiring , please have your electrician size the conductors for both rated wire temperature and 125% continuous load. - Page 6 WARNING: Do not continue this installation until the circuit breaker is turned off. 3. Install the locking bracket: Standard: Use a wall screw (x1) to secure one side of the wall bracket into the stud closest › to the installation area. Use a beam level to ensure that the bracket is level horizontally, then use a wall screw (x1) to secure the other side of the bracket into the wall.
- Page 7 Locking: Mount the locking bracket to the wall with the center tab facing downwards; › the side posts protrude out from the wall and point upwards. 4. Hang the JuiceBox onto the wall bracket.
- Page 8 5. Optional: Use a wall screw (x1) to secure the bottom of the enclosure bracket to the wall. 6. Locking Bracket: Slide the locking bar through the holes in the side posts of the bracket. Secure the locking bar with a padlock. 7.
-
Page 9: Load Balancing
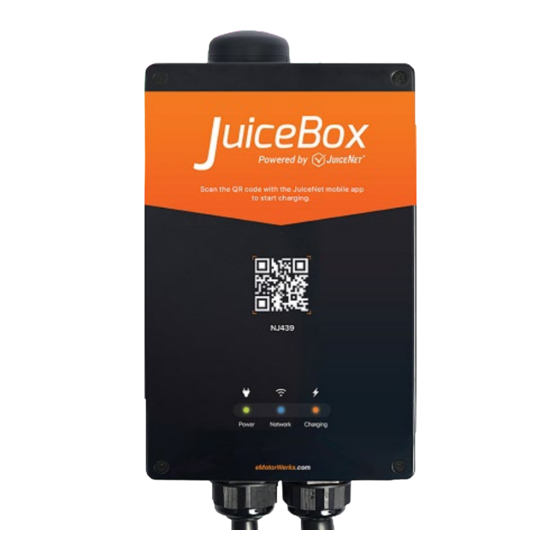
8. Turn on the circuit breaker that supplies power to the JuiceBox. Wait 10 seconds. Verify that the JuiceBox is powered by checking that the “Power” indicator light on the enclosure is solid green. 9. Optional: Install the charging cable holder. NOTE: Mount to wood, a stud, or use concrete or dry wall anchors. -
Page 10: Wi-Fi Setup
Wi-Fi Setup 1. Reset the circuit breaker that supplies power to the JuiceBox. NOTE: The following steps must be completed within 2 minutes of reconnecting power to the JuiceBox. Open Wi-Fi settings on your personal device. Connect to the “JuiceBox-###” or “JuiceNet-###”... -
Page 11: Juicebox Configuration
4. Select the desired Wi-Fi network. Enter the Wi-Fi network password, if necessary. Click Connect. Verify that the JuiceBox is connected by checking that the “Network” indicator on the enclosure is solid blue. JuiceBox Configuration For best results, perform this procedure while standing within 5 ft (1.6m) of the JuiceBox. 1. - Page 12 Video walkthrough of this section 2. Open the JuiceConfigure app. 3. Select START CONFIGURATION.
- Page 13 4. Select Configure via Wifi. 5. Have the Wi-Fi network password ready, then select NEXT. NOTE: If the JuiceBox is already power on before this step, disconnect it from power and re-connect again before proceeding.
- Page 14 NOTE: After powering the JuiceBox, complete the steps 6 through 9 within 2 minutes. 6. Navigate to the Wi-Fi settings on your mobile device. Connect to the “JuiceBox-###” or “JuiceNet-###” Wi-Fi network. If the network requires a password, use the password “GoElectric”...
- Page 15 7. Return to the JuiceConfigure app. 8. In the JuiceConfigure app, select the preferred local Wi-Fi network.
- Page 16 9. Enter the Wi-Fi network password, if necessary, then select CONNECT CHARGER TO WI-FI. 10. The app connects the JuiceBox to the Wi-Fi network, then select CONTINUE.
-
Page 17: Know Before Charging
11. You did it! The JuiceBox is now online and ready to charge. NOTE: After connecting, JuiceBox checks its firmware version and performs any necessary updates. Wait 10 minutes before plugging in a vehicle. Know Before Charging Ensure that the vehicle has stopped charging before removing the charging cable or any adapters from the vehicle charge port. -
Page 18: Troubleshooting
Troubleshooting Common Solutions › Ensure that the latch on the EV charging cable handle is locked into place. If the handle is not latched securely, the vehicle will not charge. If the latch is pressed down during charging, charging automatically stops. ›... -
Page 19: Using The Dashboard
Using the Dashboard Enterprise Dashboard Manual To access the JuiceNet Enterprise documentation and FAQs, log into your Enterprise account. Business Dashboard Manual To access the JuiceNet Enterprise documentation and FAQs, log into your Business account. -
Page 20: Important Safety Information
Important Safety Information Read all safety information before installing this product. Save this information card. WARNING: This device should be supervised when used around children. WARNING: Do not put fingers into the electric vehicle connector. WARNING: Do not use this product if the flexible power cord or EV cable is frayed, has broken insulation, or shows any other signs of damage.
Need help?
Do you have a question about the Way JuiceBox and is the answer not in the manual?
Questions and answers
My charger is flashing red and beeping
If your Enel X Way JuiceBox charger is flashing red and beeping, it indicates a system error. The device emits an audible sequence of tones to signal its error state. You should refer to the complete list of error codes for more details or contact support.
This answer is automatically generated
my charger flashes red and beeps
Your Enel X Way JuiceBox charger is flashing red and beeping because a system error has occurred. The device emits an audible sequence of tones and visual indicators to signal its error state. You should refer to the complete list of error codes to identify the specific issue.
This answer is automatically generated