
Related Manuals for TSI Instruments 3080 Series


Summary of Contents for TSI Instruments 3080 Series
- Page 1 Aerosol Neutralizers Series 3080 Electrostatic Classifiers Operation and Service Manual P/N 1933792, Revision K January 2011...
- Page 5 Product Overview Unpacking and Setting Up the System Series 3080 Controls, Indicators, and Connectors Electrostatic Classifiers DMAs: Using Different Models with the Operation and Service Manual Classifier Operating the Classifier Maintenance and Service Troubleshooting Appendixes...
- Page 6 M a n u a l H i s t o r y The following is a manual history of the Series 3080 Electrostatic Classifiers operation and service manual (Part Number 1933792). Revision Date Original Version March 1999 Final April 1999 June 2000 July 2000 October 2000...
- Page 7 W a r r a n t y Part Number 1933792 / Revision K / January 2011 ©TSI Incorporated / 1999–2011 / All rights reserved. Copyright TSI Incorporated / 500 Cardigan Road / Shoreview, MN 55126 / USA Address E-mail Address particle@tsi.com Limitation of Warranty Seller warrants the goods sold hereunder, under normal use and service as...
- Page 8 Software License This is a legal agreement between you, the end user, and TSI Incorporated. BY INSTALLING THE SOFTWARE, YOU ARE AGREEING TO BE BOUND BY THE (effective March 1999) TERMS OF THIS AGREEMENT. IF YOU DO NOT AGREE TO THE TERMS OF THIS AGREEMENT, PROMPTLY RETURN THE UNOPENED PACKAGE AND THE ACCOMPANYING ITEMS (including written materials and binders or other containers) to TSI for a full refund.
- Page 9 C o n t e n t s Manual History ................... vi Warranty ....................vii Software License (effective March 1999) ..........viii Safety ......................xv Labels ....................xv Lifting Caution ..................xvii Description of Caution Symbols ............xvii Caution ..................... xvii Warning ...................
- Page 10 CHAPTER 3 Controls, Indicators, and Connectors ......3-1 Front Panel ..................3-1 Aerosol Inlet ..................3-2 Indicators ..................3-3 Neutralizer Chamber ............... 3-3 Back Panel ..................3-3 AC Power Connector ............... 3-3 DC Power Input ................3-3 Serial Port ..................3-4 DC Power Out .................
-
Page 11: Table Of Contents
Cleaning the Nano DMA Dacron Screen ..........6-9 Cleaning Kr-85 Bipolar Charger/Neutralizer ........6-11 Replacing the Filter Cartridges ............6-12 Flowmeters ..................6-14 Replacing the EPROM ..............6-14 Replace Negative High-Voltage Controller with Positive High-Voltage Controller ..............6-17 Technical Contacts ................6-21 Returning the Classifier for Service .......... - Page 12 F i g u r e s Location of Warning and Information Labels ........xvi Model 3080 Electrostatic Classifier shown with Model 3081 Long DMA and Model 3085 Nano DMA ...... 1-1 Bottom View of Electrostatic Classifier Showing Location of Rubber Feet. Feet can be removed to provide mounting points on cabinet.
- Page 13 6-10 Location of the EPROM on the Main PC-Board ......6-16 6-11 Location of High-Voltage Controller in 3080 Electrostatic Classifier ..............6-17 6-12 Positive High-Voltage Controller ............ 6-18 6-13 Removing High-Voltage Controller ..........6-19 6-14 Electrical Board After High-Voltage Controller is Removed ..................
- Page 14 Flow Range for Each Impactor Nozzle ..........5-7 Maintenance Schedule ..............6-1 Specifications of the 3080 Controller Platform ....... A-1 Specifications of the 3080L Electrostatic Classifier ....... A-2 Specifications of the 3080N Electrostatic Classifier ....... A-3 Midpoint Mobilities, Midpoint Particle Diameters, and Fraction of Total Particle Concentration that Carries –6 to +6 Elementary Charges as a Function of Mobility ....
- Page 15 S a f e t y This section gives instructions to promote safe and proper handling of Series 3080 Electrostatic Classifiers. There are no user-serviceable parts inside the instrument. Refer all repair and maintenance to a qualified technician. All maintenance and repair information in this manual is included for use by a qualified technician.
-
Page 16: Location Of Warning And Information Labels
Customer Service Label (back of cabinet) High-Voltage Symbol Label (interior, on power entry module) Ground Symbol Label (interior, bottom, next to ground stud) High-Voltage Symbol Label (interior, on high-voltage inverter for display) Flag up Label (top, outside cover) 10 High Voltage Symbol Label (interior, on high-voltage power supply) Figure S-1 Location of Warning and Information Labels... - Page 17 L i f t i n g C a u t i o n The Model 3080 Electrostatic Classifier is a heavy instrument. The Classifier alone weighs 17.6 kg (38.9 lbs) and with a DMA attached can weigh as much as 23.2 kg (51.2 lbs). The weight can be unbalanced, especially with a DMA attached.
- Page 18 Warning W A R N I N G Warning means that unsafe use of the instrument could result in serious injury to you or cause irrevocable damage to the instrument. Follow the procedures prescribed in this manual to use the instrument safely. Caution or Warning Symbols The following symbols may accompany cautions and warnings to indicate the nature and consequences of hazards:...
- Page 19 A b o u t T h i s M a n u a l P u r p o s e This is an instruction manual for the operation and handling of Series 3080 Electrostatic Classifiers. R e l a t e d P r o d u c t L i t e r a t u r e ®...
- Page 20 Model 3787 General Purpose Water-based Condensation Particle Counter Operation and Service Manual (part number 6003712) TSI Incorporated Model 3788 Nano Water-based Condensation Particle Counter Operation and Service Manual (part number 6003713) TSI Incorporated G e t t i n g H e l p To obtain assistance with this product or to submit suggestions, please contact: TSI Incorporated...
-
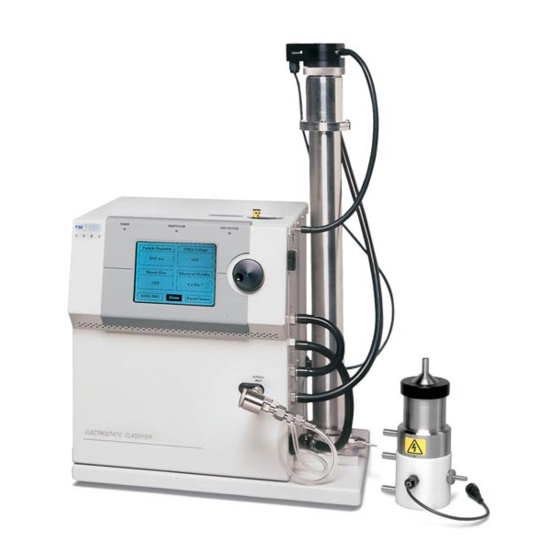
Page 21: Model 3080 Electrostatic Classifier Shown With Model 3081 Long Dma And Model 3085 Nano Dma
C H A P T E R 1 Product Overview This chapter describes the Model 3080 Electrostatic Classifier, shown in Figure 1-1, and gives an overview of how the Classifier works. P r o d u c t D e s c r i p t i o n The Model 3080 Electrostatic Classifier can be used with either Differential Mobility Analyzer (DMA): Long or Nano, as the main component for generating or sizing aerosols. - Page 22 Collectively, the family of Electrostatic Classifiers size-classifies highly monodisperse, submicrometer aerosols in the range from 2 to 1000 nanometers in particle diameter. The Electrostatic Classifier is most often used as an integral part of a monodisperse- aerosol generation system or a submicrometer-particle sizing system.
- Page 23 A p p l i c a t i o n s When used in an aerosol generation system to produce highly monodisperse particles: Aerosol research, including studies of particle transport, diffusion, coagulation, nucleation, and condensation Particle-charge and electrical-mobility studies ...
- Page 24 Polydisperse, submicrometer aerosol passes through a radioactive bipolar charger, establishing a bipolar equilibrium charge level on the particles. Particles receive either positive, negative, or zero charge(s). The particles then enter the DMA and are separated according to their electrical mobility. This parameter is inversely related to particle size and proportional to number of charges on the particles.
-
Page 25: Classifier Packing List
C H A P T E R 2 U n p a c k i n g a n d S e t t i n g U p t h e S y s t e m Use the information in this chapter to unpack and setup the Model 3080 Electrostatic Classifier. - Page 26 M o v i n g t h e I n s t r u m e n t Use the handles built into the left and right undersides of the base or the black handles attached to the back panel while moving the instrument.
-
Page 27: Bottom View Of Electrostatic Classifier Showing Location Of Rubber Feet. Feet Can Be Removed To Provide Mounting Points On Cabinet. Dimensions Are In Inches [Mm]
Figure 2-1 Bottom View of Electrostatic Classifier Showing Location of Rubber Feet. Feet can be removed to provide mounting points on cabinet. Dimensions are in inches [mm]. Ventilation Requirements The Classifier cabinet is designed to be cooled by room air drawn in through a filter from the back of the cabinet and exhausted through holes at the side, front, and bottom of the cabinet. - Page 28 50-60 Hz, 200 W max., single phase. The connector has a built-in on/off switch. Notes: Make certain the line cord is plugged into a grounded (earth grounded) power outlet. Position the Classifier so the power cord connector is not blocked and is easily accessible. The Classifier power supply contains no user-serviceable parts.
-
Page 29: Installation Of Model 3077A/3077 Kr-85 Neutralizer
W A R N I N G The Model 3077A/3077 Aerosol Neutralizer, which is installed inside the Model 3080 Electrostatic Classifier, contains radioactive material that is subject to the regulations of the U.S. Nuclear Regulatory Commission and local regulations. Carefully read the enclosed Model 3077/3077A Aerosol Neutralizers Instruction Manual to determine your legal responsibilities regarding the neutralizer. -
Page 30: Model 3077A/3077 Kr-85 Neutralizer Installed (Showing Pop-Up-Flag Indicator)
4. Insert the neutralizer with the long tube up and the screws in the side of the neutralizer aligned with the slots in the neutralizer mounting block as shown in Figure 2-2. 5. Replace the outlet block in the Classifier and push down. If the block does not fit over the neutralizer tubes easily, do not force it—you will damage the O-rings and cause a leak—try steps 2 and 3 again. -
Page 31: Impactor Inlet
side of the impactor (fitting with low pressure tap) is attached to the aerosol inlet of Classifier (Figure 2-4). Figure 2-4 Impactor Inlet There are three nozzle sizes to choose from. The nozzle size and flow rate determine the largest particle size that can be sampled within each SMPS measuring size range. -
Page 32: Impactor Inlet Installed On Classifier
To install the impactor assembly, use the following steps: 1. Refer to Figure 2-4 and Figure 2-5. The impactor can be oriented in any direction that is convenient. Simply rotate the pressure tap fittings as needed. Figure 2-5 Impactor Inlet Installed on Classifier 2. - Page 33 5. The inlet for the impactor is the fitting that attaches to the end of the impactor cylinder body. The exit fitting attaches to the side wall of the cylinder body. 6. Turn on the Classifier and rotate the control knob to highlight the Menu pane on the display.
-
Page 34: Installing Long Dma In Mounting Bracket. Push Down And Toward Cabinet Until Spring Locks In Place
Figure 2-6 Installing Long DMA in Mounting Bracket. Push down and toward cabinet until spring locks in place. To remove the DMA refer to Figure 2-7 and use the following steps: 1. Place a flat-bladed screwdriver between the DMA base plate and the mounting plate locking spring. -
Page 35: Installing The Long Dma Side-Support Bracket
2. Install the bracket on the side of the cabinet. If the DMA is already mounted at the base, simply pull the DMA column away from the side of the cabinet enough to install the bracket (the cabinet base is somewhat flexible). 3. -
Page 36: Tubing Configuration For The Model 3081 Long Dma
Table 2-3 Tubing Connections for Model 3081 Long DMA Tube # Length Description Part No. 13-in [330-mm] Black, fits ¼-in [6.35-mm] fitting 3001903 ⁄ 23-in [584-mm] Black, fits -in [9.5-mm] fitting 3001904 ⁄ 10.5-in [267-mm] Black, fits -in [9.5-mm] fitting 3001904 ⁄... -
Page 37: Installing Nano Dma In Mounting Bracket. Push Down And Toward Cabinet Until Spring Locks In Place
Nano DMA Mounting The Classifier uses a quick-connect bracket to mount any of the two TSI DMAs. This mount provides physical support for the DMA as well as electrical grounding for safety. C a u t i o n If, for any reason, you operate the Classifier with a DMA that is not installed in the mounting bracket, you must connect the base of the DMA to the chassis of the Classifier with a ground strap or provide independent earth grounding to the DMA for safety. -
Page 38: Releasing The Nano Dma Base Bracket
Figure 2-11 Releasing the Nano DMA Base Bracket Tubing The Nano DMA requires tubing to carry aerosol and sheath air between the Classifier and the DMA. There are two different modes to connect the Nano DMA to the Classifier: the Single Blower mode and the Dual Blower mode. -
Page 39: Tubing Configuration For The Model 3085 Nano Dma In Single Blower Mode
6. When using the bypass flow, connect tube #4 from the Classifier port marked BYPASS FLOW to the DMA port marked BYPASS FLOW. Leave the EXHAUST FLOW port on the Classifier open without the cap (#6 in Figure 2-12). Note: Impactor inlet has to be removed when using the bypass flow because the pressure drop across the impactor inlet is too large for the pump with the 10 to 15 L/min bypass flow. -
Page 40: Tubing Configuration For The Model 3085 Nano Dma In Dual Blower Mode
Dual Blower Mode For Dual Blower mode, refer to Figure 2-13 and Table 2-5 as you follow the steps listed below to install the DMA tubing: 1. The accessory kit contains flexible, conductive tubing that allows you to quickly configure the Classifier for use. Cut appropriate lengths of tubing as listed in Table 2-5. -
Page 41: Tubing Connections For Model 3085 Nano Dma In Dual Blower Mode
6. Connect tube #4 from the Classifier port marked EXHAUST FLOW to the Classifier port marked EXCESS FLOW. 7. In this setup, the bypass flow is not used. Add the cap to the DMA port marked BYPASS FLOW. Table 2-5 Tubing Connections for Model 3085 Nano DMA in Dual Blower mode Tube # Length Description... - Page 42 (This page intentionally left blank) 2–18 Series 3080 Electrostatic Classifiers...
-
Page 43: Front Of The Model 3080 Electrostatic Classifier
C H A P T E R 3 C o n t r o l s , I n d i c a t o r s , a n d C o n n e c t o r s Use the information in this chapter to familiarize yourself with the location and function of controls, indicators, and connectors on the Model 3080 Electrostatic Classifier. -
Page 44: Classifier Lcd Display
The LCD display is used in conjunction with the control knob to adjust the various flows, high voltage, particle size settings and many menu items. The 320 × 240 pixel LCD display provides continuous real-time display of settings. Figure 3-2 Classifier LCD Display There are several operations you can perform using the control knob with the display. - Page 45 Indicators There are three status LEDs on the Classifier: Power, Sheath Flow, and High Voltage. The green Power LED indicates that power is supplied to the instrument. The Sheath Flow LED indicates that the sheath flow is within ±0.05 L/min of its set point.
-
Page 46: Back Panel And Side Panel Of The Model 3080 Electrostatic Classifier
Figure 3-3 Back Panel and Side Panel of the Model 3080 Electrostatic Classifier DC POWER IN 24VDC, 7A MAX Pin Number Signal GND Chassis Green +24V Blue Brown Shield Not Used Figure 3-4 24V DC Power Input Pin Designations Serial Port The Serial Port is a standard RS-232 serial connection that allows communications between the system computer and the Classifier. - Page 47 N o t e If the Classifier is part of an SMPS system, when connecting the serial cable, make sure you connect the cable from the computer to the CPC. It should not be connected to the Model 3080 Electrostatic Classifier. The SMPS system requires the synchronization between DMA voltage and particle counts that the CPC provides.
- Page 48 Exhaust Flow Fitting ⁄ The Exhaust Flow fitting is a -in straight fitting that allows connections for the bypass air exiting the Classifier for the Nano DMA or for the sheath air flow for all DMAs. This fitting is left open in Single Blower mode, or it is connected to the Excess Flow fitting on the Classifier in Dual Blower mode.
-
Page 49: Main Internal Components
Impactor High/Low The impactor fittings are used to connect an internal pressure transducer to the tubes connected to the impactor on the inlet of the Classifier. This allows you to display the aerosol flow rate on the front panel (based on a calibration stored in the Classifier for each impactor nozzle). -
Page 50: Schematic Diagram Of The Classifier
S y s t e m D e s c r i p t i o n The Classifier consists of several subsystems that are needed in addition to the DMA to process a polydisperse aerosol and provide a monodisperse output. The main subsystems include: impactor, sheath-air flow controller, neutralizer, high-voltage controller, and DMA. - Page 51 Impactor An impactor may be mounted on the outside of the Electrostatic Classifier (see Figure 2-5). The aerosol first enters an impactor, which removes particles above a known particle size by inertial impaction. For more information on impactor theory, see Appendix B, “Impaction Theory and Operation.”...
- Page 52 instead of 10 millicurie) as that of the 3077A so it is sufficient enough to achieve charge equilibrium for low concentration aerosols for example ambient aerosols. High-Voltage Controller The High-Voltage controller provides a charge on the center rod of the DMA. This high voltage is controlled by the microprocessor based on the desired setting from the front panel and monitored by a sensitive high-voltage divider.
- Page 53 C H A P T E R 4 D M A s : U s i n g D i f f e r e n t M o d e l s w i t h t h e C l a s s i f i e r This chapter describes the Differential Mobility Analyzers (DMA) that can be used with the Electrostatic Classifier.
-
Page 54: Model 3081 Long Differential Mobility Analyzer
Figure 4-1 Model 3081 Long Differential Mobility Analyzer Particle-free (filtered) air enters the Sheath Flow inlet of the DMA and passes to an annular chamber at the top of the DMA. The flow ® then goes through a double screen of fine nylon (Dacron ) mesh to straighten the flow. -
Page 55: Schematic Diagram Of Long Dma
Figure 4-2 Schematic Diagram of Long DMA (drawing not to scale) M o d e l 3 0 8 5 N a n o D M A The Nano DMA, as shown in Figure 4-3, is optimized for the size range below 20 nm. -
Page 56: 3085 Nano Differential Mobility Analyzer
radius of 0.75 in. (1.905 cm). To reduce the effects of diffusion (by reducing the residence time of particles in the classification zone), the characteristic length has been reduced to 1.963 in. (4.987 cm). The characteristic length is defined as the length between middle of inlet slit to middle of outlet slit. -
Page 57: Schematic Diagram Of The Model 3085 Nano Dma
To improve the flow field at the sample slit (in the center electrode), the exit design for the Nano DMA is four thin supports instead of twelve holes for the Long DMA. The lower section of the center electrode also contains concentric cylinders. The inner cylinder allows the sheath air to pass up to the top of the DMA while the outer cylinder carries the monodisperse sample flow from the exit slit to the exit port. - Page 58 (This page intentionally left blank) 4–6 Series 3080 Electrostatic Classifiers...
-
Page 59: Control Knob Functions
C H A P T E R 5 O p e r a t i n g t h e C l a s s i f i e r This chapter describes how to operate the Classifier using the control knob and LCD display. -
Page 60: Classifier Lcd Display
Figure 5-1 Classifier LCD Display For most of the panes, you can access the function in the pane by pushing the center of the control knob into the panel. The functions of each pane are listed below. Menu The Menu pane is highlighted when you first power-up the instrument. - Page 61 This selection (also available from the main Sheath Flow Rate screen) allows you to set the sheath flow rate from 0 (off) to 15 L/min in Single Blower mode and from 0 (off) to 20 L/min in Dual Blower mode. Note that it requires operating in Dual Blower mode to reach 15 L/min with the Model 3081 Long DMA and 20 L/min with the Model 3085 Nano DMA (see above).
- Page 62 This allows you to adjust the brightness of the Display Brightness LCD display for best viewing. The brightness may have to be adjusted if you alter the lighting in the room dramatically (that is, nighttime lighting vs. bright daylight). The setting varies from 1 to 10 and the display is immediately updated.
-
Page 63: Classifier Menu Structure Quick Reference
Table 5-2 Classifier Menu Structure Quick Reference Exit Sheath Flow Mode Single Blower Dual Blower Sheath Flow Rate 0 (off) to 15.0 L/min (in Single Blower mode) 0 (off) to 20.0 L/min (in Dual Blower mode) Bypass Flow Rate Disabled (in Dual Blower mode) 0 (off) to 15.0 L/min (in Single Blower mode) DMA Model Model 3081... - Page 64 is only able to reach 15 L/min in Dual Blower mode due to the high pressure drop across it. DMA-Voltage The rod voltage is the primary setting that controls the particle size exiting the DMA. This control can be set from 0 to 10,000 volts for any of the DMAs.
-
Page 65: Flow Range For Each Impactor Nozzle
I m p a c t o r The primary function of the impactor is to remove larger particles that carry more than a single charge. However, the impactor is also used as a flowmeter, since the pressure drop across the impactor is proportional to the square of the flow rate. - Page 66 Classifier can be set up this way, the complexity of the system can be reduced dramatically if the sheath and excess flows are connected into a recirculating flow arrangement. In this case, the excess air flow is fed back into the DMA as sheath air.
- Page 67 Model 3077 Aerosol Neutralizer is an optional part that is recommended to be used for low concentration aerosol. H i g h - V o l t a g e C o n t r o l l e r An integral part of the Classifier is the precise control of high voltage.
- Page 68 3. Scroll by rotating the control knob until DMA Model is highlighted and then click the selection. 4. Select the DMA model number corresponding to the DMA physically installed and click the selection. 5. Scroll the menu up or down to Exit and click. Note: The correct DMA must be entered for the Particle Size calculations to be performed correctly on the front panel.
-
Page 69: Maintenance Schedule
C H A P T E R 6 M a i n t e n a n c e a n d S e r v i c e This chapter gives maintenance and service procedures for the Classifier. P e r i o d i c M a i n t e n a n c e Periodic cleaning of several parts of the Classifier is necessary to ensure proper performance. -
Page 70: Cleaning The Impactor
C l e a n i n g t h e I m p a c t o r The impactor’s function is to remove particles above a certain cut size. Over time, particle loading on the impaction plate influences the pressure drop across the nozzle and, therefore, particle measurements due to particle re-entrainment. -
Page 71: Unscrew Middle Flange To Split Long Dma For Cleaning
C l e a n i n g t h e L o n g D M A E l e c t r o d e s W A R N I N G High voltage is accessible in several locations within this instrument. Make sure you unplug the power source to the Classifier and unplug the high-voltage cable from the Classifier to the DMA before disassembling the DMA or performing maintenance procedures. - Page 72 Carefully pull up on the assembly above the flange. (You may need to work the assembly back and forth to loosen the O-ring seal.) Remove the four screws completely. (To avoid the possibility of disastrous damage, leave the four flange screws about one turn short of complete removal before pulling up the assembly;...
- Page 73 C l e a n i n g t h e L o n g D M A D a c r o n S c r e e n The Dacron screen (P/N 1030389) located at the top of the annulus assembly can become contaminated and contribute to arcing.
-
Page 74: Cleaning/Replacing Model 3081 Dacron Screen
Figure 6-3 Cleaning/Replacing Model 3081 Dacron Screen C l e a n i n g t h e N a n o D M A E l e c t r o d e s W A R N I N G High voltage is accessible in several locations within this instrument. -
Page 75: Disassembly Of Model 3085 Nano Dma For Cleaning
Disconnect the high-voltage connector marked HIGH VOLTAGE OUT FOR DMA ONLY on the side of the Classifier. Disconnect all of the tubing between the Classifier and the DMA. Remove the DMA from the Classifier Platform (see “DMA Mounting” under “Installing Model 3085 Nano DMA”... - Page 76 Loosen the two screws in the white plastic base of the DMA and support the parts so they don’t fall apart. Place the DMA back on its base and separate the sections between the stainless steel body and white plastic base (between the Bypass and Excess Flow fittings).
-
Page 77: Cleaning The Nano Dma Dacron Screen
Figure 6-5 Location of Ground Wire C a u t i o n Make sure when you re-assemble the base of the Nano DMA that the ground wire (Figure 6-5) is secured by the ground set screw (Figure 6-4). Use the 0.050 inch Allen-wrench to tighten the set screw. Failure to do this will result in improper grounding and can produce unpredictable measurements. -
Page 78: Replacing/Cleaning The Dacron Screen
assembly, and outer housing (Figure 6-6). Be careful not to damage the sharp edge at the bottom of the sheath assembly. Figure 6-6 Replacing/Cleaning the Dacron Screen 3. The sheath assembly must be separated to remove the Dacron screen. Remove the retaining screw from the sheath cone using the opposite side of the same tool used in step 2. -
Page 79: Cleaning Kr-85 Bipolar Charger/Neutralizer
process, it should be replaced with the spare screen from the accessory kit. 7. To clean the Dacron screen, use tweezers to dip the screen into a clean beaker filled with isopropyl alcohol. Repeat three times. 8. The screen must be dry before the Electrostatic Classifier will operate correctly. -
Page 80: Replacing The Filter Cartridges
Figure 6-7 Removal of Model 3077A/3077 Kr-85 Neutralizer 3. Remove the neutralizer by pulling up on the Polydisperse Flow (neutralizer exit) tube. If the neutralizer does not move easily, remove the cover on the Classifier (loosen seven screws on the side panels) and grip the Neutralizer body to remove it. -
Page 81: Replacing Classifier Filters
There are three filters in the Classifier: two in the Sheath Air line (before and after the pump) and one in the Bypass Air line (before the pump). The cartridges in both filters require periodic replacement (see “Periodic Maintenance” earlier in this chapter). To replace the filter cartridges, refer to Figure 6-8 and follow the steps below: 1. -
Page 82: Flowmeters
9. Leak-test the instrument (see “Testing for Leaks” in Chapter 7). Replacement filter cartridges can be reordered under TSI P/N 1602051 or directly from the manufacturer (see filter case for current part number). F l o w m e t e r s The flowmeter in the sheath-air loop is protected by a HEPA filter at all times. -
Page 83: Location Of Main Pc-Board
To replace the EPROM, proceed as follows: 1. Switch the Classifier off and unplug the power cord. 2. Remove the cabinet cover by loosening the seven (7) screws on the side panels securing the cover (the screws do not have to be removed). -
Page 84: Location Of The Eprom On The Main Pc-Board
10. Install the new chip into the vacant socket by aligning the notch on the top center of the chip with the notch shown on the silkscreen. 11. Slightly insert one row of pins, then push the chip sideways to insert the other row. -
Page 85: Replace Negative High-Voltage Controller With Positive High-Voltage Controller
19. Apply power to the instrument with the switch on the back panel. 20. Check that the version shown under the menu screen (near the bottom of the list) matches the new version of the EPROM. 21. Insert the small black bezel back to the hole around the sample inlet on the front panel. -
Page 86: Positive High-Voltage Controller
Figure 6-12 Positive High-Voltage Controller The two different polarity HV controllers can be identified by their different model numbers: Negative polarity HV controller: 10A12-N4-M (Default) Positive polarity HV controller: 10A12-P4-M (Optional) Follow the steps below to replace the negative HV controller with the positive HV controller physically in the 3080 Electrostatic Classifier: 1. -
Page 87: Removing High-Voltage Controller
Figure 6-13 Removing High-Voltage Controller 4. Grab the sides of the HV controller body and pull it slowly away from the electrical board until it is fully removed. Figure 6-14 shows the electrical board after the HV controller is removed. Negative HV Controller Slot Positive HV... -
Page 88: Optional Positive High-Voltage Controller Installed
Figure 6-15 Optional Positive High-Voltage Controller Installed 8. Put the instrument cover back on and tighten the seven (7) screws to fix the cover. 9. Plug in the power cable and turn on the instrument. 10. When the instrument is first powered, the bottom line of the front panel display shows High Voltage Check: In process. -
Page 89: Technical Contacts
T e c h n i c a l C o n t a c t s If you have any difficulty setting up or operating the Classifier, or if you have technical or application questions about this system, contact an applications engineer at TSI Incorporated, 1-800-874- 2811 (USA) or (651) 490-2811 or e-mail technical.service@tsi.com. - Page 90 (This page intentionally left blank) 6–22 Series 3080 Electrostatic Classifiers...
-
Page 91: Detecting Particles When The Collector-Rod Voltage Is Not Switched On
C H A P T E R 7 T r o u b l e s h o o t i n g This chapter tells how to troubleshoot the Classifier. D e t e c t i n g P a r t i c l e s W h e n t h e C o l l e c t o r - R o d V o l t a g e i s N o t S w i t c h e d o n When the collector-rod voltage is not on, the airstream flowing out of the Monodisperse Flow connector should be particle-free. - Page 92 2. Plug all ports on the DMA except for the Monodisperse Flow port. 3. Connect a pressure gauge or manometer between the Monodisperse Flow port and a leak-tight valve. The valve should be closed. 4. Connect the valve to a vacuum source or a vacuum pump capable of drawing 18 in.
-
Page 93: Isolating Leaks
5. Observe the gauge reading. The reading should not change by more than 0.1 in. Hg in 5 minutes. 6. If the Bypass flow plumbing does leak, follow the steps below under “Isolating Leaks.” To leak-check the Aerosol flow path, follow these steps: 1. - Page 94 (This page intentionally left blank) 7–4 Series 3080 Electrostatic Classifiers...
-
Page 95: Specifications Of The 3080 Controller Platform
A P P E N D I X A M o d e l 3 0 8 0 S p e c i f i c a t i o n s The following specifications—which are subject to change—list the most important features of the Model 3080 Electrostatic Classifier and each of the DMAs. -
Page 96: Specifications Of The 3080L Electrostatic Classifier
Table A-2 Specifications of the 3080 Controller Platform (continued) Environmental Conditions Indoor use Altitude up to 3000 m (10,000 ft) Ambient temperature 10°-40°C Ambient humidity 0-90% RH non- condensing Over-voltage category II Pollution degree II Table A-3 Specifications of the 3080L Electrostatic Classifier Long (Model 3081) DMA included Solids and nonvolatile liquids... -
Page 97: Appendix A Model 3080 Specifications
Table A-4 Specifications of the 3080N Electrostatic Classifier DMA included Nano (Model 3085) Particle type Solids and nonvolatile liquids Particle size range (generation Adjustable from 2 to 150 nm mode) Maximum input concentration particles/cm at 10 nm Voltage 10 to 10,000 VDC Flow rates Sheath air 2 to 15 L/min (Single Blower mode) - Page 98 (This page intentionally left blank) Series 3080 Electrostatic Classifiers...
-
Page 99: History
A P P E N D I X B T h e o r y o f O p e r a t i o n The principle of the Model 3080 Electrostatic Classifier with any DMA is based on the monotonic relationship between electrical mobility and particle size with singly charged particles. -
Page 100: Impaction Theory And Operation
[1982] and Hoppel [1978], and the data reduction technique was developed by Fissan et al. [1982]. The approximation of the bipolar charge distribution on submicrometer particles has been taken from the work of Wiedensohler [1986, 1987] and Wiedensohler and Fissan [1988]. In 1989, Wang and Flagan improved upon the system by using a dynamically scanned DMA voltage. -
Page 101: Classifier Shown With Impactor Installed On Inlet
Figure B-1 Classifier Shown with Impactor Installed on Inlet Figure B-2 Cross-Sectional View of an Inertial Impactor [Hinds, 1982] The impaction plate deflects the flow to form a 90° bend in the streamlines. Particles with sufficient inertia are unable to follow the streamlines and impact on the plate. -
Page 102: Electrostatic Classifier
cut-point diameter is a function of the impactor flow rate and nozzle diameter. Equation B-1 is used to calculate the cut-point diameter. π µ Equation B-1 ρ where: = particle cut-point diameter (centimeter, 50% cut efficiency) Stk = Stokes number = 0.23 ρ... - Page 103 The charged aerosol passes from the neutralizer into the main portion of the Differential Mobility Analyzer (DMA), shown in Figure B-3 and Figure B-4. The DMA contains two concentric metal cylinders. The polydisperse aerosol (q ) and sheath air (q ) are introduced at the top of the Classifier and flow down the annular space between the cylinders.
-
Page 104: Flow Schematic For The Electrostatic Classifier With Long Dma
Figure B-3 Flow Schematic for the Electrostatic Classifier with Long DMA B–6 Series 3080 Electrostatic Classifiers... -
Page 105: Flow Schematic For The Electrostatic Classifier With Nano Dma In Single Blower Mode
Figure B-4 Flow Schematic for the Electrostatic Classifier with Nano DMA in Single Blower Mode (continued on next page) Theory of Operation B–7... -
Page 106: Charging Theory
Figure B-5 Flow Schematic for the Electrostatic Classifier with Nano DMA in Dual Blower Mode C h a r g i n g T h e o r y The particle charge distribution used in the data reduction for the SMPS is based on a theoretical model developed by Wiedensohler [1986] and is an approximation of the Fuchs [1963] diffusion theory for particle sizes in the submicrometer range. -
Page 107: Bipolar Particle Charge Distribution In Air [Wiedensohler And Fissan, 1988
Figure B-6 Bipolar Particle Charge Distribution in Air [Wiedensohler and Fissan, 1988] (continued on next page) Theory of Operation B–9... -
Page 108: Midpoint Mobilities, Midpoint Particle Diameters, And Fraction Of Total Particle Concentration That Carries -6 To +6 Elementary Charges As A Function Of Mobility
Table B-1 Midpoint Mobilities, Midpoint Particle Diameters, and Fraction of Total Particle Concentration that Carries –6 to +6 Elementary Charges as a Function of Mobility B–10 Series 3080 Electrostatic Classifiers... -
Page 109: Coefficients For Equation
The formulas used to calculate Table B-1 are shown below. They are taken from Wiedensohler [1988]. The mean free path is taken from Kim et al. [2005]. To calculate the fraction of particles carrying zero, one or two charges, use Equation B-2 which is an approximation of the Fuchs model. -
Page 110: Particle Mobility Theory
P a r t i c l e M o b i l i t y T h e o r y As mentioned previously, only particles with a narrow range of electrical mobilities are extracted by the DMA to be measured by a particle sensor. - Page 111 The range of particle diameters removed from the Electrostatic Classifier not only depends on particle electrical mobility. Knutson [1975] determined the relationship between the particle electrical mobility and the Classifier parameters. The relationship is given in equation B-5. ...
-
Page 112: Collector Rod Voltage As A Function Of Particle Diameter For Normal Operating Conditions Of The Long Dma [Agarwal And Sem, 1978
Figure B-7 allows calculation of the particle diameters that pass through the exit slit of the Electrostatic Classifier, if the number of charges on the particle is known. Table B-1 shows that the majority of the aerosol in charge equilibrium exists as singly charged particles. -
Page 113: Selected References
S e l e c t e d R e f e r e n c e s The following list contains papers that are referenced in this chapter as well as other references that may be interesting to the reader. - Page 114 Kim, J.H., G.W. Mulholland, S.R. Kukuck, and D.Y.H. Pui [2005] “Slip Correction Measurements of Certified PSL Nanoparticles Using a Nanometer Differential Mobility Analyzer (Nano-DMA) for Knudsen Number From 0.5 to 83,” Journal of Research of the National Institute of Standards and Technology, 110(1):31-54. Kinney, P.D., D.Y.H.
- Page 115 Willeke, K., and P.A. Baron, [1993] “Aerosol Measurement: Principles, Techniques, and Applications,” New York :Van Nostrand Reinhold, 26-28. Wiedensohler, A., [1988] “Technical Note: An Approximation of the Bipolar Charge Distribution for Particles in the Submicron Range,” Journal of Aerosol Science, 19:3/387-389. Wiedensohler, A., and H.J.
- Page 116 (This page intentionally left blank) B–18 Series 3080 Electrostatic Classifiers...
-
Page 117: Serial Port Connector On The Back Of The Classifier
A P P E N D I X C U s i n g S e r i a l D a t a C o m m a n d s This chapter contains information you need if you are writing your own software for a computer or data acquisition system. -
Page 118: Serial Port Pin Designations
Figure C-1 Serial Port Pin Designations Table C-1 Signal Connections for RS-232 Configurations Pin Number RS-232 Signal — Transmit Output Receive Input — — — — — Figure C-2 Serial Port Connector on the Back of the Classifier C–2 Series 3080 Electrostatic Classifiers... -
Page 119: Appendix C Using Serial Data Commands
B a u d R a t e The baud-rate setting is the rate of communication in terms of bits per second (baud). The Classifier uses a baud rate setting of 9600. For proper communications, make sure that all software used with the instrument is set at the appropriate rate. -
Page 120: Command Quick Reference
Command Quick Reference The following tables provide a quick reference to all the serial commands. Command definitions, syntax, and examples begin after the tables. Directions for issuing commands and troubleshooting commands are provided at the end of this section. Read Commands Read Pressure Read Firmware Version Read Flow Rate... -
Page 121: Troubleshooting Input
Troubleshooting Input Use Table C-2 as a troubleshooting guide. Table C-2 Troubleshooting Serial Commands Symptom Possible Problem Refer to "Error" message An invalid command; command does not Detailed description of the after pressing exist. commands in this section. The <Enter> command description shows the An invalid parameter, which includes too range and an example. - Page 122 Read Temperature (Read Temperature) Returns the following temperatures: Sheath flow temperature [in Return: Cabinet temperature [in Read User Settings (Read User Setting) Returns values selected on front panel: Return: Selected DMA voltage [in Volt] Selected particle diameter [in nm] Selected flow mode [D or S (D = Dual, S = Single)] Selected electrical mobility [in cm /(Vs)] Selected sheath flow rate [in L/min]...
-
Page 123: Definitions Of Combined Set Commands
Read Model Name (Read Model Name) Returns the current model name and number as displayed on the power on screen: “Electrostatic Classifier 3080” Return: Read On Time (Read On Time) Returns the accumulated On Time hours of instrument, sheath blower and bypass blower. (updated every minute) stored in the EEPROM. - Page 124 Set Flow Mode SFMx (Set Flow Mode) Set sheath blower mode: SFMS Single Blower Set: SFMD dual blower Set: Return: S or D Set Sheath Flow Rate SQSx (Set Sheath Flow Rate) Set sheath flow rate: SQS10.0 sheath flow rate = 10.0 L/min Set: sheath flow rate [in L/min] Return:...
- Page 125 w = 2: impactor 1 flow calibration x = row of calibration table (1 ≤ x ≤ 50) y = raw impactor 1 pressure in (100 * z = calibrated impactor 1 flow rate in (100 * L/min) w = 3: impactor 2 flow calibration x = row of calibration table (1 ≤...
- Page 126 Return: read serial number of all impactor example: 0457 cm; SN: 320 0508 cm; SN: 120 0710 cm; SN: 173 Set Offset Bit Value of Flow Sensor SOVx (Set Offset Values of pressure transducer and flowmeter) SOVx measure offset bit values the following sensors Set: and stores values in EEPROM: x = B: Bypass Pressure Transducer...
- Page 127 Set Calibration Bypass Parameter B (Polynomial Flow Calibration Algorithm) SCBBx (Set Calibration Bypass B Parameter) Set sheath flow calibration parameter: SCBB1.234567e-12 Set: bypass flow calibration parameter SCBB Return: bypass flow calibration parameter Set Calibration Impactor Parameter A (Polynomial Flow Calibration Algorithm) SCIxAy (Set Calibration Impactor Parameter A) Set impactor flow calibration parameter A (x can be 1, 2,...
- Page 128 Set DMA Parameter SDMAxyz (Set DMA parameter) style z for DMA x (1 ≤ x ≤ 5) SDMAxSz Set: z = 0: DMA data not available, z = 1: cylindrical DMA,] SDMAxIz Set: inner diameter for DMA x (in mm) SDMAxOz Set: outer diameter for DMA x (in mm)
-
Page 129: Calibration Software Setup
A P P E N D I X D C l a s s i f i e r C a l i b r a t i o n This appendix contains sections on calibrating the Model 3080 Classifier. There are three main aspects of the instrument that can be calibrated by the user: sheath flowmeter, bypass flowmeter, and impactor inlets. -
Page 130: Electrostatic Classifier Calibration Software Startup Screen
software by double-clicking on the Electrostatic Classifier software icon. Figure D-1 Electrostatic Classifier Calibration Software Startup Screen When the software starts, you should see a screen similar to that shown in Figure D-1. If you get an error message like that shown in Figure D-2, check the serial cable connection or try setting the software to another available serial port using the tab shown in Figure D-3. -
Page 131: Using The Calibration Software
Figure D-3 Communications Settings for Serial Port U s i n g t h e C a l i b r a t i o n S o f t w a r e The first tab in the calibration software, shown in Figure D-4, gives instrument status information. -
Page 132: Status Settings
Figure D-4 Status Settings The setup tab allows you to view the gas properties used by the Classifier. Note: You cannot change any of the gas parameters. Series 3080 Electrostatic Classifiers... -
Page 133: Sheath-Air Calibration
Figure D-5 Setup Tab S h e a t h - A i r C a l i b r a t i o n The flows described below are calibrated at TSI and normally do not need to be recalibrated. These instructions are intended for the advanced user that may wish to perform a field calibration. - Page 134 2. Select Flow Calibration. 3. Select Sheath Flow. 4. Set Raw Sheath Flow to OFF (0.00) LPM using the dial knob on the front panel of the Classifier and wait 60 seconds until flow has completely stopped. 5. Make sure that Exhaust Flow and Excess Flow port fittings are connected by a tube on the outside of the Classifier.
-
Page 135: Bypass-Air Calibration
Figure D-6 Sheath Flow Calibration B y p a s s - A i r C a l i b r a t i o n 1. Select MENU from the main screen on the front panel display of the 3080 Electrostatic Classifier. 2. -
Page 136: Impactor Calibration
9. Enter the data into the EC program under Bypass Flow Calibration tab (Figure D-7) and click on the Set Calibration button. 10. Exit the Bypass Calibration Screen on the Classifier and close the software window. Figure D-7 Bypass Flow Calibration Tab I m p a c t o r C a l i b r a t i o n 1. -
Page 137: Impactor Calibration Tab
5. Make sure that Exhaust Flow and Excess Flow port fittings are connected by a tube on the outside of the Classifier. Put a ⁄ to ¼ inch adapter on the Bypass Flow port fitting. Connect the Bypass Flow port fitting to the Polydisperse Flow port fitting with a tube. -
Page 138: Working With Calibration Files
13. Repeat steps 6 to 12 for the 0.0508 and 0.071 cm nozzles by selecting those sizes from the Impactor Nozzle Type drop- down box. 14. The calibration file can be saved by pressing the Save button; But saving the file is not required for this calibration procedure. - Page 139 I n d e x caution, xv, 2-2, 6-4, 6-8, 6-9 description, xvii AC power connector, 3-3 electronic circuits, 6-14 AC power in connection, 2-3 high-voltage cable, 2-17 acetyl-plastic spacer (Black Delrin), 4-1 solvents, 6-11 advantages, 1-2 symbol, xviii aerosol, A-1 charging theory, B-8 3080L, A-2 chemical reactions, 1-3...
- Page 140 Classifier connectors, 3-1 menu (continued) contacting TSI firmware version, 5-4 email address, vii flow calibration, 5-4 getting help, xx impactor, 5-3 control knob functions, 5-1 power-up with, 5-3 control platform sheath flow mode, 5-2 specifications, A-1, A-2 sheath flow rate, 5-3 controls, 3-1 structure quick reference, 5-5 CPC, 1-2, 2-4...
- Page 141 Model 3085 Nano DMA, 2-12 mounting bracket, 2-13 filter cartridges internal components, 3-7 replacing, 6-13 isolating leaks, 7-3 filter efficiency, 1-3 firmware version, 5-4 flow calibration, 5-4, D-5 Kr-85 Bipolar Charger/Neturalizer flow range for impactor, 2-7 installation, 2-5 flow rate, A-1 Kr-85 Bipolar Charger/Neutralizer.
- Page 142 Model 3081 Long DMA, 1-1, 4-1 PC board cleaning, 6-3 location, 6-15 cleaning Dacron screen, 6-5 pin connectors, C-1 installation, 2-9 polydisperse, 1-1 side-support bracket, 2-11 polydisperse aerosol, 1-4, 3-8 mounting, 2-9 polydisperse flow, 4-2, D-9 mounting bracket, 2-10 polydisperse flow fitting, 3-5 schematic, 4-3 polydisperse flow port, 2-11 side-support bracket, 2-10...
- Page 143 removal serial port, 3-4 high-voltage controller, 6-19 communication settings, D-3 Model 3077A/3077 Kr-85 Neutralizer, 6-12 connector on back of Classifier, C-2 resources. (see references) pin designations, C-2 service, 6-1 returning Classifier, 6-21 set auxiliary output, C-11 safety, xv set bypass flow rate command, C-8 caution symbol, xvii set calibration, D-6, D-9 labels, xv...
- Page 144 tandem, 1-3 Teflon insulators, 4-1 testing for leaks, 7-1 theory of operation, B-1 Classifier, B-4 history, B-1 impactor, B-2 particle mobility theory, B-12 troubleshooting, 7-1 serial commands, C-5 serial data commands, C-5 tubing configuration Model 3085 Nano DMA, 2-15, 2-16 connections Model 3085 Nano DMA, 2-15, 2-17 dual blower mode, 2-16, 2-17...
- Page 145 Reader’s Comments Please help us improve our manuals by completing and returning this questionnaire to: TSI Incorporated (Particle Instruments) 500 Cardigan Road Shoreview, MN 55126 U.S.A. Fax: (651) 490-3824 E-mail Address: particle@tsi.com Manual Title: Series 3080 Electrostatic Classifiers P/N: 1933792 Rev.: K 1.
- Page 147 TSI Incorporated – 500 Cardigan Road, Shoreview, MN 55126 U.S.A Tel: +1 800 874 2811 E-mail: particle@tsi.com Website: www.tsi.com Tel: +44 149 4 459200 E-mail: Website: tsiuk@tsi.com www.tsiinc.co.uk France Tel: +33 491 11 87 64 E-mail: Website: tsifrance@tsi.com www.tsiinc.fr Germany Tel: +49 241 523030 E-mail: tsigmbh@tsi.com...
Need help?
Do you have a question about the 3080 Series and is the answer not in the manual?
Questions and answers