Table of Contents
Advertisement
Quick Links
Advertisement
Table of Contents

Related Manuals for Sitecom WLM-4501


Summary of Contents for Sitecom WLM-4501
- Page 1 WLM-4501 Wireless ADSL2+ Gigabit Modem Router User Manual Version: 1.0...
-
Page 2: Table Of Contents
WLM-4501 PLACEMENT ..............10 SETUP LAN, WAN ................10 PC NETWORK ADAPTER SETUP ............11 INDOWS 7 12 INDOWS ISTA INDOWS BRING UP THE WLM-4501 ............. 14 INITIAL SETUP WLM-4501 ............14 LOGIN PROCEDURE STATUS ....................15 TATUS TATISTICS DHCP L IAGNOSTICS CONFIGURATION WIZARD ............ - Page 3 IRMWARE PGRADE EBOOT Revision 1.0 © Sitecom Europe BV 2011 Note: All the information contained in this manual was correct at the time of publication. However, as our engineers are always updating and improving the product, your device’s software may have a slightly different appearance or modified...
-
Page 4: Introduction
802.11n client adapters. The WLM-4501 is not only a Modem or Wireless Access Point, but can also be used to connect wired Ethernet devices at 10/100/1000Mbit speeds. For data protection and privacy, the WLM-4501 can encode all wireless transmissions with WEP, WPA or WPA2 encryption. -
Page 5: Key Features
Advantages IEEE 802.11g compliant Fully Interoperable with IEEE 802.11b / IEEE802.11g compliant devices Based on 802.11n technology WLM-4501: Up to 6 times faster than regular 802.11g (in combination with a 150n or 802.11n wireless adapter) Four 10/100/1000 Mbps To connect four wired PC's as well. -
Page 6: Package Contents
Open the package carefully, and make sure that none of the items listed below are missing. Do not discard the packing materials, in case of return; the unit must be shipped back in its original package. WLM-4501 modem/router 110V~240V 12V 1A Power Adapter Quick Install Guide CD (User’s Manual) -
Page 7: Cautions
3 Cautions This router’s design and manufacturer has your safety in mind. In order to safely and effectively use this router, please read the following before usage. 3.1 Usage Cautions The user should not modify this router. The environmental temperature should be within +5 ~ +35 degrees Celsius. -
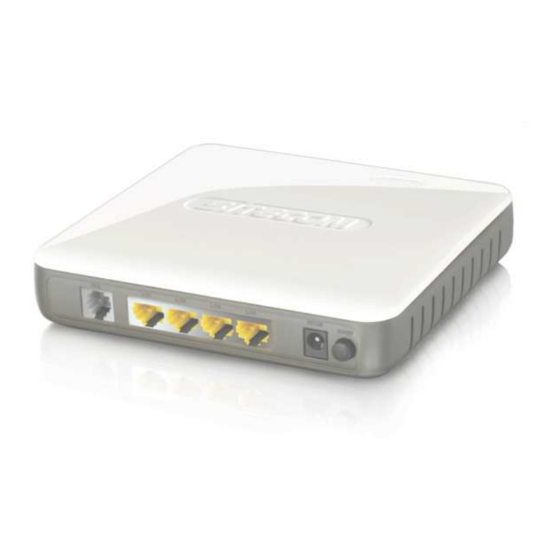
Page 8: Product Layout
4 Product Layout WPS/Reset button Power button Modem connection Power connector LAN / computer connections Port Description ADSL Connect your telephone/ADSL cable this port Connect the cable from your PC or network device to this ports. Power connector Connect your power adapter to this port. Power button Turn the modem On or Off. -
Page 9: Back Label
Back label The back label describes the corresponding LED indications and port functionality. Description Power Lights up when powered ON. Blinks on TEST/RESET ADSL Lights up when an ADSL cable is connected. Internet Lights up when internet connection is UP. WLAN Lights up in Blue when WLAN is enabled. -
Page 10: System Requirements
Ethernet compatible CAT5 cables. 6 WLM-4501 Placement You can place the WLM-4501 on a desk or other flat surface, or you can mount it on a wall. For optimal performance, place your Wireless Broadband Modem/Router in the center of your office (or your home) in a location that is away from any potential source of interference, such as a metal wall or microwave oven. -
Page 11: Pc Network Adapter Setup
8 PC Network Adapter setup Windows XP • Go to [Start Menu], [Control panel], [Network Connections]. • Right-mouse-click on the [Local Area Connection]) icon, and select [properties] • Select [Internet Protocol (TCP/IP)] =>Click [Properties]. • Select the [General] tab. The WL-358/359 supports DHCP. Please select both [Obtain an IP address automatically] and [Obtain DNS server address automatically]. -
Page 12: Windows Vista/Windows 7
Windows Vista/Windows 7 • Go to [Start Menu], [Control panel], [View network status and tasks], -> [Manage network connections]. • Right-mouse-click on the [Local Area Connection]) icon, and select [properties]... - Page 13 • Select [Internet Protocol Version 4 (TCP/IPv4)], and Click [Properties]. • Open the [General] tab. The WLM-4501 supports DHCP. Please select both [Obtain an IP address automatically] and [Obtain DNS server address automatically].
-
Page 14: Bring Up The Wlm-4501
Connect the supplied power-adapter to the power inlet port and connect it to a wall outlet. Press the Power-Button to turn the modem on. The WLM-4501 automatically enters the self-test phase. During self-test phase, the Power LED will blink briefly, and then will be lit continuously to indicate that this product is in normal operation. -
Page 15: Status
Status The pages in the status section provide you general information about the operational status of your device. Status The System status section allows you to monitor the current status of your modem/router: the UP time, hardware information, serial number as well as firmware version information is displayed here. -
Page 16: Statistics
Statistics You can view statistics on the processing of IP packets on the networking interfaces. You will not typically need to view this data, but you may find it helpful when working with your ISP to diagnose network and Internet data transmission problems. -
Page 17: Dhcp List
DHCP List This page shows all DHCP clients (LAN PCs) currently connected to your network. The table shows the assigned IP address, MAC address and expiration time for each DHCP leased client. -
Page 18: Diagnostics
Diagnostics The Diagnostics page allows you to test the current configuration. Click ‘Start’ to let the modem router perform several tasks to verify if the connection is operational. -
Page 19: Configuration Wizard
11 Configuration Wizard Click Wizard to configure the modem. The Setup wizard will now be displayed; check that the adsl line is connected and click Next. Select your country from the Country list. Select your internet provider. Click Next. Depending on the chosen provider, you may need to enter your user name and password or hostname in the following window. -
Page 20: Basic Settings
12 Basic Settings LAN Settings This page is used to configure the LAN interface of your ADSL Router. You can set IP address, subnet mask, and IGMP Snooping or modify the IPv6 address range .
Need help?
Do you have a question about the WLM-4501 and is the answer not in the manual?
Questions and answers