Table of Contents
Advertisement
Advertisement
Table of Contents

Related Manuals for Mamiya RB67 Pro SD


Summary of Contents for Mamiya RB67 Pro SD
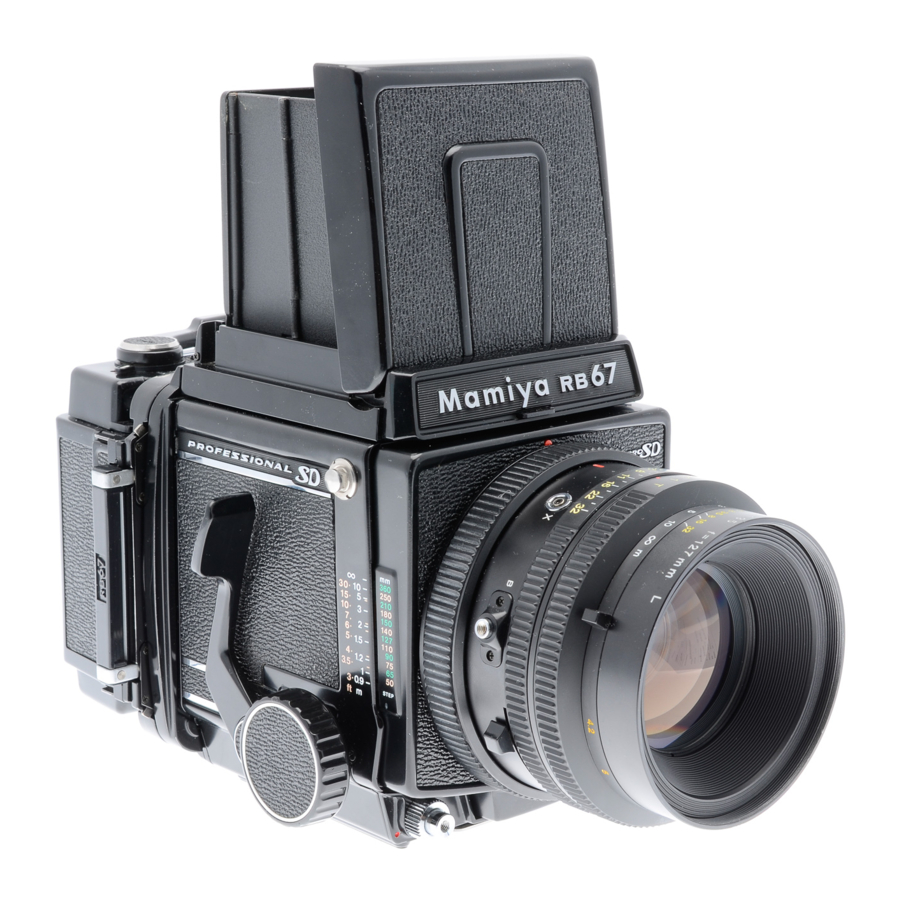
- Page 2 Congratulations on your wise decision to purchase the Mamiya RB 67 Professional SD (Pro-SD) The RB67 Pro-SD is the latest addition to the long-selling RB67 Series which was first released in 1970. Due to its innovative 6x7cm revolving back format, the RB67 has been highly recognized throughout the world as the genesis of the medium format cameras.
- Page 3 pa* and How ,o *pep@ ... 6_fI ($3 1 Smifiwons ... Operating Revolving Adapter ... ~~leHiog_the Shutter Speed and lhe Aperlure ... 21 Ming am) Fmmm bob Fixing ... 22 (13 1 Taking Photographs ... fi4/ Testing theShulterWhentheFilmisi.oaded @yj m*w SC& ... (17 / Deoth_of_field ...
- Page 4 1. Features of the Mamiya RB67 Pro-SD Practical 6x7cm Since 6x7cm format covers an area 4.5 times the 35mm format. excellent picture quality is assured. In color photography, in particular, it demonstrates superior results. The ratio between the length and width of the 6X7cm format is almost the same as that of large sized printing paper, permitting economical enlargements without cropping.
- Page 5 2. Parts and and How to Operate Shutter cocking lever The lever cocks both the sh the mirror. Unless they are set, a safety device prevents the shutter release button from being depressed. Dark slide - When the dark slide is inserted, a safety device prevents the shutter release button from being depressed.
- Page 6 Waist-level finder Focusing screen Various interchangeable screens are available. Being interlocked with the revolving adapter, horizontal picture format index lines appear under the screen. Carrying strap lug Accessory shoe Dark slide storing lug Insert the dark slide of a holder without a dark slide slot.
- Page 7 Coupling pin for film wind-stop release When the shutter is released, the pin will automatically disengage film wind- stop allowing subsequent film advance. Light baffle DO NOT touch the baffle with your fingers! Revolving adapter Turning this adapter up to 90° permits change-over between the horizontal and vertical picture format.
- Page 8 Synchroflash terminal (X contact) Synchronized at all speeds. Shutter speed ring Bulb (B) Used to close the shutter when the shutter speed dial has been set at T (time). Depth-of-field preview lever d Bayonet ring The bayonet ring clamps the lens to the body.
- Page 9 Back cover Dark slide slot Accepts the dark slide from either the right or left side. Film spool stud Load film so that th pulled out following the guide marks. Guide mark for leader paper ___________________ Starting mark Wind the film advance lever until the leader paper staring mark is aligned with this mark.
- Page 10 Additional Accessory shoe is provided. Shutter release button can be locked to prevent releasing the shutter accidentally. Standard Lenses: Lens: Mamiya KL 127mm f/3.5L with lens hood Composition: 6 elements in 4 groups Angle of view: 38° Filter screw diameter:...
-
Page 11: Attaching And Removing The Lens
4 . Attaching and Removing the Lens After cocking the mirror and the lens shutter, mount the lens on the camera body. Cocking the mirror 1. Remove the front body cap from the camera body. 2. Be sure that the mirror is in the cocked, down position in the camera body, shielding the film plane from exposure to light. - Page 12 Removing the lens 1. Set the mirror and cock the shutter by pushing the cocking lever as far as it will go toward the front of the camera body. 2. Rotate the bayonet ring of the lens counter- clockwise as far as it will go (the white dot on the bayonet ring will align with the central red mark on the body) and remove the lens.
-
Page 13: Operation
Operation Raising the magnifier Lowering the magnifier Folding the finder Slide the magnifier release slightly to the left Gently push the base plate of the magnifier After lowering the magnifier, gently squeeze and the magnifier will pop up into position. all the way down until it locks in place. - Page 14 Changing the diopter lens While holding the diopter lens base plate with both side panels of the finder, turn the diopter lens counterclockwise, and at the point where the white dot on the diopter lens aligns with the white dot on the base plate, remove the diopter lens.
-
Page 15: Shutter Operation
6. Shutter Operation Shutter release button The shutter release button incorporates a safety mechanism to prevent accidental release of the shutter. When the shutter release locking ring is turned and the red index dot is aligned with the white dot (A) on the body, the shutter release button can be pressed. -
Page 16: Attaching And Detaching The Roll Film Holder
Attaching and Detaching the Roll Film Holder Removing the rear body cap By moving the slide locks (A) on both sides all the way to the left, the cap be removed. Never push the light baffle on the camera back after removing the rear body cap. If the light baffle is forced, light leakage or other malfunctions may occur. - Page 17 Removing the roll film holder 1. Insert a dark slide in the roll film holder. 2. Remove the roll film holder by sliding both slide locks in the opposite direction to the arrow (Lock) on the slide lock. . If the dark slide is not inserted, the slide lock will be locked by the safety device, and the roll film holder cannot be detached.
-
Page 18: Releasing The Shutter
8. Releasing the Shutter It is best to become aquainted with the method of releasing the shutter before actually putting film in the camera. Rotate the shutter release lock ring until the mark on it is aligned with the white dot on the body. -
Page 19: Loading The Film Holder
9. Loading the Film Holder 1. While pressing the back cover, pull out the upper and lower back cover latches and the back cover will open. Remove the film insert. When loading film, avoid direct sunlight: either load the film in the shade or turn your body away from the sun and load it in the shade of your own body. - Page 20 Move the film advance lever gently, until the starting mark (arrow) of the leader paper aligns with the starting mark of the holder. The film advance lever can be moved in several short, definite strokes. If the leader paper is pulled too far, the film may become fogged, so be careful not to go beyond the arrow.
-
Page 21: Exposure Counter
Film winding for first exposure When the film is completely advanced, the numeral ‘1’ will appear in the exposure counter and the red film-advance warning will disappear indicating that the holder is ready for photography. The shutter cannot be released unless the film from S (start) to 1 has been completely advanced with the cocking lever. - Page 22 1 0. Operating the Revolving Adapter Operating the revolving adapter When the horizontal format mark of the revolving adapter is facing upward, a horizontal photo will result. For a vertical photograph, turn the revolving adapter clockwise until it stops. To change from vertical to horizontal, turn the revolving adapter counterclockwise.
- Page 23 Removing/attaching the revolving adapter To remove the revolving adapter, pull down the R-lock lever (A) on the back bottom of the camera. To attach the revolving adapter, position the white dot on the side of the adapter towards the upper side of the camera, and completly push in the R-lock lever while firmly holding the adapter to the camera body.
- Page 24 Focusing and Focusing Knob Fixing Focusing When the shutter is cocked, the mirror is cocked simultaneously, and an image is visible on the ground glass focusing screen. By turn- ing either the left or right focusing knob, adjust the focus and compose the picture. Focusing knob fixing After adjusting the focus, turn the focusing knob fixing lever forward and clamp it to secure...
-
Page 25: Taking Photographs
1 3. Taking Photographs Advancing the film 1. Take out the dark slide and release the shutter. When the shutter is released, the red mark will appear in the exposure counter indi- cating that the film has been exposed. 2. As the shutter is released, simultaneously the film wind-stop mechanism is automatically disengaged, and the film can be advanced to the next frame. - Page 26 Storing the dark slide When photographing, the dark slide may be conveniently kept in the storage on the back of the holder. It can be inserted either from the right or left side. The dark slide can also be stored on the side of the camera body as pictured.
- Page 27 14. Testing the Shutter When the Film is Loaded When the shutter is cocked with the darkslide partially pulled out (approx. 5mm) and the shutter release button is pres- sed, the shutter can be released without exposing the film in the roll film holder to light.
-
Page 28: Unloading The Film
15. Unloading the Film After completing the last exposure, completely wind the backing paper on to the take-up spool. 1. Open the back cover of the holder and remove the film insert. Press the right side spool release pin, remove the full spool, then wrap and seal the film to protect it from loosen- ing. -
Page 29: Distance Scale
16. Distance Scale Distance from the film plane to the subject can be determined by the distance scale (A). Each lens features different distance scale curves as pictured above. The figure on the distance graduation (B) which align with the curve indicates the distance to the subject. - Page 30 18. Time (T) exposures, Flash Photography To make a time exposure, first set the shutter speed ring to T and screw a cable release into the bulb socket. After doing so, the shutter will remain open upon depressing the shuner release button. The shutter will be closed by pressing the plunger of the cable release without giving any shock to the camera.
-
Page 31: Changing The Focusing Screen
Flash photography Connect the cord of the flash unit to the synchroflash terminal (X contact). . The flash unit synchronizes at all shutter speeds. Determining the aperture The aperture setting for flash photography is determined by dividing the guide number of the flash unit by the subject distance. -
Page 32: Mirror Lock-Up Photography
20. Mirror Lock-up Photography The mirror lock-up technique, whereby the mirror is raised beforehand and only the lens shutter is released is ideal for situations where vibrations must be completely eliminated. Specifically close-up photography, using tel- ephoto lenses and in applications where long or slow exposures are necessary mirror lockup is ideal. - Page 33 Using the Mirror Lock-up Cable Release 1. When exposure is shorter than 1 second: (1) Screw the short cable into the mirror lock-up socket, and screw the long cable into the shutter release button. (2) By pressing the cocking lever forward as far as it will go,cock the shutter and the mirror.
-
Page 34: Multiple Exposure Photography
21 Multiple Exposure Photography When the multiple exposure lever of the roll film holder is moved forward, the multiple- exposure prevention coupling pin disengages. In this mode the shutter can be cocked and released without limit. The multiple exposure lever can be changed over before or after the shutter is cocked, and also before or after the shutter is released for the first multiple exposure... - Page 35 1. After focusing the lens, read the exposure compensation factor on the scale. For example, assuming that the focus was adjusted with the 127mm lens, the result will be as shown in photo above. Look for the same pattern in the bottom column where the side panel lines meet the 127mm lens scale.
-
Page 36: Using A Tripod
Using a tripod The use of a large, sturdy tripod is recom- mended for optimum picture quality. 1. The standard tripod has a 1/4 inch tripod screw. Simply attach the RB67 Pro-SD as you would any other camera with standard threads. 2. -
Page 37: How To Use The Carrying Strap
23 How to use the Carrying Strap Attaching the Strap Hold the metal clamp of the strap so that the key-hole shaped open- ing faces the Carrying Strap Lug on the camera body. Gently fit the upper part of the key-hole opening over the lug. - Page 38 “‘. Back Locking System The unique back locking system of the Mamiya Pro-SD is designed to allow it to accept a large variety of film holders. All Pro- SD seies film holders mount and lock directly on the back of the Pro-SD.
- Page 39 It should be attached to the rear lens mount. (When using Mamiya KL lenses with the RB Pro-S and RB67. remove the lens mount adapter ring.) . The lens mount adapter ring comes with Sekor C lenses.
- Page 40 Mamiya RB67 Pro-SD Operation Diagram Attaching a lens with the shutter released or the mirror raised When a lens is removed from the body, the mirror is set (lowered) and the lens shutter cocked. Conversely, when attaching a lens, the same conditions should prevail (mirror set and shutter cocked).
- Page 41 1 Shutter setting mode Shutter blade /--\ Aperture blade Mirror-up photography Shutter blade Just after pressing the shutter release Shutter blade &b Aperture blade Exposure Shutter blade ‘L/ Aperture blade...
-
Page 42: Troubleshooting
26 Trouble Shooting Various safety interlocking device are incor- porated in the Mamiya RB67 Pro-SD to elimi- nate careless operational mistakes. When the shutter is not released, or when the lens or the roll film holder cannot be removed, do not hastily conclude that this indicates a camera malfunction. - Page 43 Also check any accessories you plan to use. For a general overhaul, cleaning, or minor repair, take the camera to your nearest au- thorized Mamiya Service Center or see your camera shop for advice.
Need help?
Do you have a question about the RB67 Pro SD and is the answer not in the manual?
Questions and answers