
Related Manuals for Critter & Guitari Organelle M

Summary of Contents for Critter & Guitari Organelle M
-
Page 1: Table Of Contents
Organelle M User Manual Contents Organelle M User Manual WAIT AM I IN THE RIGHT PLACE? IMPORTANT NOTE Getting Started 1. Organelle Concepts 1.1 What is this thing? 1.2 How to Use This Manual 2. The Hardware Unit 2.1 Acquainting yourself with the box. - Page 2 5.4 Patch Manager 5.5 Syncing Instruments 6. Editing and Creating Patches 6.1 Keyboards and Mice 6.2 Operating the Organelle as a Computer 7. Additional Info 7.1 Burning SD Card Disk Image 7.2 Editing Patches Remotely...
-
Page 3: Wait Am I In The Right Place
Chapter 7 for information on updating your Organelle OS. IMPORTANT NOTE The Organelle M has a powerful built in speaker. It is possible for a patch to make some very loud and startling sounds. Any patch that feeds audio from the input to the audio output, such as an effect processor, has the potential to feedback if the speaker is enabled and the internal mic selected. -
Page 4: Getting Started
speaker. So if you are unsure of what a patch does, it is also a good idea to switch the internal speaker off. There are two switches on the back to enable speaker and select input, see Chapter 2 for more information. Getting Started For the simplest configuration, follow these steps. -
Page 5: Organelle Concepts
back of the unit (don't worry; the port labels will be upright from this vantage). Set the speaker switch to the sounding position. This will route all sound output to the onboard speaker. Additionally, the leftmost 1/8" jack is for headphones, and the next 1/4" jack is stereo line out. - Page 6 We can (and will) talk about what the literal Organelle device is, but we'd do better to start with what it can be. Organelle is an instrument. As you may have already noticed in the getting-started section, the Organelle can be connected quickly and is ready for sound.
- Page 7 Organelle is preloaded with the factory patches and ready to go. The Organelle M does not include a USB Drive.) What are these "patches" you speak of? They are files configured with the program Pure Data. While the term "patch" often refers to the settings and parameter values that create one sound in a synthesizer (or some other predefined system), Pure Data patches are a bit more expansive.
-
Page 8: How To Use This Manual
And no, you do not need to learn Pure Data to use the Organelle. Aside from the patches that come loaded on the Organelle, new patches will be listed on the patches page, and many users have contributed patches available on Patch Storage. You can customize or create your own patches, Pure Data is free and available for all computer platforms, but "to code or not to code"... -
Page 9: The Hardware Unit
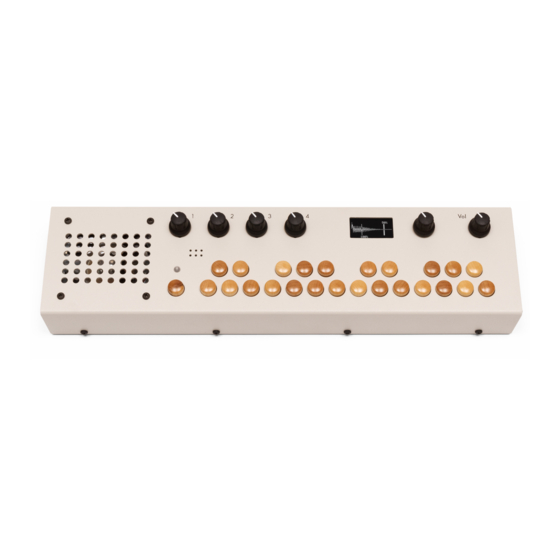
If you are satisfied with the included patches alone, the information on general hardware configuration Chapter 2, system operation Chapter 3, and the patch listing will all be relevant to you. If you are looking to load additional patches into the Organelle, then Chapter 4 will also be useful to you. - Page 10 Again, our orientation would be upside down if you walked around to the back of the unit and directly faced the back panel. We are assuming that you are standing in front of the Organelle, just as you will be when operating it. From that position, you would access the back panel either by leaning your head forward or by tilting the Organelle upward.
- Page 11 The foot Pedal port is a 1/4" jack. It is intended to be connected to a keyboard sustain-/damper-style pedal, which will deliver on/off messages to your patch. NOTE: The Organelle presumes that any sustain/damper pedal used has a "normally closed position" (negative polarity). NOTE: If an expression pedal is connected, your patch should receive a continuous range of values.
- Page 12 few seconds. When you're done using your Organelle, move this switch to the Off position. This will run a shutdown procedure that also takes a few seconds. RIGHT-SIDE PANEL Compared to the back panel, the right-side panel is downright simple, housing two USB 2.0, Type A ports.
- Page 13 is typically assigned to a parameter that is then continuously altered across a preset range of values by movement of that knob. Movement of each knob can also send a corresponding continuous controller (CC) MIDI message. For information on the default MIDI operation of the Organelle, see Chapter 3.
-
Page 14: A Few Configuration Ideas
note messages to trigger or affect audio output, these keys will be your primary performance vehicle. The large grille to the far left houses the built-in speaker. The speaker is connected to the left audio ouput channel. If a patch uses both right and left output channels, the right channel will not be heard through the speaker. - Page 15 case depends highly on the patch being run, for example audio input might be irrelevant in a simple synthesizer patch. Minimal Performance Setup Here we start with a variation on the setup proposed in the getting-started section. This bare-bones approach is the most compact performance configuration possible. Note that the Organelle is running on battery power.
- Page 16 This example uses a microphone as an audio source for the Organelle and a footswitch to control an effects patch. This setup is also fairly minimal. As the audio In(put) L+R port accepts a 1/4" cable, you will need something other than a regular XLR cable to use a microphone with the Organelle.
- Page 17 This setup demonstrates the Organelle's abilities as an effects processor. Use it like an entire pedalboard, controlling many parameters with a USB MIDI controller. Any incoming MIDI messages are sent directly to the current patch, which will determine how to use them.
- Page 18 Connecting an HDMI monitor to the Organelle shows the internal microcomputer's command-line interface and graphical user interface. Connecting an HDMI monitor assumes that you want to operate the Organelle's microcomputer in a typical way, and this implies the use of peripherals, such as a mouse and keyboard.
-
Page 19: Operating The Organelle By Itself
Receive an external MIDI clock sync, MIDI notes, MIDI CC controls, or MIDI program change messages with the 1/8" MIDI in jack. Send MIDI information to an external instrument, such as MIDI notes to a synthesizer. Control the Organelle's keyboard with a USB MIDI keyboard, expanding the number of playable notes within your patch. -
Page 20: Main Menu Screen
These topic areas will prepare you for general use of the Organelle. So let's start using it now and get the pretty box singing. 3.1 Main Menu Screen To interface with the Organelle, we will primarily work with two of its components. The Selector encoder allows us to navigate system options and execute functions, and the on- board display shows us the choices we have and provides feedback on our current patch and system. - Page 21 After the Organelle first boots up, it places us directly in the patches section, which is helpfully labeled PATCHES. By turning the Selector to the left and right, we are able to move up and down respectively in the patch list. There may be both patches or folders of patches in the Patches Menu.
- Page 22 System Menu At the top of the menu screen is the system menu. The top of this section is labeled SYSTEM, and it contains several sub menus shown below. To enter one of these sub menus, follow the same procedure as loading a patch: select the desired option by turning the Selector and then pressing down on the top of the Selector.
-
Page 23: Patch Screen
ejecting and reloading. Settings accesses options for MIDI, WiFi, and Footswitch settings. It also contains system information and Favourites. Extra may contain additional user defined functions for the Organelle. We will discuss these menus in a moment. 3.2 Patch Screen Once a patch is loaded, you will be taken to the patch information screen, which serves as your main performance interface. -
Page 24: System Menu Items
Individual patches can vary this pattern when deemed appropriate. The top line provides level meters. These are representations of the audio levels that are reaching the device's I(nputs) and those that are ending up at its O(utputs). Each meter is actually a stereo representation, with the top rows showing left levels and the bottom rows showing those for the right channels. - Page 25 Eject safely un-mounts an attached USB drive. The display will notify you when it is safe to unplug the USB drive. Reload rescans the Patches folder of the microSD card (or an attached USB drive) and then refreshes the Organelle's patches menu. (This also unloads the current patch so note that all sound will stop until you load another patch.) Any time that you connect a USB drive to the Organelle while the unit is already powered up, you should run this function.
- Page 26 NOTE: Save and Save New depend highly on the patch. In other words, a patch must be coded to take advantage of these functions. Many of the factory patches support them, but there are also many user patches that do not. Additionally there are many user patches that have there own mechanisms for storing and recalling presets and sounds.
- Page 27 USB Drive The ID number of the attached USB drive. When no drive is connected, nothing will be shown. IP IP Address of your Organelle to remotely add, remove or edit patches or WAV files (see Chapter 5 for using WiFi on Organelle). WiFi Network Network your Organelle is currently connected to.
-
Page 28: Organelle's Default Midi Setup
NOTE: Favourites is a user-currated list from all patches loaded on the Organelle's currently selected patch storage location. By default this location is the microSD card. It can also be a properly formatted USB drive (not included). If you eject a USB drive containing patches and Favourites, your Favourites will be set to the microSD card's Favourites. - Page 29 OUTGOING MIDI With the exception of the Selector knob and the Volume knob, all of the Organelle's other interface elements send out MIDI messages when they are used. All outgoing MIDI messages are sent on the MIDI channel specified in the MIDI Setup menu. The Keys The 24 keys (not including the Aux button on the far left) transmit "note on"...
- Page 30 A pedal connected to the Organelle's Pedal port transmits two sets of "control change" messages. Controller number 64 transmits a controller value of 0 (zero) for any received signal below 64, and a controller value of 127 is sent for any received signal of 64 or above. This discrete, threshold behavior is particularly good for sustain-/damper-style pedals.
- Page 31 of the Aux button. A controller value between 64 and 127 simulates the Aux button being pressed down, while a controller value between 0 (zero) and 63 simulates a release of the Aux button. NOTE: A momentary control source, such as a damper pedal or button, would work well with this sort of threshold behavior.
-
Page 32: Managing Patches
proprietary driver, you need only to connect it to the Organelle. This can be done via a USB port either on the Organelle itself or on a USB hub that is connected to the Organelle. 2. Select the MIDI device in MIDI Setup In the MIDI menu select Device. You can now scroll through a list of MIDI devices (if you have connected more than one, they will all be on the list). -
Page 33: Folder Structure
Finding and downloading Organelle-ready patches is easy enough. To use these patches, we need to get them from a computer to the Organelle's microSD card or USB drive. (And yes, that computer could be running Windows, Macintosh, Linux, or some other operating system. -
Page 34: Using A Usb Drive For Patches
Basic Poly/ main.pd voice.pd It is also possible to place patches in sub folders. Generally a sub folder is a folder that contains other patch folders. A sub folder should not have any additional files. This is useful for organizing your patches into categories, for example Synthesizers or Effects. 4.2 Using a USB Drive for Patches As has probably become clear by now the Organelle comes loaded with patches on the internal microSD card. - Page 35 computer. If the USB drive is currently connected to the Organelle, properly Eject the disk before removing it. Select Eject from the Storage menu. Once the drive is connected and seen by your computer, we can proceed. Folder Structure Revisited Earlier in this chapter, we went over the required folder structure for a usable USB drive.
- Page 36 Again, the requirement here is that each folder contains a main.pd file that serves as the primary file for that patch. As long as this file is in place, that patch will appear in the Organelle's patches menu as the folder name. So in the example shown above, the first four patches shown on the Organelle would be 32 Oscillators, Analog Style, Arpeggio - Double, and Basic Poly.
-
Page 37: Using Internal Microsd
Patches in .zop format (ending in .zop) should never be uncompressed because they often contain additional installation instructions that the Organelle will process during installation. To backup a patch: copy the patch's folder to a location on your computer. To rename a patch: rename the patch's folder, just as you would rename any folder on your computer. -
Page 38: Using Ap Mode
NOTE: The included WiFi usb adapter uses the Ralink 5370 chipset. This will only connect to 2.4 GHz WiFi networks. We have experimented with other WiFi adapters but we don't have a conclusive list of what works and what doesn't. Please consult the forum to discuss other possible adapters. - Page 39 The screen will indicate the WiFi network has been created: Now we can join this network from another device. On your computer open WiFi settings and look for the network named 'Organelle'. When you are prompted for a password type 'coolmusic'. We are now connected to the Organelle's own WiFi network.
-
Page 40: Web Interface
5.2 Web Interface In order to manage patches and enter the credentials for existing networks to join we use the Organelle's web interface. The Organelle's web interface is disabled by default, so first we need to turn it on. In WiFi Setup select Start Web Server Now on your computer open a web browser and navigate to 'http://organellem.local'. -
Page 41: Joining Existing Wifi Network
NOTE: If you are not able to open http://organellem.local, you can also access this page using the Organelle's IP address. First get the Organelle's IP address. In the Settings choose Info. Then use the numbers listed next to 'IP'. For example http://192.168.1.143. - Page 42 password and click OK. You can also delete networks from the list. These networks will now show up in the WiFi Setup menu on the Organelle. To join one, navigate to WiFi Setup and click the network you want to join. AP mode will be halted and the Organelle will attempt to join this network.
-
Page 43: Patch Manager
5.4 Patch Manager In order to access and manage the patches on the internal microSD card we use a web browser based file manager. We can access and manipulate both the USB drive and internal microSD card in this manner. Once the Organelle WiFi is started in either AP mode or by connecting to existing network, navigate to the web interface and click Patch Manager. - Page 44 after you have uploaded or moved or deleted patches to sync those changes with the Organelle's patch menu. Flash Button The lightning button flashes the Organelle's LED white. This is useful if you have several Organelles on the same wireless network. It can get confusing to remember what Organelle you are interacting with, so you can click this button to see which Organelle you are connected to.
- Page 45 Select this and it will uncompress the patch and remove the .zip or .zop file. Categorizing Patches in Sub Folders: You can move patches around on the storage device (or even between USB and microSD). In this example we will create a sub folder and then move in some patches.
-
Page 46: Syncing Instruments
5.5 Syncing Instruments It is possible to synchronize tempo and beat between patches and other music devices / apps on the network using the Ableton LINK protocol. If there are other LINK enabled devices on the network and the patch you are using has support for this, it will join and synchronize automatically. -
Page 47: Keyboards And Mice
6.1 Keyboards and Mice Connecting an HDMI monitor to the Organelle is simple enough. But the function of the HDMI device is to provide the visual output of the Organelle's functioning microcomputer. (As we will see very shortly, connecting only a monitor will show you, well, not much.) As with any computer, you need a keyboard and mouse to actually interface with the Organelle. - Page 48 unloaded, and any audio output being produced will cease. NOTE: It is also possible to edit patches from another computer in realtime, using VNC. For more information on that, check out this forum posting. The options on this screen are fairly sparse. This matches the character of the running operating system, which has been stripped down in favor of achieving the most stable audio performance.
- Page 49 this graphical mode). This red "exit" button is the primary interface option that you will need. While you can navigate the file system with the keyboard and mouse, the best way to load a patch is to do it from the Organelle's hardware. By using the Selector encoder to choose and load a patch, you will then see the patch visually loaded by the Organelle along with a crucial helper patch.
- Page 50 hardware. (This is done using the Open Sound Control [OSC] protocol.) Accordingly, mother.pd is necessary for the general operation of the Organelle. That is why this patch is loaded concurrently with any patch that you call up. NOTE: In general, you should not edit mother.pd. That being said, the Organelle will use any file named mother.pd that it finds within the Patches folder of your microSD card or USB drive.
-
Page 51: Additional Info
In addition to storing patches, the micro SD card also stores the Organelle's operating system. Burning a new disk image on the micro SD card will reset your Organelle M to the factory state. This is useful to update to the latest Organelle OS, or to fix a problem with the micro SD card. -
Page 52: Editing Patches Remotely
1. Download the microSD card disk image to your computer: Current OS release: OGM-4.1. Requires 8GB or larger microSD card. Previous OS release: OGM-4.0. Requires 8GB or larger microSD card. 2. Download the flasher program to your computer: https://www.balena.io/etcher/ 3. Power down the Organelle 4. - Page 53 Now you can connect using a VNC client on your computer. The VNC Viewer program seems to work well for this. Mac OS has built in VNC support for screen sharing, but we have not had good luck using it with the Organelle. You can connect using organelle.local or using the IP address reported on the Info screen.
Need help?
Do you have a question about the Organelle M and is the answer not in the manual?
Questions and answers