
Related Manuals for Critter & Guitari Organelle

Summary of Contents for Critter & Guitari Organelle
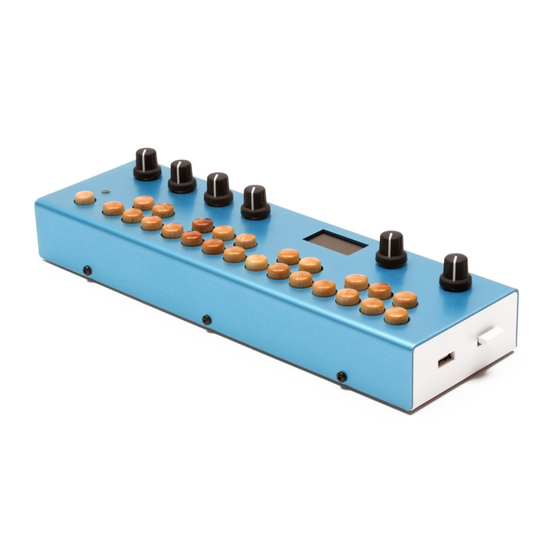
- Page 1 Welcome to Organelle ™ The User Guide for a New, Multipurpose Digital Instrument from Critter & Guitari ® Critter & Guitari ...
-
Page 2: Table Of Contents
So is it hardware or software? ..................... What are these “patches” you speak of? ................What is Pure Data? And do I need to learn it to use Organelle? ........What other concepts may be useful to understand? ............How to Use This Manual ..................... - Page 3 Other MIDI Messages ......................Using a USB MIDI Device .................... Chapter Four Loading Patches from a Computer ....Bringing additional patches from your computer to Organelle. The Required USB Drive ..................... General Information ......................Folder Structure ........................ Working with the USB Drive on a Computer .............
- Page 4 What is Pd? And where? ....................“Programming” in Pure Data .................... Learning More on Your Own ..................... Preparing a Patch for Organelle ................. How Organelle and Pure Data Communicate ..............Remote Messaging ......................Reserved Remote Busses for Organelle ................Overriding Standard MIDI Behavior ..................
- Page 5 This user guide was written by Dave Linnenbank. First Edition, January 2016 “Critter & Gutiari” is a registered trademark of Critter & Guitari Inc. “Organelle” is a trademark of Critter & Guitari Inc. “HDMI” is a trademark of HDMI Licensing, LLC. Any other included product and company names are trademarks or registered trademarks of their respective holders.
-
Page 6: Chapter Zero
Chapter Zero Quick-start Guide Let’s get sound. Now! Welcome to the world of Organelle! You seem to be in a hurry so here is the short version for getting up and running… Package Manifest Along with this card, there are two main items in the box you just opened. - Page 7 And if you want to try a different patch, simply turn the Selector encoder and select another patch. 5. When you have had enough fun for now, properly shut down Organelle. This is achieved by turning the Selector encoder so that the menu screen appears again.
-
Page 8: Chapter One
What is Organelle? We can (and will) talk about what the literal Organelle device is, but we’d do better to start with what it can be. Organelle is an instrument. -
Page 9: Organelle Is Whatever You Want It To Be
Organelle™ Concepts Organelle is whatever you want it to be. In truth, Organelle is a vessel for your musical ideas, connecting your own desires for musical expression with customizable technology and portability. You may use Organelle in a completely different way than someone else, and that is not just okay: it’s the entire point. -
Page 10: What Other Concepts May Be Useful To Understand
To use Organelle as is, basics are enough. If you decide to create patches, a little bit more will be required, but we will get to all that in later chapters. - Page 11 • Finally, the various appendices can be useful to everyone. And do realize that your uses of Organelle are likely to change over time. If a chapter is not important to you today, don’t feel bad about that: the chapters are happy to wait for you. ...
-
Page 12: Chapter Two
We are assuming that you standing in front of Organelle, just as you will be when operating it. From that position, you would access the back panel either by leaning your head forward or by tilting Organelle upward. -
Page 13: Right-Side Panel
1/4" jack. It is intended to be connected to a keyboard Pedal sustain-/damper-style pedal, which will deliver on/off messages to your patch. Organelle presumes that any sustain/damper pedal used has a “normally NOTE: closed position” (negative polarity). -
Page 14: Main Face
One of these identical ports must be used for connecting a USB drive that houses your Pure Data patches (such as the one included with Organelle). They can also connect class compliant devices that utilize MIDI over USB or other computer peripherals. -
Page 15: A Few Configuration Ideas
While Organelle is an open platform that permits and encourages nontraditional setups, we will now look at a few potential configurations for Organelle. Rather than suggested setups, treat these more as baselines or ideas; nearly all elements of any configuration can be mixed and matched. -
Page 16: Audio Input From A Microphone
USB drive is Patches now connected to the second USB port instead of the first one. The point is that Organelle’s two USB ports are completely interchangeable. A USB MIDI Controller and ... -
Page 17: An External Monitor, A Usb Hub, And Computer Peripherals
(aka, a Y-cable) for connecting the two devices. In the case of using powered speakers, you need only connect each of Organelle’s audio outputs to one of your speaker’s inputs. In addition to our trusted USB drive, a MIDI controller is connected to the other USB port. -
Page 18: Chapter Three
MIDI operation of Organelle and how connected USB MIDI devices interface with Organelle. These topic areas will prepare you for general use of Organelle. So let’s start using it now and get the pretty box singing. -
Page 19: Patches Menu
(or patches menu), which we see in the above image. Patches Menu After Organelle first boots up, it places us directly in the patches section, which is helpfully labeled . By turning the Selector to the left and right, we are able to move up and PATCHES down respectively in the patch list. -
Page 20: System Menu
• Reload Patches Organelle’s patches menu. (This also unloads the current patch so note that all sound will stop until you load another patch.) Any time that you connect a USB drive to Organelle while the unit is already powered up, you should run this function. Once the reload process has completed, you will be left in the patches menu in order to load an available patch. -
Page 21: Patch Information Screen
Once a patch is loaded, you will be taken to the patch information screen, which serves as your main performance interface. Once a patch is loaded, Organelle treats this page as your “home screen.” You can return to the menu screen by turning the Selector knob, but after a few seconds of inactivity, Organelle will automatically return to the patch information screen. -
Page 22: Organelle's Default Midi Setup
Organelle’s Default MIDI Setup The way Organelle handles MIDI will be relevant to all users, even if you are mainly pressing the unit’s own maple keys to trigger note messages. There are certain default MIDI assignments in Organelle patches that you should know. -
Page 23: Outgoing Midi
Outgoing MIDI With the exception of the Selector knob and the Volume knob, all of Organelle’s other interface elements send out MIDI messages when they are used. All MIDI messages are sent on channel one. All outgoing MIDI messages are sent over USB. They will be received by any NOTE: connected USB MIDI device or interface that is actively listening for them. -
Page 24: Incoming Midi Messages
Incoming MIDI Messages While all MIDI messages received by Organelle (via USB) will be passed on to the patch that is currently loaded, certain messages are handled uniformly across all patches. -
Page 25: Program Change Messages
Just as they are displayed in the patches menu, all currently available patches are taken in alphabetical order, and each patch is then dynamically assigned a “program number” based on its position. So if Organelle had three patches available called A Patch, B Patch, and C Patch, program number... - Page 26 That’s about it. By remembering to reload your patch and knowing what MIDI messages are understood by Organelle (see the immediately previous section) and/or those understood by the particular patch you have loaded, you should be all set to use MIDI with Organelle. Page ! of !
-
Page 27: Chapter Four
USB drive.) In this chapter, we’ll look at how to work with Organelle’s USB drive on a computer. But to get there, we must begin with how that drive needs to be configured, and we’ll end with a few extra notes on USB usage with Organelle. -
Page 28: General Information
Folder Structure An example directory listing of an Organelle-friendly USB drive would start like this. You can see here at least four patches, each with a required file. -
Page 29: Working With The Usb Drive On A Computer
On most modern operating systems, this can be achieve by simply opening the ZIP file from the system’s file browser. From here, we need to connect the USB drive you are using with Organelle to your computer. A couple important notes. -
Page 30: Folder Structure Revisited
As long as this file is in place, that patch will appear in Organelle’s patches menu as the folder name. So in the example shown above, the first four patches shown on Organelle would be... -
Page 31: Additional Usb Information
USB device is removed, any device removal will trigger Organelle to quit the running instance of Pure Data and close out the current patch. The display will notify you when this has happened (including after you disconnect a safely ejected USB drive). -
Page 32: Chapter Five
Pure Data. And in return, the current patch works with Pure Data to return text information to be shown on Organelle’s display, the status/color to be shown on the Aux button’s LED, and, of course, the rendered audio that is delivered to Organelle’s outlets. -
Page 33: A Little Bit About Pure Data (Pd)
Learning More on Your Own This chapter will continue with some details about the operation and objects of Pure Data from the perspective of Organelle, but this short preface is as far as we will go with general Pure Data concepts. The... -
Page 34: Preparing A Patch For Organelle
To start working with Pure Data patches, there are two approaches you can take. • Find generic Pure Data patches online and edit them for use on Organelle. This approach has a gentler learning curve, allowing you to see working patches in action before attempting to create your own from scratch. -
Page 35: Remote Messaging
Preparing Patches for Organelle™ data back and forth. This means that any patch you are working on should handle the tasks of receiving data from and sending data to the Organelle hardware. Remote Messaging While messages and signals are intended to travel across patch cords in Pure Data, Pd also provides another option. -
Page 36: Reserved Remote Busses For Organelle
This means that configuring our patches for Organelle simply means handling these incoming (and outgoing) data streams. The above image shows the various paths that Organelle may use to transmit data to the current patch. These various objects can be placed in your patch to... - Page 37 100 milliseconds before the patch is actually closed out. And then there are the messages that Organelle will respond to. Again, the following forms are for use in your patches so that messages can be transmitted back to Organelle.
- Page 38 A patch that is prepared to exchange these various messages/signals with Organelle is “fully compatible,” but there is no requirement that you use or even include all of these...
-
Page 39: Overriding Standard Midi Behavior
Preparing Patches for Organelle™ objects. As with most facets of Organelle, the choice of what to use — and what to ignore — is completely yours. Overriding Standard MIDI Behavior We just finished saying that you can generally change how Organelle works so here is the proof. -
Page 40: Things Unsaid
Just in case. Things Unsaid In summary, we have covered all the messages that Organelle is either providing to or expecting from your patch. By equipping your patch to use those remote busses, you are enabling your patch to be Organelle-friendly and live well in this ecosystem. -
Page 41: Chapter Six
This chapter deals with Organelle’s HDMI port, which has been sitting there the whole time. The reason for our longstanding neglect is simple: only users who want to tweak/program their own patches might benefit from connecting Organelle to a monitor, television, or what have you. -
Page 42: Operating Organelle As A Computer
So if we want to go beyond this screen, we will need a keyboard. (And we can say now that if you want to edit your Pure Data patches on Organelle, you will definitely need a mouse as well.) To start Organelle’s graphical operation mode: type... - Page 43 While you can navigate the file system with the keyboard and mouse, the best way to load a patch is to do it from Organelle’s hardware. By using the Selector encoder to choose and load a patch, you will then see the patch visually loaded by Organelle along with a crucial helper patch.
-
Page 44: The Mother.pd Helper Patch
Attaching an HDMI Display The Organelle unit itself is now functioning as we would normally expect it to: the patch has been loaded, Organelle’s hardware display has shifted to the patch information screen, and audio can now be produced. Within the computer interface, we are now seeing the behind-the-scenes implications of loading a patch. -
Page 45: The Patch Load Sequence
Once this sequence completes, all assets needed for your patch to communicate with Organelle will be loaded and ready to go. So the general flurry of windows closing and opening that you see in Organelle’s graphical operation mode is both expected and proper. -
Page 46: Other Operational Tips
While you could simply unplug your HDMI monitor and resume working with Organelle as usual, this will leave some processing resources allocated for graphics that you are no longer using. It is better to revert Organelle to its normal CLI mode and keep the processor focused on audio tasks. ... -
Page 47: Factory Patch Listing
Appendix A Factory Patch Listing Analog Style Categories: synth, sequencer A classic sawtooth plus resonant filter patch. It features the usual controls: filter cutoff, resonance, and oscillator tuning. The Aux button controls a note sequencer: hold it down to enable recording, begin playing to start a recording, and press Aux again to finish. Then tapping Aux will toggle the sequence to start and stop. - Page 48 Factory Patch Listing Basic Sampler Categories: sampler Press and hold the Aux button (or a foot switch) to record a sound (two seconds maximum). Playing the keys then plays back the sound at different pitches. Use the knobs to adjust overall speed and to add an envelope to the sample, allowing you to shape the sound in interesting ways.
- Page 49 Factory Patch Listing Sampler Style Category: sampler, sequencer Each key plays a different sample. The bottom keys are mostly drum sounds, and the top keys are mostly sound effects. It has controls for: overall reverb, playback speed, and sample decay. The Aux button controls a sequencer: hold it down to enable recording, begin playing to start a recording, and press Aux again to finish.
-
Page 50: Technical Specifications
Appendix B Technical Specifications Audio Specifications • Sampling rate: 44.1kHz; Resolution: 16 bit (both at input & output) • 2x ¼" mono sound output jacks (left & right channels) • ¼" stereo sound input jack • ⅛" stereo headphone output jack •... - Page 51 • 9VDC, 1.0 Amp (power supply included) Physical Characteristics • Size: 10.5" x 3.25" x 2.125" • Enclosure: anodized aluminum top, ABS plastic bottom, rubber foot pads New patches are available at organelle.io Visit our forum at forum.critterandguitari.com Page ! of !
Need help?
Do you have a question about the Organelle and is the answer not in the manual?
Questions and answers