Table of Contents
Advertisement
Advertisement
Table of Contents

Related Manuals for Eventide Harmonizer H90


Summary of Contents for Eventide Harmonizer H90
- Page 2 Bluetooth® and the Bluetooth logo are registered trademarks of Bluetooth SIG, Inc. Eventide is a registered trademark of Eventide Inc. Harmonizer is Eventide's trademark for a special effects device that incorporates pitch change. MixingLink® is a registered trademark of Manifold Labs, LLC.
-
Page 3: Table Of Contents
Table Of Contents 1. Introduction 1.1. Key Features 1.2. A Few Words of Advice 1.3. What’s in the Box 2. Hardware 2.1. Top Panel 2.2. Rear and Side 3. Setup 3.1. Simple Guitar Setup 3.2. Two Mono Inserts 3.3. One Stereo Insert 3.4. - Page 4 4. Terminology 4.1. List 4.2. Program 4.3. Algorithm 4.4. Preset 5. Play Modes 5.1. Select Mode 5.1.1. Program Select 5.1.2. Bank Select 5.2. Perform Mode 5.2.1. Performance Parameters 5.3. Quick Knob Assignments...
- Page 5 6. Edit Modes 6.1. Programs 6.1.1. Saving Programs 6.2. Routing 6.2.1. Insert Routing 6.2.2. Dual Routing 6.3. Presets 6.3.1. Saving Presets 6.4. Parameters 6.4.1. Mapping 6.4.2. HotKnob 6.4.3. HotSwitch 6.4.4. Tempo Sync 7. System Menu 7.1. Global 7.2. I/O 7.3. MIDI 7.4.
- Page 6 9. Software Updates...
- Page 7 10. Algorithm Guide Delay Band Delay Bouquet Delay Digital Delay Ducked Delay Filter Pong Head Space Mod Delay MultiTap Reverse Tape Echo UltraTap Vintage Delay Distortion CrushStation PitchFuzz Sculpt WeedWacker EQ Compressor Looper Modulation Chorus...
- Page 8 Even-Vibe Flanger Harmadillo Instant Phaser Instant Flanger ModFilter Phaser Q-Wah RingMod Rotary TremoloPan Tricerachorus Undulator Vibrato Multi SpaceTime Pitch Crystals Diatonic H910 H949 HarModulator HarPeggiator MicroPitch Octaver PitchFlex...
- Page 9 Polyphony Prism Shift Quadravox Resonator Reverb Blackhole DualVerb DynaVerb Hall MangledVerb ModEchoVerb Plate Reverse Reverb Room SP2016 Reverb Spring Shimmer TremoloVerb Wormhole Synth HotSawz Synthonizer Utility Mute Thru...
- Page 10 A. Tech Support B. Tech Specs C. Global Mapping Chart D. Startup Sequences D.1. Recovery Mode D.2. Clear Current State D.3. Factory Reset E. Legalese 5.1. Safety and Warranty 5.2. Federal Communications Commission Statement...
-
Page 11: Introduction
Whether you want high-quality effects or experimental sounds yet unheard, the H90 offers the great sounding effects you have always loved from Eventide, and more. Complete with an intuitive UI, comprehensive I/O, flexible routing options, and a wealth of effects to choose from, the H90 is designed to be the heart of your rig. -
Page 12: A Few Words Of Advice
Chapter (Section 3) to help you get started. 1.3. What’s in the Box The box contains: • • Quick Reference Guide • Universal AC power supply • USB-C to USB-A cable • 4x rubber feet • Eventide sticker • Guitar pick... -
Page 13: Hardware
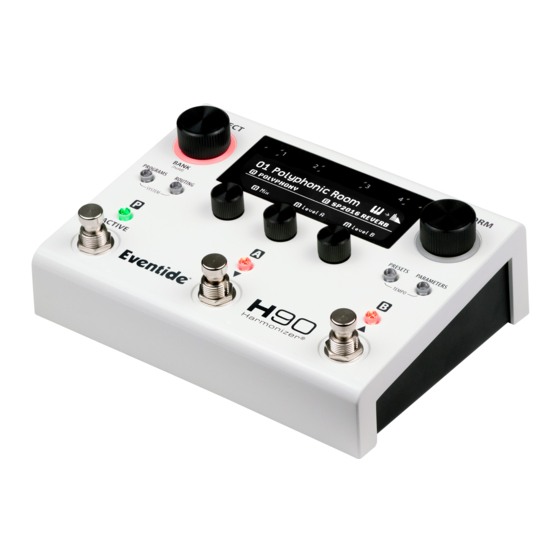
2. HARDWARE 2. HARDWARE Before you set up your H90, let’s get familiar with the main controls and input and output connections. 2.1. Top Panel Fig. 2.1 H90 Top Panel SELECT Knob Press the Select Knob to enter Select Mode. Press and hold the Select Knob to enter Bank Select Mode. - Page 14 2. HARDWARE Displays user interface with access to Effect Parameters and System Settings. Input Level Indicators The bottom row of LEDs indicate signal presence for input channels 1-4. The top row indicates clipping. If your signal is overloading the H90’s inputs, adjust the output level of your device or adjust the H90’s input levels.
- Page 15 2. HARDWARE Tip Press and hold the Programs and Routing Buttons simultaneously to access the System Menu. Fig. 2.2 Press and hold the Programs and Routing Buttons simultaneously Presets Press to enter Preset Edit Mode and browse the Preset Library. Parameters Press to enter Parameters Edit Mode to adjust Program and Preset parameters.
-
Page 16: Rear And Side
2. HARDWARE P/A/B LED Buttons In Select/Bank mode, press the LED Buttons to activate/bypass a Program or Preset. In Perform mode, press the LED Buttons to assign a Performance Parameter to a Footswitch. Footswitches In Select/Bank Mode, use the three Footswitches to cue up and load Programs. In Perform Mode, these are user-programable Footswitches. - Page 17 2. HARDWARE Four ¼” mono tip/sleeve input jacks. Configurable to instrument or line level. Analog Outputs Four ¼” mono tip/sleeve output jacks. Configurable to instrument or line level. Tip If you’re not sure how to connect the H90’s inputs and outputs, visit Setup (Section 3) for information about how to integrate the H90 into your rig.
- Page 18 This page was intentionally left 99.88% blank.
-
Page 19: Setup
3. SETUP 3. SETUP Get in tune! Press and hold the A and B Footswitches together to access the tuner. Fig. 3.1 Tuner display page • Turn Quick Knob 1 to change the tuning frequency in one-Hz increments. • Turn Quick Knob 3 to change from Mute to Thru. - Page 20 3. SETUP Fig. 3.2 A simple mono guitar configuration • Connect your guitar to H90 Input 1. • Connect H90 Output 1 to your guitar amp. • Use Select Mode to explore the User 1 Playlist. Auditioning Programs A selection of Programs have been curated from the Factory Lists and added to the User 1 List. To explore this curated List, press the Select knob to enter Select Mode (Section 5.1).
-
Page 21: Two Mono Inserts
3. SETUP 3.2. Two Mono Inserts This configuration introduces two mono inserts. In this example an Eventide dot9 MicroPitch stompbox is being used for Insert 1, and an Eventide H9 Max is being used for Insert 2. Fig. 3.3 Two Mono Inserts •... -
Page 22: Guitar And Vocals With Mixinglink
3.4. Guitar and Vocals with MixingLink Using the Eventide MixingLink, you can easily amplify a microphone signal, as well as another signal such as guitar, on two separate effects paths using the H90’s Dual Routing feature. -
Page 23: Pre/Post Amplifier
3. SETUP Fig. 3.5 Guitar and Vocals with MixingLink • Configure your H90’s Global Routing Configuration (Section 7.1) to use Dual Routing from the System Menu. • Connect your guitar to H90 Input 1. • Connect H90 Output 1 to your guitar amp. •... -
Page 24: Dual Inserts With A Daw Or Mixing Console
3. SETUP Fig. 3.6 A Pre-post or 4-cable method guitar amp configuration • Configure your H90’s Global Routing Configuration (Section 7.1) to use Dual Routing from the System Menu. • Connect your guitar to H90 Input 1. • Connect H90 Output 1 to your guitar amp’s preamp input. •... - Page 25 3. SETUP Fig. 3.7 Dual Inserts are connected to an audio interface • Configure your H90’s Global Routing Configuration (Section 7.1) to use Dual Routing from the System Menu. • Connect a stereo pair of Outputs from your mixing console or audio interface to H90 Input 1 and 2. •...
- Page 26 3. SETUP Tip If you’d like the H90’s tempo to sync to an external MIDI device via DIN or USB, navigate to the Tempo Menu (Section 8) and set the Tempo Source appropriately.
-
Page 27: Terminology
4. TERMINOLOGY 4. TERMINOLOGY These terms represent the overarching layout of the H90: 4.1. List Lists contain up to 99 Programs each, and are divided into editable User Lists and un-editable Factory Lists. The H90 ships with an assortment of Factory Lists, from which a choice selection of Programs have been picked for the first User List. -
Page 28: Program
Program Select Mode displaying the Clean Ambient Program 4.3. Algorithm An Algorithm is an Eventide-designed audio processing module, with carefully chosen parameters. Each parameter may be adjusted and mapped (Section 6.4) to Footswitches, knobs, expression pedals, and MIDI. The Algorithm Guide provides in-depth descriptions of each Algorithm. -
Page 29: Preset
4. TERMINOLOGY Fig. 4.4 Algorithms are categorized by Effect Type. Each Effect Type has a signature icon. 4.4. Preset A Preset is an Algorithm with a unique combination of parameter values that can be saved to the Preset Library, or within a Program. Fig. - Page 30 This page was intentionally left 99.88% blank.
-
Page 31: Play Modes
5. PLAY MODES 5. PLAY MODES The H90 has two Play Modes: Select and Perform. Picking one of these two Play Modes will determine how you interface with the pedal. In Select Mode, using Program Select allows you to scroll through the entire Playlist, while Bank Select organizes your Playlist into Banks of three Programs, giving you quick access to instantly load any three programs using the Footswitches. -
Page 32: Bank Select
5. PLAY MODES Turn the Select Knob or press the A or B Footswitch to scroll up and down through the Playlist. Press the P (Active) Footswitch, or the Select Knob, to load the highlighted Program. The Active LED and the Program Number will blink until the selection is confirmed. -
Page 33: Performance Parameters
5. PLAY MODES The H90’s algorithm-specific performance parameters can provide for a wealth of expressive and artistic tools, right at your feet! • Wormhole’s Warp parameter takes you on a light speed journey through the Universe. • Bouquet Delay’s Pitch Jump allows you to bounce between precise musical intervals with an analog flavor. - Page 34 5. PLAY MODES 5.2.1.1. Assign to Footswitches Press the P, A, or B LED Button to cycle through a List of the P, A, or B Footswitch available performance parameters. The available performance parameters will vary depending on what Presets are currently loaded, there are choices like momentary states denoted by the (M), or a HotSwitch, or the performance functions of the algorithm.
-
Page 35: Quick Knob Assignments
5. PLAY MODES 5.2.1.2. Map to External Controllers You may find that you’ll want more than just six footswitches to control the variety of performance parameters offered by a given Program. For instance, you may want to always control the bypass/active states of your Programs and Presets using the H90’s footswitches and control the HotSwitches and algorithm-specific performance parameters from another source. - Page 36 5. PLAY MODES The above example demonstrates the range of mappings the H90 is capable of per Program: • Quick Knob 1 is assigned to the Program’s Mix parameters • Quick Knob 2 is assigned to the Delay Mix parameter of Preset A •...
- Page 37 5. PLAY MODES • Press and hold any Quick Knob, or press the Perform Knob to exit the Quick Knob Mapping menu. Note that new mappings are not saved until the program is saved.
- Page 38 This page was intentionally left 99.88% blank.
-
Page 39: Edit Modes
6. EDIT MODES 6. EDIT MODES 6.1. Programs Programs Edit Mode allows you to search through and audition the Programs on the H90. Press the Programs Button to enter Programs Edit Mode. Press any Footswitch to exit. Fig. 6.1 The upper right corner displays the List and location of the Program. The three Quick Knobs filter the List of Programs: •... -
Page 40: Routing
6. EDIT MODES Fig. 6.2 Program save display Turn Quick Knob 3 to select the List to which you’d like to save it. This defaults to the currently active Playlist. Note that Programs can be saved to User Lists, but not to Factory Lists. Turn the Select Knob to pick which slot number to save to. -
Page 41: Insert Routing
6. EDIT MODES The H90’s two Presets can be routed to process your signal in series or parallel for each Program. This is useful for a variety of applications: • If your Program uses a Distortion and Wah Wah Preset you may want to process the distortion in series with the wah wah, meaning your audio is first processed by the distortion, and then the distorted signal is processed by the wah wah. - Page 42 6. EDIT MODES Insert Routing Options Series Parallel Pre A Pre A & B Parallel Pre A Pre B Post B Parallel Post A Post B Post A & B To enable an Insert: • Quick Knob 1: Turn to change the routing between series and parallel.
- Page 43 6. EDIT MODES Note Programs with Presets routed in series will display in the top right corner. Fig. 6.5 Programs with Presets routed in series Programs with Presets routed in parallel will display in the top right corner. Fig. 6.6 Programs with Presets routed in parallel •...
- Page 44 6. EDIT MODES Fig. 6.8 Insert 1 pre-Preset A, Insert 2 post-Preset B Fig. 6.9 Insert 1 pre-Preset A, Insert 2 in Parallel with Preset A & B Fig. 6.10 Inserts 1 & 2 routed in Parallel with Preset A & B Fig.
- Page 45 6. EDIT MODES Fig. 6.12 Insert routing in Series with one stereo Insert Each Insert has its own set of parameters: Send Level, Return Level, Mix %, Tails, Latency (from 0 samples to 512 samples), and Polarity (Normal/Inverted). Press the Routing Button or turn the Select Knob to scroll through the parameters.
-
Page 46: Dual Routing
6. EDIT MODES • Set the mix to 50%. • Bypass the external digital effect or adjust any mix knob so you only hear the dry signal. • Adjust latency from 0 samples until the signal is silent or as quiet as possible. •... - Page 47 6. EDIT MODES Dual Routing Positions Routing Path 1 Path 2 Path 1 Series Series Thru Path 1 Parallel Parallel Thru Pre/Post Preset A Preset B Path 2 Parallel Thru Parallel Path 2 Series Thru Series Fig. 6.16 Presets A & B in Series on Path 1 Fig.
-
Page 48: Presets
6. EDIT MODES Fig. 6.19 Presets A & B in Series on Path 2 Fig. 6.20 Presets A & B in Parallel on Path 1 6.3. Presets Presets Edit Mode allows you to quickly hear the effects of different Algorithm Presets on the currently loaded Program. -
Page 49: Saving Presets
6. EDIT MODES Fig. 6.22 Preset Edit Mode displaying Preset B The three Quick Knobs can be used to filter the List of Presets: • Quick Knob 1 selects the List through which to search. This includes both Factory Lists and User Lists, and also narrows down the other two Quick Knobs’... -
Page 50: Parameters
6. EDIT MODES Renaming Presets works the same way as renaming Programs. • Move the cursor by turning the Select Knob or Quick Knob 1. Pressing Quick Knob 1 moves the cursor to the right. • Select the character by turning the Perform Knob or Quick Knob 2. Pressing Quick Knob 2 cycles the character set through lowercase, uppercase, numbers, and symbols. - Page 51 6. EDIT MODES Press the Parameters Button to enter Parameters Edit Mode. Press again to cycle through P/A/B parameter groups. Turn the Select Knob to scroll through the pages of parameters in the current group. Adjust the parameters by turning the Quick Knobs. •...
-
Page 52: Mapping
6. EDIT MODES 6.4.1. Mapping The H90 offers a wide variety of parameter mapping for internal and external controllers. All of your custom parameter mapping will be configured in Parameters Edit Mode. Fig. 6.28 External Mapping menu To map a parameter: •... -
Page 53: Hotknob
6. EDIT MODES Remember! Begin at the beginning and go on till you come to the end: then stop. • Turn Quick Knob 1 to choose another parameter to map. • To un-map a parameter, set the Control Source to “Off”. •... -
Page 54: Hotswitch
6. EDIT MODES Tip A HotKnob can also be mapped to internal or external controllers. This can be useful for mapping both HotKnobs A and B to HotKnob P and control both HotKnobs simultaneously, or mapping a HotKnob to an expression pedal for easy control. You can also map a HotKnob to a Quick Knob using the Quick Knob Assignments menu. -
Page 55: Tempo Sync
6. EDIT MODES • Press the Quick Knob of a mapped parameter to un-map it. • Press and hold another LED Button to map a different HotSwitch without exiting the mapping menu. • Press the Perform Knob to exit the HotSwitch mapping menu. 6.4.4. - Page 56 This page was intentionally left 99.88% blank.
-
Page 57: System Menu
7. SYSTEM MENU 7. SYSTEM MENU Press and hold the Programs and Routing Buttons simultaneously to enter the System Menu. Press the Perform Knob to exit. Fig. 7.1 Press and hold the Programs and Routing Buttons simultaneously • Navigate between pages either by turning the Select Knob, or by pressing the Programs or Routing Button. - Page 58 7. SYSTEM MENU Fig. 7.4 Page 2 of the Global settings Playlist Select which User List you’d like to use in Select Mode. Note Only User Lists can be designated as the Playlist, and there can only be one active Playlist. Factory Lists cannot be the Playlist, but they are searchable in Programs Edit Mode.
- Page 59 7. SYSTEM MENU Fig. 7.5 A prompt will appear to ensure you’d like to change your routing configuration Bypass Mode This determines the signal path when the Program is bypassed. • DSP: Keeps signal running through the DSP. Allows bypass tails. •...
-
Page 60: I/O
7. SYSTEM MENU This is the global kill dry setting that all Programs and presets will subscribe to. If a Program or Preset’s kill dry setting is set to Global, it will reflect this setting of on or off. Pedal Control Global Pedal Control allows you to define external controllers such as aux switches and expression pedals that will always affect the H90, regardless of what Program is loaded. - Page 61 7. SYSTEM MENU Fig. 7.6 Input level display Fig. 7.7 Output level display Exp/Ctl...
- Page 62 7. SYSTEM MENU Set pedal 1 and/or 2 to expression pedal or switch using Quick Knob 1 and 2. Fig. 7.8 Exp & Aux setup display Turn Quick Knob 3 to enable calibration. Fig. 7.9 This example shows one expression pedal and one aux switch being calibrated. Jacks Displays which inputs and outputs are connected.
-
Page 63: Midi
7. SYSTEM MENU 7.3. MIDI Configure global MIDI settings for your H90. These controls will be enabled regardless of the current Program loaded. Fig. 7.11 MIDI menu display Channel Select the MIDI channel (1-16) on which the H90 receives and transmits. Receive Omni Turn this on if you’d like the H90 to receive MIDI from all channels simultaneously. - Page 64 7. SYSTEM MENU Fig. 7.12 MIDI Clock Source Global Control MIDI Global Control allows you to define MIDI control messages that will always affect the H90, regardless of which Program is loaded. For example, if you have a MIDI controller that you always want CC #1 to control the Program Mix parameter, you can configure this using the MIDI Global Controls.
-
Page 65: Preferences
7. SYSTEM MENU Fig. 7.14 MIDI Transmit • Parameter: Turn Quick Knob 1 to select a parameter. • CC #: Turn Quick Knob 2 to select a CC # for the currently selected parameter to transmit as MIDI CCs. Note Check out the Global Mapping Chart (Section C) for a full list of available mappings. -
Page 66: About
7. SYSTEM MENU • Screensaver Configure the amount of time it takes for the screensaver to be enabled. The screensaver will display an H90 animation, and help preserve the longevity of the H90’s OLED screen. Adjustable from 30 minutes to eight hours. -
Page 67: Tempo Menu
8. TEMPO MENU 8. TEMPO MENU Press and hold the Presets and Parameters Buttons simultaneously to enter the Tempo Menu. Press the Perform Knob to exit. Fig. 8.1 Press and hold the Presets and Parameters Buttons simultaneously Fig. 8.2 The Tempo Menu Tempo BPM The H90’s internal tempo can be adjusted from 20 BPM to 500 BPM. - Page 68 8. TEMPO MENU Tempo Source • Global: All Programs will subscribe to the Global Tempo setting. • Program: Programs will save with the current tempo BPM. Programs will load with the saved BPM value. • MIDI Clock: Tempo will be synced to MIDI clock from DIN or USB. Go to System Menu > MIDI (Section 7.3) to configure USB or DIN as the MIDI clock source.
- Page 69 9. SOFTWARE UPDATES 9. SOFTWARE UPDATES We recommend that you keep your H90’s software up to date. All of your updates will be done using the H90 Control application, which will notify you whenever a new update is available. To update your H90’s software: •...
- Page 70 This page was intentionally left 99.88% blank.
- Page 71 10. ALGORITHM GUIDE 10. ALGORITHM GUIDE To get an overview of the wide selection of effects the H90 offers, a stroll through this guide is recommended. You may search Algorithm descriptions by using this manual’s search box, but the best way to quickly find the best effect is to make use of the H90’s powerful real-time database features by using either the Preset Edit mode or H90 Control.
- Page 72 10. ALGORITHM GUIDE For stereo output: • Delay Mix = 0%, both outputs will have only delay A’s contribution. • Delay Mix = 50%, delay A goes to output 1 only and delay B goes to output 2 only. • Delay Mix = 100%, both outputs will have only Delay B’s contribution.
- Page 73 10. ALGORITHM GUIDE • Mod Depth: Controls the amount of modulation applied to the BBD delay line. Note that modulation amounts will vary depending on the Delay time. • LFO Rate: Controls the speed/rate of the modulation LFO. (0.01 Hz to 20 Hz) •...
- Page 74 10. ALGORITHM GUIDE For mono output: • Delay Mix = 0%, output 1 will have only delay A’s contribution. • Delay Mix = 50%, output 1 has an equal amount of delay A and delay B. • Delay Mix = 100%, output 1 will have only delay B’s contribution. For stereo output: •...
- Page 75 10. ALGORITHM GUIDE Delay Mix: Controls the relative level of Delay A and Delay B. Delay Mix’s mixing behavior depends • on whether you’re using mono or stereo outputs. For mono output: • Delay Mix = 0%, output 1 will have only delay A’s contribution. •...
- Page 76 10. ALGORITHM GUIDE Filter Pong The dual delays ping pong between the outputs with filter effects added for good measure. • Mix: wet/dry mixer, 100% is all wet signal. • Delay Mix: Controls the relative level of Delay A and Delay B. Delay Mix’s mixing behavior depends on whether you’re using mono or stereo outputs.
- Page 77 10. ALGORITHM GUIDE Modulation Speed: Speed multiplier for filter modulation. • • Filter: Controls the mix of dry/filtered signal input to ping-pong delay. Head Space An authentic emulation of classic tape delays from days past; only this time you’re in complete control. Adjustable playback heads let you decide just how many you have and where they are in relation to the record head.
- Page 78 10. ALGORITHM GUIDE maintained high end tape machine. Use 10 for a lower end, old tape machine in need of some serious repair. • Tape Hiss: Controls the amount of tape hiss. 0 is no hiss. 10 is the most amount of hiss. Control is global over all playback heads.
- Page 79 10. ALGORITHM GUIDE Mod Delay Modulated delays – great for creating chorus effects and chorused delays. • Mix: wet/dry mixer, 100% is all wet signal. • Delay Mix: Controls the relative level of Delay A and Delay B. Delay Mix’s mixing behavior depends on whether you’re using mono or stereo outputs.
- Page 80 10. ALGORITHM GUIDE MultiTap 10 delay taps with controls for delay time, diffusion, tap levels, and tap spacing. • Mix: wet/dry mixer, 100% is all wet signal. • Delay Mix: Controls the relative level of Delay A and Delay B. Delay Mix’s mixing behavior depends on whether you’re using mono or stereo outputs.
- Page 81 10. ALGORITHM GUIDE Reverse Reverse audio effects. Audio is broken into segments, are played backwards and spliced. Crossfading at the splice points prevents nasties. X-Fade controls the length of the crossfade. Small values result in fast crossfades adding an audible rhythm to the effect. Larger values result in long crossfades and a smoother reverse sound.
- Page 82 10. ALGORITHM GUIDE Modulation Speed: Sets the delay modulation rate (0 - 5 Hz). • • Filter: A low pass/high pass filter variable from -100 (max high pass) to 0 (no filtering) to 100 (max low pass) to change the tone of your delay repeats. Tape Echo Simulates the hiss, wow and flutter of analog tape delay.
- Page 83 10. ALGORITHM GUIDE Saturation: Simulates analog tape saturation. Ranges from ‘0’ (none) to ‘10’ (max) for the warm • compression and distortion associated with overdriven tape. • Tape Wow: Simulates analog tape Wow. Wow is a term used to describe relatively slowly changing pitch and amplitude modulations caused by problems with the motor or tape transport that causes the tape’s motion across the head to vary.
- Page 84 10. ALGORITHM GUIDE The UltraTap parameters detailed below affect the various signal path blocks shown above. For simplicity only the wet path is diagrammed. Mono In / Mono Out instantiations are center panned with wet output taken off of the left Tap Delay output shown in the diagram. •...
- Page 85 10. ALGORITHM GUIDE Vintage Delay Simulates the sound of analog and digital delays from days gone by. To replicate a range of delay devices from the past, a ‘Bits’ parameter recreates the effect of primitive analog-to-digital converters. Anyone remember when it was a 10 bit world? The delays can be modulated to achieve chorusing or more extreme effects.
- Page 86 An overdrive/distortion command center with controls that drive your tone from creamy saturation to brutal sonic assault with everything in between. Use Eventide Harmonizer technology to crush some octaves into the mix, or turn up the Sag to bring the whole sound to its knees. An added bonus, CrushStation is a true stereo distortion.
- Page 87 10. ALGORITHM GUIDE pedals as well as Eventide’s own CrushStation and Sculpt Algorithms. The Pitch Shifters are next in the signal path and are based on Eventide’s PitchFlex Algorithm from the PitchFactor pedal. The Delay section is last in the signal path and its lineage can be traced back to the Vintage Delay Algorithm in TimeFactor.
- Page 88 10. ALGORITHM GUIDE • Crossover Frequency: The crossover frequency where the low band and high band are split. • Low Drive: Overdrive of the low band. • High Drive: Overdrive of the high band. • Compressor: Pre distortion (counter-clockwise), or Post distortion (clockwise). Turn counter- clockwise to juice up the harmonics in the distortion, or turn clockwise for some sparkly compressor spank.
- Page 89 10. ALGORITHM GUIDE • Tone: Tone control for the stage. -100 to 0 rolls off the treble creating a bassier tone. 0 to 100 brightens the effect. • Mids: Midrange control for the stage. -100 to 0 removes midrange for a more scooped sound. 0 to 100 adds midrange.
- Page 90 10. ALGORITHM GUIDE designed to vary the numerous parameters of a typical compressor such as the ratio, attack, release and the makeup gain to keep the overall loudness consistent. • Trim: Controls the level at the output of the signal path. Provides 12 dB of boost or 12 dB of attenuation.
- Page 91 10. ALGORITHM GUIDE When a Loop is in memory, this sets the Loop Play-Length for playback that begins at the Loop Start Point. In other words, if a 12 second Loop is recorded and the Loop Start Point is set to 2 seconds and the Loop Length is set to 4 seconds, the recorded Loop will play from 2 seconds to 6 seconds into the 12 second Loop.
- Page 92 10. ALGORITHM GUIDE • Autoplay: When recording reaches the Max-Length, loop begins playing automatically and plays continuously. During Playback, the audio loops around to loop’s start point when it reaches Play- Length, and PLAY at any point will initiates playing continuously from the loop’s start point. •...
- Page 93 10. ALGORITHM GUIDE Filter: Controls the tone of the looped audio. Tone control filters are placed at both the input and • output of the Looper. This allows you to control the tone of the audio that you’re recording and then independently control the tone on playback.
- Page 94 10. ALGORITHM GUIDE • MIDI Stop: no action Tempo Sync Footswitch Quantization MIDI Clock is made up of a series 24 “ticks” per beat. Tempo Sync quantizes many of the Footswitch actions either to the next MIDI beat or the next MIDI tick. The quantization action of the Footswitches for each Looper State is as follows: Empty: •...
- Page 95 10. ALGORITHM GUIDE Parameter Tempo Sync Features The following control knobs have enhanced features for Tempo Sync allowing for perfect beat sync even when the tempo source changes. • Loop Play-Start Point: When using Tempo Sync, the minimum length of audio that can be played out is 1 beat so, the Play-Start Point will display in beats allowing you start playback from 0 beats up to Loop Length minus 1 beat.
- Page 96 10. ALGORITHM GUIDE Performance Parameters • 1-Button Looper: The 1-button looper allows you to easily control the transport of the looper using a single Footswitch. • Press once to begin recording a loop. Press again to finish recording and play the loop. •...
- Page 97 10. ALGORITHM GUIDE • Speed / Sensitivity: Sets the modulation sweep rate. Speed becomes Sensitivity when Shape is set to Envelope or ADSR. • Shape: Selects the waveform, or source, of the modulation. The choices are: • Sine • Triangle •...
- Page 98 10. ALGORITHM GUIDE Performance Parameters • Retrigger: Retriggers the primary and secondary modulation LFOs to the beginning of their cycles. Useful for re-syncing during playback, or creative effects. • Speed / Brake: The Brake engages while this switch is pressed. Short-press to toggle between Fast and Slow.
- Page 99 10. ALGORITHM GUIDE Flanger Flanging is similar to Phasing but more intense – deeper, more numerous frequency notches. • Intensity: Effect level. • Type: • Positive: Mixes the feed-forward and feedback signals, non-inverted. • Negative: Mixes the feed-forward and feedback signals, inverted. •...
- Page 100 10. ALGORITHM GUIDE • Random • Square • Ramp • SampHold • Envelope: The modulation becomes driven by the amplitude of the audio input. • ADSR: The modulation becomes driven by an ADSR triggered by the amplitude of the audio input.
- Page 101 10. ALGORITHM GUIDE are familiar with those, it will be easier to see how the ENV controls can be used to add expression to your playing. • Depth: This is the depth of the low and high bands of the tremolo. At 0, the tremolo will have no effect on the volume of the bands.
- Page 102 10. ALGORITHM GUIDE X-Over: This control determines where in the frequency spectrum the low band ends and the high • frequency band begins. In practice, each band rolls off around the crossover frequency, so they overlap a bit. The X-Over control allows you to adjust the amount of overlap; see below. To mimic an ordinary tremolo, set X-Over to its maximum value of 12,000 Hz.
- Page 103 10. ALGORITHM GUIDE note, increasing the clarity of your attacks and making sustained notes more expressive over time. Playing louder will reduce the depth of the tremolo, and you can use large negative values to create tremolos that only appear when the input is soft. The Env Depth control covers a large range, so we recommend starting with values closer to 0, and then adjusting the control as needed.
- Page 104 10. ALGORITHM GUIDE Instant Phaser Released in 1972, Eventide’s Instant Phaser began the studio effects revolution by successfully simulating tape flanging, an effect that’s been at the core of legendary albums for the last five decades. Modeled on the original hardware unit, the Instant Phaser Algorithm accomplishes the same legendary sound with all the analog personality, smooth modulations, and inherent musicality.
- Page 105 10. ALGORITHM GUIDE Age: Controls the age of the electrical components that make up the Instant Phaser. 0% is a factory • fresh unit from 1971, 25% is the box we modeled as it is now, 100% is a very ungracefully aged Instant Phaser.
- Page 106 10. ALGORITHM GUIDE producers have used it for stereo sweetening, subtle modulations, double tracking, and extreme flanging effects. • Depth: Controls the mix of wet and dry signals. At 0% the output is solely the wet signal. At 100% the output is the sum of the wet and dry signals. At −100% the output is the sum of the wet signal and the inverted dry signal.
- Page 107 10. ALGORITHM GUIDE Note The original Instant Flanger had two unique outputs called Main and Aux. The Main output used two bucket brigade devices in series, while the Aux output only used a single Bucket Brigade. This means the delay times of the Main output are roughly double that of the Aux output.
- Page 108 10. ALGORITHM GUIDE Performance Features • Retrigger: Retriggers the LFO to the beginning of the cycle. Useful for re-syncing during playback, or creative effects. ModFilter ModFilter is a set of modulated filters! • Intensity: Effect level. Controls a combination of base filter frequency and resonance. •...
- Page 109 10. ALGORITHM GUIDE • Mod Rate / Mod Sens: Sets the secondary LFO rate – determines how fast the Depth Mod and Speed Mod “wiggle” their targets. Ranges from 1/8th to 8x the Speed value. Mod Rate becomes Mod Sens when Mod Source is set to Envelope or ADSR. •...
- Page 110 10. ALGORITHM GUIDE • Bi-phase: Based on the topology of the Mu-Tron Bi-Phase. • PhaseX0: A phase 90 clone (but it also does phase 180 and some others if you check Stages). • Depth: Sets the modulation sweep range from narrow to wide. •...
- Page 111 10. ALGORITHM GUIDE Performance Parameters • Retrigger: Retriggers the primary and secondary modulation LFOs to the beginning of their cycles. Useful for re-syncing during playback, or creative effects. • Speed / Brake: The Brake engages while this switch is pressed. Short-press to toggle between Fast and Slow.
- Page 112 10. ALGORITHM GUIDE List of available vowels: • B..EA..T • M..I..X • S..E..T • S..A..X • H..O..T • R..A..W • W..OO..D • T..U..NE • F..U..N • B..IR..D • Speed / Sensitivity: Sets the modulation sweep rate. Speed becomes Sensitivity when Shape is set to Envelope or ADSR.
- Page 113 10. ALGORITHM GUIDE Speed Mod: Controls the amount of modulation of the Speed parameter. Analogous to FM • (Frequency Modulation). • Mod Rate / Mod Sens: Sets the secondary LFO rate – determines how fast the Depth Mod and Speed Mod “wiggle” their targets. Ranges from 1/8th to 8x the Speed value. Mod Rate becomes Mod Sens when Mod Source is set to Envelope or ADSR.
- Page 114 10. ALGORITHM GUIDE creates a waveform with complex (and usually nonharmonic) bell-like overtones. By using the Speed Mod control to modulate this carrier frequency you can create useful and interesting sounds. • Intensity: Effect level. • Type: • Ring • String •...
- Page 115 10. ALGORITHM GUIDE • SampHold • Envelope: The modulation becomes driven by the amplitude of the audio input. • ADSR: The modulation becomes driven by an ADSR triggered by the amplitude of the audio input. • Manual: When selected, the Manual Mod parameter will control the modulation. Performance Parameters •...
- Page 116 10. ALGORITHM GUIDE • Mod Rate / Mod Sens: Sets the secondary LFO rate – determines how fast the Depth Mod and Speed Mod “wiggle” their targets. Ranges from 1/8th to 8x the Rotor Spd value. Mod Rate becomes Mod Sens when Mod Source is set to Envelope or ADSR. •...
- Page 117 10. ALGORITHM GUIDE • When Effect Type is set to Opto, this controls the input’s slew rate (Edge) and, depending on the input signal, may only have a subtle effect. • Type • Bias: Tube-inspired. • Opto: Opto-coupled. • Depth: Sets the modulation sweep range from narrow to wide. •...
- Page 118 1980s. These units used bucket brigade delay (BBD) chips to create chorusing. TriceraChorus pairs rich BBD-style trichorusing with another classic effect of the 1980s: Eventide MicroPitch detuning. This effect can be used to thicken the sound, to add static chorusing, and to spread the stereo field by detuning the left and right signals in opposite directions.
- Page 119 10. ALGORITHM GUIDE to Off, that voice is removed from the output, and the volume levels of the other voices will be automatically adjusted to maintain a constant level. • Chorus Mix / Vibrato / Chorale Mix: Global mix control for chorusing and has two modes, Chorus and Chorale.
- Page 120 10. ALGORITHM GUIDE Delay: When Chorus Mix is in Chorus Mode, DELAY sets the minimum delay time for all voices, • ranging from 0.39 mS to 200 mS. Short delays can be used to create light flanging. Typical chorus delays range from 1.5-10 mS. You can create a chorused slapback sound by using values between 50 and 100 mS.
- Page 121 Undulator Undulator is Eventide’s classic modulated tremolo effect from the iconic H3000 effects processor. This unique, rhythmic effect combines input swell, chained detuned delays, and ethereal feedback run through an AM/FM modulated tremolo. Additional secondary modulation allows for greater creativity and control.
- Page 122 10. ALGORITHM GUIDE • SampHold • Envelope: The modulation becomes driven by the amplitude of the audio input. • ADSR: The modulation becomes driven by an ADSR triggered by the amplitude of the audio input. • Manual: When selected, the Manual Mod parameter will control the modulation. •...
- Page 123 10. ALGORITHM GUIDE Vibrato Vibrato is an effect that simulates the pitch change you get by modulating a guitar string or using a whammy bar. Modulating the rate with an Expression Pedal or envelope will create some incredible vibratos. Three types of vibrato are offered – Modern, Vintage, and Retro. •...
- Page 124 Eventide’s Vintage Delay Algorithm from the TimeFactor pedal and the Reverb section draws from both the Plate Algorithm in Eventide’s SPACE pedal, as well as Eventide’s ULTRA REVERB Native Plug-in. Unique to SpaceTime is the ability to route the Delays and Reverb in series or parallel after Modulation, further adding to its versatility and creative applications.
- Page 125 10. ALGORITHM GUIDE • Verb Lvl: Adjust the output level of the Reverb and routes the Reverb in Series after the Delays or Parallel with the Delays. The first half of the knob adjusts Series Reverb level from 0 to 100 while the second half of the knob switches to Parallel routing and adjusts Reverb level from 0 to 100.
- Page 126 10. ALGORITHM GUIDE Crystals Crystals is a classic Eventide effect combining twin reverse pitch shifters, delays, feedback, and reverb. It can create out-of-this-world climbing and cascading pitched delays, unique sounding reverbs, and granular effects for helping instruments stand out in a mix.
- Page 127 10. ALGORITHM GUIDE Note Due to the limitations of Diatonic Pitch Shifting, the pitch tracking Algorithm is monophonic and works best on single, isolated notes, and octaves. • Mix: Wet/dry mixer, 100% is all wet signal. • Pitch A/Pitch B Mix: Controls the ratio of the level of Pitch A to Pitch B. Note: The A/B mix is set before the feedback delays so that feedback can continue on A or B and not be affected by new audio when the Pitch Mix control is turned completely to the opposite channel.
- Page 128 Performance Parameter • LEARN: Press-and-hold the Learn switch while playing a note and the H90 will set the key to that note. H910 H949 This effect emulates the sound and functionality of Eventide’s legendary H910 H949 Harmonizer™ effects units. The H910 Harmonizer was the world’s first real-time pro-audio pitch changer and introduced the word “glitching”...
- Page 129 10. ALGORITHM GUIDE Delay B: Controls the amount of time delay of the B pitch-shifted output. With Tempo Sync OFF, • delay is displayed in ms. With Tempo Sync ON, delay can be sync’d to the tempo and is displayed as a rhythmic sub-division of the tempo beat value.
- Page 130 10. ALGORITHM GUIDE HarModulator HarModulator combines twin chromatic pitch shifters with modulation to deliver an extremely wide range of effects from the subtle to the insane. Chromatic pitch shifters allow you to set the pitch ratio of each of the voices in semi-tone intervals (12 steps per octave). HarModulator features a six octave range (three up, three down).
- Page 131 10. ALGORITHM GUIDE Performance Parameter • FLEX: Shifts both voices up one octave. HarPeggiator HarPeggiator creates dual 16-step arpeggios that combine three elements: Dual 16-step pitch-shift sequencer Dual 16-step rhythm sequencer Dual 16-step effect sequencer HarPeggiator lets you choose from a list of pre-programmed sequences for pitch, rhythm and effect. Using the many possible combinations gives you quite a bit of creative control.
- Page 132 10. ALGORITHM GUIDE All steps are a fourth down. Unison and one octave down. One octave down, unison, one octave up, two octaves up. Two octaves down, one octave down, unison, one octave up. One octave down, unison, one octave up, 2 octaves up. Unison, one octave up, unison, one octave up.
- Page 133 10. ALGORITHM GUIDE • M3 = major third • m3 = minor third • P4 = perfect fourth • d5 = diminished fifth • P5 = perfect fifth • M6 = major sixth • m6 = minor sixth • M7 = major seventh •...
- Page 134 10. ALGORITHM GUIDE 14 +1oct -1oct unison +2oct +1oct 15 +1oct -1oct unison +2oct +1oct 16 +1oct -1oct unison +2oct +1oct Pitch Sequences 8 – 14 -1oct Unison unison unison -1oct ↑ unison ↓ -2oct ↑ unison Unison +1oct unison -m7 ↑...
- Page 135 10. ALGORITHM GUIDE +1oct unison ↓ unison ↓ +P5 ↓ unison +1oct unison +1oct -m2 ↓ -d5 ↓ unison +1oct -M3 ↓ -1oct unison +1oct -M6 ↓ -1oct unison +1oct -P4oct ↓ unison +P5 ↓ +1oct -2oct unison unison +1oct unison unison unison...
- Page 136 10. ALGORITHM GUIDE unison unison +1oct +1oct unison -1oct unison unison +1oct unison unison +1oct +m6 ↑ unison Unison unison unison -1oct unison Unison unison unison +1oct unison unison unison Unison +1oct +1oct unison Unison unison unison +1oct -2oct ↑ •...
- Page 137 10. ALGORITHM GUIDE only 1/10th of the step’s duration. Note: This control has no effect when both Rhythm and Effect knobs are set to Off. • Step Length: With Tempo Sync OFF, sets the length of each of the 16 steps in ms. With Tempo Sync ON, sets the length of each step relative to the tap tempo (length of note e.g.
- Page 138 10. ALGORITHM GUIDE • Pitch Shift Up A: Controls the amount of pitch shift up for voice A, from Unison to +50 cents. • Pitch Shift Down B: Controls the amount of pitch shift down for voice B, from Unison to -50 cents. •...
- Page 139 10. ALGORITHM GUIDE • Envelope Filter Shift: Octaver allows your playing to vary the center frequency of the filters. This control adjusts the degree to which the input signal’s envelop shifts the filter’s center frequency. • Envelope Sensitivity: Controls the sensitivity of the frequency sweeps to the input signal level. •...
- Page 140 FLEX: Sweep the pitch shift from MIN to MAX of HOTKNOB. Polyphony A low-latency, high quality polyphonic pitch shifter capable of so much more. Making use of Eventide’s new SIFT (Spectral Instantaneous Frequency Tracking) technology, this algorithm shifts any chord or note you throw at it with zero tracking errors, all while the preserving the tone of your guitar.
- Page 141 Open the door to never before heard polyphonic effects. PrismShift leverages sophisticated polyphonic pitch tracking and Eventide’s new low-latency polyphonic pitch shifting engine to generate 3 arpeggiated voices (Low, Mid, High)—all from a single chord. The detected chord intervals are separated, staggered...
- Page 142 10. ALGORITHM GUIDE arpeggios span up to 3 octaves, and can use 6 different groups of intervals. Turn up the feedback and glide between intervals to create a multitude of new effects. • Mix: Wet/dry mixer, 100% is all wet signal. •...
- Page 143 10. ALGORITHM GUIDE • Sequence 2 • Random • Spread: Controls the stereo spread of the voices. When set to -1 the Low voice is panned hard left, the mid voice is panned center, and the high voice is panned hard right. When set to +1 this is reversed.
- Page 144 10. ALGORITHM GUIDE • Delay D: Quadravox’s delay controls work differently from those in the other effects. Quadravox’s four delays are not independently variable. Instead, they are staggered with A having the shortest delay, B longer than A, C longer than B and D the longest. The Delay D control is used to set the last delay.
- Page 145 10. ALGORITHM GUIDE Resonator Resonator staggers 4 resonant comb filters to create ambient, arpeggiated, or reverberant sounds. Each comb filter can be tuned to ring out when you play the note selected by the respective ‘Note’ knob. This creates dynamic effects that react with more or less intensity based on the harmonic content of the input audio.
- Page 146 H8000, its lush sound and popularity encouraged us to feature it as one of the premier Algorithms in Eventide’s Space guitar pedal. Its soft attack and lingering, harmonic tail cause it to really shine on guitars, strings, and pads, but those same qualities also allow it to transform a drum track into something other- worldly.
- Page 147 Tone: Tone control for the reverb. Negative values bring out the lows, while positive values bring out the highs. DynaVerb DynaVerb couples an Eventide Eclipse reverb with a model of the Eventide Omnipressor® to create an adaptable dynamics reverb. The Omnipressor is capable of all types of dynamics processing from gating, expansion, compression, limiting, and even its signature ‘dynamic reversal, ’...
- Page 148 10. ALGORITHM GUIDE incredible chaos, or any mixture of the two. As an added bonus DynaVerb can also be used as a standalone Omnipressor by setting Decay to zero. • Mix: Wet/dry mixer, 100% is all wet signal • Decay: Decay in seconds or note-based with Tempo Sync ON. When decay is 0, this effect can be used as a standalone Omnipressor or gate.
- Page 149 10. ALGORITHM GUIDE • Modulation Level: increases random modulation of reverb tails. • Mid Band Reverb Level: boost/cut of MID reverb (between 300 and 1500 Hz), -100 effectively cuts all of the mid band reverb. MangledVerb We recognize the universe is a chaotic and often violent place, so in the spirit of the yin and yang of it all, we’re proud to present MangledVerb.
- Page 150 Wobble: A modulation rate that does some spooky detuning. ModEchoVerb ModEchoVerb is based on a popular reverb structure from the Eventide H8000 that brought about such presets as Echospace Of God and Glorious Flange Canyon. It feeds the output of an infinite reverb into an infinite feedback delay and slathers on an extra helping of modulation.
- Page 151 10. ALGORITHM GUIDE Plate Plate simulates the sound of early analog-mechanical reverbs. This Algorithm allows for long reverb times that won’t take over your sound. Be sure to play with the Low Damp and High Damp knobs to explore the full palette of tonal variations.
- Page 152 • High Band Cutoff Frequency: Control the corner frequency of High Band Shelving. No affect if High Band Shelving parameter is is set to 0. SP2016 Reverb An emulation of the reverb processing from Eventide’s classic SP2016 Signal Processor. •...
- Page 153 10. ALGORITHM GUIDE • Diffusion: This alters the character of your space – from the sharp reflections of flat, hard surfaces (low) to the diffused reflections from rough, irregular ones (high). The Diffusion control doesn’t change the decay time, but it does have an effect on the evident nature of the decay by thickening or thinning its density.
- Page 154 10. ALGORITHM GUIDE • Tension: Controls spring tension. • Number of Springs: Number of springs in the ‘tank, ’ mixes in 1 to 3 springs. • Low Band Damping: Sets the damping frequency for the low end. • High Band Damping: Sets the damping frequency for the high end. •...
- Page 155 10. ALGORITHM GUIDE • Mid Band Decay: Amount of post reverb and pitch-shifter mid band signal (this is in the feedback path). TremoloVerb TremoloVerb is a celestially large reverb cut back down to Earth size by an aggressive tremolo. Use the Sine, Triangle, Peak, Ramp, or Square waves to create a rhythmic ambience;...
- Page 156 10. ALGORITHM GUIDE Wormhole Mega-sized, tilting reverb. How deep are you willing to go? • Mix: Wet/dry mixer, 0 is fully dry, 100 is fully wet. • Length: Wormhole distance in light years. Controls the decay time of the reverb. Internally tapered from 0 l.y.
- Page 157 10. ALGORITHM GUIDE Performance Parameter • Warp (L): Latching footswitch. Press once to go thru the entire warping cycle. Footswitch unlatches after cycle completion. • Warp (M): Momentary footswitch. Hold to keep warp cycle engaged. Releasing before cycle completion generates a “deceleration” (decreasing pitch) sound to the warp effect. Synth HotSawz Just like a synth, HotSawz is a musical palette for creating interesting sounds.
- Page 158 10. ALGORITHM GUIDE • Ramp Up Spd: Rising Ramp. • LFO Amount: Assigns LFO destination and controls amount of modulation. Knob has four ranges. Each range assigns the LFO to a different destination for modulation. • Cutoff: Assigns LFO to modulate Cutoff frequency. •...
- Page 159 10. ALGORITHM GUIDE • Wave Mix A: Controls the mix of the various added waveforms to control the tone and perceived pitch of voice A. • Octave B: Controls the blend between unison, 1 octave down, and 1 octave up synth voices to control the tone and perceived pitch of voice B.
- Page 160 This page was intentionally left 99.88% blank.
- Page 161 Eventide Stompbox Forum The official Eventide forum for the H90 and other stompboxes: https://etide.io/forums-pedals H90 Official Facebook Group A group where H90 users can interface with each other and members of the Eventide team: https://etide.io/ H90-FBUG H90 FAQ Get answers to frequently asked questions and get the most out of your H90: https://etide.io/H90-FAQs...
- Page 162 This page was intentionally left 99.88% blank.
- Page 163 B. TECH SPECS B. TECH SPECS Power specifications Center Positive (+), 5.5/2.5 mm jack Voltage Amperage 12 VDC 600 mA 9 VDC 800 mA Digital Specifications Sample Rate Bit Depth 48 kHz AD/DA 24-bit, DSP 32-bit floating point Audio Specifications Input Impedance Instrument Level >...
- Page 164 B. TECH SPECS Analog Audio Connections Number of Channels Four inputs, Four outputs, ¼” MONO TS jack Operating Levels User configurable: Instrument or Line level Control Connections EXP/CTL Inputs Two ¼” TRS inputs. Up to two expression pedals, two 5v control voltage sources, six foot switches, or combination MIDI Connections 5-pin DIN Input, 5-pin DIN Output/Thru...
- Page 165 C. GLOBAL MAPPING CHART C. GLOBAL MAPPING CHART Note Global Pedal Mappings and Global MIDI Mappings offer the same parameter mapping options. Global Mapping Options Parameter Description Load the currently cued up Program, plus Act/Byp toggle of Load a loaded Program Increment Increment and cue up a new Program Decrement...
- Page 166 C. GLOBAL MAPPING CHART Global Mapping Options P Act/Byp (M) Momentary Program Active A Act/Byp Preset A Active / Bypass toggle A Act/Byp (M) Momentary Preset A Active B Act/Byp Preset B Active / Bypass toggle B Act/Byp (M) Momentary Preset B Active Ins 1 Act/Byp Insert 1 Active / Bypass toggle Ins 2 Act/Byp...
- Page 167 C. GLOBAL MAPPING CHART Global Mapping Options Quick Knob 4 Adjust Program Quick Knob 4 Quick Knob 5 Adjust Program Quick Knob 5 Quick Knob 6 Adjust Program Quick Knob 6 P HotKnob Adjust Program HotKnob A HotKnob Adjust Preset A HotKnob B HotKnob Adjust Preset B HotKnob P In Gain...
- Page 168 This page was intentionally left 99.88% blank.
- Page 169 D. STARTUP SEQUENCES D. STARTUP SEQUENCES By pressing and holding certain button combinations while inserting the power cable, you can perform the following functions: D.1. Recovery Mode • Connect the provided USB-C cable from your H90 to your computer. • Press and hold the Select Knob, Perform Knob, and Quick Knob 1, while inserting the power cable to enter updater mode.
- Page 170 This page was intentionally left 99.88% blank.
- Page 171 The warranty DOES NOT COVER shipping damage, either to or from Eventide. If you receive a new unit from us in damaged condition, notify the carrier and us; we will arrange to file an insurance claim and either repair or exchange the unit.
- Page 172 A copy of your purchase invoice is normally necessary and sufficient for this. If you have any questions about who is an Authorized Eventide Dealer, call us. Units with the serial number plate defaced or removed will not be serviced or covered by this warranty.
- Page 173 E. LEGALESE However, we and our dealers do try to be helpful in various ways. Our dealers will assist, usually without charge during the warranty period, in: • Determining whether there is a problem requiring return to the factory. • Alleviating user error or interconnection problems that may be preventing the unit from operating to its full capability.
- Page 174 E. LEGALESE 5.2. Federal Communications Commission Statement This equipment has been tested and found to comply with the limits for a Class B digital device pursuant to Part 15 of FCC rules. Operation is subject to the following two conditions: This device may not cause harmful interference.
- Page 175 This page was intentionally left 99.88% blank.
- Page 176 © Copyright 2022, Eventide Inc.
Need help?
Do you have a question about the Harmonizer H90 and is the answer not in the manual?
Questions and answers
Can I assign a controller or one of the foot pedals on the H 90 to turn on and off one of the algorithms without turning off the entire program?