Table of Contents
Advertisement
Quick Links
Download this manual
See also:
Quick Reference Manual
User Guide
WARNING
Use only with supplied power supply.
Avoid spilling liquids onto/into the unit.
Do not expose to excessive heat or moisture.
Do not open – there are no user serviceable parts inside.
This equipment has been tested and found to comply with the limits for a Class B digital
device pursuant to Part 15 of FCC rules. Operation is subject to the following two conditions:
(1) This device may not cause harmful interference, and (2) this device must accept any
interference received, including interference that may cause undesired operation.
Complete MF UG Part # 159021 Rev C
MF UG Contents Part # 141141 Rev C
Eventide and Harmonizer are registered trademarks of Eventide Inc. ©2008-15 Eventide Inc.
Advertisement
Table of Contents

Related Manuals for Eventide ModFactor


Summary of Contents for Eventide ModFactor
-
Page 1: Warning
(1) This device may not cause harmful interference, and (2) this device must accept any interference received, including interference that may cause undesired operation. Complete MF UG Part # 159021 Rev C MF UG Contents Part # 141141 Rev C Eventide and Harmonizer are registered trademarks of Eventide Inc. ©2008-15 Eventide Inc. - Page 2 ModFactor User Guide Blank Page...
-
Page 3: Table Of Contents
Typical Setups........................10 Guitar > ModFactor > Amp - Mono In/Mono Out............. 11 Guitar > ModFactor > Amp 1/Amp2 – Mono or Stereo In/Stereo Out ....... 12 Guitar > Amp Effects Send > ModFactor > Amp Effects Return ........ 13 Mixer Effects Send>... - Page 4 ModFactor User Guide Table of Contents ModFilter......................... 20 Rotary..........................20 TremoloPan ........................20 Vibrato ..........................20 Undulator........................20 RingMod ......................... 20 Control Knobs/Effect Parameters ..................21 Intensity .......................... 22 Type ..........................22 Depth ..........................22 Speed ..........................22 Shape ..........................23 Xnob ..........................
- Page 5 ModFactor User Guide Table of Contents Pre/Post (PRE.PST)....................... 34 Wet/Dry (WET.DRY,STEREO) ..................35 System Mode........................36 To Enter/Exit System Mode ....................36 System Mode Navigation ....................36 System Menu Tree ......................37 [BYPASS] – Select Bypass Mode..................37 [BYP TYP] – Choose Bypass Type (DSP, RELAY) ............37 [KILLDRY] –...
-
Page 6: Introduction
We’ve worked hard to make ModFactor easy to use. We’ve done our best to design an intuitive User Interface to manage and control the awesome power and flexibility packed into every Factor Effects processor. -
Page 7: Overview
Overview Overview The Basics There are a few basic concepts that you’ll have to grasp to use ModFactor successfully. If you read nothing else, please read this section. The Effects There are ten distinct modulation algorithms which we call “Effects.” Select an Effect by turning the Encoder knob. -
Page 8: The Presets
ModFactor lets you save an Effect after you’ve adjusted the Control Knobs. An Effect along with a particular setting of its parameters is called a “Preset.” ModFactor lets you save up to 40 Presets. Instructions on saving Presets are covered later in this User Guide. -
Page 9: Changing Banks
Footswitch to load Preset 1 from the new Bank or press the Middle Footswitch to load Preset ModFactor Power Up When ModFactor turns on it remembers what it was last doing and powers up in the same mode, running the same Effect, with the same parameter values, same tempo, same system settings, etc. -
Page 10: Connections
Connections Connections ModFactor is designed to be flexible and can support both instrument and line-level inputs and outputs. Rear panel toggle switches allow you to independently select input and output levels. Audio Inputs and Outputs accept standard mono (unbalanced) ¼” phone plugs. -
Page 11: Guitar > Modfactor > Amp - Mono In/Mono Out
This is the simplest way to connect ModFactor. Connect your guitar cable to ModFactor Input 1 and a cable from ModFactor Output 1 to your amp. Input and Output Level switches (In Lvl & Out Lvl) should be set to GUITAR and AMP. -
Page 12: Guitar > Modfactor > Amp 1/Amp2 - Mono Or Stereo In/Stereo Out
Connect your guitar cable to ModFactor Input 1 and a cable from ModFactor Output 1 to one amp and a second cable from ModFactor Output 2 to the other amp. Input Level switch (In Lvl) should be set to GUITAR and Output Level switch (Out Lvl) set to AMP. -
Page 13: Guitar > Amp Effects Send > Modfactor > Amp Effects Return
Guitar > Amp Effects Send > ModFactor > Amp Effects Return If your Amp has an Effect Loop, you can connect ModFactor’s Input to the Amp Effect Loop Send and ModFactor’s Output to the Amp Effect Loop Return. Most guitar amp’s Effects... -
Page 14: Mixer Effects Send> Modfactor > Mixer Effects Return
ModFactor User Guide The Basics Mixer Effects Send> ModFactor > Mixer Effects Return When connecting ModFactor to a Mixer, set ModFactor’s Input and Output Level Switches to “Line.”... -
Page 15: Setting And Monitoring Levels
TimeFactor User Guide Setting and Monitoring Levels Setting and Monitoring Levels The TimeFactor’s output levels can be adjusted to optimize performance in most setups. It is sometimes desirable to adjust the output level of a given Effect/Preset. For example, an effect like ModFilter may have changes in amplitude and, depending on a given Preset’s parameter settings, you may find it too quiet or too loud. -
Page 16: Input And Output Swell
ModFactor User Guide Swell Input and Output Swell The expression pedal can be used to give a volume swell, either before or after the effect. This globally can be enabled either , meaning it is active all the time, or on a preset by preset basis. -
Page 17: Bypass
LINE or the Input Lvl switch is set for LINE and the Output Lvl switch is set to AMP, ModFactor will not have unity gain. In this case, using Relay Bypass will result in a level change whenever you Bypass ModFactor. -
Page 18: Effect Levels
Undulator and RingMod), when Killdry is enabled, the Intensity Control works as a Master Effects Level Control. When Killdry is enabled, ModFactor does not send any dry signal to the outputs; only the Effect. Note that when Killdry is enabled, Bypassing will mute the Effect rather than Bypass it. -
Page 19: The Effects
Effect is loaded, the green LED to the left of the Effect name is lit and the Billboard displays the Effect name. Each of ModFactor’s Effects offers a world of possibilities. For example, there are several types of Flangers, Phasers, etc. For each of the ten modulation Effects, use Type to select. -
Page 20: Flanger
Q, while Depth controls the frequency offset of the left and right channels to create a stereo image. Rotary Simulates the sound of a rotating speaker for that popular Leslie effect. ModFactor offers two types of rotary simulations – a standard-sized and an over-sized (“giant”) cabinet. TremoloPan Tremolo is an effect that is created by modulating the level of the incoming audio with an LFO. -
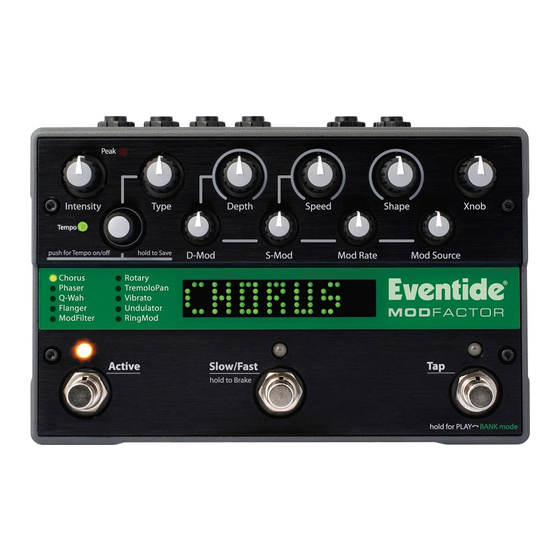
Page 21: Control Knobs/Effect Parameters
The controls are arranged in two rows and grouped according to their functions. ModFactor uses 2 LFO’s (Low Frequency Oscillators) to create classic or FM/AM modulated versions of many popular modulation effects. The primary LFO drives the main effect and is controlled by the three top row controls, Depth, Speed and Shape. -
Page 22: Intensity
For TremoloPan type Opto, Intensity controls input slew rate (Edge) and, depending on the input signal, may only have a subtle effect. Type Selects the type of effect. For example, ModFactor has 4 distinct types of Phasers – Negative, Positive, Feedback and Biphase. EFFECT... -
Page 23: Shape
ModFactor User Guide Control Knobs Shape Selects the shape (or source) of the modulation. The choices are: SINE, TRIANGL(E), PEAK, RANDOM, SQUARE, RAMP, SQUARE, SMP/HLD, ENVELOP or ADSR. In addition, the Expression Pedal (EXP PDL) can be chosen as a source. When EXP PDL is chosen, the current preset’s pedal mapping is ignored. -
Page 24: Catchup
5.00 Hz and then decreases to the desired value as you continue to turn the knob. If this happens as you’re playing, it could be a tad distracting. ModFactor’s Catchup feature is designed to prevent parameter values from abruptly changing when the knob positions don’t correspond to the Preset values. When Catchup is ON and a Control Knob is turned, the parameter value doesn’t change instantly. -
Page 25: Expression Pedal
Expression Pedal should be a simple resistive potentiometer with a maximum value of between 5k Ohms and 20k Ohms. Refer to www.eventide.com/AudioDivision.aspx for information on recommended expression pedals Because different pedals can have different electrical characteristics, it is a good idea to “calibrate”... -
Page 26: To Remove All Pedal Assignments
If you hear a “hum” only when you’ve connected a control voltage source to ModFactor’s Expression Pedal input jack, then it is likely that the device generating the control voltage is grounded to a different ground than your audio ins and outs. -
Page 27: Operating Modes
ModFactor’s footswitches are multi-purpose and operate in one of three modes, Play Mode, Bank Mode, and System Mode. In normal use, ModFactor is in either Play Mode or Bank Mode. Pressing and holding the Right Footswitch switches between Play and Bank Mode. -
Page 28: Tap Footswitch
ModFactor User Guide Operating Modes Whether Slow mode is on or off, pressing the performance switch engages a Brake mode for as long as the switch is pressed. Brake mode slows the LFOs at a constant rate while the switch is pressed. When the switch is released, Brake the LFOs return to their previous rate. -
Page 29: Selecting Preset Banks
Tempo On/Off status. Expression pedal mapping. * Note: ModFactor can be set up to change the Tempo value when a Preset is loaded or to ignore the value saved with the Preset. While Tempo values are always saved with the Preset, you may prefer to have your current Tempo stay the same as you switch from Preset to Preset. -
Page 30: Tempo
TimeFactor User Guide Tempo Tempo Tempo ON/OFF Tempo is turned ON or OFF by momentarily pressing the Encoder. When Tempo is ON, the Tempo LED flashes at the Tempo rate. With Tempo OFF, the Tempo LED is OFF. Tap Tempo In Play Mode, the Tap Footswitch can be tapped to set the tempo. -
Page 31: Saving Presets
Preset will not be saved. This is intentional. When you save a new Preset, you overwrite the old Preset. ModFactor is designed to assure that saving is a deliberate act. The Preset number corresponding to the currently running Preset will flash as a warning that saving in this location will overwrite the currently loaded Preset. -
Page 32: Restoring Presets And System Settings
If SYSTEM is selected, only System settings are dumped. Restoring Presets and System Settings Presets and System settings are restored via MIDI’s SysEx facility. ModFactor must be set to the desired SysEx ID number (from 1 to 16). To set the MIDI SysEx ID number (factory default... -
Page 33: Auxiliary Switches
Tap Tempo switch or Slow/Fast/Brake switch or Preset Switch. As noted above, the ModFactor has two operating modes, Bank and Play. An Aux Switch can be used to instantly toggle between the ModFactor’s Bank and Play Modes. Alternately, some users may want to have all six switch functions immediately available (3 from each Footswitch Mode). -
Page 34: Routing
ModFactor User Guide Routing Routing In most cases, the H9 will be connected in one of the ways described earlier. For more advanced users, it offers a number of extra routing modes, which control the functions of the inputs and outputs. These are usually associated with dedicated wiring and amplifiers and can be selected from the UTILITY/ROUTING section of System Mode. -
Page 35: Wet/Dry (Wet.dry,Stereo)
ModFactor User Guide Routing Wet/Dry (WET.DRY,STEREO) In wet dry mode, either one or two inputs can be used. One output will be dry, meaning that the output is the same as the input (or mix if two inputs are used), whereas the other will be wet, using a mono output version of the effect. -
Page 36: System Mode
ModFactor User Guide System Mode System Mode System Mode is used for settings that cover the overall system such as the Bypass, Aux Switch, MIDI, Expression Pedal, etc. To Enter/Exit System Mode Press and hold the Encoder and Right Footswitch simultaneously for a few seconds to enter and exit the System Mode. -
Page 37: System Menu Tree
The default assignments of the Aux Switches mirror the operation of the stompbox footswitches. If ModFactor is in the Play Mode, the Aux Switches act as the normal Bank Mode switches and, if ModFactor is in Bank Mode, the Aux Switches act as the normal Play Mode switches. - Page 38 To Setup Parameter Destinations Turn the Encoder knob to select an external control destination. Destinations include the ModFactor parameters and functions that can be controlled by one of the Aux Switches. The choices are: BYP – Toggle Bypass/Active. (Bypass type selected in BYPASS) BK + –...
- Page 39 ModFactor User Guide System Mode minimum value. The Billboard displays the knob value while you’re turning the parameter knob and times out to display the selected [MIN VAL] when the knob is idle. Push the Left Footswitch again to set the maximum value for the selected Parameter Control Knob.
-
Page 40: [Midi] - Midi Functions
RCV CTL allows external MIDI Continuous Control messages to be used as assignable controls for the Effects parameters and system control. The idea is to first select the ModFactor parameter or function that you want to externally control (Intensity for example) and then select either MIDI Bend or the MIDI CC with which you want to control it. - Page 41 ModFactor User Guide System Mode ISW – Input Swell OSW – Output Swell After you’ve selected a Parameter Control Knob, you can set the parameter range that the MIDI CC will control by setting minimum and maximum parameter values. When a Parameter Control Knob designator is displayed (KB0… KB9), pressing the Left Footswitch will display [MIN VAL].
-
Page 42: [Xmt Cc] - Control Knobs Transmit Midi Continuous Control
[XMT CC] – Control knobs transmit MIDI Continuous Control The default patch is as follows: PDL>C15, KB0>C22, KB1>C23, KB2>C24,…,KB9>C31 XMT CC makes it possible to use ModFactor’s Expression Pedal and Control Knobs as MIDI controllers. Here’s how it works: Press the Encoder to select XMT CC. You will see two fields (split display) of the Billboard display showing Control source and Destination assignments. -
Page 43: [Xmt Map] - Create A Midi Program Change Transmit Map
Note: When a Factor Preset is recalled with a MIDI program change message, MIDI Program Change messages are not generated. Note: MIDI Program Change Transmit must be enabled in order for ModFactor to transmit Program Change messages. MIDI Program Change Transmit is turned ON or OFF in the MIDI menu. -
Page 44: [Pgm Xmt] - Midi Program Change Transmit Enable (On, Off)
ModFactor User Guide System Mode [PGM XMT] – MIDI Program Change Transmit Enable (ON, OFF) Press the Encoder to select. Turn Encoder to set MIDI Program Change transmit ON or OFF. If ON, a MIDI Program change message is transmitted whenever a Footswitch is pressed for Preset load. -
Page 45: [Global] - Global Settings
TimeFactor User Guide System Menu Tree [GLOBAL] – Global Settings [TEMPO] – Enable Global Tempo (ON, OFF) Press the Encoder to select. Turn Encoder to set Global Tempo. Tempo is always stored with Presets, but the stored value is not used if Global Tempo is ON. With Global ON, the current Tempo is used for all Presets. -
Page 46: [Banks] - Select The Range Of Active Preset Banks (1-20)
Press the Middle Footswitch twice to go to top level System menu. [SER#] – Serial Number Press the Encoder to display your ModFactor’s unique serial number. You’ll need to know this number to request support and to download software updates. -
Page 47: Restoring Factory Settings/Software Updates
Restoring Factory Effects Presets and System Settings CAUTION: This function will overwrite any Presets that you have saved. To restore Factory Presets and all System settings, power up ModFactor while simultaneously pressing the Middle Footswitch and the Encoder until [INITIALIZING] is displayed. -
Page 48: Midi Implementation Chart
ModFactor User Guide MIDI Implementation Chart MIDI Implementation Chart Mode 1: Omni On, Poly Mode 2: Omni On, Mono O=Yes Mode 3: Omni Off, Poly Mode 4: Omni Off, Mono X=No Function Transmitted Recognized Remarks Basic Channel Default Changed 1-16... -
Page 49: Specifications
Power Supply 9 VDC, 1200 ma, Tip hot (+) Dimensions English: 4.8” (H) x 7.5” (W) x 2.12” (D) Metric: 122 (H) x 190 (W) x 54 (D) mm Weight ModFactor 2.15 lbs, 1 kG Specifications subject to change without notice. -
Page 50: Limited Warranty
When the warranty becomes effective The one-year warranty period begins on the day the unit is purchased from an Authorized Eventide Dealer or, if the unit is drop-shipped from Eventide, on the day shipped, plus a reasonable allowance for shipping delays. This applies whether or not you return your warranty registration form.
Need help?
Do you have a question about the ModFactor and is the answer not in the manual?
Questions and answers