Table of Contents
Advertisement
Quick Links
User's Manual
Satellite Click LX0W-C/Satellite
Click LX5W-C/Satellite Click10
LX0W-C/ Satellite Click10 LX5W-C
Encore LX0-C/Encore LX5-C/Encore 10
LX0-C/Encore 10 LX5-C LX0W-C/
LX5W-C/LX0-C/LX5-C
dynabook N40
dynabook NB40
dynabook S60
N40
NB40
S60
Encore 10K LX0W-C
Encore 10K LX5W-C
Satellite Click 10/Encore 10 series
(Docking only)
Keyboard Dock PA5240*-****
(Docking only)
キーボードドック PA5240*-****(Docking only)
Advertisement
Table of Contents

Related Manuals for Toshiba Satellite Click 10 Series


Summary of Contents for Toshiba Satellite Click 10 Series
- Page 1 User's Manual Satellite Click LX0W-C/Satellite Click LX5W-C/Satellite Click10 LX0W-C/ Satellite Click10 LX5W-C Encore LX0-C/Encore LX5-C/Encore 10 LX0-C/Encore 10 LX5-C LX0W-C/ LX5W-C/LX0-C/LX5-C dynabook N40 dynabook NB40 dynabook S60 NB40 Encore 10K LX0W-C Encore 10K LX5W-C Satellite Click 10/Encore 10 series (Docking only) Keyboard Dock PA5240*-**** (Docking only) キーボードドック...
- Page 2 User's Manual...
-
Page 3: Table Of Contents
Table of Contents Chapter 1 TOSHIBA Legal, Regulatory, and Safety Copyright, Disclaimer and Trademarks ..........1-1 Regulatory Information ................. 1-2 Video Standard Notice ................1-6 OpenSSL Toolkit License Issues ............1-6 FreeType License Issues ..............1-9 ENERGY STAR® Program ..............1-13 Disposing of the computer and the computer's battery .... - Page 4 Utilities and Applications ..............5-1 Special features ..................5-2 TruCapture ..................... 5-3 TOSHIBA Setup Utility ................5-3 System Recovery .................. 5-4 Chapter 6 Troubleshooting Problem-solving process ..............6-1 Hardware and system checklist ............6-4 TOSHIBA support ................6-12 Chapter 7 Appendix Specifications ..................
-
Page 5: Chapter 1 Toshiba Legal, Regulatory, And Safety
© 2015 TOSHIBA Corporation. All rights reserved. Under the copyright laws, this manual cannot be reproduced in any form without the prior written permission of TOSHIBA. No patent liability is assumed, with respect to the use of the information contained herein. -
Page 6: Regulatory Information
® The Bluetooth word mark and logos are registered trademarks owned by Bluetooth SIG, Inc. and any use of such marks by Toshiba Corporation and its affiliates is under license. The terms HDMI and HDMI High-Definition Multimedia Interface, and the HDMI Logo are trademarks or registered trademarks of HDMI Licensing LLC in the United States and other countries. - Page 7 This product was designed to fulfil the EMC (Electromagnetic Compatibility) requirements to be observed for so-called “Residential, commercial and light industry environments”. TOSHIBA do not approve the use of this product in working environments other than the above mentioned “Residential, commercial and light industry environments”.
- Page 8 For more detailed information about the collection and recycling programmes available in your country, please visit our website ( www.toshiba.eu/recycling ) or contact your local council office or the retail outlet where you purchased the product. User's Manual...
- Page 9 Evaluation, Authorization and Restriction of Chemicals), entered into force on 1 June 2007, with phased deadlines to 2018. Toshiba will meet all REACH requirements and is committed to provide our customers with information about the presence in our articles of substances included on the candidate list according to REACH regulation.
-
Page 10: Video Standard Notice
Toshiba meets all requirements of Turkish regulation 28300 “Restriction of the use of certain hazardous substances in electrical and electronic equipment”. - Page 11 The OpenSSL toolkit stays under a dual license, i.e. both the conditions of the OpenSSL License and the original SSLeay license apply to the toolkit. See below for the actual license texts. Actually both licenses are BSD-style Open Source licenses. In case of any license issues related to OpenSSL please contact openssl-core@openssl.org.
- Page 12 OUT OF THE USE OF THIS SOFTWARE, EVEN IF ADVISED OF THE POSSIBILITY OF SUCH DAMAGE. ===================================================== This product includes cryptographic software written by Eric Young (eay@cryptsoft.com). This product includes software written by Tim Hudson (tjh@cryptsoft.com). Original SSLeay License ---------------------------------- /* Copyright (C) 1995-1998 Eric Young (eay@cryptsoft.com) All rights reserved.
-
Page 13: Freetype License Issues
If you include any Windows specific code (or a derivative thereof) from the apps directory (application code) you must include an acknowledgement: "This product includes software written by Tim Hudson (tjh@cryptsoft.com)" THIS SOFTWARE IS PROVIDED BY ERIC YOUNG ``AS IS'' AND ANY EXPRESS OR IMPLIED WARRANTIES, INCLUDING, BUT NOT LIMITED TO, THE IMPLIED WARRANTIES OF MERCHANTABILITY AND FITNESS FOR A PARTICULAR PURPOSE ARE DISCLAIMED. - Page 14 We don't promise that this software works. However, we will be interested in any kind of bug reports. (`as is' distribution) You can use this software for whatever you want, in parts or full form, without having to pay us. (`royalty-free' usage) You may not pretend that you wrote this software.
- Page 15 -------------- THE FREETYPE PROJECT IS PROVIDED `AS IS' WITHOUT WARRANTY OF ANY KIND, EITHER EXPRESS OR IMPLIED, INCLUDING, BUT NOT LIMITED TO, WARRANTIES OF MERCHANTABILITY AND FITNESS FOR A PARTICULAR PURPOSE. IN NO EVENT WILL ANY OF THE AUTHORS OR COPYRIGHT HOLDERS BE LIABLE FOR ANY DAMAGES CAUSED BY THE USE OR THE INABILITY TO USE, OF THE FREETYPE PROJECT.
- Page 16 -------------- There are two mailing lists related to FreeType: freetype@nongnu.org Discusses general use and applications of FreeType, as well as future and wanted additions to the library and distribution. If you are looking for support, start in this list if you haven't found anything to help you in the documentation.
-
Page 17: Energy Star® Program
Disposing of the computer and the computer's battery The computer's battery pack is not user-accessible. Contact an authorized TOSHIBA service provider for details regarding how to dispose of the computer and the battery pack. General Precautions TOSHIBA computers are designed to optimize safety, minimize strain, and withstand the rigors of portability. - Page 18 observed to further reduce the risk of personal injury or damage to the computer. Be certain to read the following general precautions and to note the cautions included in the text of the manual. Provide adequate ventilation Always make sure that your computer and AC adaptor have adequate ventilation and are protected from overheating when the power is turned on or when an AC adaptor is connected to a power outlet (even if your computer is in Sleep Mode).
- Page 19 Heat injury Avoid prolonged physical contact with the computer. If the computer is used for long periods, its surface can become very warm. While the temperature will not feel hot to the touch, if you maintain physical contact with the computer for a long time, for example if you rest the computer on your lap or if you keep your hands on the palm rest, your skin might suffer a low-heat injury.
-
Page 20: Safety Icons
Make sure all disk/disc activity has ended before moving the computer. Turn off (shut down) the computer. Disconnect the AC adaptor and all peripherals before moving the computer. Close the display panel. Do not pick up the computer by its display panel. Before carrying your computer, shut it down, disconnect the AC adaptor and allow it to cool down. - Page 21 A caution informs you that improper use of equipment or failure to follow instructions might cause data loss, equipment damage, or might result in minor or moderate injury. Please read. A note is a hint or advice that helps you make best use of your equipment.
-
Page 22: Chapter 2 Getting Started
This chapter provides an equipment checklist, and basic information to start using your computer. If you use an operating system that was not pre-installed by TOSHIBA, some of the features described in this manual might not function properly. Equipment checklist Carefully unpack your computer, taking care to save the box and packaging materials for future use. - Page 23 Internal storage Your computer is equipped with an eMMC (Embedded Multi Media Card). In this manual, the word "internal storage" refers to eMMC unless otherwise stated. Click Tap the Touch Pad or click the left Touch Pad control button once. Left-click the mouse once.
-
Page 24: Using Your Computer For The First Time
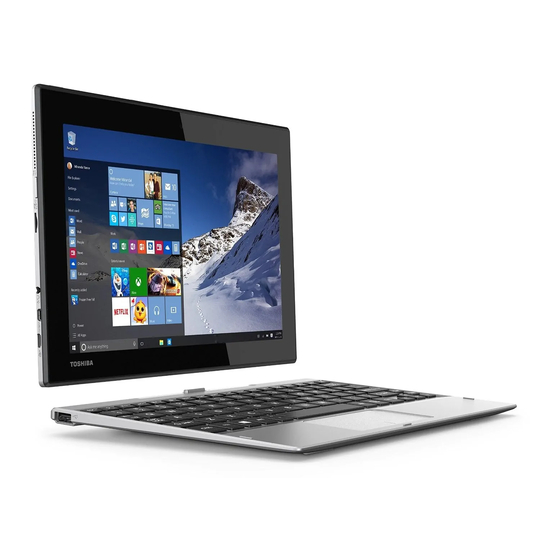
TOSHIBA Keyboard Dock provided with some models can turn your tablet into a laptop for extensibility including a physical keyboard and extra ports. To use in laptop mode, you need to connect TOSHIBA Keyboard Dock to the tablet by following the steps below:... - Page 25 Figure 2-1 Connecting the keyboard dock 1. Guide pins Product appearance depends on the model you purchased. Please follow the illustrations above and do not reverse the tablet. Gently press down the tablet until it clicks into place. The docking connector on the keyboard dock engages the docking interface on the tablet.
- Page 26 Be careful not to open the computer too wide as it might put stress on the hinges and cause damage. Be careful not to hurt your fingers when docking the computer to the keyboard dock. The rear of the keyboard dock is designed as a fulcrum, and moves slightly upwards when the computer is opened.
- Page 27 Press down the release button while holding the middle-top side of the display panel first and then lift it to release it from the computer holder and completely off the keyboard dock. Figure 2-3 Removing the computer from the keyboard dock 1.
- Page 28 Always use the TOSHIBA AC adaptor that was included with your computer, or use AC adaptors specified by TOSHIBA to avoid any risk of fire or other damage to the computer. Use of an incompatible AC adaptor might cause fire or damage to the computer possibly resulting in serious injury.
- Page 29 Figure 2-4 Plugging the Micro-USB cable into computer 2 PIN 3 PIN 1. Micro-USB port 2. Micro-USB connector Product appearance depends on the model you purchased. The AC adaptor is equipped with some models. Depending on the model, either a 2-pin or 3-pin adaptor is included with the computer. The Micro-USB connector of the AC adaptor must be correctly plugged into the Micro-USB port on the tablet.
-
Page 30: Getting To Know Windows
The computer can not be powered on by pressing the power button if the battery power is completely exhausted. It is recommended to charge the battery pack by connecting the AC adaptor for 30 minutes before turning on the power. Do not touch the display screen while turning on the computer. -
Page 31: Turning Off The Power
Start This charm takes you to the Start screen or, if already on the Start screen, returns you to your last app. Devices This charm allows you to manage your hardware. Settings This charm allows you to access your computer settings (volume, brightness, connecting to the Internet, and more). - Page 32 Make sure all disk/disc activity has stopped before removing the disk/ disc. If you turn off the power while a disk (disc) is being accessed, you might lose data or damage the disk. Never turn off the power while an application is running. Failure to do so can cause data loss.
- Page 33 functionalities, and canceling settings that reactivate the computer automatically, such as a timer recording function. Failure to shut down the computer in this way might allow the operating system to reactivate and run pre-programmed tasks or preserve unsaved data, which might interfere with aviation or other systems, possibly causing serious injury.
- Page 34 Sleep Mode limitations Sleep Mode will not function under the following conditions: Power is turned back on immediately after shutting down. Memory circuits are exposed to static electricity or electrical noise. Hibernation Mode The Hibernation Mode feature saves the contents of memory to the internal storage when the computer is turned off so that, the next time it is turned on, the previous state is restored.
-
Page 35: Chapter 3 The Grand Tour
Chapter 3 The Grand Tour This chapter identifies the various components of the computer. It is recommended that you become familiar with each before you operate the computer. Legal Footnote (Non-applicable Icons) For more information regarding Non-applicable Icons, refer to the Legal Footnotes section. - Page 36 Figure 3-1 The computer in tablet mode 1. Wireless communication antennas 9. Memory media slot (not shown) 2. Display screen 10. Headphone/Microphone combo jack 3. Web Camera (front) 11. Micro-HDMI port 4. Microphone 12. Micro-USB port 5. Power button 13. Guide pin grooves 6.
- Page 37 Display screen 33.3 cm (10") LCD screen, configured with the following resolution: WUXGA, 1920 horizontal x 1200 vertical pixels Be aware that, when the computer is operating on the AC adaptor, the image displayed on the internal screen is somewhat brighter than when it operates on battery power.
- Page 38 Memory media slot This slot lets you insert a micro SD™/SDHC™/ SDXC™ memory card. Refer to the Memory media section for more information. Keep foreign metal objects, such as screws, staples, and paper clips, out of the Memory media slot. Foreign metal objects can create a short circuit, which can cause damage and fire, possibly resulting in serious injury.
-
Page 39: The Computer (Laptop Mode)
Keep foreign metal objects, such as screws, staples, and paper clips, out of the Memory media slot. Foreign metal objects can create a short circuit, which can cause damage and fire, possibly resulting in serious injury. Guide pin grooves Designed to engage the guide pins on the keyboard dock. - Page 40 Right side The following figure shows the right side of the computer. Figure 3-4 The right side of the computer 1. Universal Serial Bus (USB 2.0) port Product appearance depends on the model you purchased. Universal Serial Bus One Universal Serial Bus port, which complies to (USB 2.0) port the USB 2.0 standard, are provided on the keyboard dock.
- Page 41 Front with the display open This section shows the computer with the display panel open. In order to open the display, lift up the display panel and position it at a comfortable viewing angle for you. Figure 3-6 The front of the computer with the display panel open 1.
-
Page 42: Toshiba Keyboard Dock
TOSHIBA Keyboard Dock The following figure shows each important component of the keyboarddock. Figure 3-7 The keyboard dock 1. -
Page 43: Internal Hardware Components
Do not attempt to dismount or replace the battery pack by yourself. Contact an authorized TOSHIBA service provider, if necessary. The rechargeable lithium-ion battery pack provides power to the computer when the AC adaptor is not connected. - Page 44 Legal Footnote (CPU) For more information regarding CPU, refer to the Legal Footnotes section. Video RAM The memory in the graphics adaptor of the computer, used to store the image displayed on a bitmap display. The amount of Video RAM available depends on the system memory of the computer.
-
Page 45: Chapter 4 Operating Basics
Chapter 4 Operating Basics This chapter describes the basic operations of your computer, and highlights the precautions that must be taken when using it. Operating in tablet mode Observe the following instructions when you operate the computer in tablet mode. Figure 4-1 Operating the computer in tablet mode Remove all external peripheral devices and their connection cables from the computer before carrying. - Page 46 Figure 4-2 Rotating the computer sideways 1. Landscape mode 2. Portrait mode To manually disable the automatic screen orientation, do the following: In the Settings charm, click Screen. Click , and appears indicating that the automatic screen orientation is currently disabled. When operating the computer in laptop mode, however, the automatic screen orientation is locked, and the computer stays in landscape mode.
-
Page 47: Using The Touch Screen
Figure 4-3 Calibrating digital compass The digital compass sensor is magnetic, and might interfere with pacemakers, defibrillators or other medical devices. Do not place any products utilizing magnetic materials in close proximity to the area marked in the following figure. Using the Touch Screen You can use your finger to manipulate icons, buttons, menu items, the onscreen keyboard, and other items on the touch screen. -
Page 48: Using The Touch Pad
Rotate Put two or more fingers on an item and then turn your hand to rotate things in the direction you turn your hand. Only some items can be rotated. Slide Drag your finger on the touch screen to move through what is on the screen. -
Page 49: The Keyboard
Pinch or stretch Place two or more fingers down on the Touch Pad and move them toward each other (pinch) or away from each other (stretch). This shows different levels of information or visually zooms in or out. Two-Finger Scroll Place two fingers down and slide them vertically or horizontally from anywhere on the Touch Pad. - Page 50 Those toast notifications are disabled by default. You can enable them in the TOSHIBA Function Key application. To access it, click Function Key under TOSHIBA group in the Apps view. Windows special keys The keyboard provides two keys that have special functions in Windows, ®...
-
Page 51: 3D Playback On An External 3D Device
This key activates the Windows Start screen. This key has the same function as the secondary (right) mouse button. Touch keyboard Touch keyboard is an on-screen virtual keyboard allowing you to type on the touch screen. To use the touch keyboard, tap in an area where you can type. The keyboard opens automatically. -
Page 52: Battery
Battery Battery This section explains battery use, recharging methods and handling. This section explains battery use, recharging methods and handling. Battery pack Battery pack The tablet computer contains a battery pack inside, Also, depending on the The tablet computer contains a battery pack inside, Also, depending on the model you purchased, the keyboard dock might contain a second battery model you purchased, the keyboard dock might contain a second battery pack to extend the battery operating time. - Page 53 Use only the computer connected to an AC power source or optional TOSHIBA Battery charger to charge the battery pack. Never attempt to charge the battery pack with any other charger. Charging Time The following table shows the approximate time required to fully charge an exhausted battery pack.
- Page 54 Repeat these steps two or three times until the battery pack recovers normal capacity. Monitoring battery pack capacity Remaining battery power can be monitored using the following methods. Clicking the battery icon on the Windows Taskbar Battery #1 refers to the battery pack inside the tablet. Battery #2 refers to the second battery pack inside the keyboard dock.
-
Page 55: Memory Media
Whether you close the display screen when you are not using the keyboard - closing the display screen saves power. The environmental temperature - operating time decreases at low temperatures. Battery pack exhausted time When you turn off the power of your computer with the battery pack fully charged, the battery pack exhaust within the following approximate period. - Page 56 This Memory media slot supports the following memory media:microSD/SDHC/SDXC Card. Not all memory media have been tested and verified to work correctly. Therefore, it is not possible to guarantee that all memory media can operate properly. Figure 4-4 Examples of memory media(microSD card) Points to note about the memory media card microSD/SDHC/SDXC memory cards comply with SDMI (Secure Digital Music Initiative), which is a technology adopted to prevent unlawful copy or...
- Page 57 The card is designed so that it can be inserted only one way. Do not try to force the card into the slot. Do not leave a card partially inserted in the slot. Press the card until you hear it click into place. Memory cards have a limited lifespan, so it is important to back up important data.
- Page 58 Press the memory media gently until it clicks into place. Figure 4-5 Inserting memory media (laptop mode) Figure 4-6 Inserting memory media (tablet mode) 1. Memory media slot 2. Memory media Product appearance depends on the model you purchased. Make sure that the memory media is oriented properly before you insert it.
-
Page 59: External Display
Push the memory media until you hear a click to partially release it. Grasp the media and remove it. If you remove the memory media or turn off the power while the computer is accessing the memory media, you might lose data or damage the media. - Page 60 Figure 4-7 Connecting the HDMI cable (laptop mode) Figure 4-8 Connecting the HDMI cable (tablet mode) 1. HDMI Micro port 2. HDMI cable (Type D connector) Product appearance depends on the model you purchased. Do not plug/unplug an HDMI device under the following conditions: The system is starting up.
- Page 61 4. Click the Set Default button. 5. Click OK to close the Sound dialog. Settings for display video on HDMI To view video on the HDMI display device, be sure to configure the following settings otherwise you might find that nothing is displayed. Be sure to use the shortcut key to select the display device before starting to play video.
-
Page 62: Optional Toshiba Accessories
If you disconnect the external display before you turn off the computer's power, be sure to switch to the internal display. Optional TOSHIBA Accessories To make your computer even more powerful and convenient to use, you can add a number of options and accessories. For reference, the following... - Page 63 Select Microphone, and click Properties. On the Levels tab, move the Microphone slider to increase or decrease the microphone volume level. If you feel the microphone volume level is inadequate, move the Microphone Boost slider to a higher level. Video mode Video mode settings are configured via the Screen Resolution dialog.
-
Page 64: Chapter 5 Utilities And Advanced Usage
TOSHIBA group in the Apps view. For details on this utility, see the help file. TOSHIBA Setup TOSHIBA Setup Utility is a BIOS setup utility that Utility provides you a menu-based user interface so that you can easily view and change BIOS settings. -
Page 65: Special Features
Windows Store apps are not included in the setup files above but can be downloaded from Windows Store. Special features The following features are either unique to TOSHIBA computers or are advanced features which make the computer more convenient to use. Access each function using the following procedures. -
Page 66: Trucapture
You can also find it by swiping from the right edge of the screen, and then tap Settings -> Help. TOSHIBA Setup Utility TOSHIBA Setup Utility is a BIOS setup utility that provides you a menu- based user interface so that you can easily view and change BIOS settings. -
Page 67: System Recovery
Then while holding down the Volume up button, press the Power button to turn on the power. Release the Volume up button after Boot menu is loaded, and then select Enter Setup to enter the TOSHIBA Setup Utility. Make sure that fast startup is disabled in the Power Options by the following steps: 1. - Page 68 The following items are described in this section: Creating Recovery Media Restoring the pre-installed software from your created Recovery Media Restoring the pre-installed software from the Recovery Partition Creating Recovery Media This section describes how to create Recovery Media. Be sure to connect the AC adaptor when you create Recovery Media. Be sure to close all other software programs.
- Page 69 To perform this restoration, do the following: Make sure that the AC adaptor is connected during the restoring process. Make sure to dock the computer to TOSHIBA Keyboard Dock before restoring the operating system. When you reinstall the Windows operating system, the internal storage will be reformatted and all data will be lost.
- Page 70 Make sure that the AC adaptor is connected during the restoring process. Make sure to dock the computer to TOSHIBA Keyboard Dock before restoring the operating system. When you reinstall the Windows operating system, the internal storage will be reformatted and all data will be lost.
- Page 71 In the System Protection tab, tap Configure, and then tap Turn on system protection to enable the function. After the System Protection feature is enabled, you can undo changes by reverting your tablet to a previous state by creating a restore point. User's Manual...
-
Page 72: Troubleshooting
In reality many problems can be solved simply, but a few might require help from TOSHIBA Support. If you find you need to consult others, be prepared to describe the problem in as much detail as possible. - Page 73 Always try to make detailed notes of your observations and keep them in a permanent error log - this helps you to describe your problems to TOSHIBA Support. In addition, if a problem recurs, the log you have made helps to identify the problem faster.
- Page 74 Before using a peripheral device or application software that is not an authorized TOSHIBA part or product, make sure that the device or software can be used with your computer. Use of incompatible devices might cause injury or might damage your computer.
-
Page 75: Hardware And System Checklist
Verify that the computer is on. If you are using an AC adaptor, verify that the computer is receiving power from the external power source. The computer does not load advanced options during startup By holding down one of the following keys or buttons during startup, your computer can load the following advanced options. - Page 76 Leave the computer off until it reaches room down automatically. temperature. If the computer has reached room temperature and it still does not start, or if it starts but shuts down quickly, contact TOSHIBA Support. AC power Problem Procedure AC adaptor does not...
- Page 77 The charge of the Real-Time Clock (RTC) has run and system date/ out. You must set the date and time in the time are lost. TOSHIBA Setup Utility by using the following steps: Launch the TOSHIBA Setup Utility. Refer to the...
- Page 78 If you are still unable to resolve the problem, contact TOSHIBA Support. Pointing device If you are using a USB mouse, you should also refer to both the mouse section and the documentation supplied with your mouse.
- Page 79 To access it, click Control Panel -> Hardware too sensitive or not and Sound -> Mouse under Windows System sensitive enough. group in the Apps view. If you are still unable to resolve the problem, contact TOSHIBA Support. User's Manual...
- Page 80 If you are still unable to resolve the problem, contact TOSHIBA Support. USB device In addition to the information in this section, also refer to the documentation supplied with your USB device.
- Page 81 Volume cannot be adjusted during Windows start up or shut down. If you are still unable to resolve the problem, contact TOSHIBA Support. External monitor Also refer to Operating Basics, and to the documentation supplied with your monitor for further information.
- Page 82 Display error occurs Check that the cable connecting the external monitor to the computer is firmly attached. If you are still unable to resolve the problem, contact TOSHIBA Support. Wireless LAN Problem Procedure Cannot access...
-
Page 83: Toshiba Support
TOSHIBA Support. TOSHIBA support If you require any additional help using your computer or if you are having problems operating the computer, you might need to contact TOSHIBA for additional technical assistance. Before you call Some problems you experience might be related to software or the operating system so it is important that you investigate other sources of assistance first. -
Page 84: Appendix Specifications
Chapter 7 Appendix Specifications This section summarizes the technical specifications of the computer. Physical Dimensions The following physical dimensions do not include parts that extend beyond the main body. The physical dimensions might vary depending on the model you purchased. Size Approximately 255.8 (w) x 178 (d) x 9.05 (h) millimeters (tablet mode) -
Page 85: Ac Power Cord And Connectors
Computer 5 V DC AC Power Cord and Connectors The AC input plug of the power cord must be compatible with the various international AC power outlets and the cord must meet the standards for the country/region in which it is used. All cords must meet the following specifications: Wire size: Minimum 0.75 mm... -
Page 86: Information For Wireless Devices
The following illustrations show the plug shapes for the U.S.A. and Canada, the United Kingdom, Australia, Europe, and China. United Kingdom UL approved BS approved Australia Europe AS approved Approved by the appropriate agency Canada China CSA approved CCC approved Information for Wireless Devices Wireless Technology Interoperability The Wireless LAN is compatible with other LAN systems Direct Sequence... - Page 87 Because Wireless products operate within the guidelines found in radio frequency safety standards and recommendations, TOSHIBA believes Wireless products are safe for use by consumers. These standards and recommendations reflect the consensus of the scientific community and result from deliberations of panels and committees of scientists who continually review and interpret the extensive research literature.
- Page 88 If this occurs, the outsider might illegally access your system, eavesdrop, or cause the loss or destruction of stored data. TOSHIBA is not liable for the loss of data due to eavesdropping or illegal access through the wireless LAN and the damage thereof. Card Specifications Compatibility IEEE 802.11 Standard for Wireless LANs...
- Page 89 impose a number of limitations to the use of wireless communication equipment. Radio Frequency Band 2.4 GHz (2400-2483.5 MHz) (Revision b/g and n) The range of the wireless signal is related to the transmit rate of the wireless communication. Communications at lower transmit range might travel larger distances.
- Page 90 comes with the product. This product complies with the following radio frequency and safety standards. Europe Restrictions for Use of 2400.0-2483.5MHz Frequencies in Europe France: Outdoor use Military Radiolocation use. limited to 10mW Refarming of the 2.4GHz band has e.i.r.p. within the been ongoing in recent years to band allow current relaxed regulation Full...
- Page 91 Federal Communication Commission interference statement (FCC) Federal Communication Commission Interference Statement: This equipment has been tested and found to comply with the limits for a Class B digital device, pursuant to part 15 of the FCC rules. These limits are designed to provide reasonable protection against harmful interference in a residential installation.
- Page 92 If this equipment causes RF interference to other radio stations, promptly change the frequency being used, change the location of use, or turn off the source of emissions. Contact an authorized TOSHIBA service provider if you have problems with interference caused by this product to Other Radio Stations.
- Page 93 This equipment is approved to the radio standard by the countries/regions in the following table. If you use this equipment in the countries/regions which are not listed in the following table, contact TOSHIBA Support. As of January 2015 Austria Belgium...
-
Page 94: Legal Footnotes
For optimum performance, use your computer product only under recommended conditions. Read additional restrictions in your product documentation. Contact TOSHIBA technical service and support, refer to TOSHIBA support section for more information. - Page 95 Published battery life numbers are achieved on select models and configurations tested by TOSHIBA at the time of publication. Recharge time varies depending on usage. Battery might not charge while computer is consuming full power.
-
Page 96: Glossary
powers of 2 for the definition of 1 GB = 2 = 1,073,741,824 bytes, and therefore shows less storage capacity. Available storage capacity will also be less if the product includes one or more pre-installed operating systems, such as Microsoft Operating System and/or pre-installed software applications, or media content. - Page 97 AMT: Intel Active Management Technology ASCII: American Standard Code for Information Interchange BIOS: Basic Input/output System BD-ROM: Blu-ray Disc Read-only Memory bps: bits per second Compact Disc CD-ROM: Compact Disc Read-only Memory CD-RW: Compact Disc-rewritable CMOS: Complementary Metal-oxide Semiconductor CPU: Central Processing Unit Direct Current DDR:...
- Page 98 IRQ: interrupt request ISP: Internet Service Provider kilobyte LAN: Local Area Network LCD: Liquid Crystal Display LED: Light Emitting Diode megabyte MBps: megabytes per second MMC: MultiMediaCard OCR: Optical Character Recognition (Reader) Personal Computer PCI: Peripheral Component Interconnect PCMCIA: Personal Computer Memory Card International Association RAM: Random Access Memory...
-
Page 99: Index
Index AC adaptor Graphics Processing Unit additional 4-18 3-10 connecting 2-6 HDMI Micro port 3-4 Battery extending life 4-11 monitoring capacity 4-10 Keyboard save mode 5-3 function keys 4-5 Function keys F1...F12 4-5 problems 6-6 Bluetooth 7-6 Windows special keys 4-6 Cleaning the computer 1-15 Media care Cooling vents 3-9... - Page 100 5-3 problems 6-10 Shut Down mode 2-10 Sleep Mode 2-11 turning off 2-10 turning on 2-8 TOSHIBA Desktop Assist 5-1 Problems Analyzing the problem 6-2 TOSHIBA Display Utility 5-1 Battery 6-5 Dual Pointing device 6-7 Touch Screen 4-3...