Table of Contents
Advertisement
Quick Links
Help Guide
Interchangeable Lens Digital Camera
ILME-FR7 / ILME-FR7K
This guide describes the configuration and operation of the ILME-FR7 / ILME-FR7K Interchangeable Lens Digital
Camera.
Refer to this manual and the operating instructions for related devices as required.
Overview
Typical Usage Applications
System Configuration
Controlling a Single Unit Using the Supplied Infrared Remote Control
Controlling a Single Unit Using a Tablet or Computer
Controlling a Single Unit Using an External Remote Controller
Controlling Multiple Units Using External Remote Controller
Location and Function of Parts
Front View
Rear View
Connector Block
Side View
Top View
Bottom View
Lens Support
Location and Function of Parts of the Infrared Remote Control (supplied)
Web App Screen
Web App Screen Overview
Structure of Common Area of Screens
Structure of the Live Operation Screen
Structure of the Playback Operation Screen
Structure of the Settings Screen
1
Advertisement
Table of Contents

Related Manuals for Sony ILME-FR7


Summary of Contents for Sony ILME-FR7
- Page 1 Help Guide Interchangeable Lens Digital Camera ILME-FR7 / ILME-FR7K This guide describes the configuration and operation of the ILME-FR7 / ILME-FR7K Interchangeable Lens Digital Camera. Refer to this manual and the operating instructions for related devices as required. Overview Typical Usage Applications...
- Page 2 Camera Menu Camera Screen Display Preparation Mounting the Unit Mounting Upright in a Fixed Location Mounting Upright in a High, Fixed Location Mounting on a Ceiling Attaching/Removing a Lens Precautions when Attaching/Removing a Lens Checking the Lens Switches Precautions When Using a Zoom Lens Attaching a Lens Removing a Lens Connecting Cables...
-
Page 3: Basic Operation
Checking the Remaining Recording Time Restoring Memory Cards Shooting Basic Operation Starting/Stopping Recording Switching Between Memory Cards Checking the Audio Specifying Time Data Reviewing the Recording (Rec Review) Adjusting the Framing Framing Adjustment Screen Adjusting the Shooting Direction Adjusting the Shooting Direction Using the Web App Setting the Pan/Tilt Operating Speed Setting the Pan/Tilt Operation Acceleration Adjusting the Shooting Direction Using the Supplied Infrared Remote Control... -
Page 4: Adjusting The Focus
Adjusting the Focus Focus Adjustment Screen Adjusting the Focus Manually (Manual Focus) Adjusting Manually Using the Web App Adjusting Manually Using the Supplied Infrared Remote Control Focusing by Specifying a Focus Position (Spot Focus) Using Auto Focus Temporarily (Push Auto Focus (AF)) Using Single-Shot Auto Focus (Push Auto Focus (AF-S)) Adjusting the Focus Automatically (Auto Focus) Adjusting Automatically Using the Web App... - Page 5 Adjusting the Gain Manually Adjusting the Shutter Adjusting the Shutter Automatically Adjusting the Shutter Manually Adjusting the Light Level (ND Filter) About the ND Filter Adjusting in Preset Mode Adjusting Automatically in Variable Mode Adjusting Manually in Variable Mode Adjusting for Natural Colors (White Balance) White Balance Adjustment Screen Adjusting the White Balance Automatically Adjusting the White Balance Manually...
- Page 6 Proxy Recording Proxy Recording Overview Recording a Proxy Shooting with the Desired Look Look Overview Selecting a Look Importing a Desired Base Look Customizing a Look Saving a Look Deleting a Base Look Shooting with Look Adjustment in Post-Production Shooting with Look Adjustment in Post-Production Applying a LUT to HDMI Output and Streaming Changing a LUT Changing the Distribution of Dark and Bright Areas in the Recorded Image...
- Page 7 Registering a File Transfer Destination Selecting a File and Uploading Uploading a Proxy File on a Memory Card from the Thumbnail Screen Uploading an Original File on a Memory Card from the Thumbnail Screen Checking the File Transfer Status Uploading Using Secure FTP Configuring Streaming About Streaming Setting the Streaming Format...
- Page 8 ND Filter Shutter Iris Auto Exposure White White Setting Offset White Focus S&Q Motion LUT On/Off Noise Suppression Flicker Reduce SteadyShot Project Menu Base Setting Rec Format Cine EI Setting Simul Rec Proxy Rec Interval Rec Picture Cache Rec SDI/HDMI Rec Control Assignable Button Paint/Look Menu Scene File...
- Page 9 Detail Matrix Multi Matrix Pan-Tilt Menu P/T Acceleration TC/Media Menu Timecode TC Display Users Bit HDMI TC Out Clip Name Format Update Media Format Media Media Life Monitoring Menu Output Format Display On/Off Video Signal Monitor Marker Audio Menu Audio Input Audio Output Thumbnail Menu Display Clip Properties...
- Page 10 Transfer Clip (Proxy) Filter Clips Customize View Technical Menu Color Bars Genlock Tally Rec Review Zoom Lens Network Menu Wired LAN File Transfer Maintenance Menu Language Clock Set Hours Meter Shooting Menu Settings and Default Values ISO/Gain Settings and Default Values AGC Limit Settings and Default Values Image Quality Settings Saved for Each Shooting Mode Web Menu and Detailed Settings...
- Page 11 Base Setting Rec Format Simul Rec Proxy Rec Interval Rec Picture Cache Rec All File Paint/Look Menu Base Look Pan-Tilt Menu P/T Speed P/T Acceleration P/T Range Limit P/T Direction P/T Preset Monitoring Menu Output Format Output Display Audio Menu Audio Input Audio Output Technical Menu...
- Page 12 File Transfer FTP Server 1 to 3 Referer Check Brute Force Attack Protection Stream Menu Stream Video Stream Audio Stream Maintenance Menu Language Accessibility Clock Set Reset Information System Log HTTP Access Log Service EULA Software External Device Connection Connecting External Monitors and Recording Devices Operating Using an RM-IP500 Remote Controller (Option) About Operation Using an RM-IP500 Remote Controller (option) Connecting an RM-IP500 Remote Controller...
- Page 13 Connecting a Tally Signal Appendix Usage Precautions Output Formats and Limitations Troubleshooting Error/Warning Messages List of Menu Items Preset Position Saved Items Block Diagrams Updating E-Mount Lens Software Attaching the Lens Release Button Cover Licenses Specifications Trademarks 5-041-957-11(1) Copyright 2022 Sony Corporation...
-
Page 14: System Configuration
Help Guide Interchangeable Lens Digital Camera ILME-FR7 / ILME-FR7K System Configuration This unit can be combined with peripheral devices to form various system configurations. E-mount lens LA-EA3 / LA-EA4 A-mount Adaptor Infrared remote control (supplied) CFexpress Type A memory cards / SDXC memory cards... - Page 15 5-041-957-11(1) Copyright 2022 Sony Corporation...
- Page 16 ILME-FR7 / ILME-FR7K Controlling a Single Unit Using the Supplied Infrared Remote Control You can control a single unit remotely using the supplied infrared remote control. Video signal Signal flow Infrared remote control (supplied) Video monitor 5-041-957-11(1) Copyright 2022 Sony Corporation...
- Page 17 Controlling a Single Unit Using a Tablet or Computer You can connect a tablet or computer to the unit and then control unit using a web browser. Video signal Remote control signal Signal flow Video monitor Tablet Computer Access point 5-041-957-11(1) Copyright 2022 Sony Corporation...
- Page 18 Interchangeable Lens Digital Camera ILME-FR7 / ILME-FR7K Controlling a Single Unit Using an External Remote Controller You can control the unit remotely using a remote controller. Video signal Remote control signal Signal flow Video monitor RM-IP500 Remote Controller 5-041-957-11(1) Copyright 2022 Sony Corporation...
- Page 19 Controlling Multiple Units Using External Remote Controller You can control up to 100 units remotely using a single remote controller (RM-IP500). Video signal Remote control signal Tally/contact signal Signal flow Video monitor Video switcher Ethernet hub RM-IP500 Remote Controller 5-041-957-11(1) Copyright 2022 Sony Corporation...
-
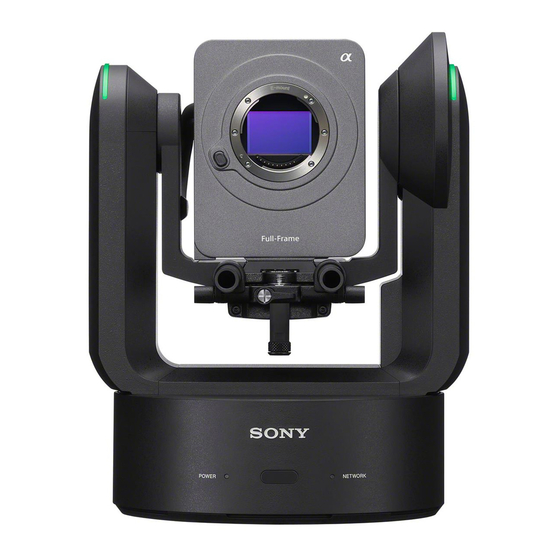
Page 20: Front View
Help Guide Interchangeable Lens Digital Camera ILME-FR7 / ILME-FR7K Front View This topic describes the location and function of parts on the front of the unit. Hint This description refers to the illustration of the unit without an attached lens. - Page 21 Blinking Blinking orange green A malfunction occurred on the unit. Contact your Sony service representative. rapidly rapidly Blinks green when a command is received from the supplied infrared remote control. Blinking slowly: Blinking once per second Blinking rapidly: Blinking four times per second Infrared remote control sensor Receives the control signal from the supplied infrared remote control.
-
Page 22: Air Inlet
Air inlet Note Do not block the air flow. Doing so may cause a malfunction. 5-041-957-11(1) Copyright 2022 Sony Corporation... -
Page 23: Rear View
Turn off the power of the unit and lock the camera head horizontally using the pan/tilt lock lever before operating the lock lever to avoid injury due to pinched fingers. For details about the pan/tilt lock lever, see “Pan/tilt lock lever” in “Side View.” Slide base 5-041-957-11(1) Copyright 2022 Sony Corporation... -
Page 24: Connector Block
Help Guide Interchangeable Lens Digital Camera ILME-FR7 / ILME-FR7K Connector Block This topic describes the location and function of parts on the connector block of the unit. (ground) connection Connect to ground by connecting to the ground terminal of a power outlet or to a grounding bar. - Page 25 Display Connection speed 100 Mbps Lit orange 1000 Mbps Link/ACT LED display status Indicates the status of the network connection. Display Connection status Not lit No link Blinking green Link established, data active Lit green Active link Note When connecting this product to the Internet, connect via a system that provides a protection function, such as a router or firewall.
- Page 26 Configures the following settings. Switch 1: Sets which settings are reset when the RESET switch is pressed. Setting Description Resets the network connection settings only. The network settings, security settings, and user (default) information (user name and password) of the unit will be reset. Resets all settings to factory defaults.
- Page 27 Use to input the signal from an external microphone or audio device. It functions as an AUDIO IN CH-1 connector or AUDIO IN CH-2 connector. For details, see “Connecting an External Microphone or External Audio Device.” 5-041-957-11(1) Copyright 2022 Sony Corporation...
-
Page 28: Side View
When attaching or removing a lens. For details, see “Attaching a Lens” or “Removing a Lens.” When using a lens that does not support pan/tilt operation (such as Sony SEL100400GM / SEL200600G / SEL400F28GM / SEL600F40GM lenses). Hint The pan/tilt movement can be fixed at the following angles. - Page 29 CFexpress Type A / SD card slot (B) Use for inserting recording media. For details, see “Inserting Memory Cards.” QR code for network connection Use when configuring initial settings. For details, see “Accessing the Web App from a Web Browser.” 5-041-957-11(1) Copyright 2022 Sony Corporation...
-
Page 30: Top View
Maximum length of 6 mm (1/4 inch). ɸ (imager mark) The imager mark is on the same plane as the image sensor. To measure the distance between the unit and the subject accurately, use this imager mark as a reference point. 5-041-957-11(1) Copyright 2022 Sony Corporation... -
Page 31: Bottom View
Help Guide Interchangeable Lens Digital Camera ILME-FR7 / ILME-FR7K Bottom View This topic describes the location and function of parts on the bottom of the unit. Hint This description refers to the illustration of the unit without an attached lens. - Page 32 5-041-957-11(1) Copyright 2022 Sony Corporation...
-
Page 33: Lens Support
Help Guide Interchangeable Lens Digital Camera ILME-FR7 / ILME-FR7K Lens Support This topic describes the location and function of parts of the lens support of the unit. Hint This description refers to the illustration of the unit without an attached lens. - Page 34 To prevent the lens support unit from interfering with pan/tilt operation, move the lens support unit up against the camera head when not using the lens support unit, and move the lens support pedestal attachment screw to its highest position (closest to the lens). 5-041-957-11(1) Copyright 2022 Sony Corporation...
- Page 35 Help Guide Interchangeable Lens Digital Camera ILME-FR7 / ILME-FR7K Location and Function of Parts of the Infrared Remote Control (supplied) This topic describes the location and function of pars of the infrared remote control (supplied). REC● (record START/STOP) button Press to start or stop recording.
- Page 36 Pan and tilt control buttons Press the arrow buttons to control the pan/tilt of the camera. Press the HOME button to return the orientation of the camera to face the front. Preset position control buttons Press and hold the PRESET button and press one of the 1 to 3 buttons to store camera direction, zoom, and focus adjustment status in the pressed number button.
- Page 37 Note Do not use any batteries other than manganese or alkaline batteries as they may rupture. Dispose of used batteries according to the laws and regulations of the country or region. 5-041-957-11(1) Copyright 2022 Sony Corporation...
- Page 38 Help Guide Interchangeable Lens Digital Camera ILME-FR7 / ILME-FR7K Web App Screen Overview By connecting a tablet or computer, you can pan/tilt, zoom, record, play recorded video, and configure the unit from a web browser (hereinafter, this function is referred to as the “Web App”).
-
Page 39: Settings Screen
Playback operation screen Press the [Playback] tab to display the playback operation screen. For details about the playback operation screen, see “Structure of the Playback Operation Screen.” Settings screen Press the [Settings] tab to display the settings screen (hereinafter referred to as the web menu). - Page 40 [OK] button. For details about the settings screen, see “Structure of the Settings Screen.” In this Help Guide, the settings screen of the Web App is referred to as the web menu. 5-041-957-11(1) Copyright 2022 Sony Corporation...
- Page 41 Help Guide Interchangeable Lens Digital Camera ILME-FR7 / ILME-FR7K Structure of Common Area of Screens This topic describes the structure of the common area of screens. Camera name Displays the name of the camera. You can change the name using [Network] > [Camera Name] in the web menu.
- Page 42 (Operation Unlock): Set the switch to the left position to control operations on the live operation screen and playback operation screen. (Operation Lock): Set the switch to the right position to lock operations on the live operation screen and playback operation screen to prevent accidental misoperation. 5-041-957-11(1) Copyright 2022 Sony Corporation...
- Page 43 Help Guide Interchangeable Lens Digital Camera ILME-FR7 / ILME-FR7K Structure of the Live Operation Screen This topic describes the structure of the live operation screen. Preset position control panel Displays the registered position of a preset using a thumbnail. Double-tap the thumbnail to return to the position stored in the preset.
- Page 44 Display Description Focus mode indicator See “Focus mode indicator” in “Camera Screen Display.” Recording mode, slot A/B, Interval Rec See “Recording mode, slot A/B, Interval Rec recording interval recording interval indicator indicator” in “Camera Screen Display.” Displayed during streaming (when [Stream Setting] is set to Streaming status indicator [SRT-Caller] only) Displays the output status of the RAW signal.
- Page 45 For details about tracking, see “Tracking a Specified Subject (Realtime Tracking AF).” Record START/STOP button Press the button to start recording. During recording, the record START/STOP button lights up red. Press during recording to stop recording. You can set the Hold switch to the Hold state to prevent misoperation of the record START/STOP button. Camera basic configuration panel Displays settings for basic functions required for shooting on buttons.
- Page 46 For details about assignable buttons, see “Assignable Buttons.” For details about the camera basic configuration adjustment panel, refer to the description of each function. Framing control panel / GUI control panel Switch between the framing control panel / GUI control panel using the tabs at the top. Use the framing control panel to adjust the framing.
- Page 47 When pan/tilt operation is disabled When pan/tilt is not initialized or needs to be reset, you can quickly access the [Pan-Tilt Reset] button in the camera control panel by pressing the message displayed below the joystick. Use the GUI control panel to operate the camera menu, clip playback, and other functions. Press the [Cam GUI] tab to display the GUI control panel.
- Page 48 Iris Gain Exposure Index AE Level Zoom Speed Pan-Tilt Speed Displayed according to menu settings. (Focus) tab Displays the setup items related to focus. (Audio) tab Displays the setup items related to audio.
- Page 49 The items displayed will vary depending on the streaming format setting. When set to [SRT-Caller], streaming can be started/stopped on this screen. For details, see “About Streaming” and other topics in “Configuring Streaming.” (Others) tab Displays the setup items related to other functions. 5-041-957-11(1) Copyright 2022 Sony Corporation...
- Page 51 Help Guide Interchangeable Lens Digital Camera ILME-FR7 / ILME-FR7K Structure of the Playback Operation Screen This topic describes the structure of the playback operation screen. Camera image panel Displays the playback image and related information. When playback is stopped, the camera image screen appears.
- Page 52 1-1 Shooting date and time 1-2 Playback status indicator 1-3 Playback format (picture size) indicator 1-4 Playback format (codec) indicator 1-5 Clip name display 1-6 Clip number/total number of clips 1-7 Streaming status indicator 1-8 Playback format (frame rate and scan method) indicator 1-9 Base Look indicator Playback control panel Displays the playback control buttons.
- Page 53 For details about assignable buttons, see “Assignable Buttons.” GUI control panel Use the GUI control panel to operate the camera menu, clip playback, and other functions. For details about operation, see “Operating the Camera Menu” and “Playing Recorded Clips.” 5-041-957-11(1) Copyright 2022 Sony Corporation...
- Page 54 In the web menu, settings are not applied until you press the [OK] button as a general rule. If you change settings on a page that has an [OK] button, be sure to press the [OK] button. For details about the settings screen, see “Web Menu and Detailed Settings.” 5-041-957-11(1) Copyright 2022 Sony Corporation...
-
Page 55: Camera Menu
However, be aware that menu operations in the GUI control panel are still active. To avoid inadvertent operation, take care to not perform any menu operations using the GUI control panel when [HDMI/Stream] is set to Off. 5-041-957-11(1) Copyright 2022 Sony Corporation... - Page 56 Help Guide Interchangeable Lens Digital Camera ILME-FR7 / ILME-FR7K Camera Screen Display You can displays the status and settings of the unit superimposed on the output image from the camera. You can set the outputs for which screen display is enabled using [Monitoring] > [Output Display] in the web menu.
- Page 57 (mismatch) mark is displayed if there is a mismatch between the image circle size of the lens and the effective picture size imager scan mode setting. When Imager Scan Mode is set to FF, a “C” mark is displayed in modes with narrower angle of view (cropped). Cropping occurs in the following modes.
- Page 58 Display Display Meaning Meaning (Clear Image Zoom is enabled) Clear Image Zoom is enabled Magnification value When using Clear Image Zoom For details about zoom, see “Setting the Zoom Type” and other topics in “Adjusting the Zoom.” Image stabilization mode indicator SDI output/HDMI output Rec Control status indicator Displays the output status of the REC control signal.
- Page 59 For details about the iris, see “Adjusting the Iris Automatically” and “Adjusting the Iris Manually.” Video level warning indicator Gain indicator Displays the EI value when in Cine EI mode. Display Meaning Auto mode Preset L mode (Temporary adjustment mode) Temporary adjustment mode Bokeh control mode For details about the gain, see...
- Page 60 For details about Cine EI mode, see “Setting the shooting mode” in “Configuring Basic Operation.” Base look/recording look indicator Displays the base look setting. In Cine EI mode, it displays the video signal to record on the memory cards. For details about the base look, see “Look Overview”...
- Page 61 Media indicator (protect) icon appears if the memory card is write-protected. Time data display Clip name display Gamma display assist indicator Audio level meter Displays the playback audio level. Base look/recording look indicator Tally indicator 5-041-957-11(1) Copyright 2022 Sony Corporation...
-
Page 62: Installation Note
Help Guide Interchangeable Lens Digital Camera ILME-FR7 / ILME-FR7K Mounting Upright in a Fixed Location This topic describes mounting the unit on a desktop or tripod. Installation note To protect the lens and the lens connector block of the unit, keep the lens and the cap or cover of the unit attached until you attach the lens. - Page 63 Select a tripod that will not tip over even when the lens turns. Next, attach the lens. See “Attaching a Lens,” taking into account the information in “Precautions when Attaching/Removing a Lens,” “Checking the Lens Switches,” and “Precautions When Using a Zoom Lens.” 5-041-957-11(1) Copyright 2022 Sony Corporation...
- Page 64 Help Guide Interchangeable Lens Digital Camera ILME-FR7 / ILME-FR7K Mounting Upright in a High, Fixed Location This topic describes the procedure for mounting the unit upright in a high location using the ceiling bracket (CIB-PCM1 (option)). To mount the unit in a high location, ask a professional contractor.
-
Page 65: Mounting Space
The fall prevention wire rope is designed to support the unit when suspended. Do not apply any load to it other than the load of the unit. Mounting space Refer to the following drawing when determining the mounting location and direction, taking into consideration the space required for turning the lens and the wiring at the rear of the unit. - Page 66 Note If the camera head pan/tilt does not lock when the lock lever is in the LOCK position, move the camera head manually until it locks in position. Attach the body bracket to the bottom of the unit using the six supplied screws (M3×8).
- Page 67 Use the supplied screws. The use of screws other than the supplied screws may damage the interior of the unit. Attach the fall prevention wire rope to the body bracket.
- Page 68 A: Supplied wire rope B: Supplied Phillips screw (M4×8) C: Wire rope metal loop Use the supplied screw. The use of a screw other than the supplied screw may reduce the effectiveness of the wire rope function. Attach the ceiling bracket to the surface, such as a shelf, where the unit will be mounted.
- Page 69 A: Wall B: △ mark (camera forward direction) C: Hole for connection cables D: Shelf or other mounting surface Attach the fall prevention wire rope to a point near the mounting surface. Use an M5 (3/16 inch) hexagon socket head cap screw (option) and attach it to an object near the shelf or surface to which the ceiling bracket is attached.
- Page 70 A: Wire rope B: Hexagon socket head cap screw (M5, 3/16 inch) Align the 〇 screw hole at the front of the body bracket with the ◇ hole of the ceiling bracket, insert the unit, and temporarily fix the body bracket in the ceiling bracket by turning the unit clockwise.
- Page 71 A: 〇 hole B: ◇ hole Attach the body bracket and ceiling bracket using the three supplied rotation lock screws (M3×8).
- Page 72 “Precautions When Using a Zoom Lens.” Note After attaching a lens, check that the lens is securely attached. The lens does not have any protection against falling. Sony can assume no liability for a lens falling from the unit. 5-041-957-11(1) Copyright 2022 Sony Corporation...
-
Page 73: Mounting On A Ceiling
Help Guide Interchangeable Lens Digital Camera ILME-FR7 / ILME-FR7K Mounting on a Ceiling This topic describes the procedure for mounting the unit on a ceiling using the ceiling bracket (CIB-PCM1 (option)). To mount the unit on a ceiling, ask a professional contractor. - Page 74 The fall prevention wire rope is designed to support the unit when suspended. Do not apply any load to it other than the load of the unit. Mounting space Refer to the following drawing when determining the mounting location and direction, taking into consideration the space required for turning the lens and the wiring at the rear of the unit.
- Page 75 Camera head turned by 180° Note If the camera head pan/tilt does not lock when the lock lever is in the LOCK position, move the camera head manually until it locks in position. Attach the body bracket to the bottom of the unit using the six supplied screws (M3×8).
- Page 76 Use the supplied screws. The use of screws other than the supplied screws may damage the interior of the unit. Attach the ceiling bracket to a mounting plate (option), and then attach the plate to the ceiling.
- Page 77 A: Ceiling bracket B: Ceiling C: Mounting plate D: △ hole Attach the bracket, according to the orientation of the ceiling bracket Note that when mounted on a ceiling, the front of the camera is on the opposite side of the ceiling bracket in comparison to a normal upright mounting.
- Page 78 A: Ceiling bracket B: Hexagon socket head cap screw (M5, 3/16 inch) C: Wire rope (supplied) D: Mounting plate E: Ceiling Pull the fall prevention wire rope through the hole in the center of the ceiling bracket, and attach it to the body bracket.
- Page 79 Use the supplied screw. The use of a screw other than the supplied screw may reduce the effectiveness of the wire rope function. Note It is recommended that one person holds the unit as shown in the following diagram while another person mounts the unit. Do not hold the camera head or lens support while mounting the unit.
- Page 80 A: Screw hole on the body bracket B: Screw hole on the ceiling bracket (◇ hole) C: Screw hole D: Ceiling E: Mounting plate Attach the body bracket and ceiling bracket using the three supplied rotation lock screws (M3×8).
- Page 81 To operate the pan/tilt correctly when the unit is mounted on a ceiling, set [Pan-Tilt] > [Direction] > [Ceiling] to [On] in the web menu. After attaching a lens, check that the lens is securely attached. The lens does not have any protection against falling. Sony can assume no liability for a lens falling from the unit. 5-041-957-11(1) Copyright 2022 Sony Corporation...
- Page 82 A lens is a precision component. Do not place the lens on a surface with the lens mount face down. Attach the supplied lens mount cap. Hint For details about lenses supported by the unit, contact your Sony service representative. 5-041-957-11(1) Copyright 2022 Sony Corporation...
- Page 83 Help Guide Interchangeable Lens Digital Camera ILME-FR7 / ILME-FR7K Checking the Lens Switches The following checks and settings are required, depending on the type of lens. For a lens with a zoom switch Set the switch to SERVO. If the switch is set to MANUAL, the zoom can only be adjusted using the zoom ring. Zoom control from the unit has no effect.
- Page 84 5-041-957-11(1) Copyright 2022 Sony Corporation...
- Page 85 When using a zoom lens other than a power zoom lens, the zoom position may change depending on the mounting environment. Secure the zoom ring in position using tape according to the purpose of use. Plastic film tape: 471 BLA 50 or equivalent 5-041-957-11(1) Copyright 2022 Sony Corporation...
-
Page 86: Attaching A Lens
Help Guide Interchangeable Lens Digital Camera ILME-FR7 / ILME-FR7K Attaching a Lens This topic describes how to attach an E-mount lens or A-mount lens. Note When using an A-mount lens, the iris is set manually and focus is set to MF. - Page 87 Turn the camera head lock lever in the direction of the arrow to unlock the camera head. Note Until the camera head is locked again, there is a risk that the camera head may move under its own weight. Support the camera head with your hand while performing the task.
- Page 88 Remove the cap and cover from the unit and the lens. Align the lens mount mark (white) with the unit, carefully insert the lens into the camera head, and then turn the lens clockwise until it clicks into the locked position. A: Mount marks (white) Note To use an A-mount lens, attach a lens mount adaptor (option) to the unit and then attach the A-mount lens.
- Page 89 Note Until the camera head is locked again, there is a risk that the camera head may move under its own weight. Support the camera head with your hand while performing the task. Maintain the forward/rearward balance of the camera head so that the slide base is horizontal. If you are using one of the following lenses, you can roughly balance the unit and lens by referring to the scale on the slide base.
- Page 90 Scale position Lens name 5.0 or higher SEL1224GM, SEL1635GM, SELP1635G, SELP18105G, SELP1020G Note Use the slide base scale as a reference for rough balance. While attaching the lens, make appropriate adjustments to the balance so that the unit does not tilt back and forth. Adjust the balance on a horizontal surface.
- Page 91 Note Make sure the lens support pedestal is perpendicular to the lens support pedestal attachment screw, and then tighten. Turn the clamp lever for the lens support pedestal attachment screw clockwise to lock the lens support pedestal attachment screw. A: Lens support pedestal attachment screw B: Attachment screw hole C: Lens support pedestal attachment screw clamp lever Hint...
- Page 92 When using an E-mount power zoom lens, the lens must also be calibrated separately to accurately restore the zoom positions stored in the camera as preset positions. For details, see “Calibrating an E-Mount Lens.” 5-041-957-11(1) Copyright 2022 Sony Corporation...
-
Page 93: Removing A Lens
With the mount marks (white) of the camera and the lens aligned, pull out the lens toward the front. Note Grasp the lens securely in your hand to prevent the lens from falling. If another lens will not be attached immediately, always attach the body cap. 5-041-957-11(1) Copyright 2022 Sony Corporation... -
Page 94: Connecting Cables
Secure the HDMI cable to the HDMI cable retaining plate using a commercially available cable tie or band. A: HDMI cable retaining plate mounting screw (M2.6×6, black) B: Commercially available cable tie or band C: HDMI cable retaining plate (supplied) 5-041-957-11(1) Copyright 2022 Sony Corporation... - Page 95 This topic describes connecting the unit to a network device via a wired connection. Connect the unit to a network device (such as a Wi-Fi access point or switching hub) using a Category 5e or higher LAN cable. 5-041-957-11(1) Copyright 2022 Sony Corporation...
-
Page 96: Using Ac Power
Help Guide Interchangeable Lens Digital Camera ILME-FR7 / ILME-FR7K Using AC Power This topic describes the procedure to power the unit using AC power. Slide the pan/tilt lock lever to the LOCK position to lock the pan/tilt of the camera head. - Page 97 When using a lens that does not support pan/tilt operation, lock the pan/tilt lock lever and skip the following steps. For details about lenses that support pan/tilt, contact your dealer or Sony service representative. Slide the pan/tilt lock lever to the UNLOCK position to unlock the pan/tilt of the camera head.
- Page 98 When disconnecting the AC adaptor from the unit, grasp the plug and pull it straight out. Pulling on the cable may cause a malfunction. 5-041-957-11(1) Copyright 2022 Sony Corporation...
- Page 99 Help Guide Interchangeable Lens Digital Camera ILME-FR7 / ILME-FR7K Using PoE++ Power When the unit is connected to a PoE++ compatible power delivery device, power is supplied to the unit via a commercially available network cable. This method enables power to be supplied to the unit without the need for power supply wiring in environments where there is no power supply outlet near the mounting location.
- Page 100 When using a lens that does not support pan/tilt operation, lock the pan/tilt lock lever and skip the following steps. For details about lenses that support pan/tilt, contact your dealer or Sony service representative. Slide the pan/tilt lock lever to the UNLOCK position to unlock the pan/tilt of the camera head.
- Page 101 The unit has a function that limits the pan/tilt range, but this function is disabled when the unit is turned on or pan/tilt reset is executed. Hint When pan/tilt reset is completed, the unit returns to the pre-execution position. 5-041-957-11(1) Copyright 2022 Sony Corporation...
- Page 102 Help Guide Interchangeable Lens Digital Camera ILME-FR7 / ILME-FR7K Accessing the Web App from a Web Browser By connecting the unit to a tablet or computer, you can operate and configure the unit from a web browser. Check whether your tablet or computer supports Web App operations.
- Page 103 A communication protocol used to determine the IP address from a host name on a local network. Hint You can subsequently access the unit quickly using the bookmark function of the web browser. 5-041-957-11(1) Copyright 2022 Sony Corporation...
-
Page 104: Initializing The Unit
Help Guide Interchangeable Lens Digital Camera ILME-FR7 / ILME-FR7K Initializing the Unit Make sure to configure the unit using the following procedure when using the unit for the first time. Hint If the backup battery becomes completely discharged, you will need to configure the initial setup again. - Page 105 [Manual setting]: Set manually. When this method is selected, entry fields for the date and time appear. [Time Zone] Select the time zone. The live screen for shooting operations appears. Continue to configure the basic operation of the unit according to the operation mode. 5-041-957-11(1) Copyright 2022 Sony Corporation...
- Page 106 Switch using [Project] > [Cine EI Setting] > [Color Gamut] in the camera menu. [S-Gamut3.Cine/SLog3]: Easy to adjust color gamut for digital cinema (DCI-P3). [S-Gamut3/SLog3]: Sony wide color gamut that covers the ITU-R BT.2020 color space. For details, see “Shooting with Look Adjustment in Post-Production.”...
-
Page 107: Setting The Video Format
Note You cannot switch the video format during recording or playback. Restrictions may apply to the signal from the SDI OUT and HDMI OUT connectors, depending on the video format setting. 5-041-957-11(1) Copyright 2022 Sony Corporation... -
Page 108: Supported Memory Cards
(available separately) inserted in the card slots. The memory cards are also used for proxy recording. CFexpress Type A memory cards Use the Sony CFexpress Type A memory cards listed in “Recommended media” in the unit. For details on operations with media from other manufacturers, refer to the operating instructions for the media or consult the manufacturer’s information. - Page 109 System frequency Class 10 VSC V10 VSC V30 VSC V60 VSC V90 29.97P 23.98P RAW Out & XAVC-I, 3840×2160 Class 300, S&Q (60 fps or lower) System frequency Class 10 VSC V10 VSC V30 VSC V60 VSC V90 59.94P 29.97P 23.98P RAW Out &...
- Page 110 XAVC-I, 3840×2160 Class 300, Normal mode System frequency Class 10 VSC V10 VSC V30 VSC V60 VSC V90 59.94P 29.97P 23.98P XAVC-I, 3840×2160 Class 300, S&Q (60 fps or lower) System frequency Class 10 VSC V10 VSC V30 VSC V60 VSC V90 59.94P 29.97P...
- Page 111 XAVC-I, 1920×1080 Class 100, S&Q (100 fps, 120 fps) System frequency Class 10 VSC V10 VSC V30 VSC V60 VSC V90 59.94P 29.97P 23.98P XAVC-I, 1920×1080 Class 100, S&Q (150 fps, 180 fps) Verified media not available. XAVC-I, 1920×1080 Class 100, S&Q (200 fps, 240 fps) Verified media not available.
- Page 112 System frequency Class 10 VSC V10 VSC V30 VSC V60 VSC V90 29.97P 23.98P XAVC-L, 1920×1080 HD50, Normal mode System frequency Class 10 VSC V10 VSC V30 VSC V60 VSC V90 59.94P 29.97P 23.98P XAVC-L, 1920×1080 HD50, S&Q (60 fps or lower) System frequency Class 10 VSC V10...
- Page 113 System frequency Class 10 VSC V10 VSC V30 VSC V60 VSC V90 23.98P XAVC-L, 1920×1080 HD50, S&Q (200 fps, 240 fps) System frequency Class 10 VSC V10 VSC V30 VSC V60 VSC V90 59.94P 29.97P 23.98P XAVC-L, 1920×1080 HD35, Normal mode System frequency Class 10 VSC V10...
- Page 114 Class 10 VSC V10 VSC V30 VSC V60 VSC V90 59.94P 29.97P 23.98P XAVC-L, 1920×1080 HD35, S&Q (200 fps, 240 fps) System frequency Class 10 VSC V10 VSC V30 VSC V60 VSC V90 59.94P 29.97P 23.98P 5-041-957-11(1) Copyright 2022 Sony Corporation...
-
Page 115: Inserting Memory Cards
Help Guide Interchangeable Lens Digital Camera ILME-FR7 / ILME-FR7K Inserting Memory Cards This topic describes the precautions when inserting memory cards. Open the media cover of the card slot section. Insert a memory card. For CFexpress cards, the label faces up. - Page 116 When recording to media inserted in both CFexpress Type A / SD card slots A and B, insert media in both slots that is recommended for operation with the format of the recording. 5-041-957-11(1) Copyright 2022 Sony Corporation...
-
Page 117: Ejecting A Memory Card
All data recorded on the card may be discarded. Always make sure the access indicator is green or off before turning off the unit or removing the memory card. When removing a memory card immediately after recording is finished, the memory card may be hot, but this does not indicate a problem. 5-041-957-11(1) Copyright 2022 Sony Corporation... - Page 118 A warning message is displayed. Follow the instructions to replace the card with a supported memory card. To use a card formatted on the unit in the slot of another device First, make a backup of the card, then reformat the card in the device to be used. 5-041-957-11(1) Copyright 2022 Sony Corporation...
-
Page 119: Checking The Remaining Recording Time
Replace with media that has free space. If you continue recording until the total remaining recording time reaches zero, the message changes to “Media Full” and recording stops. Note Up to approximately 600 clips can be recorded on one memory card. 5-041-957-11(1) Copyright 2022 Sony Corporation... - Page 120 Media recorded with a device other than this unit or with another unit of different version (even of the same model) may not be restored using this unit. Clips shorter than 2 seconds cannot be restored. 5-041-957-11(1) Copyright 2022 Sony Corporation...
-
Page 121: Starting/Stopping Recording
Help Guide Interchangeable Lens Digital Camera ILME-FR7 / ILME-FR7K Starting/Stopping Recording This topic describes how to start/stop recording. Note Recording and playback are not supported when the unit is powered via PoE++ power delivery. Attach the necessary devices, and check that power of the unit and peripheral devices is being supplied. - Page 122 Hint You can also turn on the unit using the power button on the supplied infrared remote control. Press the record START/STOP button. Recording starts, and the recording/tally lamp (2 places) of the unit lights up. During recording, the record START/STOP button lights. Also, an icon for the target recording media and [●Rec] are displayed.
- Page 123 5-041-957-11(1) Copyright 2022 Sony Corporation...
-
Page 124: Switching Between Memory Cards
Help Guide Interchangeable Lens Digital Camera ILME-FR7 / ILME-FR7K Switching Between Memory Cards When two memory cards are inserted, you can press the [Slot Select] button on the playback control panel of the Web App to switch memory cards. Hint You can also press the SLOT SEL (memory card slot (A)/(B) select) button on the supplied infrared remote control to switch memory cards. - Page 125 To combine video created using the relay recording function of the unit, use “Catalyst Browse” software. 5-041-957-11(1) Copyright 2022 Sony Corporation...
- Page 126 HDMI connector using [Audio] > [Audio Output] > [HDMI/Stream Output CH] in the camera menu. CH1/CH2: CH1 and CH2 combination CH3/CH4: CH3 and CH4 combination When monitoring the audio in the Web App, use the audio level meter at the bottom right of the camera image. 5-041-957-11(1) Copyright 2022 Sony Corporation...
-
Page 127: Setting The Time Code
Set the timecode to display using [TC/Media] > [TC Display] > [Display Select] in the camera menu. Pressing an assignable button with [DURATION/TC/U-BIT] assigned will switch the display between the timecode, user bits, and duration in sequence. 5-041-957-11(1) Copyright 2022 Sony Corporation... - Page 128 Help Guide Interchangeable Lens Digital Camera ILME-FR7 / ILME-FR7K Reviewing the Recording (Rec Review) You can review the last recorded clip on the screen (recording review). Note Rec Review is not supported if the video format is changed after recording a clip.
- Page 129 The clip is played to the end, Rec Review ends, and the unit returns to Stby (standby) mode. To stop Rec Review Press an assignable button with Rec Review assigned or press the [Cancel/Back] button.
- Page 130 Hint You can also press the [Cancel/Back] button of the supplied infrared remote control to stop the Rec Review function. 5-041-957-11(1) Copyright 2022 Sony Corporation...
- Page 131 [Pan-Tilt] > [P/T Range Limit] in the web menu. When the unit is turned on or pan/tilt reset is executed, this range limit setting is ignored. For details, see [Pan-Tilt] > [P/T Range Limit] in the web menu. Hint You can also control the framing using the supplied infrared remote control. 5-041-957-11(1) Copyright 2022 Sony Corporation...
- Page 132 [Pan-Tilt] > [P/T Range Limit] in the web menu. When the unit is turned on or pan/tilt reset is executed, this range limit setting is ignored. For details, see [Pan-Tilt] > [P/T Range Limit] in the web menu. 5-041-957-11(1) Copyright 2022 Sony Corporation...
- Page 133 The pan/tilt acceleration depends on physical characteristics, such as the weight balance of the lens. You can change the acceleration setting using [Pan-Tilt] > [P/T Acceleration] > [Ramp Curve] in the web menu or camera menu. 5-041-957-11(1) Copyright 2022 Sony Corporation...
- Page 134 Help Guide Interchangeable Lens Digital Camera ILME-FR7 / ILME-FR7K Setting the Pan/Tilt Operation Acceleration You can set the acceleration operation in nine gradations using [Pan-Tilt] > [P/T Acceleration] > [Ramp Curve] in the web menu or camera menu. Increase the value for more rapid changes in speed, or decrease the value for more gradual changes in speed.
- Page 135 5-041-957-11(1) Copyright 2022 Sony Corporation...
- Page 136 [Pan-Tilt] > [P/T Range Limit] in the web menu. When the unit is turned on or pan/tilt reset is executed, this range limit setting is ignored. For details, see [Pan-Tilt] > [P/T Range Limit] in the web menu. 5-041-957-11(1) Copyright 2022 Sony Corporation...
-
Page 137: Clear Image Zoom
Image Zoom is enabled, zoom is supported even for fixed-focus lenses. It can also be used to extend the range beyond the optical range on a power zoom lens. The maximum zoom ratio using Clear Image Zoom varies depending on the recording resolution. For QFHD/4K recording resolution: 1.5× For HD recording resolution: 2× 5-041-957-11(1) Copyright 2022 Sony Corporation... - Page 138 [Pan-Tilt] > [P/T Range Limit] in the web menu. When the unit is turned on or pan/tilt reset is executed, this range limit setting is ignored. For details, see [Pan-Tilt] > [P/T Range Limit] in the web menu. 5-041-957-11(1) Copyright 2022 Sony Corporation...
- Page 139 If the [Zoom Speed] slider is not displayed, select either of the two slider function selection buttons to display the slider. Move the [Zoom Speed] slider knob left or right. Moving the knob to the left decreases the operating speed, while moving the knob to the right increases the operating speed. 5-041-957-11(1) Copyright 2022 Sony Corporation...
- Page 140 [Pan-Tilt] > [P/T Range Limit] in the web menu. When the unit is turned on or pan/tilt reset is executed, this range limit setting is ignored. For details, see [Pan-Tilt] > [P/T Range Limit] in the web menu. 5-041-957-11(1) Copyright 2022 Sony Corporation...
-
Page 141: Calibration Data
You can check whether calibration data is available for the attached lens by pressing the (Camera Status) button in the common area of the Web App screen and selecting [Lens] > [Calibration Data]. 5-041-957-11(1) Copyright 2022 Sony Corporation... - Page 142 Help Guide Interchangeable Lens Digital Camera ILME-FR7 / ILME-FR7K Saving/Restoring Pan/Tilt, Zoom Position, and Focus Setting Using the Web App You can save the pan/tilt, zoom position, and focus setting and recall them when required using the Web App. For details about the items that can be saved/restored, see “Preset Position Saved...
- Page 143 The degree of change in the pan/tilt position when moving to a preset position can be adjusted using the transition speed and [Ramp Curve] settings. For details, see “Changing the Transition Speed of Position Presets” and “Setting the Pan/Tilt Operation Acceleration.” 5-041-957-11(1) Copyright 2022 Sony Corporation...
- Page 144 Press the position preset you want to rename. (Preset Position Menu) button appears at the top right of the image. Press the (Preset Position Menu) button and select [Rename] from the displayed menu. Enter a new preset name. 5-041-957-11(1) Copyright 2022 Sony Corporation...
- Page 145 Press the position image you want to replace in the preset position control panel. (Preset Position Menu) button appears at the top right of the screen. Press the (Preset Position Menu) button and select [Replace] from the displayed menu. The new position replaces the current setting. 5-041-957-11(1) Copyright 2022 Sony Corporation...
- Page 146 Press the position image you want to delete in the preset position control panel. (Preset Position Menu) button appears at the top right of the image. Press the (Preset Position Menu) button and select [Delete] from the displayed menu. The saved position is deleted. 5-041-957-11(1) Copyright 2022 Sony Corporation...
- Page 147 The next time a saved position is restored, the camera will move at the configured speed. Hint When [Pan-Tilt] > [P/T Preset] > [Speed Select] is set to [Common], all positions will be restored at the set speed using [Pan-Tilt] > [P/T Preset] > [Common Speed]. 5-041-957-11(1) Copyright 2022 Sony Corporation...
- Page 148 In the case of the infrared remote control, the image moves to the saved position at the maximum speed. You can also change the transition speed after saving. For details, see “Changing the Transition Speed of Position Presets.” 5-041-957-11(1) Copyright 2022 Sony Corporation...
- Page 149 You can adjust the focus by touching the camera image. You can disable touch operation by turning off the [Touch Focus] switch on the (Focus) tab in the camera control panel. Camera control panel (Focus) tab GUI control panel 5-041-957-11(1) Copyright 2022 Sony Corporation...
- Page 150 Adjust using the slider at the bottom of the (Focus) tab. Hint You can also use auto focus when manual adjustment is the main method of operation. For details, see “Setting the Auto Focus Target Manually (AF Assist) Using the Web App.” 5-041-957-11(1) Copyright 2022 Sony Corporation...
- Page 151 To focus on a near subject, press the N button. Hint You can also use auto focus when manual adjustment is the main method of operation. For details, see “Focusing Manually During Auto Focus Using the Supplied Infrared Remote Control.” 5-041-957-11(1) Copyright 2022 Sony Corporation...
- Page 152 In spot focus mode, you can press an assignable button assigned with [Push AF/MF] to temporarily stop spot focus and enable auto focus while the button is pressed. The focus returns to manual focus when you release the button. 5-041-957-11(1) Copyright 2022 Sony Corporation...
- Page 153 Push auto focus is released and the focus returns to manual focus when you release the button. Note The push auto focus function does not operate if the lens is set for manual focusing. Hint The same operation is supported using an assignable button assigned with [Push AF/MF]. 5-041-957-11(1) Copyright 2022 Sony Corporation...
- Page 154 Help Guide Interchangeable Lens Digital Camera ILME-FR7 / ILME-FR7K Using Single-Shot Auto Focus (Push Auto Focus (AF-S)) You can press the [Push AF/MF] button when in manual focus mode to focus automatically at high speed. This function is convenient when you focus on a subject before shooting.
- Page 155 You can also assign [Push AF Mode] to an assignable button. You can also assign [Focus Area (AF-S)] to an assignable button. You can display/hide the focus area frame using [Monitoring] > [Display On/Off] > [Focus Area Ind.(AF-S)] in the camera menu. 5-041-957-11(1) Copyright 2022 Sony Corporation...
- Page 156 The focus cannot be adjusted automatically on an A-mount lens. Hint During auto focus mode, you can adjust the focus using the Focus slider in the camera control panel. For details, see “Setting the Auto Focus Target Manually (AF Assist) Using the Web App.” 5-041-957-11(1) Copyright 2022 Sony Corporation...
- Page 157 The focus on a subject is adjusted automatically. Note You can also use auto focus when manual adjustment is the main method of operation. For details, see “Focusing Manually During Auto Focus Using the Supplied Infrared Remote Control.” 5-041-957-11(1) Copyright 2022 Sony Corporation...
- Page 158 Help Guide Interchangeable Lens Digital Camera ILME-FR7 / ILME-FR7K Setting the Auto Focus Area/Position (Focus Area) You can set the target area for auto focus and adjust the focus for that area. Press the [Menu] button GUI control panel to open the camera menu.
- Page 159 The focus area frame is not hidden when using the [Display] button on the camera image panel. During Clear Image Zoom, the focus area is set to [Wide] (fixed). Hint You can display/hide the focus area frame using [Monitoring] > [Display On/Off] > [Focus Area Indicator] in the camera menu. 5-041-957-11(1) Copyright 2022 Sony Corporation...
- Page 160 (manual focus mode), you can change the [Focus Area (AF-S)] focus area position. The focus area frame is displayed orange when the position of the focus area can be changed. 5-041-957-11(1) Copyright 2022 Sony Corporation...
- Page 161 Help Guide Interchangeable Lens Digital Camera ILME-FR7 / ILME-FR7K Moving the Focus Area Frame Using Touch Operation (Touch Focus Area) You can change the position of the focus area by pressing an assignable button assigned with [Focus Setting] to change the focus area display to orange, and then move the focus area frame using touch operation in the camera image panel.
- Page 162 When the [Auto Focus] switch is turned off in the camera control panel When the [Touch Focus] switch is turned off in the camera control panel When the focus area frame is displayed in gray or is not displayed at all 5-041-957-11(1) Copyright 2022 Sony Corporation...
- Page 163 Help Guide Interchangeable Lens Digital Camera ILME-FR7 / ILME-FR7K Adjusting the Auto Focus Operation (AF Transition Speed, AF Subject Shift Sensitivity) You can adjust the auto focus operation by changing the transition speed and the subject shift sensitivity. Setting the AF transition speed You can set the speed of the focus drive for when the subject changes using the [AF Transition Speed] button in the camera control panel.
- Page 164 AF transition speed and AF subject shift sensitivity settings. AF transition speed → AF subject shift sensitivity → No display … 5-041-957-11(1) Copyright 2022 Sony Corporation...
- Page 165 Help Guide Interchangeable Lens Digital Camera ILME-FR7 / ILME-FR7K Setting the Auto Focus Target Manually (AF Assist) Using the Web App After shifting and adjusting the focus manually, you can pass focus control to auto focus for fine focus adjustment.
- Page 166 5-041-957-11(1) Copyright 2022 Sony Corporation...
- Page 167 When [Shooting] > [Focus] > [AF Assist] is set to [On] in the camera menu, you can use the F (Far) button and N (Near) on the supplied infrared remote control even during auto focus to adjust the focus on a subject. 5-041-957-11(1) Copyright 2022 Sony Corporation...
- Page 168 This allows you to temporarily stop auto focus and focus manually when something that is not the subject of shooting crosses in front of the subject. Hint The same operation is supported using an assignable button assigned with [Push AF/MF]. 5-041-957-11(1) Copyright 2022 Sony Corporation...
- Page 169 Help Guide Interchangeable Lens Digital Camera ILME-FR7 / ILME-FR7K Tracking Using Face and Eye Detection (Face/Eye Detection AF) The unit can detect people’s faces and eyes as a target to track, and then adjust the focus on faces and eyes within the focus area.
- Page 170 [Face/Eye Priority AF], [Face/Eye Only AF], and [AF] each time you press the button. Setting using the direct menu You can also set the face/eye detection AF operation using the direct menu. For details about the direct menu, see “Direct Menu Operation.” 5-041-957-11(1) Copyright 2022 Sony Corporation...
- Page 171 Help Guide Interchangeable Lens Digital Camera ILME-FR7 / ILME-FR7K Tracking a Specified Subject (Realtime Tracking AF) You can maintain focus on a subject by specifying the subject by touch operation or by selecting a face detection frame in the camera control panel.
- Page 172 Slide the [Touch Focus] switch on the (Focus) tab in the camera control panel to the right position to turn it on, then tap the target subject to track in any of the following states. During manual focus or during push manual focus, and when [Shooting] > [Focus] > [Touch Function in MF] is set to [Tracking AF] in the web menu or camera menu During auto focus or during push auto focus (AF) To specify by face detection frame selection...
- Page 173 When a tracking face is saved (when the (saved tracking face icon) is displayed), realtime tracking AF will resume when the saved tracking face enters the image area. To clear the tracking face, stop realtime tracking AF as described above. 5-041-957-11(1) Copyright 2022 Sony Corporation...
- Page 174 Help Guide Interchangeable Lens Digital Camera ILME-FR7 / ILME-FR7K Brightness Adjustment Screen You can adjust the brightness by adjusting the iris, gain, shutter speed, and by adjusting the light level using ND filters in the following control panels of the Web App live operation screen. You can also adjust the brightness automatically.
- Page 175 5-041-957-11(1) Copyright 2022 Sony Corporation...
- Page 176 Help Guide Interchangeable Lens Digital Camera ILME-FR7 / ILME-FR7K Setting the Base Sensitivity You can set the base sensitivity before starting to adjust the brightness. When [Shooting Mode] is set to [Custom] Press the [ISO/Gain] button in the camera basic configuration panel and set [Base Sensitivity] on the ISO/gain adjustment panel to [High] or [Low].
- Page 177 (Main) tab in the camera control panel. Can also be set using [Shooting] > [ISO/Gain/EI] > [Base Sensitivity] or [Base ISO] in the camera menu. You can also assign [Base ISO/Sensitivity] to an assignable button. 5-041-957-11(1) Copyright 2022 Sony Corporation...
- Page 178 Move the slider knob to the left to make the image darker. Move the slider knob to the right to make the image brighter. Hint Can also be set using [Shooting] > [Auto Exposure] > [Level] in the camera menu. 5-041-957-11(1) Copyright 2022 Sony Corporation...
- Page 179 The iris switches to auto adjustment mode. The auto adjusted iris value is displayed on the right side of the switch. Note The iris cannot be adjusted automatically on an A-mount lens. Hint You can also assign [Auto Iris] to an assignable button. 5-041-957-11(1) Copyright 2022 Sony Corporation...
-
Page 180: Adjusting The Iris Manually
Help Guide Interchangeable Lens Digital Camera ILME-FR7 / ILME-FR7K Adjusting the Iris Manually You can adjust the brightness manually. If a lens with an Auto Iris switch is attached, set the switch to AUTO. Note When the Auto Iris switch of the lens is set to MANUAL, the [Auto Iris] and [Push Auto Iris] functions on the unit have no effect. - Page 181 Hint Press an assignable button assigned with the [Push Auto Iris] function to adjust the iris automatically while the button is pressed. The iris returns to manual mode when you release the button. 5-041-957-11(1) Copyright 2022 Sony Corporation...
- Page 182 The gain switches to auto adjustment mode. The auto adjusted gain value is displayed on the right side of the switch. Hint You can also perform the same action by setting [Shooting] > [Auto Exposure] > [AGC] to [On] in the camera menu. You can also assign [AGC] to an assignable button. 5-041-957-11(1) Copyright 2022 Sony Corporation...
- Page 183 Help Guide Interchangeable Lens Digital Camera ILME-FR7 / ILME-FR7K Adjusting the Gain Manually You can adjust the brightness manually using the gain setting when [Shooting Mode] is set to [Custom]. You can control the gain when you want to adjust the exposure while using a fixed iris setting or when you want to prevent the gain increasing due to AGC.
- Page 184 Setting the AGC switch to the on position Switching the power supply of the unit to standby Note This function cannot be executed when [Shooting] > [Iris] > [Bokeh Control] is set to [On] in the camera menu. 5-041-957-11(1) Copyright 2022 Sony Corporation...
- Page 185 Press the [Shutter Type] button and select [Auto] from the list. Hint You can also perform the same action by setting [Shooting] > [Auto Exposure] > [Auto Shutter] to [On] in the camera menu. You can also assign [Auto Shutter] to an assignable button. 5-041-957-11(1) Copyright 2022 Sony Corporation...
- Page 186 Help Guide Interchangeable Lens Digital Camera ILME-FR7 / ILME-FR7K Adjusting the Shutter Manually You can adjust the shutter manually. Press the [Shutter] button in the camera basic configuration panel. The frame of the [Shutter] button changes to orange. The Shutter adjustment panel appears.
- Page 187 5-041-957-11(1) Copyright 2022 Sony Corporation...
- Page 188 ND filter. The unit features the following ND filter modes. Preset mode “Adjusting in Preset Mode.” Variable mode (automatic adjustment) “Adjusting Automatically in Variable Mode.” Variable mode (manual adjustment) “Adjusting Manually in Variable Mode.” 5-041-957-11(1) Copyright 2022 Sony Corporation...
- Page 189 When one of [Preset1] to [Preset3] is selected for the ND filter, the transmittance value is displayed beside the ND filter name. Hint When an assignable button assigned with [ND Filter Position] is pressed, the ND filter changes in the sequence [Clear] → [Preset1] → [Preset2] → [Preset3] → [Clear]. 5-041-957-11(1) Copyright 2022 Sony Corporation...
- Page 190 When the ND filter is switched to or from [Clear] during shooting, the ND filter frame is displayed on the image and an operating sound is emitted. Hint You can also assign [Auto ND Filter] to an assignable button, and press the button to switch between [Auto] and [Manual]. 5-041-957-11(1) Copyright 2022 Sony Corporation...
- Page 191 Help Guide Interchangeable Lens Digital Camera ILME-FR7 / ILME-FR7K Adjusting Manually in Variable Mode You can perform manual exposure adjustment using the ND filter. Set [Shooting] > [ND Filter] > [Mode] to [Variable] in the camera menu. Press the [ND Filter] button in the camera basic configuration panel.
- Page 192 You can also assign [ND Filter Position] to an assignable button, and press the button to switch between [Manual] and [Clear]. You can also press the [Push Auto] button on the ND Filter adjustment panel to turn auto ND filter on while the button is pressed. 5-041-957-11(1) Copyright 2022 Sony Corporation...
-
Page 193: White Balance Adjustment Screen
You can adjust the white balance using the live operation screen of the Web App to obtain a white balance that makes the image look more natural. Camera basic configuration panel Camera basic configuration adjustment panel Displays the adjustment panel for the setup item selected on the camera basic configuration panel. 5-041-957-11(1) Copyright 2022 Sony Corporation... - Page 194 Speed] in the camera menu. The lower the number, the faster the response speed. You can freeze the current white balance setting by assigning the [ATW Hold] function to an assignable button, and pressing the assignable button to temporarily pause ATW during ATW mode. 5-041-957-11(1) Copyright 2022 Sony Corporation...
-
Page 195: Adjusting The White Balance Manually
Help Guide Interchangeable Lens Digital Camera ILME-FR7 / ILME-FR7K Adjusting the White Balance Manually You can adjust the white balance manually. Press the [White Balance] button in the camera basic configuration panel. The frame of the [White Balance] button changes to orange. - Page 196 [Custom] mode: 3200 K → 4300 K → 5600 K → 6300 K → 3200 K… [Cine EI] mode: 3200 K → 4300 K → 5500 K → 3200 K… 5-041-957-11(1) Copyright 2022 Sony Corporation...
- Page 197 Help Guide Interchangeable Lens Digital Camera ILME-FR7 / ILME-FR7K Running Auto White Balance In memory A mode, the white balance to save is adjusted automatically. Press the [White Balance] button in the camera basic configuration panel. The frame of the [White Balance] button changes to orange.
- Page 198 Note If the adjustment is not successful, an error message is displayed on the screen for about three seconds. If the error message persists after repeated attempts to set white balance, contact your Sony service representative. Hint You can also run it in ATW mode. You can use this when you want to quickly adjust the white balance during ATW operation.
- Page 199 You can adjust the audio level to be recorded by the unit on the live operation screen of the Web App. Configure the switches on the connector block of the unit and configure the audio using the web menu. Camera control panel – (Audio) tab 5-041-957-11(1) Copyright 2022 Sony Corporation...
-
Page 200: Setting Description
Select the audio input using [Audio] > [Audio Input] > [CH1 Input Select] to [CH4 Input Select] in the web menu or camera menu. Note Audio is not recorded in Interval Rec mode or Slow & Quick Motion mode. 5-041-957-11(1) Copyright 2022 Sony Corporation... - Page 201 [Audio] > [Audio Input] > [CH1 Level Control] to [CH4 Level Control] in the camera menu. The channels specified for auto adjustment are indicated by an (Auto) icon beside the corresponding channels on the (Audio) tab of the live operation screen. 5-041-957-11(1) Copyright 2022 Sony Corporation...
- Page 202 Hint The slider and adjustment button settings in each row are linked. You can check the audio input level in realtime using the audio level meter display on the shooting screen. 5-041-957-11(1) Copyright 2022 Sony Corporation...
- Page 203 Press an assignable button assigned with [Direct Menu] again or wait 3 seconds without performing any action to exit the direct menu. Hint You can also perform the same function using an assignable button and the GUI control panel of the Web App. 5-041-957-11(1) Copyright 2022 Sony Corporation...
-
Page 205: Assignable Buttons
Use [Project] > [Assignable Button] in the camera menu. When you change an assignment, the display of the assignable button list changes. For details about the assignable functions, see “Assignable Button” in “Camera Menu and Detailed Settings.” 5-041-957-11(1) Copyright 2022 Sony Corporation... - Page 206 Help Guide Interchangeable Lens Digital Camera ILME-FR7 / ILME-FR7K Slow & Quick Motion When the recording format is set to the following values, you can specify different values for the shooting frame rate and playback frame rate. The following table shows the configurable frame rates.
- Page 207 5-041-957-11(1) Copyright 2022 Sony Corporation...
- Page 208 Help Guide Interchangeable Lens Digital Camera ILME-FR7 / ILME-FR7K Recording Video Intermittently (Interval Rec) The Interval Rec function allows you to capture video intermittently to the unit’s internal memory. This function is an effective way to shoot slow-moving subjects. When you start recording, the unit automatically records a specified number of frames (Number of Frames) at a specified interval time (Interval Time).
-
Page 209: Starting Shooting
To exit Interval Rec mode, do one of the following. Set the power supply of the unit to standby. In recording standby mode, set [Project] > [Interval Rec] > [Setting] to [Off]. Also, Interval Rec mode is automatically released when the unit is rebooted. 5-041-957-11(1) Copyright 2022 Sony Corporation... -
Page 210: Setting The Cache Size
Help Guide Interchangeable Lens Digital Camera ILME-FR7 / ILME-FR7K Recording Cached Pictures (Picture Cache Rec) The Picture Cache Rec function allows you to capture video retroactively when you start recording by maintaining an internal cache memory of a specified duration when shooting. - Page 211 Picture cache recording of video during that interval is not possible. Canceling Picture Cache Rec Set [Project] > [Picture Cache Rec] > [Setting] to [Off] in the web menu, or press an assignable button assigned with the [Picture Cache Rec] function. 5-041-957-11(1) Copyright 2022 Sony Corporation...
-
Page 212: Changing The Setting
Button: [SlotB] Rec Button: [SlotB] The record START/STOP button starts/stops recording to memory card B, and the [2nd Rec 2nd Rec START/STOP] button on the (Others) tab starts/stops recording to memory card A. Button: [SlotA] 5-041-957-11(1) Copyright 2022 Sony Corporation... - Page 213 You can also assign the [Video Signal Monitor] function to an assignable button. Monitoring target display In Cine EI mode, the color space setting or monitor LUT setting information is displayed at the top right of the video signal monitor to indicate the target of monitoring. 5-041-957-11(1) Copyright 2022 Sony Corporation...
- Page 214 You can also add a clip flag using [Thumbnail] > [Set Clip Flag] in the camera menu. The thumbnail screen can be displayed sorted by clip flag type (filtered clip thumbnail screen). For details, see “Operations on Recorded Clips” in “Thumbnail Screen.” 5-041-957-11(1) Copyright 2022 Sony Corporation...
- Page 215 When [Shooting] > [S&Q Motion] > [Setting] is set to [On] in the web menu or camera menu When [Project] > [Rec Format] > [Codec] is set to [RAW] or [RAW & XAVC-I] in the web menu or camera menu 5-041-957-11(1) Copyright 2022 Sony Corporation...
-
Page 216: About The File Name
/XDROOT/Sub About the file name The file name consists of the clip name recorded on the memory card and an “S03” suffix. For clip names, see [TC/Media] > [Clip Name Format] in the camera menu. 5-041-957-11(1) Copyright 2022 Sony Corporation... - Page 217 Make sure that the memory card does not pop out when inserting or removing it. To stop shooting Stop the recording. To set the audio channel for proxy recording Set the audio channel for proxy data recording using [Project] > [Proxy Rec] > [Audio Channel] in the camera menu. 5-041-957-11(1) Copyright 2022 Sony Corporation...
- Page 218 When the unit is in Custom mode, you can add adjustments to the black, matrix, and other parameters to create a “look” based on the base look. You can also quickly select a different look by saving different combinations of settings in scene files. The unit is provided with a total of six preset looks. 5-041-957-11(1) Copyright 2022 Sony Corporation...
- Page 219 Help Guide Interchangeable Lens Digital Camera ILME-FR7 / ILME-FR7K Selecting a Look This topic describes how to select a look. Check that [Project] > [Base Setting] > [Shooting Mode] is set to [Custom] in the web menu or camera menu.
- Page 220 5-041-957-11(1) Copyright 2022 Sony Corporation...
- Page 221 Help Guide Interchangeable Lens Digital Camera ILME-FR7 / ILME-FR7K Importing a Desired Base Look You can import a 3D LUT file, created on a computer or other device, as a base look. Up to 16 files can be imported. File format: CUBE file (*.cube) for a 17-point or 33-point 3D LUT created using Catalyst Browse, RAW Viewer, or DaVinci Resolve (by Blackmagic Design Pty.
- Page 222 3D LUT files are not deleted when [Maintenance] > [Reset] > [All Reset (except for Network Settings)] is executed in the web menu. 5-041-957-11(1) Copyright 2022 Sony Corporation...
- Page 223 [Paint/Look] > [Matrix] and settings other than the base look settings in the camera menu are changed. You can reset all customized settings using [Paint/Look] > [Reset Paint Settings] > [Reset without Base Look] in the camera menu. 5-041-957-11(1) Copyright 2022 Sony Corporation...
- Page 224 You can delete a scene file saved in internal memory using [Paint/Look] > [Scene File] > [Delete] in the camera menu. Hint When deleted, it is no longer displayed in the Scene File adjustment panel or the direct menu. 5-041-957-11(1) Copyright 2022 Sony Corporation...
- Page 225 Imported 3D LUT files are not deleted when [Maintenance] > [Reset] > [All Reset (except for Network Settings)] is executed in the web menu. A deleted base look can no longer be used as a LUT in Cine EI mode. 5-041-957-11(1) Copyright 2022 Sony Corporation...
- Page 226 LUT to the playback video to check the finished result. LUTs are applied by the following systems. However, only one LUT can be applied. SDI output HDMI output and streaming Proxy clip recorded on recording media High-res (main) clip recorded on recording media 5-041-957-11(1) Copyright 2022 Sony Corporation...
- Page 227 This can also be set using [Shooting] > [LUT On/Off] > [HDMI/Stream] in the camera menu. SDI output can be set in the same way. For video on recording media, you can set this using [Shooting] > [LUT On/Off] > [Internal Rec] and [Proxy] in the camera menu. 5-041-957-11(1) Copyright 2022 Sony Corporation...
- Page 228 You can also import and apply a 3D LUT file. For details, see “Importing a Desired Base Look” and “Deleting a Base Look.” This can also be set using [Paint/Look] > [Base Look] > [Select] in the camera menu. 5-041-957-11(1) Copyright 2022 Sony Corporation...
- Page 229 Help Guide Interchangeable Lens Digital Camera ILME-FR7 / ILME-FR7K Changing the Distribution of Dark and Bright Areas in the Recorded Image You can change the distribution of dark areas and bright areas, for example, if you want to prioritize the tone of dark areas over bright areas, by changing the Exposure Index from the base sensitivity.
- Page 230 Example: In “400EI/5.0E,” 5.0 steps are assigned on the bright side. You can also use this as a guide to check the tone of dark and bright areas during shooting. Remember to return to the original EI value after checking the exposure. 5-041-957-11(1) Copyright 2022 Sony Corporation...
- Page 231 Help Guide Interchangeable Lens Digital Camera ILME-FR7 / ILME-FR7K Recording RAW Video You can record the RAW video signal output from the SDI OUT connector of the unit to a supported external recorder. The supported RAW output formats are shown below.
- Page 232 Check the indicator on the external recorder to obtain the correct operating status. Note When recording is started on an external recorder without using the record START/STOP button on the live operation screen, clips may not be recorded properly. 5-041-957-11(1) Copyright 2022 Sony Corporation...
- Page 233 ILME-FR7 / ILME-FR7K Recording RAW Video in Slow & Quick Motion Mode You can record RAW video in Slow & Quick Motion mode. For details about the supported frame rates for shooting, see “Slow & Quick Motion.” 5-041-957-11(1) Copyright 2022 Sony Corporation...
- Page 234 This function is enabled only on E-mount lenses that can communicate with the unit. The maximum effect of this function can be obtained using a Sony E-mount lens. You can also assign the [Bokeh Control] function to an assignable button and switch the bokeh control function between On and Off using the button.
- Page 235 When the bokeh control function is set to On, the gain may change as the iris is adjusted. When the gain link is active and the gain changes, a message appears at the top of the screen and the (B) icon on the gain indicator blinks. 5-041-957-11(1) Copyright 2022 Sony Corporation...
- Page 236 With this unit, you can save almost all settings related to camera functions, other than the following note, as an ALL file (file with all settings). Note Network function settings and authentication information are not saved. For details about saved items, see “List of Menu Items.” 5-041-957-11(1) Copyright 2022 Sony Corporation...
- Page 237 The web browser will download a file named all-file.ALL momentarily. Specify a location and file name for the downloaded all-file.ALL file, and save the file. For details about file operations, refer to the operating instructions of your device. 5-041-957-11(1) Copyright 2022 Sony Corporation...
- Page 238 For details about file operations, refer to the operating instructions of your device. When the load file name confirmation screen appears, press the [OK] button. When the execution result screen appears, press the [OK] button. Wait for the unit to reboot, then reconnect the Web App. 5-041-957-11(1) Copyright 2022 Sony Corporation...
- Page 239 You can upload a proxy file or original file that is recorded on the unit to a server on the Internet or a server on a local network. Note When the power supply is set to standby state, file transfers are placed on hold even though the unit is still powered. 5-041-957-11(1) Copyright 2022 Sony Corporation...
- Page 240 Help Guide Interchangeable Lens Digital Camera ILME-FR7 / ILME-FR7K Registering a File Transfer Destination You can register a transfer destination server before starting a file transfer. Select [Network] > [File Transfer] > [Default Upload Server] > [Server Settings1] (or [Server Settings2], [Server Settings3]) in the web menu.
- Page 241 [Reset]: Resets the Server Settings settings to the defaults. 5-041-957-11(1) Copyright 2022 Sony Corporation...
- Page 242 The proxy file corresponding to the selected clip is registered as a transfer job, and uploading begins. When the transfer job is successfully registered, the transfer result screen appears. Press the [OK] button. Note Up to 200 transfer jobs can be registered. 5-041-957-11(1) Copyright 2022 Sony Corporation...
- Page 243 The original file of the selected clip is registered as a transfer job, and uploading begins. When the transfer job is successfully registered, the transfer result screen appears. Press the [OK] button. Note Up to 200 transfer jobs can be registered. 5-041-957-11(1) Copyright 2022 Sony Corporation...
- Page 244 If [Network] > [File Transfer] > [Auto Upload (Proxy)] is set to [On] in the camera menu and a network connection exists, proxy files are automatically uploaded to the server specified using [Default Upload Server] when recording ends. 5-041-957-11(1) Copyright 2022 Sony Corporation...
- Page 245 You can upload files with encryption using FTPS in Explicit mode (FTPES) for the connection with the destination file server. For secure FTP transfer, set [Using Secure Protocol] to [On] in the destination file server settings and load a certificate. For details about configuration, see “Registering a File Transfer Destination.” 5-041-957-11(1) Copyright 2022 Sony Corporation...
-
Page 246: About Streaming
● – – ● ● ● NDI|HX – ● Main Web App – – ● – ●: Enabled, –: Disabled Hint The image in the Web App camera image panel is also a streaming system. 5-041-957-11(1) Copyright 2022 Sony Corporation... - Page 247 Help Guide Interchangeable Lens Digital Camera ILME-FR7 / ILME-FR7K Setting the Streaming Format Set the streaming format using [Stream] > [Stream] > [Stream Setting] > [Setting] in the web menu. When [Setting] is set to [RTSP] In RTSP streaming, the image from a single camera can be viewed simultaneously by up to five users.
- Page 248 The description of services and software is subject to change without notice. Separate registration and subscription may be required. Sony will not be liable for any claims made by users or a third party due to the use of services and software of other companies.
- Page 249 Help Guide Interchangeable Lens Digital Camera ILME-FR7 / ILME-FR7K Setting the Video Codec for Streaming Set the video codec using [Stream] > [Video Stream] in the web menu. [Video Stream 1], [Video Stream 2], [Video Stream 3] You can set up to three image codec modes. Configure the following settings separately for each image mode.
- Page 250 For [Quality 1] and [Quality 2], you can set H.264 image quality by setting [Bit Rate Compression Mode] to [VBR] and [Codec] to [H.264]. You can set H.265 image quality by setting [Bit Rate Compression Mode] to [VBR] and [Codec] to [H.265]. 5-041-957-11(1) Copyright 2022 Sony Corporation...
- Page 251 [AAC (256kbps)]: Select to prioritize the sound quality. [AAC (128kbps)]: Select to prioritize the data capacity. This setting has no affect on the clip recorded by the unit or the audio signal embedded in the HDMI/SDI signal. 5-041-957-11(1) Copyright 2022 Sony Corporation...
- Page 252 SRT-Listener streaming example The URL of the stream is shown below. srt://<camera_address>:<Port> <camera_address>: IP address of the unit <Port>: Listener port configured using [Port Number] Note Playback in all applications or devices is not guaranteed. 5-041-957-11(1) Copyright 2022 Sony Corporation...
-
Page 254: Thumbnail Screen
Help Guide Interchangeable Lens Digital Camera ILME-FR7 / ILME-FR7K Thumbnail Screen When you press the [Thumbnail] button on the playback operation screen or the THUMBNAIL button on the infrared remote control, clips recorded on the memory card are displayed in the camera image panel. This display on the camera image panel is referred to as the thumbnail screen. - Page 255 Special recording information Displays the recording mode only if the clip was recorded using a special recording mode. For Slow & Quick Motion clips, the frame rate is displayed on the right. Clip duration Creation date 5-041-957-11(1) Copyright 2022 Sony Corporation...
- Page 256 Help Guide Interchangeable Lens Digital Camera ILME-FR7 / ILME-FR7K Playing Recorded Clips You can play recorded clips when the unit is in recording standby (Stby) mode. This topic describes how to play recorded clips using the GUI control panel. Insert the memory card to play.
- Page 257 Note Clips cannot be selected by touch operation. Press the [Set] button in the GUI control panel. Playback begins from the start of the selected clip. Operate the playback control panel as required. Button Function (Play/Pause) button Plays a clip. During playback, pauses the clip. (Fast Forward) button, (Fast Plays a clip at high speed.
- Page 258 5-041-957-11(1) Copyright 2022 Sony Corporation...
- Page 259 Help Guide Interchangeable Lens Digital Camera ILME-FR7 / ILME-FR7K Operations on Recorded Clips On the thumbnail screen, you can operate the clips or check clip properties using the [Thumbnail] menu in the camera menu. Press the [Menu] button on the playback operation screen to display the camera menu in the camera image panel.
- Page 260 Hint You can also press the [Menu] button on the live operation screen to display the camera menu. Operations using the [Thumbnail] menu in the camera menu...
- Page 261 Select a function to operate using the arrow buttons in the GUI control panel and press the [Set] button. Press the [Cancel/Back] button to return to the previous screen. Note Some items cannot be selected, depending on the state when the menu was displayed. Menu items for clip operations The [Thumbnail] menu in the camera menu has the following menu items related to clip operations.
- Page 262 [Date Time]: Displays the date and time the clip was created and last modified. [Time Code]: Displays the timecode. [Duration]: Displays the duration of the clip. [Sequential Number]: Displays a sequential number on each thumbnail. 5-041-957-11(1) Copyright 2022 Sony Corporation...
-
Page 263: Menu Configuration
Help Guide Interchangeable Lens Digital Camera ILME-FR7 / ILME-FR7K Camera Menu Configuration When the [Menu] button in the GUI control panel or the MENU button on the infrared remote control is pressed, the camera menu for configuring the various required settings for shooting and playback is displayed in the camera image panel. - Page 264 Contains settings related to timecodes and recording media. [Monitoring] menu Contains settings related to video output and the screen display. [Audio] menu Contains settings related to audio. [Thumbnail] menu Contains settings related to thumbnail display. [Technical] menu Contains settings for technical items. [Network] menu Contains settings related to networks.
- Page 265 Level 1 Level 2 Auto Exposure White White Setting Offset White Focus S&Q Motion LUT On/Off Noise Suppression Flicker Reduce SteadyShot Base Setting Rec Format Cine EI Setting Simul Rec Project Proxy Rec Interval Rec Picture Cache Rec SDI/HDMI Rec Control Assignable Button Scene File Base Look...
- Page 266 Set Clip Flag Lock/Unlock Clip Delete Clip Thumbnail Transfer Clip Transfer Clip (Proxy) Filter Clips Customize View Color Bars Genlock Tally Technical Rec Review Zoom Lens Wired LAN Network File Transfer Language Maintenance Clock Set Hours Meter 5-041-957-11(1) Copyright 2022 Sony Corporation...
-
Page 268: Operating The Camera Menu
Selecting [Execute] for a function will execute the corresponding function. Selecting an item that requires confirmation before execution will temporarily hide the menu and display a confirmation message. Check the message, and then select whether to execute or cancel the function. 5-041-957-11(1) Copyright 2022 Sony Corporation... - Page 269 [←] [→]: Moves the position of the cursor. [BS]: Deletes the character on the left of the cursor (backspace). When finished, press the [Done] button to apply the setting. The character string is confirmed and the character entry screen disappears. 5-041-957-11(1) Copyright 2022 Sony Corporation...
- Page 270 Technical > Lens item Edit User Menu Displays the Edit User menu. Note You can add and remove menu items in the [User] menu using the [Edit User] menu. Up to 20 items can be configured. 5-041-957-11(1) Copyright 2022 Sony Corporation...
-
Page 271: Factory Default
Level 2 menu item selected Rearranges the registered menu items within the [User] Move – during editing menu. Edit Sub Edits (register/delete) the registered level 3 menu sub- – Item item in the [User] menu. 5-041-957-11(1) Copyright 2022 Sony Corporation... - Page 272 Help Guide Interchangeable Lens Digital Camera ILME-FR7 / ILME-FR7K ISO/Gain/EI Sets gain settings. Item Sub-item setting Factory default Description Selects the gain setting Mode ISO/dB mode. For details about settings, see Sets the <L> gain preset “ISO/Gain Settings and Default ISO/Gain<L>...
- Page 273 5-041-957-11(1) Copyright 2022 Sony Corporation...
- Page 274 1/4 / 1/8 / 1/16 / 1/32 / 1/64 / 1/128 1/16 Sets the preset 2 value for the ND filter. Preset3 1/4 / 1/8 / 1/16 / 1/32 / 1/64 / 1/128 1/64 Sets the preset 3 value for the ND filter. 5-041-957-11(1) Copyright 2022 Sony Corporation...
- Page 275 Help Guide Interchangeable Lens Digital Camera ILME-FR7 / ILME-FR7K Shutter Sets electronic shutter operation. Factory Item Sub-item setting Description default Selects the operating mode of the electronic shutter. Speed: Mode for setting the shutter speed in units of seconds. Select for...
- Page 276 23.99 to 8000 29.97P: Sets the ECS frequency The available settings vary depending on the frame 30.00 Frequency when Mode is set to ECS. frequency of the selected recording format. 23.98P: 23.99 25P: 25.02 24P: 24.02 5-041-957-11(1) Copyright 2022 Sony Corporation...
- Page 277 Help Guide Interchangeable Lens Digital Camera ILME-FR7 / ILME-FR7K Iris Sets iris settings. Item Sub-item setting Factory default Description Bokeh Control On / Off Turns the bokeh control function on/off. 5-041-957-11(1) Copyright 2022 Sony Corporation...
-
Page 278: Auto Exposure
Help Guide Interchangeable Lens Digital Camera ILME-FR7 / ILME-FR7K Auto Exposure Sets automatic exposure adjustment settings. Factory Item Sub-item setting Description default +3.0 / +2.75 / +2.5 / +2.25 / +2.0 / +1.75 / +1.5 / +1.25 / +1.0 / +0.75 / +0.5 / +0.25 / ±0 / −0.25 /... - Page 279 70 to 999 Height range. Custom Sets the horizontal position of the light −479 to +479 ±0 metering range. Position Custom Sets the vertical position of the light −464 to +464 ±0 metering range. Position 5-041-957-11(1) Copyright 2022 Sony Corporation...
- Page 280 R Gain/B Gain value. −99.0 R Gain ±0.0 Sets the white balance R gain value saved in memory A. <A> +99.0 −99.0 B Gain ±0.0 Sets the white balance B gain value saved in memory A. <A> +99.0 5-041-957-11(1) Copyright 2022 Sony Corporation...
- Page 281 1 to 3: Switches more slowly the higher the number. Sets the response speed in ATW mode. ATW Speed 1 / 2 / 3 / 4 / 5 The fastest response speed is 1, and the slowest response speed is 5. 5-041-957-11(1) Copyright 2022 Sony Corporation...
- Page 282 Sets the color temperature offset to be added to the ATW white balance ±0 Temp<ATW> when [Offset White<ATW>] is set to On. Offset −99 to Sets the tint value offset to be added to the ATW white balance when ±0 Tint<ATW> [Offset White<ATW>] is set to On. 5-041-957-11(1) Copyright 2022 Sony Corporation...
- Page 283 When set to On, allows you to temporarily override auto focus and set focus manually. “Setting the Auto Focus Target Manually (AF Assist) Using AF Assist On / Off the Web App” and “Focusing Manually During Auto Focus Using the Supplied Infrared Remote Control.” 5-041-957-11(1) Copyright 2022 Sony Corporation...
- Page 284 Sets the frame rate for Slow & Quick Motion shooting. Note Frame 1fps to 60fps / 100fps / 120fps / – The available settings vary depending on the selected Rate 150fps / 180fps / 200fps / 240fps system frequency, codec, and video format. 5-041-957-11(1) Copyright 2022 Sony Corporation...
- Page 285 Internal Rec MLUT On / MLUT Off MLUT Off recording video. LUT On/Off SDI / HDMI/Stream / SDI & Sets the target output controlled by an assignable HDMI/Stream Button Target HDMI/Stream button assigned with LUT On/Off. 5-041-957-11(1) Copyright 2022 Sony Corporation...
-
Page 286: Noise Suppression
Sets the noise suppression level in Custom mode. Setting(Cine EI) On / Off Turns the noise suppression function on/off in Cine EI mode. Level(Cine EI) Low / Mid / High Sets the noise suppression level in Cine EI mode. 5-041-957-11(1) Copyright 2022 Sony Corporation... -
Page 287: Flicker Reduce
Item Description setting default Mode Auto / On / Off Sets the flicker correction mode. Sets the frequency of the power source supplying the lighting that is Frequency 50Hz / 60Hz 60Hz causing the flicker. 5-041-957-11(1) Copyright 2022 Sony Corporation... - Page 288 Sub-item setting Description default Sets the image stabilization function. Note Active / Standard Enabled when a compatible lens is attached. Setting / Off When set to Active or Standard, unexpected behavior may occur during pan/tilt operation. 5-041-957-11(1) Copyright 2022 Sony Corporation...
-
Page 289: Base Setting
Sets the shooting mode. Shooting See “Setting the shooting mode” in “Configuring Basic Custom / Cine EI Custom Mode Operation.” Target SDR(BT.709) / Sets the color space of the recording/output in Custom SDR(BT.709) Display HDR(HLG) mode. 5-041-957-11(1) Copyright 2022 Sony Corporation... -
Page 290: Rec Format
Help Guide Interchangeable Lens Digital Camera ILME-FR7 / ILME-FR7K Rec Format Sets recording format settings. Factory Item Sub-item setting Description default Frequency 59.94 / 50 / 29.97 / 25 / 24 / 23.98 59.94 Selects the system frequency. Imager Scan FF / S35 Selects the imager size. - Page 291 59.94 / 50 / 29.97 / 25 / 23.98 3840×2160P XAVC-L 1920×1080P 50 1920×1080P 35 XAVC-I 1920×1080P 1920×1080P 50 XAVC-L 1920×1080P 35 – RAW & XAVC-I / XAVC-I 4096×2160P Default values are shown in bold. 5-041-957-11(1) Copyright 2022 Sony Corporation...
- Page 292 Sets Cine EI mode settings (see “Setting the shooting mode” in “Configuring Basic Operation”). Item Sub-item setting Factory default Description Color S-Gamut3/SLog3 / S- Sets the color space in Cine EI Gamut Gamut3.Cine/SLog3 Gamut3.Cine/SLog3 mode. 5-041-957-11(1) Copyright 2022 Sony Corporation...
- Page 293 Rec Button: [SlotA Assigns the record Button Rec Button: [SlotA] 2nd Rec Button: [SlotB] / Rec Button: SlotB] 2nd Rec buttons used to control [SlotB] 2nd Rec Button: [SlotA] Button: [SlotA SlotB] each recording media. 5-041-957-11(1) Copyright 2022 Sony Corporation...
- Page 294 Sets proxy recording mode settings (see “Proxy Recording”). Item Sub-item setting Factory default Description Setting On / Off Turns proxy recording mode on/off. Audio Channel CH1/CH2 / CH3/CH4 CH1/CH2 Selects the audio channel to record to proxy data. 5-041-957-11(1) Copyright 2022 Sony Corporation...
- Page 295 Interval Rec recording video format. 29.97P/25P/24P/23.98P: mode (when Interval Rec is set to Frames 59.94P/50P: 2frames / 6frames / 1frame On). 12frames 29.97P/25P/24P/23.98P: 1frame / 3frames / 6frames / 9frames 5-041-957-11(1) Copyright 2022 Sony Corporation...
- Page 296 Sets the time for accumulation of images in picture cache memory Size Long / Max (picture cache recording time). Cache Displays the time for accumulation of images in picture cache memory – – Rec Time (picture cache recording time). 5-041-957-11(1) Copyright 2022 Sony Corporation...
- Page 297 Synchronized with frame accuracy to media in the Parallel Rec unit. Note For control using the HDMI output signal, set [TC/Media] > [HDMI TC Out] > [Setting] to [On] in the camera menu. 5-041-957-11(1) Copyright 2022 Sony Corporation...
- Page 298 Help Guide Interchangeable Lens Digital Camera ILME-FR7 / ILME-FR7K Assignable Button Sets function assignments to assignable buttons (<1> to <9>) and [Focus Hold Button]. The following functions can be assigned. [Off]: No function assignment. [Base ISO/Sensitivity]: Switches the base sensitivity of the image sensor.
- Page 299 [Thumbnail]: Displays/exits the thumbnail screen. [Auto Upload (Proxy)]: Turns proxy file auto transfer on/off. [Direct Menu]: Displays/exits the direct menu. [User Menu]: Displays/exits the User menu. 5-041-957-11(1) Copyright 2022 Sony Corporation...
-
Page 300: Scene File
Applies preset image quality settings (non- Preset Standard / Still / ITU709 – rewritable) as the current image quality Recall When Shooting Mode is set to Custom and settings. Target Display is set to HDR(HLG): HLG Live / HLG Natural 5-041-957-11(1) Copyright 2022 Sony Corporation... - Page 301 BT.709 gamut for the base look selected using [Select]. Sets the exposure 0EV / 1/3EV / 2/3EV / 1EV / 4/3EV / 5/3EV / reference value for the Level base look selected Offset using [Select]. 5-041-957-11(1) Copyright 2022 Sony Corporation...
- Page 302 Resets the [Paint/Look] menu settings, excluding the base look. Sub-item Factory Item Description setting default Resets the [Paint/Look] menu settings, excluding the Reset without Base Execute / – base look. Look Cancel Execute: Execute function. 5-041-957-11(1) Copyright 2022 Sony Corporation...
- Page 303 Factory default Description Master Black −99.0 to +99.0 ±0.0 Sets the master black level. R Black −99.0 to +99.0 ±0.0 Sets the R black level. B Black −99.0 to +99.0 ±0.0 Sets the B black level. 5-041-957-11(1) Copyright 2022 Sony Corporation...
- Page 304 When Target Display to [Standard] or [ITU709]. to HDR(HLG): On / Off / --- is set to HDR(HLG):Off Point 75% to 109% Sets the knee point. Slope −99 to +99 ±0 Sets the knee slope. 5-041-957-11(1) Copyright 2022 Sony Corporation...
- Page 305 Sets the limit level of the detail for detail manual adjustment. Crispening 0 to 7 Sets the crispening level for detail manual adjustment. High Light Sets the detail level of high-luminance areas for detail manual 0 to 4 Detail adjustment. 5-041-957-11(1) Copyright 2022 Sony Corporation...
- Page 306 −99 to +99 ±0 Sets a user-defined G-B user matrix. User Matrix B-R −99 to +99 ±0 Sets a user-defined B-R user matrix. User Matrix B-G −99 to +99 ±0 Sets a user-defined B-G user matrix. 5-041-957-11(1) Copyright 2022 Sony Corporation...
- Page 307 YL+ / G− / G / G+ / CY / CY+ / B− Sets the hue of the color used for multi −99 to +99 ±0 matrix correction. Sets the saturation of the color used for Saturation −99 to +99 ±0 multi matrix correction. 5-041-957-11(1) Copyright 2022 Sony Corporation...
- Page 308 P/T Acceleration Sets settings related to acceleration for pan/tilt operations. Sub-item Factory Item Description setting default Ramp Selects the acceleration/deceleration for pan/tilt operations. The larger the 1 to 9 Curve number, the higher the acceleration. 5-041-957-11(1) Copyright 2022 Sony Corporation...
- Page 309 Sets the timecode to an arbitrary value. Setting – – Set: Set the value. Resets the timecode to 00:00:00:00. Reset Execute / Cancel – Execute: Execute function. Sets the timecode format. DF / NDF DF: Drop Frame Format NDF: Non-Drop Frame 5-041-957-11(1) Copyright 2022 Sony Corporation...
- Page 310 Help Guide Interchangeable Lens Digital Camera ILME-FR7 / ILME-FR7K TC Display Sets time data display settings. Item Sub-item setting Factory default Description Display Select Timecode / Users Bit / Duration Timecode Switches the time data display. 5-041-957-11(1) Copyright 2022 Sony Corporation...
- Page 311 Mode Fix / Time Fix: Uses an arbitrary fixed value in user bits. Time: Uses the current hour, minute, and second in user bits. Setting – – Sets the user bits to an arbitrary value. 5-041-957-11(1) Copyright 2022 Sony Corporation...
- Page 312 HDMI TC Out Sets settings related to timecode output when using HDMI. Sub-item Factory Item Description setting default Sets whether to output the timecode to devices for other purposes, using Setting On / Off HDMI. 5-041-957-11(1) Copyright 2022 Sony Corporation...
- Page 313 After setting the title, select [Done] to close the character entry screen. For detail about operation on the character entry screen, see “Entering a Character String.” The following characters can be selected. !#$%()+,-.;=@[ ]^_~ space 0123456789 abcdefghijklmnopqrstuvwxyz ABCDEFGHIJKLMNOPQRSTUVWXYZ 5-041-957-11(1) Copyright 2022 Sony Corporation...
- Page 314 Updates the management file on the memory card in slot A. Media(A) Execute / Cancel – Execute: Execute function. Updates the management file on the memory card in slot B. Media(B) Execute / Cancel – Execute: Execute function. 5-041-957-11(1) Copyright 2022 Sony Corporation...
-
Page 315: Format Media
Factory default Description Media(A) Full Format / Quick Format / Cancel – Formats the memory card in slot A. Media(B) Full Format / Quick Format / Cancel – Formats the memory card in slot B. 5-041-957-11(1) Copyright 2022 Sony Corporation... -
Page 316: Media Life
Displays the remaining life of the memory card in slot A. Media(B) – – Displays the remaining life of the memory card in slot B. Note Requires memory cards that support remaining media life display. 5-041-957-11(1) Copyright 2022 Sony Corporation... -
Page 317: Output Format
Interchangeable Lens Digital Camera ILME-FR7 / ILME-FR7K Output Format Sets output format settings. Factory Item Sub-item setting Description default – For details about settings, see “Output Formats and Sets the SDI and HDMI output Limitations.” resolution. HDMI – 5-041-957-11(1) Copyright 2022 Sony Corporation... -
Page 318: Display On/Off
Help Guide Interchangeable Lens Digital Camera ILME-FR7 / ILME-FR7K Display On/Off Sets display item settings. To show a display item, select On. To hide a display item, select Off. Item Sub-item setting Factory default File Transfer Status On / Off... - Page 319 ISO/Gain/EI On / Off Shutter On / Off Level Gauge On / Off Audio Level Meter On / Off Video Level Warning On / Off Clip Number On / Off Notice Message On / Off 5-041-957-11(1) Copyright 2022 Sony Corporation...
- Page 320 Sets the type of video signal monitor. Level Marker 1 0% to 109% Sets the level of luminance level marker 1. Level Marker 2 0% to 109% 100% Sets the level of luminance level marker 2. 5-041-957-11(1) Copyright 2022 Sony Corporation...
- Page 321 Help Guide Interchangeable Lens Digital Camera ILME-FR7 / ILME-FR7K Marker Sets marker display settings. Factory Item Sub-item setting Description default Setting On / Off Turns the display of all markers on/off. White / Yellow / Cyan / Green / Magenta /...
- Page 322 Sets the horizontal position of the center of −476 to +476 H Position the user box marker. User Box Sets the vertical position of the center of −266 to +266 V Position the user box marker. 5-041-957-11(1) Copyright 2022 Sony Corporation...
-
Page 323: Audio Input
Help Guide Interchangeable Lens Digital Camera ILME-FR7 / ILME-FR7K Audio Input Sets audio input settings. Factory Item Sub-item setting Description default AUDIO IN MIC / LINE Selects the type of device connected to the AUDIO IN connector. Select Phantom Power On / Off Displays the status of the +48 V phantom power supply. - Page 324 On / Off When set to [On], the 1 kHz reference tone signal is set for recording Bars on channel 3 and channel 4, even if [CH3 Input Select] and [CH4 Input Select] are set to [Off]. 5-041-957-11(1) Copyright 2022 Sony Corporation...
-
Page 325: Audio Output
Interchangeable Lens Digital Camera ILME-FR7 / ILME-FR7K Audio Output Sets audio output settings. Sub-item Factory Item Description setting default HDMI/Stream CH1/CH2 / Sets the combination of audio channels for the CH1/CH2 Output CH CH3/CH4 HDMI/streaming output. 5-041-957-11(1) Copyright 2022 Sony Corporation... - Page 326 Help Guide Interchangeable Lens Digital Camera ILME-FR7 / ILME-FR7K Display Clip Properties Displays the clip properties screen. Item Sub-item setting Factory default Description Display Clip Properties – – Displays the clip properties screen. 5-041-957-11(1) Copyright 2022 Sony Corporation...
- Page 327 Factory default Description Add OK – – Adds an OK flag. Add NG – – Adds an NG flag. Add KEEP – – Adds a KEEP flag. Delete Clip Flag – – Deletes all flags. 5-041-957-11(1) Copyright 2022 Sony Corporation...
- Page 328 Sets clip protection settings. Item Sub-item setting Factory default Description Select Clip – – Selects and locks/unlocks a clip. Lock All Clips – – Locks all clips. Unlock All Clips – – Unlocks all clips. 5-041-957-11(1) Copyright 2022 Sony Corporation...
-
Page 329: Delete Clip
Help Guide Interchangeable Lens Digital Camera ILME-FR7 / ILME-FR7K Delete Clip Deletes clips. Item Sub-item setting Factory default Description Select Clip – – Deletes the selected clip. All Clips – – Deletes all clips. 5-041-957-11(1) Copyright 2022 Sony Corporation... - Page 330 ILME-FR7 / ILME-FR7K Transfer Clip Transfers clips. Item Sub-item setting Factory default Description Select Clip – – Transfers selected clips. Transfers all clips. Note All Clips – – Up to 200 transfer jobs can be registered. 5-041-957-11(1) Copyright 2022 Sony Corporation...
- Page 331 Factory default Description Select Clip – – Transfers proxy clips corresponding to the selected clips. Transfers proxy clips corresponding to all the clips. Note All Clips – – Up to 200 transfer jobs can be registered. 5-041-957-11(1) Copyright 2022 Sony Corporation...
- Page 332 Display only clips that have an NG flag. KEEP – – Display only clips that have a KEEP flag. None – – Display only clips that have no flag. – – Displays all clips, regardless of whether there are any flags. 5-041-957-11(1) Copyright 2022 Sony Corporation...
- Page 333 ILME-FR7 / ILME-FR7K Customize View Switches the thumbnail screen view. Factory Item Sub-item setting Description default Thumbnail Date Time / Time Code / Duration / Switches the information displayed below Time Code Caption Sequential Number thumbnails. 5-041-957-11(1) Copyright 2022 Sony Corporation...
-
Page 334: Color Bars
Color Bars Sets color bar settings. Item Sub-item setting Factory default Description Setting On / Off Turns the color bars on/off. Type ARIB / 100% / 75% / SMPTE ARIB Selects the color bar type. 5-041-957-11(1) Copyright 2022 Sony Corporation... - Page 335 Genlock Configures the genlock status display (see “Synchronizing the Phase of the Video Signal (Genlock)).” Item Sub-item setting Factory default Description Reference Internal / External(HD) / External(SD) – Displays the type of genlock reference signal. 5-041-957-11(1) Copyright 2022 Sony Corporation...
- Page 336 Enables/disables the G tally lamp. Disable Selects the target for accepting the recording/tally lamp control External / information of the unit. Tally Control Internal Internal External: Tally control from outside the camera. Internal: Control via camera recording operation. 5-041-957-11(1) Copyright 2022 Sony Corporation...
-
Page 337: Rec Review
Rec Review Sets recording review settings (see “Reviewing the Recording (Rec Review)”). Item Sub-item setting Factory default Description Setting 3s / 10s / Clip Sets the time for playback of clips just recorded for recording review. 5-041-957-11(1) Copyright 2022 Sony Corporation... - Page 338 Interchangeable Lens Digital Camera ILME-FR7 / ILME-FR7K Zoom Sets the zoom settings (“Adjusting the Zoom”). Item Sub-item setting Factory default Description Zoom Type Optical Zoom Only / On(Clear Image Zoom) Optical Zoom Only Sets the type of zoom. 5-041-957-11(1) Copyright 2022 Sony Corporation...
- Page 339 Compensation Distance Meter / Feet Meter Sets the display units for lens information and focus position. Display Zoom Position Focal Length / Number Sets the display format for the zoom position. Display Number / Bar 5-041-957-11(1) Copyright 2022 Sony Corporation...
- Page 340 ILME-FR7 / ILME-FR7K Executes APR. Sub-item Factory Item Description setting default Runs APR (Automatic Pixel Restoration) for image sensor auto adjustment. Execute: Execute function. Execute / – Note Cancel Always attach the lens cap before running APR. 5-041-957-11(1) Copyright 2022 Sony Corporation...
-
Page 341: Wired Lan
Displays the subnet mask of the unit when [DHCP] is set to Settings Subnet Mask – [Off]. Gateway – Displays the default gateway when [DHCP] is set to [Off]. DNS Auto Displays the DNS auto acquisition setting. On / Off 5-041-957-11(1) Copyright 2022 Sony Corporation... -
Page 342: File Transfer
Clears completed transfer jobs from the list. Completed – Cancel Execute: Execute function. Jobs Clear All Execute / Clears all transfer jobs from the list. – Jobs Cancel Execute: Execute function. View Job – – Displays the transfer job list. List 5-041-957-11(1) Copyright 2022 Sony Corporation... - Page 343 Help Guide Interchangeable Lens Digital Camera ILME-FR7 / ILME-FR7K Language Sets the display language. Item Sub-item setting Factory default Description Sets the display language. Select – – Set: Set the value. 5-041-957-11(1) Copyright 2022 Sony Corporation...
-
Page 344: Clock Set
Selects the clock display format. 12H/24H 12H / 24H 12H: 12-hour mode 24H: 24-hour mode Sets the current date. Date – – Set: Set the value. Sets the current time. Time – – Set: Set the value. 5-041-957-11(1) Copyright 2022 Sony Corporation... -
Page 345: Hours Meter
Displays the accumulated hours of use (cannot be reset). Hours(Reset) – – Displays the accumulated hours of use (can be reset). Resets the accumulated running time to 0. Reset Execute / Cancel – Execute: Execute function. 5-041-957-11(1) Copyright 2022 Sony Corporation... - Page 346 Help Guide Interchangeable Lens Digital Camera ILME-FR7 / ILME-FR7K ISO/Gain Settings and Default Values The range of [ISO/Gain<L>] settings and default values vary depending on the [Mode], [Base Look] > [Select], and [Base Sensitivity] settings. Default values in the tables are shown in bold.
- Page 347 ISO 256000 ISO 20000 ISO 320000 ISO 25600 ISO 409600 When [Mode] is set to [dB] A value in the range −3dB to +30dB in 1dB increments can be configured. The default value is 0dB. 5-041-957-11(1) Copyright 2022 Sony Corporation...
- Page 348 Help Guide Interchangeable Lens Digital Camera ILME-FR7 / ILME-FR7K AGC Limit Settings and Default Values The range of [AGC Limit] menu settings and default values vary depending on the [Mode], [Base Look] > [Select], and [Base Sensitivity] settings. Default values in the tables are shown in bold.
- Page 349 ISO 25600 ISO 409600 When [Mode] is set to [dB] Select from 3dB / 6dB / 9dB / 12dB / 15dB / 18dB / 21dB / 24dB / 27dB / 30dB. The default value is 15dB. 5-041-957-11(1) Copyright 2022 Sony Corporation...
- Page 350 Help Guide Interchangeable Lens Digital Camera ILME-FR7 / ILME-FR7K Image Quality Settings Saved for Each Shooting Mode The current status of configuration items related to image quality are saved for each of the following shooting modes. When you change the shooting mode, the corresponding settings that are saved for the target shooting mode are applied.
- Page 351 Other than above Detail Matrix Multi Matrix Separate ISO sensitivity settings are saved for both Custom mode [SDR(BT.709)] and [HDR(HLG)]. Settings are saved for each [Base Look], and do not depend on the shooting mode. 5-041-957-11(1) Copyright 2022 Sony Corporation...
- Page 352 Help Guide Interchangeable Lens Digital Camera ILME-FR7 / ILME-FR7K Web Menu Configuration Press the [Settings] operation screen switching tab to display the settings screen. Use the settings screen to configure the various setup items of the unit, including initial settings, network settings, shooting/playback settings using the web menu.
- Page 353 Level 1 Level 1 description Level 2 All File Paint/Look Contains settings related to image quality. Base Look P/T Speed P/T Acceleration Pan-Tilt Contains settings related to the pan/tilt. P/T Range Limit P/T Direction P/T Preset Output Format Monitoring Contains settings related to video output and the screen display. Output Display Audio Contains settings related to audio.
- Page 354 Level 1 Level 1 description Level 2 Service EULA Software Note [Accessibility] is only available on models for North America. 5-041-957-11(1) Copyright 2022 Sony Corporation...
- Page 355 Help Guide Interchangeable Lens Digital Camera ILME-FR7 / ILME-FR7K Web Menu Operations Press the [Settings] operation screen switching tab to display the settings screen to configure the various setup items of the unit, including initial settings, network settings, shooting/playback settings using the web menu.
- Page 356 If you press the [Reload] button before saving a setting, changes to the setting will be discarded. If you move to a different page before saving a setting, changes to the setting will be discarded. 5-041-957-11(1) Copyright 2022 Sony Corporation...
-
Page 357: Factory Default
“Setting the Auto Focus Target Manually (AF Assist) Using the Web App.” AF Assist On / Off Control Note This item is enabled only when [AF Assist] is set to [On] in the camera menu. 5-041-957-11(1) Copyright 2022 Sony Corporation... - Page 358 Sets the shooting mode. Shooting See “Shooting mode” in “Configuring Basic Custom / Cine EI Custom Mode Operation.” Target SDR(BT.709) / Sets the color space of the recording/output in Custom SDR(BT.709) Display HDR(HLG) mode. 5-041-957-11(1) Copyright 2022 Sony Corporation...
- Page 359 Help Guide Interchangeable Lens Digital Camera ILME-FR7 / ILME-FR7K Rec Format Sets recording format settings. Factory Item Sub-item setting Description default Selects the system frequency. Note If the frequency is changed, the camera will Frequency 59.94 / 50 / 29.97 / 25 / 24 / 23.98 59.94...
- Page 360 59.94 / 50 / 29.97 / 25 / 23.98 3840×2160P 1920×1080P 50 XAVC-L 1920×1080P 35 XAVC-I 1920×1080P 1920×1080P 50 XAVC-L 1920×1080P 35 – RAW & XAVC-I / XAVC-I 4096×2160P Default values are shown in bold. 5-041-957-11(1) Copyright 2022 Sony Corporation...
- Page 361 Rec Button SlotA/SlotB SlotA/SlotB Displays the record button assignment for each recording media. Set [Project] > [Simul Rec] > [Rec Button Set] in the camera menu. 2nd Rec SlotA / SlotB / SlotA/SlotB Button SlotA/SlotB 5-041-957-11(1) Copyright 2022 Sony Corporation...
- Page 362 Help Guide Interchangeable Lens Digital Camera ILME-FR7 / ILME-FR7K Proxy Rec Sets proxy recording mode settings (see “Proxy Recording”). Item Sub-item setting Factory default Description Setting On / Off Turns proxy recording mode on/off. 5-041-957-11(1) Copyright 2022 Sony Corporation...
- Page 363 Interval Rec recording video format. 29.97P/25P/24P/23.98P: mode (when Interval Rec is set to Frames 59.94P/50P: 2frames / 6frames / 1frame On). 12frames 29.97P/25P/24P/23.98P: 1frame / 3frames / 6frames / 9frames 5-041-957-11(1) Copyright 2022 Sony Corporation...
- Page 364 Sets the time for accumulation of images in picture cache memory Size Long / Max (picture cache recording time). Cache Displays the time for accumulation of images in picture cache memory – – Rec Time (picture cache recording time). 5-041-957-11(1) Copyright 2022 Sony Corporation...
- Page 365 When an ALL file is loaded into the unit, the unit will reboot. After rebooting, File reload the page in the web browser. Save All – – Save the settings of the unit to the device running the Web App as an ALL file. File 5-041-957-11(1) Copyright 2022 Sony Corporation...
- Page 366 To add a base look Press the [Import] button to import a new base look. Follow the on-screen instructions. After importing, set appropriate values for [Input], [Output], and [AE Level Offset]. For details, see “Importing a Desired Base Look.” 5-041-957-11(1) Copyright 2022 Sony Corporation...
- Page 367 Normal: Speed can be specified using 24-step range. Use this setting for Extended Step Extended compatibility with existing Sony remote cameras. Extended: Speed can be specified using 50-step range. Sets the speed mode of the pan/tilt drive. Enabled only when [Speed Step] is set to [Normal].
- Page 368 ILME-FR7 / ILME-FR7K P/T Acceleration Sets settings related to the pan/tilt speed. Sub-item Factory Item Description setting default Selects the acceleration/deceleration for pan/tilt operations. The larger the Acceleration 1 to 9 number, the higher the acceleration. 5-041-957-11(1) Copyright 2022 Sony Corporation...
- Page 369 Help Guide Interchangeable Lens Digital Camera ILME-FR7 / ILME-FR7K P/T Range Limit Sets settings related to limiting the pan/tilt operating range. Set the pan/tilt operating range limits using the following screen. Note When the unit is turned on or pan/tilt reset is executed, this range limit setting is ignored. This function cannot be used to avoid obstacles near the unit.
- Page 370 If the [Pan-Tilt] > [P/T Direction] > [Ceiling] setting is changed, the configured limit position settings are returned to the factory defaults. The setting cannot be changed during playback, during thumbnail display, when a pan/tilt error occurs, when pan/tilt is not initialized, and when pan/tilt is locked. 5-041-957-11(1) Copyright 2022 Sony Corporation...
- Page 371 When a changed [Ceiling] setting is applied, all preset positions are deleted since the pan/tilt coordinates would become inverted. The pan/tilt drive range changes as shown in the following diagram depending on the [Ceiling] setting. A: When [Ceiling] is set to [Off] B: When [Ceiling] is set to [On] 5-041-957-11(1) Copyright 2022 Sony Corporation...
- Page 372 Common 1 to 50 A maximum drive speed of 24 is used if a value of 25 or higher is set when [Pan- Speed Tilt] > [P/T Speed] > [Speed Step] is set to [Normal]. 5-041-957-11(1) Copyright 2022 Sony Corporation...
- Page 373 Interchangeable Lens Digital Camera ILME-FR7 / ILME-FR7K Output Format Sets output format settings. Factory Item Sub-item setting Description default – For details about settings, see “Output Formats and Sets the SDI and HDMI output Limitations.” resolution. HDMI – 5-041-957-11(1) Copyright 2022 Sony Corporation...
-
Page 374: Output Display
Sets whether the menu and status are embedded in the HDMI HDMI/Stream On / Off output signal. Note This setting is also applied to the HDMI output signal image, streaming output image, and the image in the Web App camera image panel. 5-041-957-11(1) Copyright 2022 Sony Corporation... -
Page 375: Audio Input
Filter Sets the master audio input level. The master audio input level is used for all channels 1 to 4. Item Sub-item setting Factory default Description Master 0 to 99 Sets the master input level. 5-041-957-11(1) Copyright 2022 Sony Corporation... -
Page 376: Audio Output
Sets settings related to audio output. Sub-item Factory Item Description setting default HDMI/Stream CH1/CH2 / Sets the combination of audio channels for the CH1/CH2 Output CH CH3/CH4 HDMI/streaming output. Note This setting is also applied to the streaming output audio. 5-041-957-11(1) Copyright 2022 Sony Corporation... - Page 377 Sets the brightness of the recording/tally lamp. Brightness Enable / G Tally Lamp Enable Enables/disables the G tally lamp. Disable External / Selects the target for accepting the recording/tally lamp control Tally Control Internal Internal information of the unit. 5-041-957-11(1) Copyright 2022 Sony Corporation...
- Page 378 Interchangeable Lens Digital Camera ILME-FR7 / ILME-FR7K IR Remote Sets settings related to the infrared remote control. Sub-item Factory Item Description setting default Enables/disables operation of the unit from the infrared remote Setting On / Off control. 5-041-957-11(1) Copyright 2022 Sony Corporation...
-
Page 379: Camera Name
Sets settings related to the camera name (unit name). Item Sub-item setting Factory default Description Camera Name – Sets the camera name. Up to eight (0 to 8) of the following characters can be entered for Camera Name. Alphanumeric characters Symbols (space !#$`*+-./;<=>?@[\]^_`{|}) 5-041-957-11(1) Copyright 2022 Sony Corporation... - Page 380 Sets the user name. When changing the password, enter the current Current Password – – password. New Password – – Enter the new password. Re-Type – – Enter the new password again for confirmation. Password 5-041-957-11(1) Copyright 2022 Sony Corporation...
- Page 381 Help Guide Interchangeable Lens Digital Camera ILME-FR7 / ILME-FR7K Wired LAN Status Displays the network status. Item Sub-item setting Factory default Description Host Name – – Displays the host name. MAC Address – – Displays the MAC address of the unit.
- Page 382 Primary DNS Server – Sets the primary DNS server when [DNS Auto] is set to Off. address Secondary DNS IPv4/IPv6 Sets the secondary DNS server when [DNS Auto] is set to – Server address Off. 5-041-957-11(1) Copyright 2022 Sony Corporation...
-
Page 383: File Transfer
Upload Settings1 to 3 > Settings1 from the thumbnail screen. Server Display Name Displays the [Display Name] settings configured in [Server Settings1 to 3]. 5-041-957-11(1) Copyright 2022 Sony Corporation... - Page 384 Press the [Delete] button to delete the loaded root certificate. Root Certificate – – Displays the load status of the root certificate. Status Reset – – Resets the [Server Settings] settings to the defaults. 5-041-957-11(1) Copyright 2022 Sony Corporation...
- Page 385 Help Guide Interchangeable Lens Digital Camera ILME-FR7 / ILME-FR7K Sets settings related to SSL. Enables/disables the SSL function. Factory Item Sub-item setting Description default Disable / Enable / Enable (Allow HTTP connection for Enables/disables the SSL Function Disable some clients) function.
- Page 386 Reset – – of a new password. Self-Signed Press the [Generate] button to generate a self-signed Certificate – – certificate when [Certificate Options] is set to [Use a self- Generation signed certificate (For test use)]. 5-041-957-11(1) Copyright 2022 Sony Corporation...
-
Page 387: Exception List
– Press to register the configured exception in the exception list. Select an exception that you want to delete and press the button to delete the Delete – – registered exception from the exception list. 5-041-957-11(1) Copyright 2022 Sony Corporation... -
Page 389: Brute Force Attack Protection
Enabled when [Setting] is set to On. Time 86400 s When Release Mode: is set to [Timer], entries are deleted from the attacker list after the release time has elapsed. When an attacker is detected, the attacker list information is displayed. 5-041-957-11(1) Copyright 2022 Sony Corporation... -
Page 390: Stream Setting
Help Guide Interchangeable Lens Digital Camera ILME-FR7 / ILME-FR7K Stream Sets streaming settings (see “About Streaming”). Stream Setting Sets settings related to the streaming protocol. Item Sub-item setting Factory default Description Setting RTSP / SRT-Caller / SRT-Listener / NDI|HX / Off RTSP Selects the streaming protocol. - Page 391 Displayed when [Multicast Mode] is set to On. Multicast TTL 1 to 256 Sets the TTL value for multicast streaming. Multi-TCP Mode On / Off Turns Multi-TCP mode on/off. Unicast UDP On / Off Turns Unicast UDP mode on/off. Mode 5-041-957-11(1) Copyright 2022 Sony Corporation...
-
Page 392: Video Stream
Help Guide Interchangeable Lens Digital Camera ILME-FR7 / ILME-FR7K Video Stream Sets settings related to the streaming video codecs. Video Stream 1 Sets settings related to video codec 1. Factory Item Sub-item setting Description default Codec 1 H.264 / H.265 H.264... - Page 393 Video Stream 2 Sets settings related to video codec 2. Factory Item Sub-item setting Description default Codec 2 H.264 / H.265 / Off Sets the codec of image 2. 4096×2160 / 3840×2160 / 2048×1080 / Size 2 1920×1080 Sets the picture size of image 2. 1920×1080 / 1280×720 / 640×360 / 512×270 Displayed when [Codec 2] is not For details about supported frame rates, see...
- Page 394 Sets the frame rate of – Video Codec for Streaming.” Rate 3 image 3. Quality 3 1 / 2 / 3 / 4 / 5 / 6 / 7 / 8 / 9 / 10 Sets the quality. 5-041-957-11(1) Copyright 2022 Sony Corporation...
-
Page 395: Audio Stream
Sub-item setting Factory default Description Setting On / Off Turns audio streaming output on/off. Displayed when [Setting] is set to On. Codec AAC (128kbps) / AAC (256kbps) AAC (128kbps) Sets the audio codec for streaming. 5-041-957-11(1) Copyright 2022 Sony Corporation... - Page 396 Interchangeable Lens Digital Camera ILME-FR7 / ILME-FR7K Language Sets the display language. Item Sub-item setting Factory default Description Language – – Sets the display language. Note The available languages may vary depending on the country or region. 5-041-957-11(1) Copyright 2022 Sony Corporation...
- Page 397 This function is only available on models sold in North America. The screen reader function can only be used when the language is set to English (as of the release date). Enable the screen reader function of the web browser on the device running the Web App. 5-041-957-11(1) Copyright 2022 Sony Corporation...
- Page 398 [Synchronize with NTP] and [NTP Auto] is set to IPv4/IPv6 address or host name – Off. Server Specifies the NTP server used for time synchronization. Time UTC − 12:00 to UTC + 14:00 – Selects the time zone. Zone 5-041-957-11(1) Copyright 2022 Sony Corporation...
- Page 399 Returns the settings of the unit to the factory default state. Execute: Execute function. Note Factory Default Execute – After executing Factory Default, the unit will reboot. After rebooting, reload the page in the web browser. 5-041-957-11(1) Copyright 2022 Sony Corporation...
- Page 400 Help Guide Interchangeable Lens Digital Camera ILME-FR7 / ILME-FR7K Information Displays camera and lens information. Also used to update software. Camera Displays camera information and updates software. Sub-item Factory Item Description setting default Model – – Displays the model name of the camera.
- Page 401 Press the [Choose File] button and follow the on-screen instructions to update the lens software. For details, see “Updating E-Mount Lens Software.” Version Up – – Note After updating the lens, the unit will reboot. After rebooting, reload the page in the web browser. 5-041-957-11(1) Copyright 2022 Sony Corporation...
-
Page 402: System Log
Sets the size of the log to save in the system log. Download Press the [Download] button and save the system log to a – – as File tablet or computer from the displayed screen. The acquired log is displayed as shown below. 5-041-957-11(1) Copyright 2022 Sony Corporation... - Page 403 Sets the size of the log to save in the HTTP access log. Download Press the [Download] button and save the HTTP access log – – as File to a tablet or computer from the displayed screen. 5-041-957-11(1) Copyright 2022 Sony Corporation...
- Page 404 Help Guide Interchangeable Lens Digital Camera ILME-FR7 / ILME-FR7K Service Obtains device information about the unit. Use when contacting your Sony service representative. Sub- Factory Item item Description default setting Place a check mark here to agree to acquire device information, and press the [OK] button.
- Page 405 Help Guide Interchangeable Lens Digital Camera ILME-FR7 / ILME-FR7K EULA Displays the End User License Agreement (EULA). 5-041-957-11(1) Copyright 2022 Sony Corporation...
- Page 406 Help Guide Interchangeable Lens Digital Camera ILME-FR7 / ILME-FR7K Software Displays the software license. 5-041-957-11(1) Copyright 2022 Sony Corporation...
-
Page 407: Connecting External Monitors And Recording Devices
Help Guide Interchangeable Lens Digital Camera ILME-FR7 / ILME-FR7K Connecting External Monitors and Recording Devices To display recorded/playback pictures on an external monitor, set the video output type for the external monitor and use an appropriate cable for the monitor to be connected. - Page 408 When [Project] > [SDI/HDMI Rec Control] > [Setting] is set to [SDI/HDMI Remote I/F] in the camera menu, only the REC trigger signal is output when there is no recording media currently inserted and the record START/STOP button is operated. 5-041-957-11(1) Copyright 2022 Sony Corporation...
- Page 409 ILME-FR7 / ILME-FR7K About Operation Using an RM-IP500 Remote Controller (option) You can operate the unit using a Sony RM-IP500 Remote Controller running software version 2.2 or later. The devices communicate using VISCA over IP (LAN). Depending on the target item to operate, you may need to view the screen display of the unit. Prepare a monitor that can be used to check the screen display.
- Page 410 5-041-957-11(1) Copyright 2022 Sony Corporation...
- Page 411 Assign functions of this unit to buttons and knobs, as required, using the following RM menu items of the RM-IP500. SW ASSIGN AE CONFIG2 WB MODE For details about assigning functions, refer to the operating instructions for the RM-IP500. 5-041-957-11(1) Copyright 2022 Sony Corporation...
- Page 412 When shooting using multiple units, the units can be synchronized to a specific reference signal or timecode via the GENLOCK connector of the units. For details about genlock, see “Synchronizing the Phase of the Video Signal (Genlock).” For details about synchronizing timecodes, see “Locking the Timecode to Other Devices.” 5-041-957-11(1) Copyright 2022 Sony Corporation...
- Page 413 720×576 50i You can check the external sync status using [Technical] > [Genlock] > [Reference] in the camera menu. Note If the reference signal is unstable, genlock cannot be achieved. The subcarrier is not synchronized. 5-041-957-11(1) Copyright 2022 Sony Corporation...
- Page 414 Change the [TC/Media] > [Timecode] setting in the camera menu. External synchronization is also released if the system frequency is changed and when you start recording in a special recording mode (Slow & Quick Motion or Interval Rec). 5-041-957-11(1) Copyright 2022 Sony Corporation...
-
Page 415: Setting Description
Help Guide Interchangeable Lens Digital Camera ILME-FR7 / ILME-FR7K Connecting an External Microphone or External Audio Device You can input the signal from an external microphone or external audio device and embed the audio in the recorded video or output video of the unit. - Page 416 Setting this switch to the ON position and connecting a microphone that is not compatible with a +48 V source may damage the connected device. Check the setting before connecting the device. Turn on the unit and set the type of connected device using [Audio] > [Audio Input] > [AUDIO IN Select] in the camera menu. 5-041-957-11(1) Copyright 2022 Sony Corporation...
- Page 417 Catalyst Browse, to import the clips. Using a nonlinear editing system In a nonlinear editing system, editing software (option) that supports the formats recorded by the unit is required. 5-041-957-11(1) Copyright 2022 Sony Corporation...
- Page 418 The same signal as the SDI output connector is output to the SFP+ module. The unit does not support optical fiber signal input. Use an SFP+ module for optical fiber signal output. For details about verified SFP+ modules, contact your dealer or Sony service representative.
- Page 419 Help Guide Interchangeable Lens Digital Camera ILME-FR7 / ILME-FR7K Connecting a Tally Signal This topic describes tally signal control. Lighting the tally lamp using a signal from a remote controller You can light up the tally lamp using a VISCA over IP command from an external device, such as the RM-IP500.
-
Page 420: Signal Direction
Set the output signal using [Technical] > [Tally] > [Tally Control] in the web menu or camera menu. [Internal]: Recording operation status of the unit [External]: Logical-AND of red/green tally signals received by the unit via the IN signals and remote controllers. 5-041-957-11(1) Copyright 2022 Sony Corporation... -
Page 421: Usage Precautions
Periodic inspections are recommended to keep the unit working properly and to prolong its usable lifetime. Contact a Sony service representative for more information about inspections. About the built-in rechargeable battery The unit has a built-in rechargeable battery for storing the date, time, and other settings even when the unit is turned off. -
Page 422: Security Precautions
Consult your doctor before using this product if you use any such medical device. Security precautions SONY WILL NOT BE LIABLE FOR DAMAGES OF ANY KIND RESULTING FROM A FAILURE TO IMPLEMENT PROPER SECURITY MEASURES ON TRANSMISSION DEVICES, UNAVOIDABLE DATA LEAKS RESULTING FROM TRANSMISSION SPECIFICATIONS, OR SECURITY PROBLEMS OF ANY KIND. - Page 423 WARRANTY PERIOD OR AFTER EXPIRATION OF THE WARRANTY, OR FOR ANY OTHER REASON WHATSOEVER. SONY WILL NOT BE LIABLE FOR CLAIMS OF ANY KIND MADE BY USERS OF THIS UNIT OR MADE BY THIRD PARTIES. SONY WILL NOT BE LIABLE FOR THE LOSS, REPAIR, OR REPRODUCTION OF ANY DATA RECORDED ON THE INTERNAL STORAGE SYSTEM, RECORDING MEDIA OR ANY OTHER MEDIA OR STORAGE SYSTEMS.
- Page 424 Help Guide Interchangeable Lens Digital Camera ILME-FR7 / ILME-FR7K Output Formats and Limitations This topic describes the output formats and limitations. Note The resolution of the output format is limited by the [Project] > [Rec Format] > [Frequency], [Codec], and [Video Format] settings in the web menu or camera menu.
- Page 425 Setting Selectable output format RAW output resolution/ Recording/playback Internal recording HDMI mode resolution 3840×2160P 1920×1080P 3840×2160 (2SI) 1920×1080i 1920×1080P (Level A) 1920×1080P (default) 3840×2160 (default) 1920×1080i 1920×1080P 1920×1080P (Level B) 1920×1080i 1920×1080i 1920×1080i 1920×1080P (Level A) 1920×1080P (default) (default) 1920×1080i 1920×1080P 1920×1080P (Level B) 1920×1080i...
- Page 426 When the system frequency is 24 Hz Setting Output Format (output resolution) RAW output resolution/ Recording/playback mode HDMI Internal recording resolution 4096×2160 4096×2160P (4096×2160 RAW) RAW & XAVC-I (RAW) 1920×1080P (default) 4096×2160 (2SI) 4096×2160P XAVC-I 4096×2160 1920×1080P (default) 1920×1080P (default) 5-041-957-11(1) Copyright 2022 Sony Corporation...
-
Page 427: Troubleshooting
Help Guide Interchangeable Lens Digital Camera ILME-FR7 / ILME-FR7K Troubleshooting Power supply Symptom Cause Solution The AC adaptor is not connected to the DC IN Insert the power cord firmly as far as it will go. connector firmly. The AC power cord is not inserted firmly into the AC Insert the power cord firmly as far as it will go. - Page 428 Symptom Cause Solution Use a cable that supports A cable that does not support the output SDI standard is being used. the output SDI standard in use. Use a monitor that The monitor connected to the SDI connector does not support the supports the output SDI No image is output output signal.
- Page 429 Symptom Cause Solution The pan/tilt speed from the infrared Pan/tilt operating speed is Set SETUP switch 4 to the ON position on the remote control is set to normal slow. rear panel. mode. Operation targeted a The infrared signal was received Set [Technical] >...
- Page 430 Symptom Cause Solution The configured IP Check that the IP addresses of peripheral devices are address is in use on unique. another device. The configured subnet mask does not match Perform a network reset. the used network subnet. The unit is being accessed on the same Change the configuration so that a proxy server is not local network via a...
- Page 431 Symptom Cause Solution The user name and password may have Check the correct user name and password with the been changed by a user camera administrator. logged in using another web browser. The HDMI output of the camera is set to Change the resolution of the HDMI output of the camera.
- Page 432 Shooting Camera Symptom Cause Solution Turn off the image Image looks distorted at the start The image may be distorted if the image stabilization function of the and end of pan/tilt operation. stabilization function of the lens is turned on. lens.
- Page 433 Acceleration] > [Ramp Curve] in the web menu or camera menu. attached lens. A large lens is being used. Contact your Sony support representative. The lens support pedestal Turn the lens support pedestal attachment screw clamp lever so attachment screw clamp that it is pointing up.
- Page 434 Symptom Cause Solution “Execute Pan-Tilt An unexpected force was Reset” is displayed applied to the camera Execute a pan/tilt reset as described in “Resetting the Pan/Tilt.” below the framing head, causing a pan/tilt control panel in the error. Web App. Recording / playback Symptom Cause...
- Page 435 Symptom Cause Solution The user name or password If the streaming format of the unit is set to [RTSP], [SRT- entered in the client app to Listener], or [NDI|HX], it is necessary to enter the user name view streaming from the unit is and password set for this unit in the client app.
- Page 436 The OPTION connector connection is incorrect Short-circuit pin 7 or pin 8 of the OPTION connector or the target pin is not short-circuited to GND. to GND as described in “Connecting a Tally Signal.” 5-041-957-11(1) Copyright 2022 Sony Corporation...
-
Page 437: Error/Warning Messages
Turn off the unit, and check for any problem with connected devices, cables, or media. code blinking If the error persists when the unit is turned on again, contact your Sony service representative. An error display or warning sound may not occur depending on the status of the unit. -
Page 438: Message Display
Message Recording/tally Cause and solution display lamp Media The temperature of the CFexpress card is high. Temperature Blinking Replace the card or allow it to cool down before using it again. High Voltage Low Blinking The DC IN voltage is low (level 1). Check the power source. Insufficient High-speed The DC IN voltage is too low (level 2). - Page 439 E-mount lens was attached. Lens I/F Error(xx:xx) Check the status of the connection with the E-mount lens. If the problem persists, contact your Sony service representative with the error code (five characters in parentheses). Cannot add auto upload job of Proxy file The maximum number of transfer jobs has been reached.
- Page 440 5-041-957-11(1) Copyright 2022 Sony Corporation...
-
Page 441: List Of Menu Items
Help Guide Interchangeable Lens Digital Camera ILME-FR7 / ILME-FR7K List of Menu Items The following tables list the menu items of the unit. Legend “Camera menu” and “web menu” ●: Available ▲: Some items available –: Not available “All File” and “Scene File”... - Page 442 Item Camera Scene All Reset (except for Network Network Factory (level 2) menu menu File File Settings) Reset Default LUT On/Off ● – Noise ● – Suppression Flicker ● – Reduce SteadyShot ● – [Mode] not applicable [Clip High light], [Detect Window], [Average Peak Level Ratio], [Custom Width], [Custom H Position], [Custom V Position] not applicable [Preset White] not applicable Project Item...
- Page 443 Item Camera Scene All Reset (except for Network Factory (level 2) menu menu File File Network Settings) Reset Default Knee ● – Detail ● – Matrix ● – Multi Matrix ● – LUT data imported as base look not applicable [Axis] not applicable Pan-Tilt Item...
- Page 444 Monitoring Item Camera Scene All Reset (except for Network Factory (level 2) menu menu File File Network Settings) Reset Default Output Format ● ● Output Display – ● Display On/Off ● – Video Signal ● – Monitor Marker ● – Audio Item Camera...
- Page 445 Item Camera Scene All Reset (except for Network Network Factory (level 2) menu menu File File Settings) Reset Default Genlock ● – Tally ● ● ● – Review Zoom ● – – ● Remote Lens ● – ● – [Type] applicable, [Setting] not applicable Network Item Camera...
-
Page 446: Maintenance
Information – ● System Log – ● HTTP – ● Access Log Service – ● EULA – ● Software – ● Date and time information not applicable [Time Zone], date, and time information not applicable 5-041-957-11(1) Copyright 2022 Sony Corporation... - Page 447 Help Guide Interchangeable Lens Digital Camera ILME-FR7 / ILME-FR7K Preset Position Saved Items “Yes” indicates a setting that is saved for the preset position, and “No” indicates a setting that is not saved. Pan/tilt items Display location Item Save target...
- Page 448 Focus size and focus position set using [Focus Area] [Shooting] > [Focus] in the camera menu Focus position set using [Focus Area (AF-S)] Not restored when the [Auto Focus] switch is set to the on position. Restored when set to off. 5-041-957-11(1) Copyright 2022 Sony Corporation...
-
Page 449: Block Diagrams
Help Guide Interchangeable Lens Digital Camera ILME-FR7 / ILME-FR7K Block Diagrams Audio Input Audio Output 5-041-957-11(1) Copyright 2022 Sony Corporation... - Page 450 Do not perform the following actions until the update has been completed. Disconnecting the network Removing a lens Turning off the power If a message indicating that the update failed is displayed, check the displayed description and try to update again. 5-041-957-11(1) Copyright 2022 Sony Corporation...
- Page 451 Attach the lens eject cover so that it covers the lens release button. Secure the lens eject cover using the lens eject cover retaining screw. Note This does not prevent the lens from completely being removed. 5-041-957-11(1) Copyright 2022 Sony Corporation...
- Page 452 We would prefer that you do not contact us about the contents of the source code. μT-Kernel source code This product uses the source code of μT-Kernel under T-License 2.1 granted of TRON Forum (www.tron.org). 5-041-957-11(1) Copyright 2022 Sony Corporation...
-
Page 453: Specifications
Help Guide Interchangeable Lens Digital Camera ILME-FR7 / ILME-FR7K Specifications General Mass Approx. 4.6 kg (10 lb 2.3 oz) (body only) Approx. 6.0 kg (13 lb 3.6 oz) (including SELP28135G lens) Dimensions See “External dimensions.” Power requirements 19.5 V DC PoE++ (IEEE802.3bt Type 4 Class 8 compliant) - Page 454 XAVC-L HD 35 mode: 1920×1080/59.94P, 50P, 29.97P, 25P, 23.98P Recording/playback time XAVC Intra XAVC-I QFHD mode: 59.94P, Approx. 30 minutes (using CEA-G160T) XAVC-I HD mode: 59.94P, Approx. 78 minutes (using CEA-G160T) XAVC Long XAVC-L QFHD mode: 59.94P, Approx. 115 minutes (using CEA-G160T) XAVC-L HD 50 mode: 59.94P, Approx.
-
Page 455: Audio Section
Shutter speed 64F to 1/8000 sec. (23.98P) Shutter angle 5.6° to 360°, 2 to 64 frames Slow & Quick Motion XAVC QFHD: 1 fps to 120 fps XAVC HD: 1 fps to 240 fps XAVC 4K: 1 fps to 60 fps XAVC HD (S35): 1 fps to 120 fps White balance 2000 K to 15000 K... -
Page 456: Supplied Accessories
GENLOCK IN BNC connector, 1.0 Vp-p, 75 Ω TC IN BNC connector Outputs SDI OUT BNC connector, 12G-SDI, 6G-SDI, 3G-SDI (Level A/B), HD-SDI HDMI Type-A connector OPTICAL output connector SFP+ compliant * The unit does not support optical signal input. Input/output LAN connector RJ-45, 1000BASE-T... - Page 457 Design and specifications are subject to change without notice. 5-041-957-11(1) Copyright 2022 Sony Corporation...
- Page 458 Mac and macOS are registered trademarks of Apple Inc. in the U.S. and other countries. The “Catalyst Browse” logo is a trademark or registered trademark of Sony Group Corporation. IOS is a trademark or registered trademark of Cisco in the U.S. and other countries and is used under license.