Advertisement
Overview


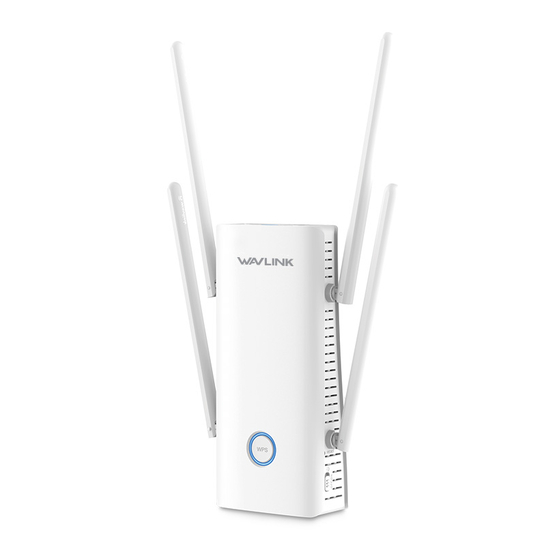
- WPS button
- Night light Auto/Off
- WAN
- LAN/Backhaul
- Night light
- Reset port
- Power button (Off/On)
WPS Button:
Hold the WPS button on your router for few seconds, then press and hold WPS on this device for 8 seconds, the pairing process is established in 2 mins. Press and hold the WPS button for 2 to 6 seconds to get paired with your phone.
Reset Button:
Press and hold for 6 seconds until LED light turns solid pink (or purple).
LED Indicators
| Light color | Light status | Description |
| Purple | Solid | The device is being activated. |
| Red | Fast blinking | (Repeater mode) The device is not connected to the upstream router. |
| Slow blinking | (Repeater mode) The device is connected but doesn't have access to the Internet. | |
| Blue | Fast blinking | Pairing with the WPS of an upstream router. |
| Slow blinking | The phone is pairing with WPS. | |
| Solid | 1) The internet is connected and stable. 2) AP Mode. |
Default Parameters
2.4G SSID: WAVLINK-AX_XXXX
5G SSID: WAVLINK-AX_5G_XXXX
Default IP: 192.168.10.1
Login: http://wifi.wavlink.com
Default login password: admin
Official website: www.wavlink.com
Technical support: support@wavlink.com
Configuration
- Plug the extender in a power outlet.
- Turn on the power button, then you can either configure the device wirelessly or via cable by connecting the device to your laptop.
- Cable Connection

- Wireless Connection
Power up the product and search SSID of this product on your wireless devices (smart phone, tablet PC, laptop, etc.) then connect to it.
For Windows users

For Mac users

- Cable Connection
- Technically speaking, the product web UI will guide you to the "login" page once you chave connected to the device successfully in your first time. but if it doesn't, please manually input 192.168.10.1 or wifi.wavlink.com in the address bar of your browser on PC/laptop or phone, the default password is admin.

- Select your Country/Region and Time Zone. For your network security, we suggest that you set a new login password.

Note: The three colored bars in "Password strength" area indicates the strength of the login password. - Mode Selection
This product has four modes.- Repeater Mode
For Repeater mode, we recommend you choose "WISP", and the setted Password needs to be the same as the connected WiFi password.

- Easymesh Agent Mode
If you have a router that supports Easymesh function, then you can build a mesh system with this mode.
Please configure according to the following steps:- Log in to 192.168.10.1 or wifi.wavlink.com.
- In Mode Selection, please choose "EasyMesh Agent Mode".
- Click on the "Start Pairing" button.

- Now please start pairing process on the Easymesh controller, if you are not sure how to start, please ask manufacturer for help.
- LAN Bridge (AP Mode)
If you want to set up this device as an access point, you can follow the steps below:
 Step 1")
 Step 2")
- Router Mode
If you want to set up the device as Router, please select the Router Mode and follow the steps below:

- Repeater Mode


 Step 1")
 Step 2")

Which WAN Type am I supposed to choose?
If you use DSL line and you are only provided an account name and a password by your ISP, choose PPPoE. If you use cable TV or fiber cable, choose DHCP(Dynamic IP). If you are provided information such as IP address, Subnet Mask and Default Gateway, choose Static IP.
Wi-Fi Password Management
When you need to change your Wi-Fi password, please click on "Wireless".

Firmware Upgrade
If you need to update firmware, please proceed as the following steps:
- Download the latest firmware file on Wavlink website (www.wavlink.com->SUPPORT->Firmware).
- Extract the firmware from the downloaded file.
- Log in to wifi.wavlink.com or 192.168.10.1, then choose "Advanced" and select "Firmware Update".

- Click on
![]() to locate the firmware file.
to locate the firmware file. - Click on "Upload" and choose "Apply", and wait for the firmware upgrade process to complete.

 to locate the firmware file.
 Option II
- Log in to 192.168.10.1 or wifi.wavlink.com, then choose "Advanced" and select "Firmware Update".
- Click on "Check New Version" to find the latest version.
- Click on "Download and Upgrade", and wait for the firmware upgrade process to complete.

Note: After updating firmware, please Reset The Device And Clear Your Browser Cache.
What is firmware upgrade and why do I need it?
Firmware fixes bugs for your device, contains new features, and improves the experience of using the product. For your device update and security, please ask us for help, wrong upgrade may damage your device and void the product warranty.
For more details, please visit our website www.wavlink.com
Our Technical Support: support@wavlink.com
FAQ
Q1. One LAN of the device is connected to the upstream router (the router works normally), why does the other LAN port not work normally when connected to the laptop/PC?
- To solve this problem, please choose "LAN Bridge (AP mode)".
Q2. How do I turn off the LED light if it affects my sleep?
- Please go to "Setup" > "LED Control" to manage the light status or you can simply switch the LED button to "Off".
Q3. Why can't I visit the web UI by inputting the IP address 192.168.10.1 or wifi.wavlink.com?
- If you can't log in to the IP address or URL, please checkthe IP address arranged by the upstream router, then try to restart the process.
Q4. How do I choose the two modes?
- Please choose the mode that suits you, AP mode turns your wired network into wireless connection; repeater mode enhances your network.
Q5. Why can't I visit the web UI by inputting the IP address 192.168.10.1 or wifi.wavlink.com in AP mode?
- If you can't log in to the IP address or URL, please check the IP address arranged by the upstream router, then try to restart the process.
Please visit https://www.wavlink.com/en_us/faq.html for more details.
GNU General Public License Notice
This product includes software codes developed by third parties. These software codes are subject to either the GNU General Public License (GPL), Version 2, June 1991 or the GNU Lesser General Public License (LGPL), Version 2.1, February 1999. You can copy, distribute, and/or modify in accordance with the terms and conditions of GPL or LGPL.
The source code should be complete, if you want us to provide any additional source code files under GNU General Public License (GPL), please contact us in these matters. We are committed to meeting the requirements of the GNU General Public License (GPL). You are welcome to contact our local office to get the corresponding software and licenses. Please inform us of your contact details (full address) and the product code. We will send you a software package with the software and license for free.
The respective programs are distributed WITHOUT ANY WARRANTY; without even the implied warranty of MERCHANTABILITY or FITNESS FOR A PARTICULAR PURPOSE. Please refer to the GNU General Public License website for further information.
http://www.gnu.org/licenses/old-licenses/lgpl-2.0.html
http://www.gnu.org/licenses/gpl.html
WEEE Directive & Product Disposal
 At the end of its serviceable life, this product should not be treated as household or general waste. It should be handed over to the applicable collection point for the recycling of electrical and electronic equipment, or returned to the supplier for disposal.
Federal Communications Commission Interference Statement
This equipment has been tested and found to comply with the limits for a Class B digital device, pursuant to Part 15 of the FCC Rules. These limits are designed to provide reasonable protection against harmful interference in a residential installation. This equipment generates, uses and can radiate radio frequency energy and, if not installed and used in accordance with the instructions, may cause harmful interference to radio communications. However, there is no guarantee that interference will not occur in a particular installation. If this equipment does cause harmful interference to radio or television reception, which can be determined by turning the equipment off and on, the user is encouraged to try to correct the interference by one or more of the following measures:
--Reorient or relocate the receiving antenna.
--Increase the separation between the equipment and receiver.
--Connect the equipment into an outlet on a circuit different from that to which the receiver is connected.
--Consult the dealer or an experienced radio/TV technician for help.
Official website: www.wavlink.com
Technical support: support@wavlink.com

WAVLINK (@WavlinkOfficial)
WAVLINK SUPPORT (@WavlinkTechSupport)

Documents / Resources
References
![www.wavlink.com]() See the world with wavlink. wireless mesh WiFi,wifi repeater,powerline adapter,docking station,thunderbolt 3,hub,type-c hub,USB Graphic Adapter - Powered by Wavlink
See the world with wavlink. wireless mesh WiFi,wifi repeater,powerline adapter,docking station,thunderbolt 3,hub,type-c hub,USB Graphic Adapter - Powered by Wavlink![www.wavlink.com]() faq - WAVLINK See the world! Powered by Wavlink
faq - WAVLINK See the world! Powered by Wavlink![www.gnu.org]() GNU Library General Public License v2.0 - GNU Project - Free Software Foundation
GNU Library General Public License v2.0 - GNU Project - Free Software Foundation![www.gnu.org]() The GNU General Public License v3.0
- GNU Project - Free Software Foundation
The GNU General Public License v3.0
- GNU Project - Free Software Foundation
Download manual
Here you can download full pdf version of manual, it may contain additional safety instructions, warranty information, FCC rules, etc.
Download Wavlink WiFi 6 Extender/AP AERIAL D4X Quick Start Guide
Advertisement


Need help?
Do you have a question about the AERIAL D4X and is the answer not in the manual?
Questions and answers