Roche Coaguchek XS System User Manual
Hide thumbs
Also See for Coaguchek XS System:
- Quick start manual ,
- User manual (222 pages) ,
- Procedures manual (59 pages)
Table of Contents
Advertisement
Quick Links
Advertisement
Table of Contents

Related Manuals for Roche Coaguchek XS System


Summary of Contents for Roche Coaguchek XS System
- Page 1 User Manual for Self-Testing...
- Page 2 CoaguChek XS System ® User Manual for Self-Testing Version 10.0 0 4999045001 (10) 2022-05 USA...
- Page 3 The contents of this manual, including all graphics and photographs, are the property of Roche Diagnostics. No part of this document may be reproduced or transmitted in any form or by any means, electronic or mechanical, for any purpose, without the express written permission of Roche Diagnostics.
- Page 4 Manual version Revision date Changes Version 2.0 November 2009 New document Version 3.0 March 2011 Revised to update meter images, add disposal information and update product specifications section. Version 4.0 September 2013 Revised error 6 and error 7 verbiage. Version 5.0 April 2016 Revised to add Rx only statement.
-
Page 5: Table Of Contents
Setting the measuring unit to INR ........22 Setting the beep tone ..............24 Setting the therapeutic range..........25 The Meter’s Display ................29 Code Chip....................30 Inserting a New Code Chip............. 31 Integrated Quality Controls............. 32 CoaguChek XS System User Manual for Self-Testing, version 10.0 USA... - Page 6 Repairs .................... 76 Display Information and Symbols ..........77 Disposal of the Meter, Test Strips, Lancets, and Batteries. 81 Warranty ....................83 CoaguChek XS Meter Limited (1 Year) Warranty ..83 CoaguChek XS System User Manual for Self-Testing, version 10.0 USA...
-
Page 7: About This Manual
(UL LISTED, in accordance with UL 61010A-1:02 and CAN/CSA-C22.2 No. 61010-1-04) Rx Only Caution: Federal law restricts this device to sale by or on the order of a physician Global Trade Item Number CoaguChek XS System User Manual for Self-Testing, version 10.0 USA... -
Page 8: User Resources
Several resources are available to help you use and maintain the CoaguChek XS System. Training DVD The CoaguChek XS System DVD is for new users of the CoaguChek XS System. This program will help you get comfortable with the CoaguChek XS Meter and the testing procedure. -
Page 9: Test Strip Package Inserts
Be sure to read the lancet device package insert to learn how to use the lancet device and for important updates. Keep the insert from your current lancet device package for future reference. CoaguChek XS System User Manual for Self-Testing, version 10.0 USA... -
Page 10: The Coaguchek Xs System
Your doctor also determines how often your blood should be tested. Your doctor needs to know your blood-clotting time in order to successfully treat you. CoaguChek XS System User Manual for Self-Testing, version 10.0 USA... -
Page 11: How The System Works
When the meter determines that the blood has clotted, it stops the measurement and calculates the result. CoaguChek XS System User Manual for Self-Testing, version 10.0 USA... -
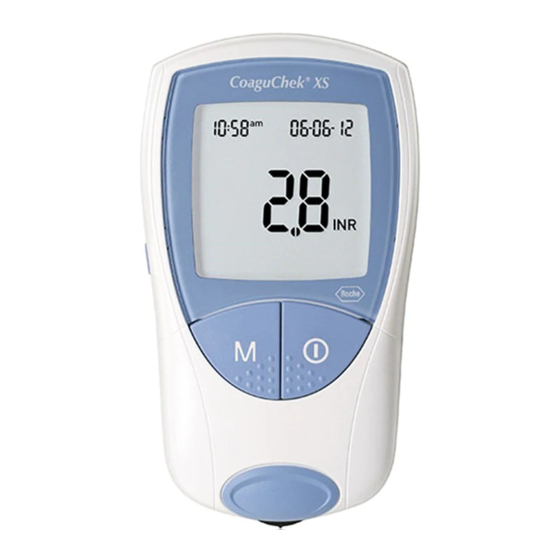
Page 12: The Coaguchek Xs Meter
The CoaguChek XS Meter Display Battery Compartment Cover M (Memory) Button Code Chip Slot ON-OFF button SET Button Test Strip Guide Cover Data Port Test Strip Guide CoaguChek XS System User Manual for Self-Testing, version 10.0 USA... -
Page 13: Operating Conditions
Note: The CoaguChek XS Meter automatically shuts off after 3 minutes if no buttons have been pushed. CoaguChek XS System User Manual for Self-Testing, version 10.0 USA... - Page 14 This page intentionally left blank. CoaguChek XS System User Manual for Self-Testing, version 10.0 USA...
-
Page 15: Getting Started
The meter saves battery power by automatically powering off after 3 minutes, unless you press a button or insert a test strip. Even when the batteries are removed, the test results are saved in memory. CoaguChek XS System User Manual for Self-Testing, version 10.0 USA... -
Page 16: Installing (Or Replacing) Batteries
Remove the old batteries, if necessary. 2. Insert New Batteries Position the batteries according to the diagram inside the battery compartment. Replace the cover. Turn the meter back over. CoaguChek XS System User Manual for Self-Testing, version 10.0 USA... -
Page 17: Meter Setup
Meter Setup When you turn the meter on, the display briefly shows the installed software version in the upper left corner of the display: CoaguChek XS System User Manual for Self-Testing, version 10.0 USA... -
Page 18: Setting The Date Format
Before you use the meter for the first time—or if there is no battery power for more than 1 minute—you’ll have to set the current date and time. CoaguChek XS System User Manual for Self-Testing, version 10.0 USA... -
Page 19: Setting The Date And Time
You can also go to Setup mode at any time by pressing the SET button ( To set the date and time, you’ll use these buttons: • to change a setting. • (SET) to accept a setting. CoaguChek XS System User Manual for Self-Testing, version 10.0 USA... - Page 20 Press the SET button Press the M button to change the month. Press the SET button Press the M button to change the day. Press the SET button CoaguChek XS System User Manual for Self-Testing, version 10.0 USA...
- Page 21 Press the M button 3. Set Current Time to change the hour. Press the SET button Press the M button to change the minutes. Press the SET button CoaguChek XS System User Manual for Self-Testing, version 10.0 USA...
-
Page 22: Setting The Measuring Unit To Inr
Press the SET button 4. Setting the measuring unit on the left side of the meter to enter the Setup mode. First, the date format flashes in the upper-right corner. CoaguChek XS System User Manual for Self-Testing, version 10.0 USA... - Page 23 INR is flashing. To save the measuring unit to INR, power off the meter by pressing the On/ Off button. If you need assistance, call the Roche Customer Support Center at 1-800-428-4674. CoaguChek XS System User Manual for Self-Testing, version 10.0 USA...
-
Page 24: Setting The Beep Tone
5. Setting the beep tone toggle between “OFF” and “On” (“On” is the presetting). Press the SET button to save the chosen setting. The display automatically moves on to the next setting option. CoaguChek XS System User Manual for Self-Testing, version 10.0 USA... -
Page 25: Setting The Therapeutic Range
If you have activated this display option (“On”), you are now able to enter the limits of your target range. CoaguChek XS System User Manual for Self-Testing, version 10.0 USA... - Page 26 0.1 INR above the lower limit you have selected. Press the SET button to save the chosen upper limit and close the meter setup. CoaguChek XS System User Manual for Self-Testing, version 10.0 USA...
- Page 27 After that the meter 11:23 automatically enters Test Mode. CoaguChek XS System User Manual for Self-Testing, version 10.0 USA...
- Page 28 INR. If the result is displayed in %Q or Sec, follow the instructions in the Testing a Blood Sample section of this manual to reset the measuring unit to INR. CoaguChek XS System User Manual for Self-Testing, version 10.0 USA...
-
Page 29: The Meter's Display
For as long as you keep the button pressed, the display remains frozen. The full display should appear as shown at left. CoaguChek XS System User Manual for Self-Testing, version 10.0 USA... -
Page 30: Code Chip
Caution: Using the wrong code chip can produce incorrect results. Protect the code chip from moisture and also from equipment that produces magnetic fields, such as a microwave oven. CoaguChek XS System User Manual for Self-Testing, version 10.0 USA... -
Page 31: Inserting A New Code Chip
3-digit code number on the new code chip. Slide the new code chip 3. Insert New Code Chip into the code chip slot until it snaps into place. CoaguChek XS System User Manual for Self-Testing, version 10.0 USA... -
Page 32: Integrated Quality Controls
If the quality control test fails, the meter displays this error message. See the Error Messages section in this manual for an explanation of this and other error messages and what to do when they occur. CoaguChek XS System User Manual for Self-Testing, version 10.0 USA... -
Page 33: Testing A Blood Sample
• Massage your finger from its base. If needed, immediately after lancing, gently massage your finger from its base until a drop of blood is formed. Do not press or squeeze the finger. CoaguChek XS System User Manual for Self-Testing, version 10.0 USA... -
Page 34: Important Notes About Blood Testing
• Never touch or remove the test strip during a test. • Never wait more than 15 seconds after sticking your fingertip before applying the blood. CoaguChek XS System User Manual for Self-Testing, version 10.0 USA... -
Page 35: Infection Control
The CoaguChek XS Softclix lancet device is intended for use by a single person and is not suitable for use where testing different persons with the same device may lead to infections. CoaguChek XS System User Manual for Self-Testing, version 10.0 USA... -
Page 36: Preparing For A Test
Make sure the 3-digit 2. Match Codes code number on the test strip container and the code chip match. CoaguChek XS System User Manual for Self-Testing, version 10.0 USA... - Page 37 Select the penetration depth. Press the plunger. A yellow dot appears in the release button. Wash your hands in warm, 4. Wash Hands soapy water. Make sure your fingertip is thoroughly dry. CoaguChek XS System User Manual for Self-Testing, version 10.0 USA...
-
Page 38: Performing A Test
2. Insert Strip test strip guide in the direction of the arrows until it stops. The meter turns on. The code number of the inserted code chip flashes on the display. CoaguChek XS System User Manual for Self-Testing, version 10.0 USA... - Page 39 30 11:24 seconds. When the warming-up process is complete, a beep tone (provided the beep tone is turned on) indicates that you can now apply blood. CoaguChek XS System User Manual for Self-Testing, version 10.0 USA...
- Page 40 You must apply the drop of blood to the test strip within this time, otherwise you will receive an error message (error, and “000” where the result would normally be displayed). CoaguChek XS System User Manual for Self-Testing, version 10.0 USA...
- Page 41 Do not press or squeeze the finger. Find the target area on the 7. Identify the Target Area test strip. To prevent error messages, the meter must be on a table free of vibrations. CoaguChek XS System User Manual for Self-Testing, version 10.0 USA...
- Page 42 The flashing blood drop symbol disappears. Do not add more blood to the test strip. Do not touch the test strip. The result appears in about 1 minute. CoaguChek XS System User Manual for Self-Testing, version 10.0 USA...
- Page 43 If the result is displayed in %Q or Sec, follow the instructions in the procedure Setting the measuring unit to INR of this section to reset the measuring unit to INR. CoaguChek XS System User Manual for Self-Testing, version 10.0 USA...
- Page 44 10.Record Result the CoaguChek XS System Prothrombin Time Self- Testing Log Book. Call your doctor and/or the service provider that provides your test strips and the handling of your test results. CoaguChek XS System User Manual for Self-Testing, version 10.0 USA...
- Page 45 Turn the meter off If the meter is dirty, wipe it clean with a lint-free tissue and an approved cleaning solution. See Cleaning/Disinfecting the Meter section of this manual. CoaguChek XS System User Manual for Self-Testing, version 10.0 USA...
-
Page 46: Very Low Or Very High Test Results
INR. If the measuring unit is set correctly to INR, repeat the test. If, when you repeat the test, you get the same result (either < 0.8 INR or > 8.0 INR), call your doctor. CoaguChek XS System User Manual for Self-Testing, version 10.0 USA... - Page 47 For meters with serial number UP0910000 and lower: In rare cases, “error 6” may indicate extremely high coagulation times (> 10 INR). If “error 6” is displayed repeatedly, please contact your doctor without delay. CoaguChek XS System User Manual for Self-Testing, version 10.0 USA...
- Page 48 This page intentionally left blank. CoaguChek XS System User Manual for Self-Testing, version 10.0 USA...
-
Page 49: Memory
To review results in memory: Press the M button 1. Access the Memory The meter turns on, if it is not already on, and goes to Memory mode. CoaguChek XS System User Manual for Self-Testing, version 10.0 USA... - Page 50 To view earlier results, 3. View Earlier Results press the M button again. After you have viewed all the results in the memory, 3 dashes appear. CoaguChek XS System User Manual for Self-Testing, version 10.0 USA...
-
Page 51: Erasing Stored Test Results
5 seconds. The meter displays mem (flashing) and clr. The number of results in memory is shown in the top-right corner of the display. CoaguChek XS System User Manual for Self-Testing, version 10.0 USA... - Page 52 Then, the counter is set to 0 and 3 dashes appear. Note: To exit Erase mode without erasing the results, press the ON-OFF button instead. CoaguChek XS System User Manual for Self-Testing, version 10.0 USA...
-
Page 53: Cleaning/Disinfecting The Meter
• Do not use sprays of any sort. • Ensure that swab or cloth is only damp, not wet. Useful tip: To prevent contamination, apply blood via side-dosing directly from fingertip. CoaguChek XS System User Manual for Self-Testing, version 10.0 USA... -
Page 54: Cleaning/Disinfecting The Exterior
• With a lint-free tissue, 2. Dry the Exterior wipe away residual moisture and fluids after cleaning the housing. • Allow wiped areas to dry for at least 10 minutes before performing a test. CoaguChek XS System User Manual for Self-Testing, version 10.0 USA... -
Page 55: Cleaning/Disinfecting The Test Strip Guide
With the meter turned off, 1. Open the Cover use your thumbnail to open the cover of the test strip guide by pressing its front edge upward. CoaguChek XS System User Manual for Self-Testing, version 10.0 USA... - Page 56 • Wipe away residual moisture and fluids. Caution: Do not insert any objects into the test strip guide. Doing so could damage the electrical contacts behind the test strip guide. CoaguChek XS System User Manual for Self-Testing, version 10.0 USA...
- Page 57 10 minutes before re-attaching the test strip guide cover and testing again. Close the cover, and make 4. Close the Cover sure it snaps into place. CoaguChek XS System User Manual for Self-Testing, version 10.0 USA...
- Page 58 This page intentionally left blank. CoaguChek XS System User Manual for Self-Testing, version 10.0 USA...
-
Page 59: Error Messages
If the problem persists, call the Roche Customer Support Center at 1-800-428-4674, Monday through Friday from 7 AM to 11 PM EST. In case of an emergency, please contact your doctor. CoaguChek XS System User Manual for Self-Testing, version 10.0 USA... - Page 60 18) to set up date batteries were removed and time correctly. from the meter for more than one minute). You cannot perform a test. CoaguChek XS System User Manual for Self-Testing, version 10.0 USA...
- Page 61 • The meter timed out after you inserted the test strip. • The test strip is unusable. • The test strip is not a CoaguChek XS PT test strip. CoaguChek XS System User Manual for Self-Testing, version 10.0 USA...
- Page 62 • Reinsert the batteries after no less than 5 minutes. • Set date and time correctly after inserting the batteries (see the chapter Setting the Date and Time starting on page 19 to set up date and time correctly). CoaguChek XS System User Manual for Self-Testing, version 10.0 USA...
- Page 63 19 to set up date and time correctly. Error: Test Strip Guide Solution: Cover Close the test strip guide The test strip guide cover cover. is not properly closed. CoaguChek XS System User Manual for Self-Testing, version 10.0 USA...
- Page 64 For more information, see the Code Chip section of this manual. If the code chip is damaged, call the Roche Customer Support Center at 1-800-428-4674. CoaguChek XS System User Manual for Self-Testing, version 10.0 USA...
- Page 65 Use a test strip from a new lot and insert the code chip that came with the new lot. Ensure you are not using expired test strips. CoaguChek XS System User Manual for Self-Testing, version 10.0 USA...
- Page 66 If you still get the error message after you have inserted a new test strip, call Roche Customer Support Center at 1-800-428-4674. CoaguChek XS System User Manual for Self-Testing, version 10.0 USA...
- Page 67 Repeat the test using a drop symbol appeared. new test strip and blood taken from a new fingerstick from a different finger. CoaguChek XS System User Manual for Self-Testing, version 10.0 USA...
- Page 68 Repeat the test with a new test strip and a sufficient amount of blood from a different finger. If you still get the error message, call Roche Customer Support Center at 1-800-428-4674. CoaguChek XS System User Manual for Self-Testing, version 10.0 USA...
- Page 69 This error (6) might also be triggered by high hematocrit values (above 55 %), or the blood containing a high concentration of oxidizing substances, e.g. after a Vitamin C infusion. CoaguChek XS System User Manual for Self-Testing, version 10.0 USA...
- Page 70 (e.g. humidity or ambient light) may deteriorate the test strips. The blue reagent line on the back of the strip may turn pink or purple if the strips have been exposed to external influences. CoaguChek XS System User Manual for Self-Testing, version 10.0 USA...
- Page 71 (> 10 INR). If this error message appears again when the test is repeated, it’ s urgent to contact a doctor immediately and seek an alternate method of testing! CoaguChek XS System User Manual for Self-Testing, version 10.0 USA...
- Page 72 If you see the same error message again, the meter has a defect, or the maximum number of test strip insertions might be reached. Call Roche Customer Support Center at 1-800-428-4674. CoaguChek XS System User Manual for Self-Testing, version 10.0 USA...
- Page 73 Error: Internal Error Solution: Because this error indicates possible damage to the heater plate contacts, call the Roche Customer Support Center at 1-800-428-4674 to have the meter replaced. CoaguChek XS System User Manual for Self-Testing, version 10.0 USA...
- Page 74 This page intentionally left blank. CoaguChek XS System User Manual for Self-Testing, version 10.0 USA...
-
Page 75: Other Information
(depending on frequency of use) Safety class Automatic power-off After 3 minutes Dimensions 5.43 x 3.07 x 1.10 in (138 x 78 x 28 mm) Weight 4.48 oz. or 127 g (without batteries) CoaguChek XS System User Manual for Self-Testing, version 10.0 USA... -
Page 76: Sample Material
In case of an emergency, please contact your physician. Repairs Please note that repairs, new settings or other modifications to the meter may only be performed by persons authorized by Roche Diagnostics. CoaguChek XS System User Manual for Self-Testing, version 10.0 USA... -
Page 77: Display Information And Symbols
For as long as you keep the button pressed, the display remains frozen. The full display should appear as shown at left. CoaguChek XS System User Manual for Self-Testing, version 10.0 USA... - Page 78 Indicates the results are displayed as a Quick percentage value.* Indicates the results are displayed in Seconds.* Indicates the results are displayed in INR units. * Only available for SW version 5.40 and lower. CoaguChek XS System User Manual for Self-Testing, version 10.0 USA...
- Page 79 Indicates the code number of the code chip code inserted in the meter. Result in the chosen unit is above the measuring range. Result in the chosen unit is below the measuring range. CoaguChek XS System User Manual for Self-Testing, version 10.0 USA...
- Page 80 Reports an error (see Error messages) error Room or meter temperature is outside the acceptable range. Communication is taking place via the infrared interface Measurement chamber cover is open. CoaguChek XS System User Manual for Self-Testing, version 10.0 USA...
-
Page 81: Disposal Of The Meter, Test Strips, Lancets, And Batteries
Roche is committed to recycling and sustainability. Please consider the following points when disposing of your used testing materials: *29 CFR 1910.1030 - Bloodborne pathogens **Directive 2002/96/EC - Directive on waste electrical and electronic equipment (WEEE) CoaguChek XS System User Manual for Self-Testing, version 10.0 USA... - Page 82 • Users in professional environments (i.e., healthcare professionals) should follow the existing policies and procedures governing the proper handling and disposal of potentially infectious waste, e-scrap and batteries. CoaguChek XS System User Manual for Self-Testing, version 10.0 USA...
-
Page 83: Warranty
IS IMPLIED FROM THE SALE OF THE COAGUCHEK XS METER. NO WARRANTY, EXPRESS OR IMPLIED (IF ANY), SHALL EXTEND FOR A LONGER DURATION THAN THE DURATION OF THE EXPRESS WARRANTY STATED ABOVE. CoaguChek XS System User Manual for Self-Testing, version 10.0 USA... - Page 84 The warranty of the repaired/replacement meter will expire on the date of the original warranty expiration or ninety (90) days after shipment of a replacement system, whichever period is longer. CoaguChek XS System User Manual for Self-Testing, version 10.0 USA...
- Page 85 Notes: CoaguChek XS System User Manual for Self-Testing, version 10.0 USA...
- Page 86 Notes: CoaguChek XS System User Manual for Self-Testing, version 10.0 USA...
- Page 88 COAGUCHEK and SOFTCLIX are trademarks of Roche. Roche Diagnostics GmbH Sandhofer Strasse 116 68305 Mannheim, Germany Made in Germany Manufactured for and distributed in the U.S.A. by: Roche Diagnostics 9115 Hague Road Indianapolis, IN 46256 Rx Only www.roche.com https://go.roche.com/CoaguChekXS-USA dialog.roche.com...
Need help?
Do you have a question about the Coaguchek XS System and is the answer not in the manual?
Questions and answers
What is error 8