
Related Manuals for Canon FAXPHONE B95


Summary of Contents for Canon FAXPHONE B95
- Page 1 USER’S GUIDE Please read this guide before operating this equipment. After you finish reading this guide, store it in a safe place for future reference.
-
Page 2: Table Of Contents
INTRODUCTION Where to find help (USA only)...iv Using this guide ...v Important safety instructions...vi Users in the U.S.A..viii Pre-Installation Requirements for Canon Facsimile Equipment...viii Connection of the Equipment ...viii Users in Canada ...xi Pre-Installation Requirements for Canon Facsimile Equipment... xi Notice... - Page 3 Table of Contents Sending other documents while the fax is set for delayed sending...5-12 Canceling delayed sending ...5-12 Sequential broadcasting... 5-13 Sending a document to more than one location ...5-13 Documents stored in memory... 5-14 Printing a list of documents in memory ...5-14 Printing a document in memory...5-14 Deleting a document from memory...5-15 6 RECEIVING...
-
Page 4: Where To Find Help (Usa Only)
• H12414 (FAXPHONE B95) Copyright Copyright © 2004 by Canon U.S.A., Inc. All rights reserved. No part of this publication may be reproduced, transmitted, transcribed, stored in a retrieval system, or translated into any language or computer language in any form or by any means, electronic, mechanical, magnetic, optical, chemical, manual, or otherwise, without the prior written permission of Canon U.S.A. -
Page 5: Using This Guide
Using this guide This guide provides detailed information on how to set up, operate, maintain, and troubleshoot your fax. Please read the list below to become familiar with the symbols, terms, and abbreviations used in this guide. Cautions tell you how to avoid actions that could injure you or damage your fax. In order to use your fax safely, always observe these cautions. -
Page 6: Important Safety Instructions
This could result in fire or electric shock. • Do not allow small objects (such as pins, paper clips, or staples) to fall into the fax. If something does fall into the fax, unplug it immediately and contact the Canon Customer Care Center (see p. iv). -
Page 7: Power Supply
If you notice anything unusual (smoke, strange odors, noises) around the fax, unplug it immediately. Contact the Canon Customer Care Center (see p. iv). • Do not allow anything to rest on the power cord, and do not place the fax where the cord will be walked on. -
Page 8: Users In The U.s.a
IDDD (INTERNATIONAL DIRECT DISTANCE DIAL) LINE IF YOU COMMUNICATE OVERSEAS Canon recommends an individual line following industry standards, e.g. the 2500 (Touch Tone) or 500 (Rotary/Pulse Dial) telephones. A dedicated extension off a PBX machine without “Call Waiting” can be used with your machine. Key telephone systems are not recommended because they send non-standard signals to individual telephones for ringing and special codes, which may cause a fax error. -
Page 9: In Case Of Equipment Malfunction
The telephone line should not be reconnected or the power cord plugged in until the problem is completely resolved. Users should contact Canon Authorized Service Facilities for servicing of equipment. Information regarding Authorized Service Facility locations can be obtained by calling the Canon Customer Care Center. - Page 10 User’s Guide. If such changes or modifications should be made, you could be required to stop operation of the equipment. Canon U.S.A. Inc. One Canon Plaza, Lake Success, NY 11042, U.S.A. TEL No. 1-516-328-5600 The Telephone Consumer Protection Act of 1991 makes it unlawful for any person to use a...
-
Page 11: Users In Canada
IDDD (INTERNATIONAL DIRECT DISTANCE DIAL) LINE IF YOU COMMUNICATE OVERSEAS Canon recommends an individual line following industry standards [e.g. the 2500 (Touch Tone) or 500 (Rotary/Pulse Dial) telephones]. A dedicated extension off a PBX machine without “Camp On” signal is also permissible with your machine. Key telephone systems are not recommended because they send non-standard signals to individual telephones for ringing and special codes, which may cause a fax error. -
Page 12: For Canadian Users
RENs of all the devices does not exceed five. For Canadian Users ____________________________ Canon Canada Inc., offers a full range of customer technical support* options: • For interactive troubleshooting, e-mail technical support, the latest driver downloads and answers to frequently asked questions (www.canon.ca) •... -
Page 13: Setting Up Unpacking
• Telephone line cord • Documentation • Registration Card (USA only) • Warranty • Destination labels If any of these items are damaged or missing, contact the Canon Customer Care Center (see p. iv) immediately. Multi-purpose tray BX-3 Black ®... -
Page 14: Removing The Shipping Materials
Removing the shipping materials______________ Remove the protective piece Open the printer cover by gently pulling it towards you. Open the document tray. Remove the shipping tapes Close the printer cover until it locks into place. Close the document tray. The actual shipping materials may differ in shape, quantity, and position from the ones shown above. and the protective pieces... -
Page 15: Assembling The Fax
Assembling the fax Attaching components _________________________ For user convenience, the destination labels provided with your fax should be fitted over the one- touch speed dialing buttons on the left of the operation panel. Insert the tabs on the multi- purpose tray into the slots on the fax. -
Page 16: Making Connections
Making connections Connecting the telephone line, handset, and external device ________________________________ There are three jacks on the back of the fax for connection of the following: Be sure to connect any external devices before using the fax. Connect the supplied telephone line cord to the telephone line jack on your wall. -
Page 17: Connecting The Ac Power Cord
Connect an extension phone to the • You cannot use the extension phone while the fax is using the phone line. • If you have connected an external device to your fax, be sure to select the correct receive mode (see Chapter 6). -
Page 18: Loading Paper
Loading paper Paper guidelines _______________________________ • Be sure to load paper of the correct size, weight, and quantity recommended for your fax • (see pp. 3-3, S-1). • Store all paper wrapped and on a flat surface until ready to use. Keep opened packs in their original packaging, in a cool, dry location. -
Page 19: Loading Paper In The Multi-Purpose Tray
Loading paper in the multi-purpose tray ______ Squeeze, then slide the paper guide to the left. Fan a stack of paper, then tap the edge of the stack on a flat surface to even the stack. Insert the stack face up into the multi-purpose tray stack with the right side of the multi-purpose tray. -
Page 20: Installing The Bj Cartridge
For information on replacing the BJ Cartridge Guidelines ______________________________________ • Use only a Canon BX-3 Black BJ Cartridge • Store BJ cartridges at room temperature. • When the BJ Cartridge To avoid this, follow these recommendations: –... -
Page 21: Installing The Bj Cartridge ® In Your Fax
Installing the BJ Cartridge ® When a BJ Cartridge is not installed in your fax, PUT IN CARTRIDGE is displayed on the LCD. Make sure the fax is plugged in. Load the paper in the multi-purpose tray. Open the printer cover by gently pulling it towards you (see p. 1-2). Raise the cartridge lock lever on the cartridge holder. -
Page 22: Testing The Fax
Align the slot in the cartridge with the yellow post in the fax, and with the label facing outwards, insert the BJ Cartridge lever until you hear a click to lock the cartridge in place. The yellow post (BJ Cartridge slightly to the left before lowering the cartridge lock lever. -
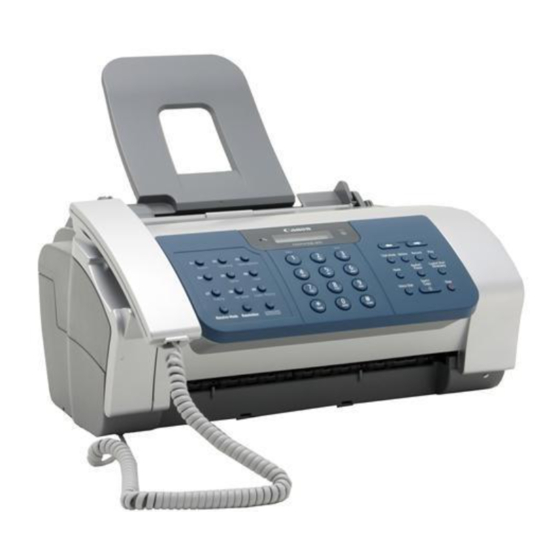
Page 23: Preparing To Use Your Fax Main Components Of Your Fax
PREPARING TO USE YOUR FAX Main components of your fax Handset Multi-purpose tray Document tray Document guide Operation panel Printer cover Cartridge holder... -
Page 24: Fax Controls - The Operation Panel
Fax controls - the operation panel The buttons on the operation panel may differ from the ones shown in this chapter. One-touch speed dialing/Special function buttons (see below) Report Cleaning Space Polling Ink Saver Caller History Receive Mode Resolution The buttons on the left of the operation panel have the following two functions: •... - Page 25 TAM Mode Delete TAM Mode Delete Record Play Record Play Coded Dial/ Redial/ Hook Directory Pause Hook Start/ Voice Dial Copy Stop Redial/ Pause Coded Dial/ Directory Scroll/Cursor buttons (see pp. 2-5, 6-6, 7-9, 8-1) TAM Mode button (see p. 7-2) Delete button (see p.
-
Page 26: Guidelines For Entering Numbers, Letters, And Symbols
Guidelines for entering numbers, letters, and symbols When you come to a step that requires you to enter a name or number, see the table below to determine which numeric button to press for the letter you want. Button OPER SYMB TONE Letter mode (:A) -
Page 27: Correcting Mistakes
Use [ ] or [ ] to move the cursor under the incorrect letter. CANEN Use the numeric buttons to enter the correct letter over the incorrect letter. CANON When you have finished making corrections, press [Start/Copy] to register your new entry. -
Page 28: Setting The Tel Line Type
Setting the TEL LINE TYPE Before using your fax, make sure it is set for the telephone line type of your telephone system. If you are unsure of your telephone line type, check with your local telephone company. See pp. 2-2, 2-3 for the buttons on the operation panel. Press [Function]. -
Page 29: Registering Sender Information
The date and time appear on the LCD as well as on the documents you send. Press [Function]. Press [Start/Copy] three times. 12/20/2003 13:30 CANON CANADA The page number The name of the party who is receiving the document Your name or company name... -
Page 30: Registering Your Fax/Telephone Number And Name
You can enter a plus sign (+) or space to make your number easier to read. To enter a plus sign (+), press [#]. TEL= 123 xxxx Press [Start/Copy] twice. Enter your name (up to 16 letters) using the numeric buttons (see pp. 2-4, 2-5). CANON Press [Start/Copy]. Press [Stop]. Registration ends and the fax returns to standby mode. -
Page 31: Setting The Daylight Saving Time
Setting the daylight saving time_______________ Your fax supports the daylight saving time system that shifts the clock time ahead or back according to the change in seasons. You can select if the time information in your fax changes to match the daylight saving time system, and also set the day and time when the daylight saving time begins and ends. - Page 32 Use [ ] or [ ] to select the week in which the daylight saving time starts. Press [Start/Copy]. WEEK Use [ ] or [ ] to select DAY. Press [Start/Copy]. SUNDAY Use [ ] or [ ] to select the day of the week on which the daylight saving time starts. Press [Start/Copy].
-
Page 33: Registering One-Touch Speed Dialing Numbers And Names
Press [Start/Copy] to register the number. Enter the party's name (up to 16 letters) using the numeric buttons (see pp. 2-4, 2-5). CANON Press [Start/Copy] to register the name. To delete the name and number registered under the one-touch speed dialing button, press [Clear] and [Start/Copy] after you perform steps 1 to 4 above. - Page 34 Register the party’s voice tag for voice dialing. See Registering voice dialing voice tags, p. 2-14. The fax asks you if you want to register the voice tag. YES=( ) NO=(#) Press [ ] or [#] to select YES or NO. •...
-
Page 35: Registering Coded Speed Dialing Numbers And Names
Registering coded speed dialing numbers and names Use coded speed dialing to dial a fax number at the press of three buttons. A fax/telephone number can be registered under each two-digit speed dialing code and you can register up to 70 locations. -
Page 36: Registering Voice Dialing Voice Tags
Registering voice dialing voice tags Voice dialing allows you to dial a number by speaking the receiving party’s name to the fax. Before you can use the voice dialing feature, you must register voice tags. You can register a name or phrase (no longer than 3 seconds) you want to use to retrieve the party, such as the first name, family name, nickname, company name, official position, and so forth. -
Page 37: Modifying Voice Tags
Modifying voice tags ___________________________ Perform steps 1 to 4 on p. 2-14. If a voice tag is already registered under the speed dialing number, the fax asks you if you want to modify the voice tag. Press [ ] to select YES. Use [ ] or [ ] to select REDO VOICE TAG. -
Page 38: Documents And Paper Preparing Documents
DOCUMENTS AND PAPER Preparing documents Types of documents you can scan ____________ ■ Size You can load documents larger than 5.9 in. (148 mm) wide and 4.2 in. (105 mm) long. The maximum size of document that can be loaded is 8.5 in. (216 mm) wide by 28.0 in. (700 mm) long. -
Page 39: Loading Documents
Loading documents Adjust the document guide to the width of the document, and gently insert the top of the document face up into the document tray until it stops. You will hear a beep. • For a multipage document, the pages are fed one by one from the top of the stack. •... -
Page 40: Paper Requirements
Paper requirements Your fax supports A4-, letter-, and legal-size paper in portrait orientation. You can use regular copier paper, cotton bond paper, or typical letterhead. Your fax does not require special ink jet paper. Always use paper without curls, folds, staples, or damaged edges. Look at the label on the package to see if the paper has a preferred side for printing. -
Page 41: Making Copies
MAKING COPIES Copying documents One of the convenient features of the fax is its ability to make high quality copies. You can make up to 99 copies of one document at a time. If you make copies of multiple documents at a time, the number of pages the fax can scan into memory varies depending on the scanning resolutions (see p. -
Page 42: Sending Documents Preparing To Send A Document
SENDING DOCUMENTS Preparing to send a document Before you send a document, see Chapter 3: DOCUMENTS AND PAPER. Adjusting the quality of your documents ______ ■ Setting the scanning resolution Resolution is a measure of the fineness or clarity of a printout. Low resolutions may cause text and graphics to have a jagged appearance, while higher resolutions provide smoother curves and lines, crisp text and graphics, and a better match to traditional typeface designs. -
Page 43: Sending Methods
Sending methods_______________________________ ■ Direct sending (see below) ■ Memory sending (see p. 5-3) ■ Manual sending (see p. 5-4) Dialing methods ________________________________ There are several methods of dialing the receiving party’s number, depending on how your fax is set up. ■... -
Page 44: Memory Sending
You can send up to 15 letter-size (5 legal-size) pages at a time with memory sending (based on the Canon FAX Standard Chart No.1, standard resolution). If MEMORY FULL appears on the LCD during the scanning process, re-start sending the document using direct sending (see p. -
Page 45: Manual Sending
Manual sending ________________________________ If you would like to first speak with the person you are sending the document to, use manual sending. Load the document face up into the document tray. See Loading documents, p. 3-2. You can set the scanning resolution and contrast (see p. 5-1). Pick up the handset or press [Hook] and dial the receiving party’s fax number. -
Page 46: Canceling Sending
Canceling sending Press [Stop]. • When you cancel sending, you may need to press and hold [Start/Copy] for a few seconds, then the fax will feed out the document. • You can set whether or not the fax prints an ERROR TX REPORT (see p. 8-3). Automatic dialing Sending a document using one-touch speed dialing or coded speed dialing numbers_______... -
Page 47: Sending A Document Using Directory Dialing
Press a numeric button to enter the first letter of the name of the party you are searching for. 01 Canon CANADA Press [ ] or [ ] to display the other names and numbers registered for the button letter group. -
Page 48: Sending A Document Using Voice Dialing
Press [Voice Dial]. Then, after the tone, speak the voice tag into the microphone. The registered name will be displayed on the LCD. CANON With the party’s name you wish to dial displayed, press [Start/Copy] to start the document transmission. -
Page 49: Special Dialing
The date and time, names, and numbers from which you have received calls recently will be displayed on the LCD. TEL= 3456XXXX CANON 20/12 13:30 • Press [Redial/Pause] or [Coded Dial/Directory] to switch between the date and time, name, and phone/fax number on the LCD. -
Page 50: Redialing When The Line Is Busy
Redialing when the line is busy There are two methods of redialing: manual redialing and automatic redialing. This section explains these two methods. Manual redialing _______________________________ Press [Redial/Pause] to dial the last number you dialed with the numeric buttons. (This starts redialing regardless of whether automatic redialing is enabled.) ■... -
Page 51: Setting The Options For Automatic Redialing
■ Setting the options for automatic redialing You can set the following options for automatic redialing: • Whether or not the fax redials automatically. • The number of times the fax attempts to redial. • The time interval between redialing attempts. Press [Function]. -
Page 52: Delayed Sending
Delayed sending Your fax can send a document automatically at a preset time. This allows you to take advantage of lower late-night long-distance rates offered by some telephone companies. The fax can only register one preset sending operation at a time. Load the document face up into the document tray. -
Page 53: Sending Other Documents While The Fax Is Set For Delayed Sending
Sending other documents while the fax is set for delayed sending ____________________________ You can send, receive, and copy other documents even when the fax is set for sending at a preset time. To send or copy other documents after setting the fax for delayed sending, simply send or copy using any other sending procedure in this guide. -
Page 54: Sequential Broadcasting
Sequential broadcasting Sending a document to more than one location ____________________________________ Sequential broadcasting sends one document to more than one location. You can send to a total of 80 locations as follows: • One-touch speed dialing • Coded speed dialing •... -
Page 55: Documents Stored In Memory
Documents stored in memory Printing a list of documents in memory _______ Your fax can print a list of documents stored in memory, along with the transaction number (TX/ RX NO.) of each document. Once you know the transaction number of a document in memory, you can print it or delete it. -
Page 56: Deleting A Document From Memory
Press [Start/Copy]. 1ST PAGE ONLY? YES=( ) NO=(#) Press to print the first page only, or press [#] to print all pages of the document. The fax prints the document. Deleting a document from memory ____________ Press [Function]. Use [ ] or [ ] to select MEMORY REFERENCE. Press [Start/Copy]. -
Page 57: Receiving Documents Different Ways To Receive A Document
RECEIVING DOCUMENTS Different ways to receive a document Your fax provides you with several modes for receiving documents. To determine which mode best suits your requirements, see the table below. Receive Mode Main Use Operation FAX/TEL AUTO Fax/Tel (Fax/Tel mode) MANUAL MODE DRPD Fax/Tel... -
Page 58: Setting The Receive Mode
Setting the receive mode Once you have decided which mode is suitable for your needs, set the mode by pressing [Receive Mode]. Press [Receive Mode]. Every time you press [Receive Mode], the mode changes cyclically. Press [Start/Copy]. The fax returns to standby mode. Receiving both documents and telephone calls automatically: Fax/Tel mode _____________ If you set Fax/Tel mode, you can control precisely how the fax handles incoming calls by... - Page 59 Press [Start/Copy]. 8SEC Use the numeric buttons to enter the time the fax waits before ringing when it receives a call. Press [Start/Copy] twice. 15SEC Use the numeric buttons to enter the time the fax rings while waiting for someone to pick up the handset.
-
Page 60: Receiving Documents Manually: Manual Mode
Receiving documents manually: MANUAL MODE ___________________________________________ Check that Manual is displayed on the LCD (see p. 6-2). 12/20 Manual When you hear the fax or extension phone ring, pick up the handset. ■ If you hear a person’s voice: Start your conversation. If the caller wants to send a document after talking to you, ask them to press the start button on their fax machine. -
Page 61: Receiving With A Drpd (Distinctive Ring Pattern Detection) Service: Drpd
Receiving with a DRPD (Distinctive Ring Pattern Detection) service: DRPD _____________ DRPD service assigns two or more telephone numbers with distinctive ring patterns to a single telephone line, allowing you to have both a fax number(s) and a telephone number(s) using only one telephone line. -
Page 62: Other Features
Other features Saving ink ______________________________________ You can enable/disable ink-saving feature by pressing the [Ink Saver] button when the [Function] button is pressed. By enabling this feature, print quality will be reduced. For highest print quality, disable this feature. Press [Function]. Press [Ink Saver]. -
Page 63: Polling To Receive Documents
• Before attempting to poll a fax machine, make sure that the other fax machine supports polling. • If the other party is using a Canon fax machine which has the Polling ID function, ask them to set the Polling ID of their fax machine to 255 (11111111 binary number). - Page 64 Use [ ] or [ ] to select CALLER ID. Press [Start/Copy]. • To disable Caller ID feature, use [ return to standby mode. • To enable Caller ID feature, use [ Press [Start/Copy]. Use [ ] or [ ] to select the type of CALL REJECTION setting you want. Press [Start/Copy].
-
Page 65: Canceling Receiving
Use [ ] or [ ] to select PLAY MESSAGE or DISCONNECT. Press [Start/Copy]. • PLAY MESSAGE: The call will be disconnected after the ALT OUTGOING MSG (see p. 7-1) is played. If you set SELECTIVE to ON in step 5, and want to select this setting, OUTGOING MESSAGE must have been recorded. -
Page 66: Using Tam Mode Recording The Outgoing Message
USING TAM MODE Recording the outgoing message Before you use the built-in answering machine (TAM), you must record an outgoing message. Use the microphone on the operation panel to record your outgoing message. Only one outgoing message, no longer than 20 seconds, can be recorded. You cannot receive documents while you are recording a message or voice memo. -
Page 67: Setting Tam Mode
Setting TAM MODE Setting TAM MODE allows you to receive telephone messages (ICM) and fax transmissions while the fax is unattended. When you cancel TAM MODE, any new telephone messages will be played automatically. Press [TAM Mode] to set TAM MODE. •... -
Page 68: Setting The Recording Time For A Telephone Message
Setting the recording time for a telephone message ________________________________________ Press [Function]. Press [Start/Copy]. USER SETTINGS Use [ ] or [ ] to select TAM SETTINGS. Press [Start/Copy] twice. 30 SECONDS Use [ ] or [ ] to select the recording time. The recording time can be set to 0, 30, 60 or 120 seconds. -
Page 69: Setting Tam Monitor
Setting TAM MONITOR _________________________ TAM MONITOR allows you to screen all incoming calls. To use this feature, LINE MONITOR VOL (see p. 8-2) must be set to a setting other than 0. If LINE MONITOR VOL is set to 0, you will not be able to hear any incoming messages as they are being recorded. -
Page 70: Setting Toll Saver
Setting TOLL SAVER ___________________________ Setting TOLL SAVER allows you to check whether you have any new messages when you call from a remote location. Press [Function]. Press [Start/Copy]. USER SETTINGS Use [ ] or [ ] to select TAM SETTINGS. Press [Start/Copy]. -
Page 71: Recording Voice Memos
Recording voice memos Use this feature when you are going out and want to leave a message for another member of the family. Use the microphone on the operation panel to record your voice memo. Only one voice memo, 30, 60, or 120 seconds*, can be recorded. If you record a new voice memo when there is already a voice memo recorded, the old voice memo will be deleted. -
Page 72: Deleting Messages
Press [Stop] when recording is finished. The fax returns to standby mode. * The recording time for a voice memo can be set to the same settings as the recording time for a telephone message. However, if you set 0 as the recording time for each telephone message, voice memo recording time will be set to 30. - Page 73 Press [Start/Copy] . The fax asks you to confirm that you want to delete the message. YES=( ) NO=(#) Press [ ] to delete the message. If you do not want to delete the message, press [#]. You cannot delete the OUTGOING MESSAGE. The old outgoing message will be automatically deleted when you record your new message.
-
Page 74: Playing Telephone Messages
Playing telephone messages Telephone messages will be played back in order from the oldest message recorded. If a voice memo has been recorded, it will be played back first. Press [Play]. The date and time when the telephone message was recorded, the number of telephone messages and the number of the message being played (ICM No.) are displayed whenever a message is played. -
Page 75: Remote Control Features
Remote control features Use these features when you call home to play back any messages you may have received. You can also use the remote control features to set TAM MODE. You must register a four-digit PIN as your password before you can use these features (see below). -
Page 76: Using Remote Control
Using remote control __________________________ Call home. The outgoing message will be played. Press [#] while the outgoing message is playing. Enter your password when you hear the beeps indicating that you should enter your password. When your password is accepted, you will hear a confirmation tone (a short series of beeps). - Page 77 ■ List of remote control commands Command Sub-command* * Sub-commands are only valid while the command they are linked to is active. ** When no forwarding number has been set, ICM forwarding mode cannot be set. When TAM MODE has not been set, entering this command activates TAM MODE and ICM forwarding mode simultaneously.
-
Page 78: Forwarding Telephone Messages
Forwarding telephone messages This feature allows you to automatically forward telephone messages, recorded when the fax is set to TAM MODE, to a registered forwarding number. You can use remote control to access the forwarding number and listen to your telephone messages. -
Page 79: Setting The Number Of Redial Times
Setting the number of redial times ____________ Follow steps 1 to 3 on p. 7-13. Use [ ] or [ ] to select ON. Press [Start/Copy]. FWD TEL NUMBER Use [ ] or [ ] to select AUTO REDIAL. Press [Start/Copy]. Use [ ] or [ ] to select ON. -
Page 80: Setting Pin Entry
Setting PIN ENTRY _____________________________ If you set PIN ENTRY setting to ON, it becomes necessary to enter a password when you use forwarding feature (see p. 7-16). Follow steps 1 to 3 on p. 7-13. Use [ ] or [ ] to select ON. Press [Start/Copy]. -
Page 81: When A Forwarded Call Is Received
When a forwarded call is received When FWD SETTINGS is set to ON, telephone messages recorded when the fax is set to TAM MODE will be automatically forwarded to a registered forwarding number. A call is received at the forwarding number. When you answer the phone, you will hear your forwarding message. -
Page 82: Settings And Activity Reports Selecting A Menu
SETTINGS AND ACTIVITY REPORTS Selecting a menu The USER SETTINGS, REPORT SETTINGS, TX SETTINGS, RX SETTINGS, PRINTER SETTINGS, SYSTEM SETTINGS, TAM SETTINGS, and CALLER ID menus allow you to customize the way your fax works. Each menu contains settings that control different functions of your fax. -
Page 83: User Settings
USER SETTINGS Name DATE & TIME UNIT TELEPHONE # UNIT NAME TX TERMINAL ID TTI POSITION TELEPHONE # MARK SCAN CONTRAST OFFHOOK ALARM VOLUME CONTROL LINE MONITOR VOL ALARM VOLUME KEYPAD VOLUME RX CALL LEVEL TEL LINE TYPE AUTO VOICE DIAL Description Set the date and time (24-hour clock) using the numeric buttons. -
Page 84: Report Settings
REPORT SETTINGS Name Description Enable/disable automatic printing of the transmission report. TX REPORT OUTPUT NO: Turn off the transmission report feature. OUTPUT YES: Set the fax to print a transmission report every time you send a document. PRINT ERROR ONLY: Print only when an error occurs during sending. -
Page 85: Printer Settings
RX SETTINGS Name ECM RX FAX/TEL AUTO SW RING START TIME F/T RING TIME DEFAULT ACTION INCOMING RING RING COUNT MAN/AUTO SWITCH RING TIME REMOTE RX REMOTE RX ID MEMORY RX DRPD:SELECT FAX PRINTER SETTINGS Name RX REDUCTION FIXED REDUCTION REDUCE DIMENSION PAPER SIZE Description... -
Page 86: System Settings
SYSTEM SETTINGS Name Description AUTO TEST PRINT Enable/disable auto test printing whenever the BJ Cartridge is replaced. RX RESTRICTION Enable/disable the direct mail preventive function. RX CONDITION WITH SENDER INFO: The fax only receives documents with the TTI. REGISTERED SENDR: The fax only receives documents with the TTI. - Page 87 TAM SETTINGS Name MESSAGE LENGTH PASSWORD TOLL SAVER RING COUNT FWD SETTINGS FWD TEL NUMBER AUTO REDIAL PIN ENTRY TAM MONITOR CALLER ID Name CALLER ID ANONYMOUS SELECTIVE OUT OF AREA SHOW IN HISTORY? Description Set the maximum recording time for each recorded message. Set a four-digit PIN so that you can access the fax from remote locations.
-
Page 88: Activity Reports
Activity reports Your fax keeps track of most of its sending and receiving operations. These operations can be printed out in the form of activity reports that can help you check the dates and times of fax transmissions and whether or not each transaction was successful. How to print a report___________________________ Depending on the type of report, you can have the fax print the report automatically, or you can print it directly. -
Page 89: Activity Report
Activity report __________________________________ Summarizes the information for the sending and receiving activities of your fax after 20 transactions. For automatic printing, see ACTIVITY REPORT, p. 8-3. Transactions in an activity report are listed chronologically. One-touch speed dialing list ___________________ Lists the numbers and names registered under one-touch speed dialing buttons. Coded speed dialing list _______________________ Lists the numbers and names registered under coded speed dialing codes. -
Page 90: Solutions To Common Problems Clearing Jams
SOLUTIONS TO COMMON PROBLEMS Clearing jams Jams in the document tray ____________________ When a document jams or misfeeds in the document tray, OPEN COVER and SEE FIG. 1 are displayed on the LCD. You do not need to unplug the fax when clearing document jams. Hold down [Start/Copy] for a few seconds. -
Page 91: Periodic Cleaning
Periodic cleaning Your fax requires little periodic maintenance. This section describes the necessary cleaning procedures for the fax. Please note the following before cleaning: • Be sure to disconnect the power cord before cleaning the fax. Since documents in memory are erased when the power is disconnected, print any documents stored in memory before disconnecting the power cord (see p. -
Page 92: Cleaning The Scanner Components
When you are finished, close the printer cover. Be sure to close the printer cover until it locks into place. Reconnect the power cord. ■ Cleaning the scanner components • If the scanner components are dirty, the documents you send or copy will also be dirty. •... -
Page 93: Testing And Cleaning The Bj Cartridge ® Print
Testing and cleaning the BJ Cartridge head ____________________________________________ The print head in the BJ Cartridge paper. To maintain the best possible print quality, these nozzles need to be cleaned from time to time. Your fax is equipped with a print head cleaning function that does this. ■... -
Page 94: Replacing The Bj Cartridge
■ Cleaning the BJ Cartridge If your printouts become faint or streaked, or if their quality otherwise deteriorates, print the nozzle check pattern to see if the print head nozzles are operating properly (see p. 9-4). If the pattern is broken or missing, clean the BJ Cartridge •... - Page 95 • Discard the old BJ Cartridge consumables. You may want to place it in a plastic bag to keep any residual ink from spilling. • Spilled ink can stain any surface; protect yourself and your work area. Remove the new BJ Cartridge and tape •...
-
Page 96: Troubleshooting
Troubleshooting Paper feeding problems________________________ ❏ Paper does not load. The multi-purpose tray may contain too many sheets. • Make sure the paper stack in the multi-purpose tray does not exceed the paper limit mark ( ) (see p. 1-6). Paper may not be loaded correctly. •... -
Page 97: Faxing Problems
Faxing problems _______________________________ Sending problems ❏ You cannot send a document. ® The BJ Cartridge • Make sure the BJ Cartridge except to replace it with a new one. The fax may have overheated. • Unplug the fax and let it cool for several minutes. Then plug it back in and try sending again. -
Page 98: Receiving Problems
The document may not have been loaded correctly into the document tray. • Remove the document, stack it if necessary, and load it into the document tray correctly (see p. 3-2). ❏ Cannot send using Error Correction Mode (ECM). The receiving party’s fax machine may not support ECM. •... - Page 99 ❏ The fax does not switch automatically between telephone and fax reception. The fax may not be set to switch automatically between telephone and fax reception. • For the fax to switch automatically, the receive mode must be set to FAX/TEL AUTO SW (Fax/Tel mode), or DRPD (see p.
- Page 100 ❏ Fax does not print. ® The BJ Cartridge may not be installed properly. ® • Make sure the BJ Cartridge • Be sure to remove the orange protective tape from the BJ Cartridge (see p. 1-9). ® The BJ Cartridge print head may need cleaning.
-
Page 101: Copying Problems
Copying problems ______________________________ ❏ The fax does not make a copy. ® The BJ Cartridge • Determine if the problem is with the BJ Cartridge The document may not have been loaded correctly into the document tray. • Remove the document, stack it if necessary, and load it face up into the document tray correctly (see p. -
Page 102: Print Quality Problems
Print quality problems _________________________ ❏ The print quality is not what you expect; print is not clear, is splashed, has missing dots or white streaks. The paper you are using may not be supported by the fax. • Make sure you are using the recommended paper (see p. 3-3). You may be printing on the wrong side of the paper. -
Page 103: Lcd Messages
LCD messages The following messages are displayed on the LCD when the fax is performing a function or encounters an error. Message AUTO REDIAL BUSY/NO SIGNAL CARTRIDGE JAMMED 9-14 Cause The fax is waiting to redial the receiving number because the line was busy or the receiving party did not answer when you tried to send the document. - Page 104 Wait several minutes, then plug it back in. Also, try replacing the BJ Cartridge with a new one (see p. 9-5). Contact the Canon Customer Care Center (see p. ii) to have the waste ink tank replaced immediately. Allow the fax to cool down.
- Page 105 Message CLEAR PAPER JAM DATA ERROR DOC. TOO LONG ECM RX ECM TX MEMORY FULL MSG DATA LOST 9-16 Cause There is a paper jam. An error has occurred and all one-touch speed dialing, coded speed dialing, and user data have been lost.
- Page 106 Message Cause NO DATA The one-touch speed dialing button or coded speed dialing code you entered has not been registered. NO OGM The outgoing message has not been recorded. REC’D IN MEMORY The fax received the document in memory because paper or ink ran out, a paper jam occurred, or the incorrect BJ Cartridge installed.
-
Page 107: In Case Of A Power Failure
In case of a power failure The user data settings and registered data for one-touch speed dialing and coded speed dialing are saved during a power failure using a built-in battery*. However, documents stored in the fax memory will be deleted and redial data in the extension phone memory may be lost. If a power failure occurs or the power is turned off, the fax will automatically print a memory clear report as soon as the power is turned on or the power is restored. -
Page 108: Specifications
Power consumption: Operating environment: Dimensions: Weight: Specifications are subject to change without notice. * Based on the Canon FAX Standard Chart No.1, Standard mode. Width: Max. 8.5 in. (216 mm) Min. 5.9 in. (148 mm) Height: Max. 27.5 in. (700 mm) Min. -
Page 109: Index
(extension phone) jack 1-5 (handset) jack 1-4 (telephone line) jack 1-4 AC power cord, connecting 1-5 ACTIVITY REPORT description 8-8 printing 8-7 setting 8-3 ALARM VOLUME setting 8-2 ALT OUTGOING MSG (Alternative outgoing message) description 7-1 ANONYMOUS setting 6-8, 8-6 Attaching components 1-3 AUTO PRINT setting 8-3 AUTO REDIAL... - Page 110 DOC. TOO LONG message 9-16 Documentation 1-1 Documents Copying 4-1 deleting from memory 5-15 different ways to receive 6-1 guides 2-1 loading 3-2 polling to receive 6-7 printing document in memory 5-14 printing list of documents in memory 5-14 problem 3-1 problems with multipage 3-2 receiving in memory when a problem occurs 6-6...
- Page 111 Lower case letter mode 2-4 Main unit 1-1 MAN/AUTO SWITCH setting MANUAL MODE description 6-1 receiving in 6-4 setting 6-4 Manual redialing 5-9 canceling 5-9 Manual sending 5-4 canceling 5-5 Memory deleting document from 5-15 documents in 5-14 printing document in 5-14 printing list of documents in 5-14 receiving when problem occurs...
- Page 112 document in memory 5-14 list of document in memory 5-14 nozzle check pattern 9-5 USER DATA LIST 8-7 Problem documents 3-1 Problems copying 9-12 faxing 9-8 general 9-13 paper feeding 9-7 print quality 9-13 receiving 9-9 receiving in memory when 6-6 sending 9-8 telephone 9-12 Quality...
- Page 113 Speed dialing coded 2-13 lists 8-8 one-touch 2-11 printing lists 8-7 Start/Copy button 2-3 Stop button 2-3 Switchboard, dialing through Symbols, entering 2-5 SYSTEM SETTINGS menu 8-5 TAM Mode button 2-3, 7-2 TAM MEMORY FULL message 9-17 TAM MODE description 7-2 setting 7-2 to 7-5 TAM MONITOR setting 7-4, TAM SETTINGS menu 8-6...
- Page 114 Separate Warranty. Non-Canon brand equipment and software that may be distributed with the Product are sold “as is” and without warranty of any kind by Canon USA, including any implied warranty regarding merchantability or fitness for a particular purpose, and all such warranties are disclaimed.
- Page 115 • Toll-free live technical support Monday—Saturday (excluding holidays) at 1-800-828-4040 • Repair or Exchange Service Options • In the event service is required for any Canon product during the limited warranty period, Canon offers two support options: 1. Authorized Service Facility Carry-in / Mail-In Service 2.
- Page 116 CANON INC. 30-2, Shimomaruko 3-chome, Ohta-ku, Tokyo 146-8501, Japan CANON U.S.A., INC. One Canon Plaza, Lake Success, NY 11042, U.S.A. CANON CANADA INC. 6390 Dixie Road, Mississauga, Ontario L5T 1P7, Canada CANON EUROPA N.V. Bovenkerkerweg 59-61 P.O. Box 2262, 1180 EG Amstelveen, The Netherlands CANON FRANCE S.A.