Table of Contents
Advertisement
Quick Links
Advertisement
Table of Contents

Related Manuals for Blomberg LDVS2284


Summary of Contents for Blomberg LDVS2284
- Page 1 LDVS2284 Dishwasher Instruction Manual...
- Page 2 Please read this user manual first! Dear Customer, We hope that you get the best results from your product which has been manufactured with high quality and state-of-the-art technology. Therefore, please read this entire user manual and all other accompanying documents carefully before using the product and keep it as a reference for future use.
-
Page 3: Table Of Contents
CONTENTS 1 INSTRUCTIONS FOR SAFETY 5 OPERATING THE PRODUCT 22 Keys ............22 AND ENVIRONMENT Preparing the machine ..... 22 General safety ........4 Programme selection ......22 Intended use ..........4 Auxiliary functions ......24 Children’s safety ........5 Scheduling the washing time ..25 Disposing of packaging material ..5 Starting the programme .... -
Page 4: Instructions For Safety And Environment
InstructIons for safety and envIronment This section contains safety electric shock! instructions that will help to Never touch the plug with • give protection from risk of wet hands! Never unplug by personal injury or property pulling on the cable, always damage. -
Page 5: Children's Safety
InstructIons for safety and envIronment It must be used to do the Store all detergents and • • domestic type dishes only. additives in a safe place This appliance is intended away from the reach of the • to be used in household and children. -
Page 6: Compliance With Weee Directive And Disposing Of The Waste Product
InstructIons for safety and envIronment Compliance with WEEE collection points designated by the local authorities. Directive and Disposing of the Waste Product This product complies with EU WEEE Directive (2012/19/EU). This product bears a classification symbol for waste electrical and electronic equipment (WEEE). -
Page 7: Dishwasher Overview
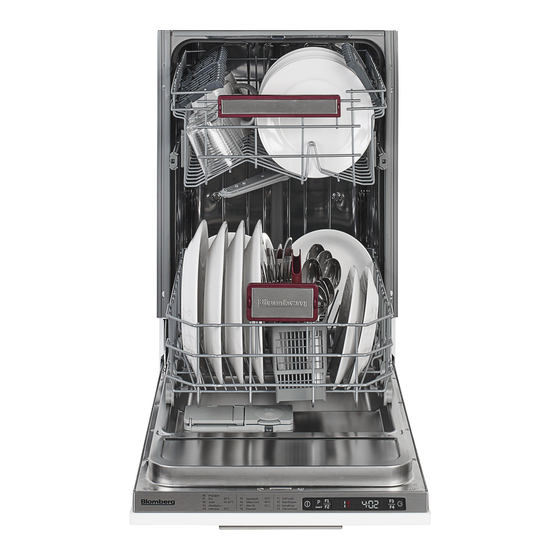
Dishwasher Overview 1. Upper impeller 2. Lower basket 3. Lower impeller 4. Filters 5. Rating Label 6. Control panel 7. Door 8. Detergent dispenser 9. Cutlery basket 10. Salt reservoir lid 11. Upper basket rail 12. Upper basket 13. Condensing Drying System 7 / 37 EN Dishwasher / Instruction Manual... -
Page 8: Condensing Drying System
Dishwasher Technical specifications Compliance to standards and test data / EC declaration of conformity This product complies with the following EU directives; Development, production and sales stages of this product comply with the safety rules included in all pertaining European Community regulations. 2006/95/EC, 2004/108/EC, 93/68/EC, IEC 60436/DIN 44990, EN 50242 Power input 220-240 V, 50 Hz (see rating label) -
Page 9: Installation
Installation To make the product ready for use, Do not install the product at places • make sure that the electricity, tap water where temperature may fall below supply and water drainage systems are 0ºC. appropriate before calling the Authorised Place the product on a rigid floor. -
Page 10: Adjusting The Feet
Installation Adjusting the feet must be min. 50 cm and max. 100 cm from the floor. A discharge hose longer than 4 If the door of the product cannot be closed meters will cause washing performance properly or if the product wobbles when to be affected.Attach the water discharge you push it slightly, then you need to adjust hose to the drainpipe without bending... -
Page 11: This Appliance Must Be Earthed
Installation terminal in the plug marked ‘L’ or This appliance must coloured red. be earthed If the fitted moulded plug is not Green and yellow suitable for your socket, then or green the plug should be cut off and an appropriate plug fitted. Destroy the old plug, which is cut off as a plug with a bared cord could cause a shock... -
Page 12: Preparation Tips For Energy Saving
Preparation Tips for energy saving operates with the same performance continuously. Dishwasher salt is used for Following information will help you use the this purpose. product in an ecological and energy-efficient Use only special softening salts manner. produced particularly for the Wipe away any coarse food remnants on dishwashers in your machine. -
Page 13: Water Hardness & Regeneration Settings
Preparation 2. Turn the salt reservoir lid counter 4. Replace the lid and tighten it securely clockwise to open it (A, B). when the reservoir is full. 5. If you will not start a washing programme Salt reservoir will fill with water immediately after adding the salt, run the when you start the product. - Page 14 Preparation Test Strip 1 second Level 1 No Lime Level 2 Very low lime content Level 3 Low lime content Level 4 Medium lime content 1 minute Level 5 High lime content Very High lime content Level 6 Remove the Let the water Take the test strip Hold for...
-
Page 15: Detergent
Preparation Put the detergent into the detergent If you move your house, it dispenser just before operating the is very important to make machine as illustrated below. the water hardness level Push the latch to right to open the adjustment of your machine detergent dispenser lid (A). -
Page 16: Tablet Detergents
Preparation If dishes have been waiting Tablet detergents give for a long time and have satisfying results only under dried residues, fill the 5 cm³ certain usage conditions. The compartment too (5). best washing performance in dishwashers is obtained 3. Close the detergent dispenser lid by by using detergent, rinse pressing on it lightly. -
Page 17: Rinse Aid
Preparation 4. Make the appropriate rinse aid Wipe clean any spilled rinse aid settings. outside the reservoir. Rinse aid that spilled accidentally Depending on the model, will cause foaming and it will salt indicator and/or rinse aid eventually decrease washing indicator must be enabled again performance. - Page 18 Preparation Decorative prints of chinaware To prevent possible injuries, as well as aluminum and silver always place the sharp and items may get discoloured pointed dishes such as service or tarnished after washing fork, bread knife, etc. upside in the dishwasher just as it down so as their pointed ends happens in handwashing as will face down or they will lie...
- Page 19 Preparation Suggestions for loading the dishwasher Improper Loading Of Dishware Lower basket Upper basket 19 / 37 EN Dishwasher / Instruction Manual...
-
Page 20: Adjusting The Height Of The Upper Basket
Preparation Adjusting the height of the upper basket Basket adjustment mechanism on the loaded upper basket of the machine is designed to allow you create taller areas in the upper or lower section of the machine based on your requirements by adjusting the height of the loaded basket in up or down directions. -
Page 21: Collapsible Lower Basket Tines
Preparation Collapsible lower basket Bringing the tines to the tines horizontal position by holding them from the tips may cause Foldable tines (A) located at the lower them to bend. Therefore, it basket of the machine are designed for will be appropriate to bring the an easier placement of large pieces such tines in the middle to horizontal as pans, bowls, etc. -
Page 22: Operating The Product
Operating the product On/Off key 5. Salt indicator 2. Programme Selection / Programme Not in use Cancel (3 seconds) key 7. Start / Cancel indicator 3. Function keys 8. Time Delay / Programme Time indicator Half Load Function 9. Time Delay key Rapid Clean 10. - Page 23 Operating the product 23 / 37 EN Dishwasher / Instruction Manual...
-
Page 24: Auxiliary Functions
Operating the product Auxiliary functions Extra Rinse function Depending on the type of the detergent Washing programmes of your dishwasher used, if a detergent dissolving issue is are designed to obtain the best cleaning encountered it will remove the resulting effect, considering the type of the soiling, stains from the dishes and enables the soiling degree and properties of the dishes... -
Page 25: Scheduling The Washing Time
Operating the product Scheduling the washing Interior Lighting (Depends on the model) time Some models have interior lighting to Time Delay illuminate the interior when the door is If an economical electricity tariff is applied opened. in your region, you can use the Time Changing the interior lighting Delay function to wash your dishes during setting... -
Page 26: Starting The Programme
Operating the product To cancel the Time Delay function The machine will remain silent Press and hold the Programme in pause mode for some time Selection / Programme Cancel keys for in order to remove the water 3 seconds. from the machine and on the 2. -
Page 27: End Of Programme
Operating the product with rinse aid whenever rinse aid indicator regularly by the machine; when the water appears on the display of your machine. is restored E:02 icon will disappear after a while and the washing programme End of programme resumes. -
Page 28: Maintenance And Cleaning
Maintenance and cleaning Cleaning the filters Service life of the product extends and frequently faced problems decrease if it is Clean the filters at least once a week in order cleaned at regular intervals. for the machine operates efficiently. Check if food residues are left on the filters. -
Page 29: Cleaning The Hose Filter
Maintenance and cleaning Cleaning the impellers 4. Clean all three filters under tap water by means of a brush. Clean the impellers at least once a week in 5. Replace the metal/plastic filter. order for the machine operates efficiently. 6. Place the coarse filter into the Lower impeller microfilter. -
Page 30: Upper Impeller
Maintenance and cleaning Upper impeller Check if the holes on the upper impeller (1) are clogged. If they are clogged, remove and clean the impeller. Turn its nut to left to remove the upper impeller (A, B). Make sure that the nut is tightened well when installing the upper impeller. -
Page 31: Troubleshooting
Troubleshooting Machine does not start. • Power cable is unplugged. >>> Check if the power cable is plugged in. • Fuse is blown. >>> Check the fuses in your house. • Water is cut. >>> Make sure that the water inlet tap is open. • Door of the machine is open. >>> Make sure that you have closed the door of the machine. • On / Off button is not pressed. >>> Make sure that you have turned on the machine by pressing the On / Off button. Dishes are not washed clean • Dishes are not placed orderly in the machine. >>> Load the dishes as described in the user manual. • Selected programme is unsuitable. >>> Select a programme with a higher temperature and cycle time. • Impellers are stuck. >>> Prior to starting the programme, turn the lower and upper impellers by hand to make sure that they rotate freely. • Impeller holes are clogged. >>> Lower and upper impeller holes might be clogged with food remnants such as lemon pips. - Page 32 Troubleshooting • Rinse aid is not sufficient. >>> Check the rinse aid indicator and add rinse aid if necessary. Increase the rinse aid setting if there is enough amount of rinse aid in the machine. • Machine is unloaded right after the programme is over. >>> Do not unload your machine right after washing process is completed. Slightly open the door and wait for evacuation of the steam inside for a while. Unload the dishes after the pieces cool down to a touchable level.
- Page 33 Troubleshooting the filling process. Run the prewash programme to remove the salt that spilled inside the machine. Since the salt granules that will remain under the lid will dissolve during prewash, causing the lid loosen, check the lid once again at the end of the programme. There is a different odour in the machine A new machine has a peculiar odour.
- Page 34 Troubleshooting Detergent remains in detergent dispenser. • Detergent dispenser was damp when adding detergent. >>> Make sure that the detergent dispenser is dried well prior to filling it with detergent. • Detergent is added long before the washing process. >>> Pay attention to add detergent shortly before start-up of the washing. • Opening of the detergent dispenser lid is prevented during washing. >>> Place the dishes in a way that will not prevent the detergent dispenser lid from opening and the water going into the machine from impellers.
- Page 35 Troubleshooting A smear remains on glasses that resembles milk stain which can not be removed when wiped by hand. A bluish / rainbow appearance occurs when the glass is pointed to light. • Excessive rinse aid is used. >>>Lower rinse aid setting. Clean the spilled rinse aid when adding rinse aid. • Corrosion has occurred on glass due to soft water. >>> Measure the hardness of the supply water appropriately and check the water hardness setting.
-
Page 36: Guarantee
Instructions as a charge may be levied where no fault is found even though your product may still be under guarantee. Guarantee Details Your new BLOMBERG product is guaranteed against the cost of breakdown repairs for three years from the date of the original purchase. What is covered? • Repairs necessary as a result of faulty materials, defective components or manufacturing... - Page 37 • Repairs to products used on commercial or non-residential household premises. • Loss of frozen food in freezers or fridge/freezers. (Food loss insurance is often included within your household contents insurance policy, or may be available separately from your retailer). Important notes. • Your BLOMBERG product is designed and built for domestic household use only. • The guarantee will be void if the product is installed or used in commercial or nonresidential domestic household premises. • The product must be correctly installed, located and operated in accordance with the instructions contained in the User Instructions Booklet provided. • Professional installation by a qualified Electrical Domestic Appliance Installer is recommended for all Washing Machines, Dishwashers and Electric Cookers • Gas Cookers must only be installed by a Gas Safe (or BORD GAIS) registered Gas Installer.